

Professional Visual Studio 2005 (2006) [eng]
.pdfChapter 14
Figure 14-7
Refactoring can also be used to generate accessor properties for member fields, to extract blocks of code as separate methods, to encapsulate code in try-catch blocks, and for promotion of variables to method parameters. This is all covered in Chapter 21.
Project and Item Templates
Another mechanism for reducing the amount of mundane code that you have to write is to create your own set of project and item templates. Visual Studio 2005 now has the capability to export an existing project or item as a template that can be reused in future projects. More information on Visual Studio 2005 templates is covered in Chapter 25.
Strongly Typed Datasets
One of the easiest mechanisms for referencing data from a database is to use strongly typed datasets. As part of creating a data source for a project, a strongly typed dataset is added to the project. This can be edited directly using the Dataset design surface built into Visual Studio 2005.
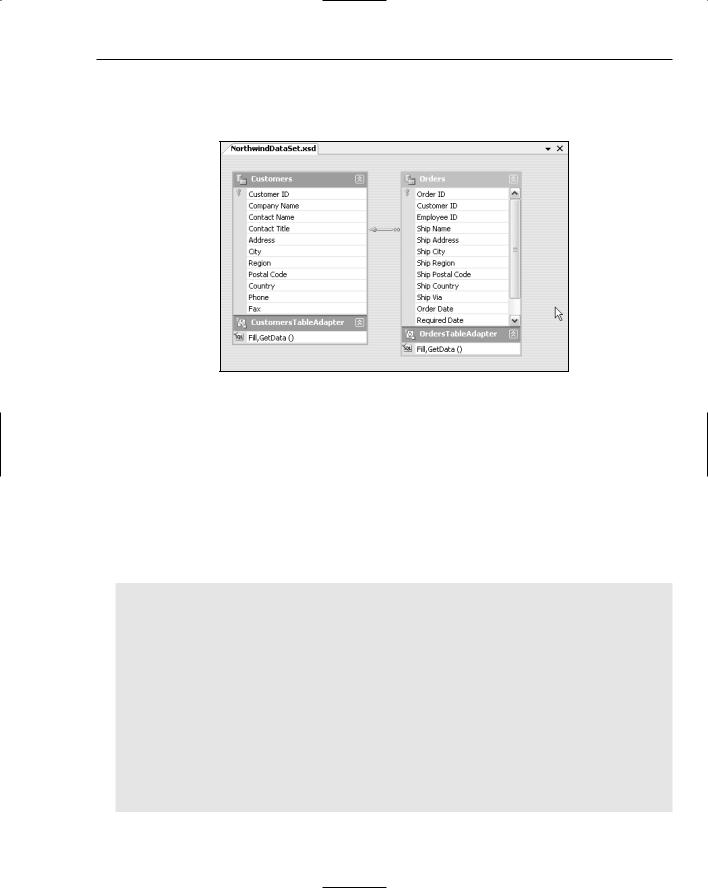
Figure 14-8 shows a strongly typed dataset for a NorthwindDataSet that was generated from the Customers and Orders table from the Northwind database. When this was added as a data source to the project, it not only generated the dataset schema, which you see on the design surface, it also created a designer file and two additional support files. You don’t need to know the details of how this is accomplished
186
Code Generation
because everything is generated by the Custom tool MSDataSetGenerator, and can be controlled using the various wizards and property windows that support the Dataset Designer. Strongly typed datasets are covered in detail in Chapter 30.
Figure 14-8
Forms
The Forms Designer within Visual Studio 2005 is one of the most heavily used code-generating tools because it dynamically generates all the code required to create and lay out the controls that have been added to the form in the Designer. Previously, all the code relating to a form had to be contained within the same file. A section at the beginning of the Form class was marked with a big Do Not Touch sign, as it was Designer-generated. With the introduction of partial classes, all the Designer-generated code has been moved into a designer file. For example, if you have a Form1, whereas in the past you would have just had Form1.vb, you now also have Form1.designer.vb. The contents of the designer file for Form1 that only has a single control, Button1, might look like the following:
<Global.Microsoft.VisualBasic.CompilerServices.DesignerGenerated()> _ Partial Class Form1
Inherits System.Windows.Forms.Form
‘Form overrides dispose to clean up the component list. <System.Diagnostics.DebuggerNonUserCode()> _
Protected Overrides Sub Dispose(ByVal disposing As Boolean) If disposing AndAlso components IsNot Nothing Then
components.Dispose() End If MyBase.Dispose(disposing)
End Sub
‘Required by the Windows Form Designer
Private components As System.ComponentModel.IContainer
‘NOTE: The following procedure is required by the Windows Form Designer
187

Chapter 14
‘It can be modified using the Windows Form Designer. ‘Do not modify it using the code editor. <System.Diagnostics.DebuggerStepThrough()> _ Private Sub InitializeComponent()
Me.Button1 = New System.Windows.Forms.Button Me.SuspendLayout()
‘
‘Button1
‘
Me.Button1.Location = New System.Drawing.Point(60, 82) Me.Button1.Name = “Button1”
Me.Button1.Size = New System.Drawing.Size(75, 23) Me.Button1.TabIndex = 1
Me.Button1.Text = Global.WindowsApplication1.My.MySettings.Default.Button1_Text
Me.Button1.UseVisualStyleBackColor = True
‘
‘Form1
‘
Me.AutoScaleDimensions = New System.Drawing.SizeF(6.0!, 13.0!) Me.AutoScaleMode = System.Windows.Forms.AutoScaleMode.Font Me.ClientSize = New System.Drawing.Size(292, 273) Me.Controls.Add(Me.Button1)
Me.Name = “Form1”
Me.Text = “Form1” Me.ResumeLayout(False)
End Sub
Friend WithEvents Button1 As System.Windows.Forms.Button
End Class
By default, the designer file is hidden in the Solution Explorer. Selecting the Show All Files button will show that Form1 is made up of Form1.vb, Form1.designer.vb, and Form1.resx.
My Namespace
VB.NET developers have an additional code generator that is used to generate the My Namespace. The My Namespace achieves a number of goals, one of which is to provide quick accessors for forms and web services. When a VB.NET project is compiled, a series of fields, properties, and methods are dynamically created to allow forms and web services to be referenced via the My Namespace. This process does not generate a code file, as it is done as part of the build process.
Other parts of the My Namespace require actual code to be generated. This is the case for the strongly typed accessors for the application settings and resources. The following code illustrates the code that is generated to provide a strongly typed property for accessing the CompanyLogo resource from the application resource file:
Namespace My.Resources
<GeneratedCodeAttribute(“StronglyTypedResourceBuilder”, “2.0.0.0”), _
DebuggerNonUserCodeAttribute(), _
CompilerGeneratedAttribute(), _
188

Code Generation
HideModuleNameAttribute()> _
Friend Module Resources
Private resourceMan As Global.System.Resources.ResourceManager
Private resourceCulture As Global.System.Globalization.CultureInfo
<EditorBrowsableAttribute(EditorBrowsableState.Advanced)> _ Friend ReadOnly Property ResourceManager() As ResourceManager
Get
If Object.ReferenceEquals(resourceMan, Nothing) Then Dim temp As ResourceManager = _
New ResourceManager(“WindowsApplication1.Resources”,
GetType(Resources).Assembly) resourceMan = temp
End If
Return resourceMan End Get
End Property
<EditorBrowsableAttribute(EditorBrowsableState.Advanced)> _ Friend Property Culture() As CultureInfo
Get
Return resourceCulture End Get
Set
resourceCulture = value End Set
End Property
Friend ReadOnly Property CompanyLogo() As Bitmap Get
Dim obj As Object = ResourceManager.GetObject(“CompanyLogo”,
resourceCulture)
Return CType(obj, Bitmap) End Get
End Property End Module
End Namespace
Taking Charge of the Class Designer
Now that you understand the basics of code generation within Visual Studio 2005, you can return to the Class Designer and work through some advanced features that can greatly improve the experience of designing, writing, and debugging code.
Earlier in this chapter, it was mentioned that the class diagram file is used in conjunction with the code file to generate the visual representation displayed on the class design surface. The question is, what exactly does the class diagram file contain? As with most files that are used by or generated by Visual Studio 2005, the class diagram file is an XML document that conforms to the class diagram schema.
189

Chapter 14
Class Diagram Schema
Although the actual class diagram schema has not been made public, most of it can be inferred from the XML file that is generated from using the Class Designer. To view the class diagram file in XML format, right-click on the file in the Solution Explorer and select Open With from the context menu. When prompted for the program to open it with, select the XML Editor.
Taking the example class diagram from earlier in the chapter, you would expect to see an XML file similar to the following:
<?xml version=”1.0” encoding=”utf-8”?>
<ClassDiagram MajorVersion=”1” MinorVersion=”1” MembersFormat=”FullSignature”> <Font Name=”Tahoma” Size=”8.51” />
<Class Name=”WindowsApplication1.Customer”> <Position X=”0.5” Y=”1.5” Width=”2.5” /> <TypeIdentifier>
<FileName>Customer.vb</FileName>
<HashCode>MAEAAAAgAAAAAAAIAACACAQAAAAAAEACAAAAAAAAAAA=</HashCode>
</TypeIdentifier>
<ShowAsCollectionAssociation> <Property Name=”Orders” /> </ShowAsCollectionAssociation>
<Compartments>
<Compartment Name=”Events” Collapsed=”true” /> </Compartments>
</Class>
<Class Name=”WindowsApplication1.Order” Collapsed=”true”> <Position X=”5” Y=”2.5” Width=”1.5” /> <TypeIdentifier>
<FileName>Order.vb</FileName>
<HashCode>AAAICAAAAAAgAAAgAACAABAAAAAAAAAAAAAAgABAwAA=</HashCode>
</TypeIdentifier> <Lollipop Position=”0.2” />
</Class>
</ClassDiagram>
From this XML document you can see that the contents all relate to the layout of entities on the designer surface. One of the most significant points about the class diagram is that it contains no functional information about the class. Because the code file needs to contain this information for the code to function, there is no reason why it should be duplicated in the class diagram. This would only create the potential for the Designer to be out of sync with the code file. Changes made in either the Designer or the code file are immediately reflected in the other file.
Without going into every boring detail of the XML schema, note that each class to be contained on the class diagram is specified using a Class element. This element defines the full name of the class being referenced and whether it should be displayed in collapsed mode or not. Another optional parameter determines whether inheritance lines are shown where they are relevant. Sub-elements of the Class element are used to determine the position of the entity on the design surface and the code file in which the entity resides. Other elements are used to control relationships between entities and the appearance of interface (lollipop) markers.
190

Code Generation
IntelliSense Code Generation
When a class implements an interface or inherits from a base class it is highly probable that it will not initially implement or override all the methods. The Class Designer can provide a shortcut for creating methods that either implement an interface method or override an overridable base class method. For example, the steps to override a base class method are as follows:
1.Open the class diagram.
2.Right-click the class in which you want to override the method.
3.Select the IntelliSense item from the context menu, followed by the Override Members item.
4.Select the method from the base class you wish to override. This will add that method to the class you selected.
5.Double-click the method from the class diagram to edit that method in the code file.
Object Test Bench
Debugging classes can be quite a tedious process, especially when they are part of a large system that can take considerable time to start running. Visual Studio 2005 has what is known as the object test bench, which can be used to instantiate entities and invoke methods without having to load the entire application.
Invoking Static Methods
Starting from either the Class View window or the class diagram, static methods can be invoked. Rightclicking on the class will bring up the context menu from which you can select Invoke Static Method. This will bring up the Invoke Method dialog shown in Figure 14-9, which prompts you to provide parameters for the method.
Figure 14-9
191
Chapter 14
Specify values for each of the parameters and click OK to invoke the method. If there is a return method, a Method Call Result dialog will appear, returning the method output, as shown in Figure 14-10.
Figure 14-10
Instantiating Entities
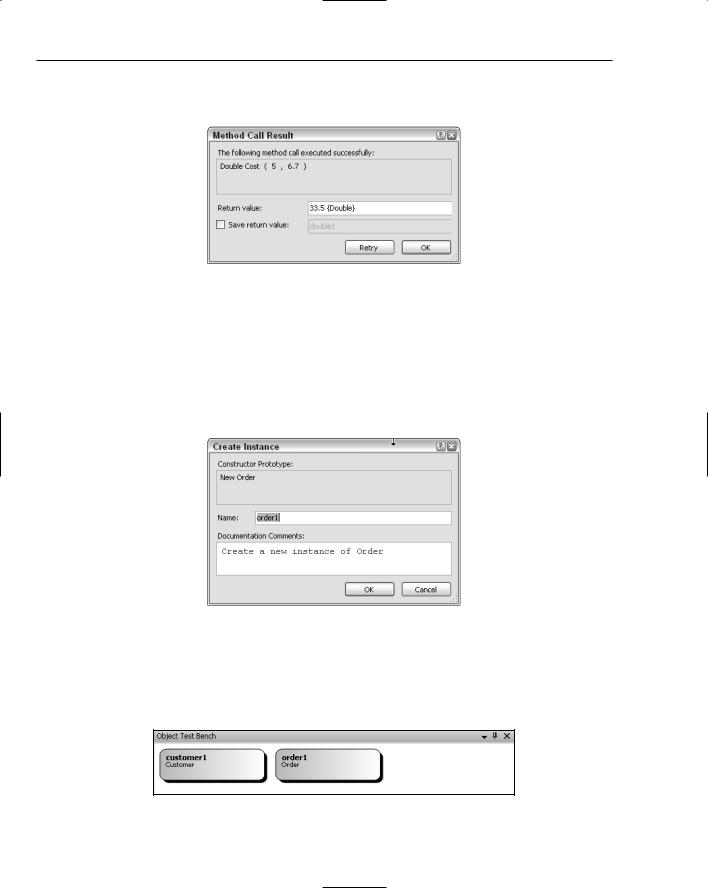
You can use a similar technique to create an instance of an entity from either the Class View or the class diagram. Right-click on the class and select Create Instance from the context menu. This will prompt you for a name for the instance, as shown in Figure 14-11. The name you give the instance has no relationship to any property that may be called Name in your class. All it does is provide a user-friendly name for referring to the instance when working with it.
Figure 14-11
Clicking OK creates an instance of the Order class and places it in the object test bench. Figure 14-12 shows the newly created instance order1 alongside a previously created customer1 object. The friendly name that you gave the instance appears above the object type so that you can clearly distinguish it from any other objects of the same type that may have been created.
Figure 14-12
192

Code Generation
Accessing Fields and Properties
Within the object test bench you can access fields and properties using the same technique available during application debugging. In fact, it is exactly the same process, as Visual Studio 2005 is actually in debugging mode in the background to maintain the instances of the objects you are working with. As such, you can hover the mouse over the objects to access the properties of that object. When the mouse hovers over the object, an intelligent mouse-over tooltip appears that can be used to drill down to obtain the current values of both fields and properties, as shown in Figure 14-13. This tooltip also permits you to modify the public properties of the object to adjust the state of the object.
Figure 14-13
Invoking Instance Methods
The final step in working with items in the object test bench is to invoke instance, or nonstatic, methods. You can do this by right-clicking on the object on the test bench and selecting Invoke Method. In Figure 14-14, the AddOrder method has been invoked on the customer1 object off the test bench. The parameter for this method needs to be an Order. In the value column of the parameters list you can select from any object that appears on the object test bench. Because an Order is required, the order1 object seems a good candidate.
Figure 14-14
193

Chapter 14
Invoking this method will return the number of orders that have been added to the customer. Referring back to Figure 14-10, note the checkbox to save the return value. Because this is going to be added to the object test bench it needs to have a friendly name so that it too can be referenced in future method invocations. If you assign the return value a name of orderCount, you end up with an object test bench that looks like what is shown in Figure 14-15.
Figure 14-15
A couple of words of caution about the object test bench: To invoke a member or create an instance of a class you have to ensure that the project to which they belong is the startup project. This can be a pain when you want to access classes from different assemblies. Another big issue with the test bench is that it periodically decides that it needs to rebuild the project. Unfortunately, this process removes any objects you might have added to the work bench. The final issue is that there is no way to either access or set parameterized properties or methods with optional parameters. While none of these issues prevents you from using the object test bench, they can cause some frustration when a series of objects is removed due to a recompilation, or you wish to access classes from different assemblies.
Summar y
This chapter focused on the Class Designer, one of the best tools built into Visual Studio 2005 for generating code. The design surface and supporting toolbars and windows provide a rich user interface with which complex class hierarchies and associations can be designed.
Other elements of Visual Studio 2005 where code is automatically generated for you were covered in the second half of the chapter. Most of these are covered in depth in later chapters, so this is merely a summary of code generation within Visual Studio 2005.
194

Security Concepts
In Chapter 16 you’ll see how to secure your data by implementing cryptography, and in Chapter 17 protecting your source code is explained through the process of obfuscation. However, before you approach either feature within Visual Studio 2005 application programming, you should be familiar with the basic concepts that underpin how security works within the .NET environment.
Because security is such an important part of many applications, this chapter introduces these concepts, rather than examine any specific technical feature of the IDE.
Application Security
Applications and services can be executed in many different ways, mostly intentional. However, applications can also be run inadvertently, or with active malice toward gaining access to the functionality of the application’s internals. With simple applications that do not provide anything particularly proprietary, such as common access functions (e.g., a simple text editor or calculator), you may not be concerned with who gains the capability to access it, or even if it is executed via another process.
However, in a situation where your application contains or processes sensitive data, you need a more proactive attitude regarding who can access the functionality within your application, and you may want to fine-tune the control over individual parts of it.
Code written in .NET enables you to decide who can execute what based on two different views. The first option is to look at what each individual function is and control access to parts of the application based on that particular set of code. This specific set of access to data and the underlying system is known as code-based security.
Alternatively, you can control access to the application or function based on the particular user, or rather, the user account being used to execute the application. This is known as role-based security because it interrogates the user account’s authority to access the functions within your application code.