

Professional Visual Studio 2005 (2006) [eng]
.pdfChapter 10
Figure 10-1
The following code snippet shows the designer-generated method InitializeComponent, which creates and sets properties on Button1. This is how the code would appear with the Localizable property on the form set to False:
Private Sub InitializeComponent()
Me.Button1 = New Button
‘
‘Button1
‘
Me.Button1.Location = New Point(71, 43) Me.Button1.Size = New Size(185, 166) Me.Button1.Text = “Button1”
Me.Button1.TabIndex = 0 Me.Button1.Name = “Button1”
Me.Button1.UseVisualStyleBackColor = True
‘
‘Form1
‘
Me.Controls.Add(Me.Button1) End Sub
Once the Localizable property of the form has been set to True, the form uses the new Component ResourceManager class to load and apply properties found in the associated resource file (this framework class is covered in more detail later in this chapter):
Private Sub InitializeComponent()
Dim resources As New componentResourceManager(GetType(Form1)) Me.Button1 = New Button
‘
‘Button1
‘
resources.ApplyResources(Me.Button1, “Button1”) Me.Button1.Name = “Button1” Me.Button1.UseVisualStyleBackColor = True
‘
126

XML Resource Files
‘Form1
‘
Me.Controls.Add(Me.Button1) End Sub
Although the resource files generated by the forms designer can be manually edited, this is not encouraged because changes may be overwritten the next time the file is regenerated by the designer.
When resources files are used properly, they can provide a number of benefits because they are a convenient place to store strings, icons, images, and other data that might be referenced by an application. The use of resource files, both for tracking form properties and for application data, is a must for any application that needs to be translated for a foreign culture. We use the term “culture” here because it is more than language that can differ between countries and ethnic groups. Resource files enable developers to provide alternative data for different cultures. When the application is run, the .NET Framework uses the current culture information to determine which data to load based upon the resource fallback process. Common examples of information that might vary between cultures are prompts, titles, error messages, and button images.
What Are Resources?
A resource is any data required by an application, whether it is a string, an icon, an image, or even an audio clip. Resources are nonexecutable and support the running of the application through the provision of data such as location, size, and other physical properties of controls. While most resources are typically strings, images, audio, or icons, there is no reason why a resource could not be a more complex object that supports serialization.
Three types of resource files can be compiled into an application: text, resx (XML resource file), and resources (binary resource file) file formats. Whole files can also be embedded as application resources where needed. Most developers who use Visual Studio 2005 will use resx files and embedded file resources.
Text File Resources
Text files are the most basic sort of resource because they are limited to providing string values. In applications for which a large number of string literals need to be managed, a simple text file can be the easiest way to manage them because they are not cluttered among the other resources of the application.
The format of strings defined in a text resource file is a name-value pair, where the name is used to reference the resource in code, as shown in the following example:
Error_Unable_To_Connect = Unable to connect to specified server
Because each name-value pair is delimitated by a new line, this character cannot be added to the string. However C-style escape characters can be used to insert new lines (\n) or tabs (\t) into the text.
Comments can also be added to the resource file by prepending a line with a semicolon, as shown here:
;Error message to be displayed when a connection could not be made to the server
Error_Unable_To_Connect = Unable to connect to specified server
127
Chapter 10
Text resource files should be saved with the file extension of txt or restext. The latter is useful when you want to distinguish text resource files from regular text files.
Although text resource files are easy to edit and update, it is harder to integrate them into your application. As text files, they cannot be directly compiled into an application; they must instead be converted into either resx or resources files. This can be achieved using the Resource Generator utility, resgen
.exe, located in the bin folder of the Visual Studio 2005 SDK (located at C:\Program Files\Microsoft Visual Studio 8\SDK\v2.0\Bin):
resgen StringResources.txt StringResources.resources
The output file — in this case, StringResources.resources — can be included in your application to give you access to those resources.
A prebuild event can be used to convert text resource files into a resources file that can be compiled into the main application build. This will ensure that the resource files contained in the application are always up to date. To do this, include the text resource file in the application and set the build action property to None. Navigate to the Project Settings window and on the Compile tab select Build Events. In the prebuild events, enter the resgen command required to compile your text resource file:
“C:\Program Files\Microsoft Visual Studio 8\SDK\v2.0\Bin\resgen.exe”
“$(ProjectDir)StringResources.txt” “$(ProjectDir StringResources.resources”
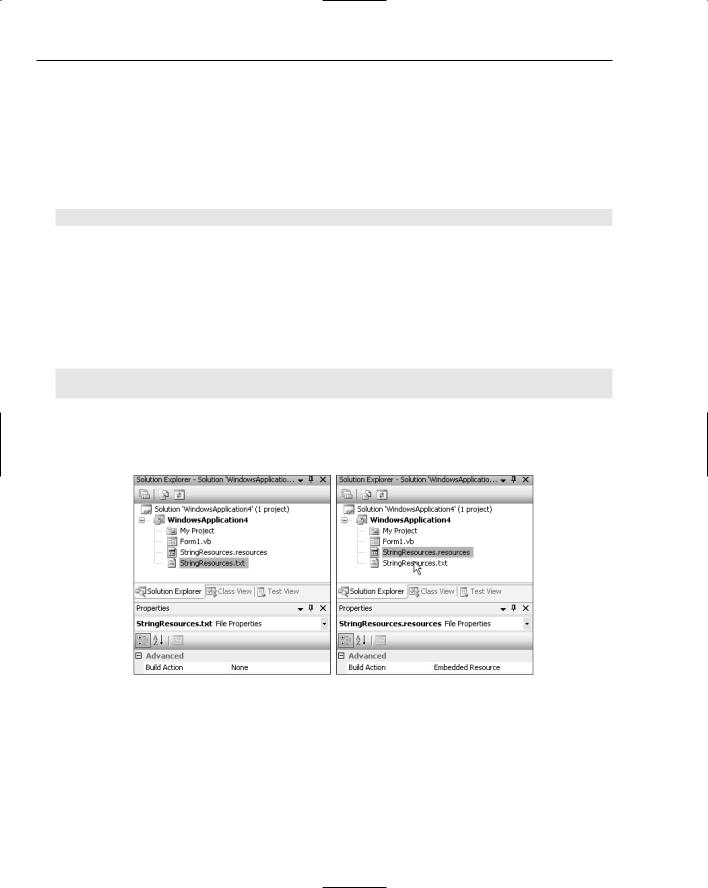
Building the application will generate the resources file that needs to be included within your application as an embedded resource. Figure 10-2 illustrates how both the text and resources file are included within an application with appropriate build action properties.
Figure 10-2
ResxResource Files
A much more user-friendly format for resources is the XML resource file, commonly referred to as a resx file. This is a simple XML data file that contains name-value pairs of XML nodes. The advantage of this format is that the value is not restricted to just a string; it can be any type that is serializable or can be represented as a string.
128
XML Resource Files
The following XML snippet shows a resource named HelloWorld, with associated value and comment. As you can see from the code, no information is available about the type of data contained within the resource, as this is a string resource:
<data name=”HelloWorld”> <value>Say Hello</value>
<comment>This is how we say hello</comment> </data>
The next snippet illustrates how a more complex data type can be stored in a resource file as a string representation. It also shows how an assembly alias can be used to reference an external assembly that contains type information. When this resource is accessed, the type information will be used to convert the string value to an object of this type:
<assembly alias=”System.Drawing” name=”System.Drawing, Version=2.0.0.0, Culture=neutral, PublicKeyToken=b03f5f7f11d50a3a” />
<data name=”Button1.Location” type=”System.Drawing.Point, System.Drawing”> <value>71, 43</value>
</data>
Although resx files can be included in an application without having to use the Resource File Generator (resgen), they are still converted prior to being compiled into the application. During the build process, resources files are generated for each resx file in the application. These are subsequently linked into the application.
Adding Resources
Visual Studio 2005 now supports a rich user interface for adding and modifying resource files. In the past it was possible to view the contents of a resource file within the IDE. However, unless the resource was a string, or had a string representation, it was not possible to modify the value within the resource file. The new resource editor provides support for strings, images, icons, audio, files, and more.
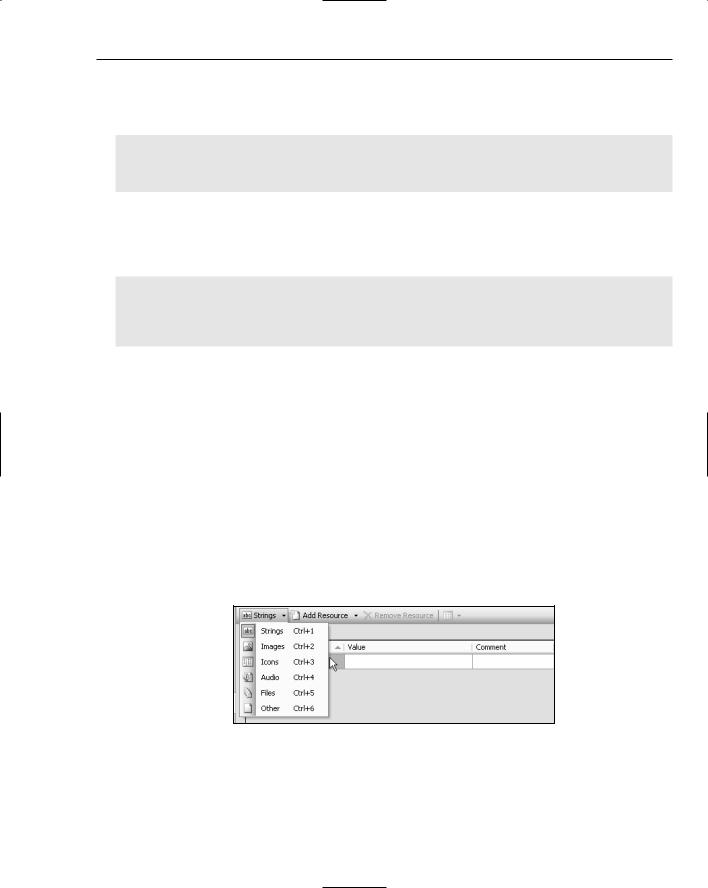
Double-clicking on a resx file within the Solution Explorer will bring up the resource editor. In the top left-hand corner of the resource editor is a drop-down list that navigates between resources of different types, as shown in Figure 10-3.
Figure 10-3
Depending on the resource type, the editor displays the resource in an appropriate format. For example, strings are presented in an editable textbox, whereas images are presented as thumbnail images that can be opened and edited. Adding new resources is as simple as selecting the Add Resource drop-down, choosing the appropriate resource type, and then adding the necessary information.
129

Chapter 10
Embedding Files as Resources
It is often necessary to embed an entire file in an application. This can be done by including the file in the application and modifying the build action. Depending on the file type, when the item is included in the application, the build action (click on the file and open the Properties window) is normally set to either Compile or None. If this is changed to Embedded Resource, the entire file will be added to the application as an embedded resource.
When images, icons, and other files are added to an existing resource file, they are added as a resxfileref item. The file will appear in the resources directory, but the build action will be None. When the application is built, these files are compiled into the resources file prior to being linked into the application. In the past, the data from these files was pulled out and added to the resx file as a binary block. This meant that, once added, the data could not be easily modified. With the new file reference item, the data remains in an associated file and can easily be updated.
Accessing Resources
Resources can be accessed in code using a resource manager. A resource manager is easily created from the name of the resource file and a reference to the assembly from which the resource should be extracted:
Dim res As New ResourceManager (“MyProject.MyResources”, GetType(Form1).Assembly)
Once created, resources can be extracted using either the GetObject or GetString functions:
res.GetObject(“StringResource”)
Resource Naming
Resources are named by combining the name of the resource file to which they belong and the root namespace. For example, if you have a resource file called Sample.resources in a project called MyProject, the full resource name will be MyProject.Sample.
This is particularly important to remember when you make a file an embedded resource. Each file can be accessed by prepending the project name to the filename. Unlike resource files, the name of the file retains the extension. For example, if you have a file called ASimpleDataDocument.doc in a project called MyProject, then it will need to be referenced as MyProject. ASimpleDataDocument.doc.
Satellite Resources
One of the big advantages of placing data in a resource file is the resulting capability to translate the data into foreign cultures. Instead of including all the languages in the single resource file, each culture is stored in a resource file that has a suffix defined by the culture.
130

XML Resource Files
Cultures
Cultures are defined by a combination of two lowercase letters, which represent the language, and two uppercase letters, which represent the country or region of the culture, separated by a hyphen. For example, U.S. English and Australian English are represented as en-US and en-AU, respectively. The corresponding resource files for these cultures would be MyResource.en-US.resx and MyResource.en-AU.resx. A full list of culture identifiers can be found at http://msdn2.microsoft.com/en-us/library/system
.globalization.cultureinfo.aspx. For those who are curious, you can enumerate over all cultures available returned by CultureInfo.GetCultures(CultureTypes.AllCultures).
This returns approximately 220 cultures that can be grouped as follows:
Invariant culture: No language or country identifier (for example, Form1.resx). Data is not dependent upon culture. For example, this might be the company logo, which will not vary and is not dependent upon culture information.
Neutral culture: Language identifier (for example, Form1.en.resx). Data is dependent upon language alone — for example, a simple warning message that merely needs to be translated.
Specific culture: Language and country identifier (for example, Form1.en-US.resx). Data is dependent upon both language and country/region — for example, form layout, color, and prompts should all be translated and adjusted for a specific country.
Creating Culture Resources
If you are creating additional resource files for a form, then it is important to ensure that the Localizable property is set to True. There are three ways to create culture-specific resource files:
If you know the identifier of the culture for which you want to generate a resource file, you can simply save the resx file to <culture identifier>.resx. For example, if you were converting the resource file Form1.resx to Australian English, you would save it as Form1.en-AU.resx. You will notice that when you do this, Visual Studio removes the original resx file from the solution and adds the new culture-specific resx file. In order to get both files to show up nested under the Form1 node, you actually need to exclude the new resx file, refresh the solution view (by closing and reopening the solution), and then include both files back into the project.
Visual Studio supports a much better way to create culture-specific resource files for forms. From the Properties window for the form, you can select Language. The name of this property is slightly misleading because it adjusts not only the language, but also the country/region of the form in designer mode. This property is initially set to (Default) and should always be returned to this setting after you have finished generating or modifying specific culture resource files. To generate the resource file for Australian English, select English (Australia) from the Language drop-down and make appropriate changes to the form. Once you are comfortable with the new layout, save it and reset the Language property to (Default).
The last way to generate culture-dependent resource files is to use WinRes.exe. Although it’s not added to the Start menu, it is available under the .NET Framework SDK folder (c:\program files\microsoft visual studio 8\sdk\v2.0\bin) and is a graphical utility for generating resource files for forms. This utility can load an existing resource file, allow properties of all controls
131

Chapter 10
on the form to be modified, and then save the changes to a particular culture resource file. Before opening a form’s resource file using this utility, make sure that the Localizable property is set to True; otherwise, the file will not load properly.
Loading Culture Resource Files
At this point you might be wondering how resource files interact, and whether culture-specific resource files have to be created and compiled at the same time as the main application. The answer to both of these questions lies in the resource fallback process, which is the mechanism by which the ResourceManager class loads resources.
The fallback process has three levels based upon the current user interface culture (UI culture) of the executing thread. This can be accessed in code via the CultureInfo.CurrentUICulture property. Be aware that this is different from CultureInfo.CurrentCulture, which is the current culture used in string comparisons, date formats, and so on. Unlike the current culture, which is based upon the regional settings of the computer (which can be adjusted using Control Panel Regional Settings), the default UI Culture is dependent upon the Windows user interface language pack that is currently selected. Unless you have a Windows Multilingual User Interface Pack installed, you will not be able to modify the default UI culture for your applications.
Although you can’t change the default user interface culture, you can adjust this property in code. A word of caution here, however: Without the interface pack installed, some cultures may not display correctly.
Thread.CurrentThread.CurrentUICulture = New CultureInfo(“en-US”)
Using the current user interface culture, the fallback process tries to locate resources based on a culture match. For example, if the UI culture is en-US, the process would start off by looking for specific culture resources that match both language (English) and country (U.S.). Where no resource can be located, the process falls back to neutral culture resources that match just the language (English). Finally, if still no resource can be located, then the process falls back to invariant culture, indicating there is no match on language or country.
Satellite Culture Resources
So far we have mentioned only how a resource can be converted into a new culture and added to an application. While this method gives you control over which cultures are deployed with your application, it would be better if you didn’t have to rebuild your entire application whenever a culture resource needed to be modified, or when you decided to add support for a new culture.
When Visual Studio 2005 compiles culture resources, it splits the resource files into a hub-and-spoke arrangement, using satellite assemblies to contain culture resources. At the hub is the main assembly that would contain the invariant resources. Satellite assemblies are then created for each culture for which a resource has been created. The naming of the satellite assembly is of the form MyApp.resources
.dll and it is located in a subdirectory named according to the culture under the main output path. Although there is an implicit relationship between specific cultures (for example, en-US) and neutral cultures (for example, en), satellite assemblies for these cultures should both reside in a subdirectory under the main output path.
132

XML Resource Files
Another alternative is for the main assembly and/or satellite assemblies to be installed into the Global Assembly Cache (GAC). In this case, each assembly must be strongly named so that it is unique within the cache.
Clearly, the resource fallback process needs to accommodate assemblies both in the GAC and in subdirectories. Hence, for each culture level (specific, neutral, and invariant) the GAC is checked first, followed by the culture subdirectory. Finally, if no resource is found, an exception is raised.
Note that culture resource files do not have to contain all the resources defined in the default resource file. The resource fallback process will load the resource from the default resource file if it is not located in a more specific resource file, so it makes sense to save only resources that are different in the specified culture.
Accessing Specifics
Numerous shortcuts have been built into the .NET Framework to support the most common tasks related to accessing resources. These include the My namespace (VB.NET only), single-line image loading, and the new ComponentResourceManager class.
My Namespace
VB.NET has introduced the concept of the My namespace, which serves several purposes, including providing wrapper functionality to projectwide resources. For example, an image resource called CompanyLogo can be accessed as follows:
Dim img As Image = My.Resources.CompanyLogo
This wrapper is an extension of the designer file generated by resgen, enabling such resources to be accessed using a single line. Although C# does not have the My Namespace, it does provide the designer file for project resources so that developers can easily access these resources in a strongly typed manner.
Bitmap and Icon Loading
Images and icons are two of the most common data types held in resource files. Therefore, both the Bitmap and Icon classes in the framework support a constructor that can create an instance directly from a resource without the need to use a resource manager:
Dim img As New Bitmap(gettype(ThisClass),”MyImage”)
ComponentResourceManager
In the first example in this chapter, after localization was turned on, a ComponentResourceManager object was used to retrieve resources associated with the form. The ComponentResourceManager extends the base ResourceManager by providing additional functionality for retrieving and applying component properties. Here are the original four lines required to set the properties defined for Button1:
133

Chapter 10
Me.Button1.Location = New Point(71, 43)
Me.Button1.Size = New Size(185, 166)
Me.Button1.Text = “Button1”
Me.Button1.TabIndex = 0
Using the ComponentResourceManager, this can be condensed to just one line:
resources.ApplyResources(Me.Button1, “Button1”)
In previous versions of Visual Studio, the code that was generated when localization was turned on was much more verbose. For each property, a separate call was made to the ResourcesManager to retrieve the property by name, as shown in this code snippet:
Me.Button1.Location = CType(resources.GetObject(“Button1.Location”), Point)
Me.Button1.Size = CType(resources.GetObject(“Button1.Size”), Size)
Me.Button1.TabIndex = CType(resources.GetObject(“Button1.TabIndex”), Integer) Me.Button1.Text = resources.GetString(“Button1.Text”)
It is still possible to write this code because the GetObject method is still available on the ComponentResourceManager. The issue with writing this code is that each property that is going to be localized needs to be known at compile time. As such, every property on every control was added to the resource file. This added excess properties (even when they were no different from the default value) to the resource file. It also added huge overhead when loading up a form, as each property was set via a resource property.
The ApplyResources method in the ComponentResourceManager class works in reverse. By specifying a control name, which must be unique on a form, all resources that start with that prefix are extracted. The full resource name is then used to determine the property to set on the control. For example, a resource with the name Button1.Location would be extracted for the control called Button1, and the value used to set the Location property on that control.
This process eliminates the need to have all properties specified in a resource file. It also enables culture resource files to specify additional properties that perhaps were not defined in the default resource file.
You might be wondering whether there are any additional penalties in using the ComponentResourceManager. In order to set a property on a control using the name of the property, the ComponentResourceManager uses reflection to find the appropriate property. Once it has been retrieved, it can be invoked. Each search that is done in order to set the property is relatively expensive. However, given the reduced number of properties that are to be set, the trade-off is definitely worthwhile, as the application can easily be localized without recompilation of the main application.
Coding Resource Files
In addition to the rich visual tools that Visual Studio 2005 now provides for editing resource files, it is possible to create resource files from code. The .NET Framework provides support for reading and writing resource files using two interfaces: IResourceReader and IResourceWriter. Once the resource files have been created, they need to be added to the application or manually linked so that they can be referenced within the application.
134

XML Resource Files
IResource Reader: The reader interface ensures that resource readers have the following methods:
GetEnumerator: The GetEnumerator method retrieves an IDictionaryEnumerator object that permits the developer to iterate over each of the resources in the resource file.
Close: The Close method is used to close the resource reader and release any associated resources.
IResource Writer: The writer interface ensures that resource writers have the following methods:
AddResource: There are three overloads to the AddResource method that support adding resources to the resource file. Both of the framework implementations of this interface have either an additional overload of this method or an alternative method for adding resources. The overloads that are part of this interface support adding resources in a name-value pair. Each method has the resource name as the first parameter; and takes a value, as a string, byte array, or object, as the second parameter. The final implementation that takes an object as a parameter may need to be serializable or converted to a string via a typeconverter.
Close: The Close method writes resources out to the stream before closing it.
Generate: Unlike the Close method, the Generate method simply writes the resources out to the stream without closing the stream. Once called, any other method will cause an exception to be raised.
ResourceReader and ResourceWriter
The ResourceReader and ResourceWriter are an implementation of the IResource interfaces to support reading and writing directly to resources files. Although reading and writing to this format is the most direct, as it reduces the need to use resgen to generate the resources file, it does limit the quality of information that can be retrieved when reading from the file. Each resource is treated as a series of bytes where the type is unknown.
ResxResourceReader and ResxResourceWriter
The ResxResourceReader and ResxResourceWriter are a more versatile implementation of the IResource interfaces. In addition to supporting the IResource interface, the ResxResourceWriter supports an additional overload of the AddResource method, whereby a ResxDataNode can be added. A ResxDataNode is very similar to a dictionary entry, as it has a key (in this case, the Name property) and a value (which needs to be set when the node is created). However, the difference is that this node can support additional properties such as a comment and, as an alternative to a value, a file reference (for example, where an image needs to be added to a resource file).
As mentioned previously, it is possible to add a file reference into a resx file so that the file is still editable yet has the benefit of being compiled into the resource file by resgen.exe. The supporting class in the framework is ResxFileRef. This can be instantiated and added as a resource using the ResxResourceWriter. This inserts an XML node similar to the following snippet:
<data name=”Figure_11_2” type=”ResXFileRef, System.Windows.Forms”> <value>..\Resources\CompanyLogo.tif;System.Drawing.Bitmap, System.Drawing,
Version=2.0.0.0, Culture=neutral, PublicKeyToken=b03f5f7f11d50a3a</value>
</data>
135