

Professional Visual Studio 2005 (2006) [eng]
.pdfChapter 6
Summar y
In this chapter you received a good grounding in how to design Windows forms. The various controls and their properties enable you to very quickly and easily create complex layouts that can respond to user interaction in a large variety of ways.
This discussion serves to complete your introduction to the world of Visual Studio 2005. The next section goes into detail about handling solutions and their projects.
76

Part II
Project and Solution
Design
Chapter 7: Projects and Solutions
Chapter 8: Source Control
Chapter 9: Application Configuration Files
Chapter 10: XML Resource Files


Projects and Solutions
Other than the simplest applications, such as Hello World, most applications require more than one source file. This raises a number of issues, such as how the files will be named, where they will be located, and whether they can be reused. Within Visual Studio 2005, the concept of a solution, containing a series of projects, is used to enable developers to track, manage, and work with their source files. The IDE has a number of built-in features that aim to simplify this process, while still allowing developers to get the most out of their applications. This chapter examines the structure of solutions and projects, looking at available project types and how they can be configured.
Solution Structure
Whenever you’re working within Visual Studio, you will have a solution open. When you’re editing an ad hoc file, this will be a temporary solution that you can elect to discard when you have completed your work. However, the solution enables you to manage the files that you’re currently working with, so in most cases saving the solution means that you can return to what you were doing at a later date without having to locate and reopen the files on which you were working.
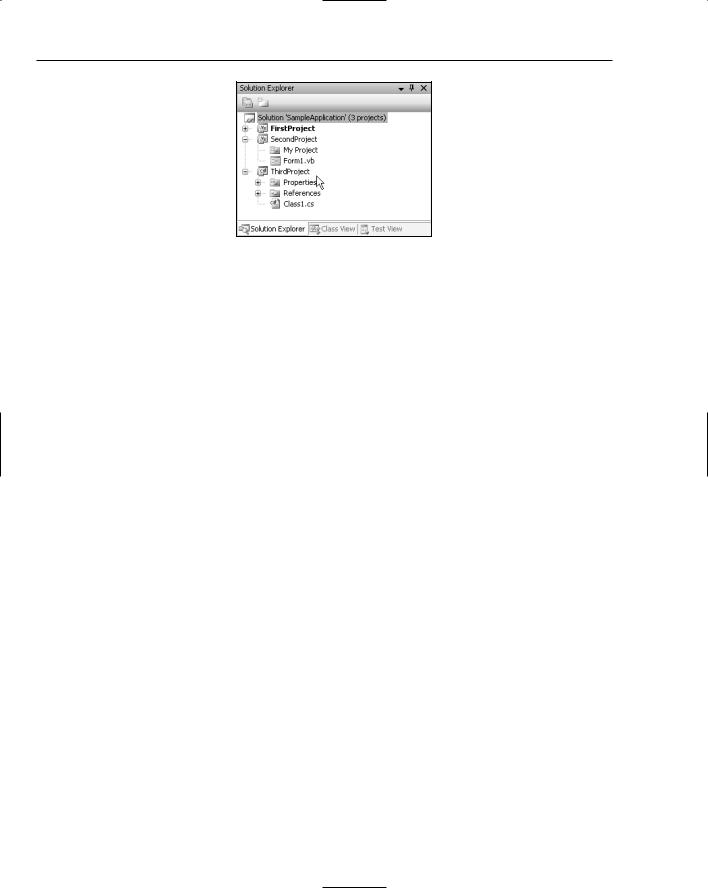
The most common way to structure applications written within Visual Studio is to have a single solution containing a number of projects. Each project can then be made up of a series of both code files and folders. Figure 7-1 illustrates a typical multi-project solution.
Folders are used to aid source code navigation and have no application meaning associated with them (with the exception of web applications, which have specially named folders that have specific meaning in this context). Some developers use folder names that correspond to the namespace to which the classes belong. For example, if class Person is found within a folder called DataClasses in a project called FirstProject, the fully qualified name of the class could be
FirstProject.DataClasses.Person.
Chapter 7
Figure 7-1
There is often a misconception that projects necessarily correspond to .NET assemblies. While this is mostly true, it is possible for multiple .dll files to represent a single .NET assembly. However, this case is not supported by Visual Studio 2005, so this book assumes that a project will correspond to an assembly.
The main window in which you work with solutions and projects is the Solution Explorer, as shown previously in Figure 7-1. By default, new solutions will only show project information about the first project. However, when additional projects are added, the solution node appears. This is configurable via the Tools Options menu. Under the Projects and Solutions tree node is an option Always Show Solution that controls whether the solution node is visible for single-project solutions. Regardless of this setting, a solution file is always generated to maintain information about the application being built.
In Visual Studio 2005, the format for solution and project files has significantly changed. In fact, the whole mechanism used to build applications has changed. MSBuild is the new engine for compiling, linking, and assembling applications. As an external tool, similar to the VB and C# compilers, it can be executed from the command line. Also like other build tools, such as Nant, MSBuild uses a build file, which specifies targets to be built and other information pertaining to the order and build mechanism to use. The new project file format is in fact a build file and can be consumed by MSBuild to build a project.
MSBuild was put together to enable developers to tailor the way their applications are built. This is particularly relevant for large applications where the build process may need to be done in multiple stages and has dependencies that need to be built in a specific order. As MSBuild can be run from the command line, it is easy to schedule the build process and integrate it with source control for continuous builds based on source change notifications. More information about the structure of a build file can be found at C:\WINDOWS\Microsoft.NET\Framework\v2.0.50727\MSBuild.
In addition to tracking which files are contained within an application, solution and project files can record other information, such as how a particular file should be compiled, project settings, resources, and much more. Visual Studio 2005 introduces a new non-modal dialog for editing project properties, while solution properties still open in a separate window. As you might expect, the project properties are those properties pertaining only to the project in question, such as assembly information and references, whereas solution properties determine the overall build configurations for the application.
80

Projects and Solutions
Solution File Format
Visual Studio 2005 actually creates two files for a solution, with extensions .suo and .sln (solution file). The first of these is a rather uninteresting binary file, and hence difficult to edit. It contains user-specific information — for example, which files were open when the solution was last closed and the location of breakpoints. This file is marked as hidden, so it doesn’t appear in the solution folder using Windows Explorer.
The solution file contains information about the solution, such as the list of projects, build configurations, and other nonproject-related settings. Unlike many files used by Visual Studio 2005, the solution file is not an XML document. The format is VB in nature, as it stores information in blocks, as shown in the following example Solution file:
Microsoft Visual Studio Solution File, Format Version 9.00
# Visual Studio 2005 Project(“{F184B08F-C81C-45F6-A57F-5ABD9991F28F}”) = “FirstProject”,
“FirstProject\FirstProject.vbproj”, “{FD041258-F0D6-4A69-9426-1A40B52126D4}” EndProject
Global
GlobalSection(SolutionConfigurationPlatforms) = preSolution Debug|Any CPU = Debug|Any CPU
EndGlobalSection GlobalSection(ProjectConfigurationPlatforms) = postSolution
{FD041258-F0D6-4A69-9426-1A40B52126D4}.Debug|Any CPU.ActiveCfg = Debug|Any CPU {FD041258-F0D6-4A69-9426-1A40B52126D4}.Debug|Any CPU.Build.0 = Debug|Any CPU EndGlobalSection
GlobalSection(SolutionProperties) = preSolution HideSolutionNode = FALSE
EndGlobalSection EndGlobal
In this example, the solution consists of a single project, FirstProject, and a Global section outlining settings that apply to the solution. For instance, the solution will be hidden because the
HideSolutionNode setting is FALSE.
Solution Proper ties
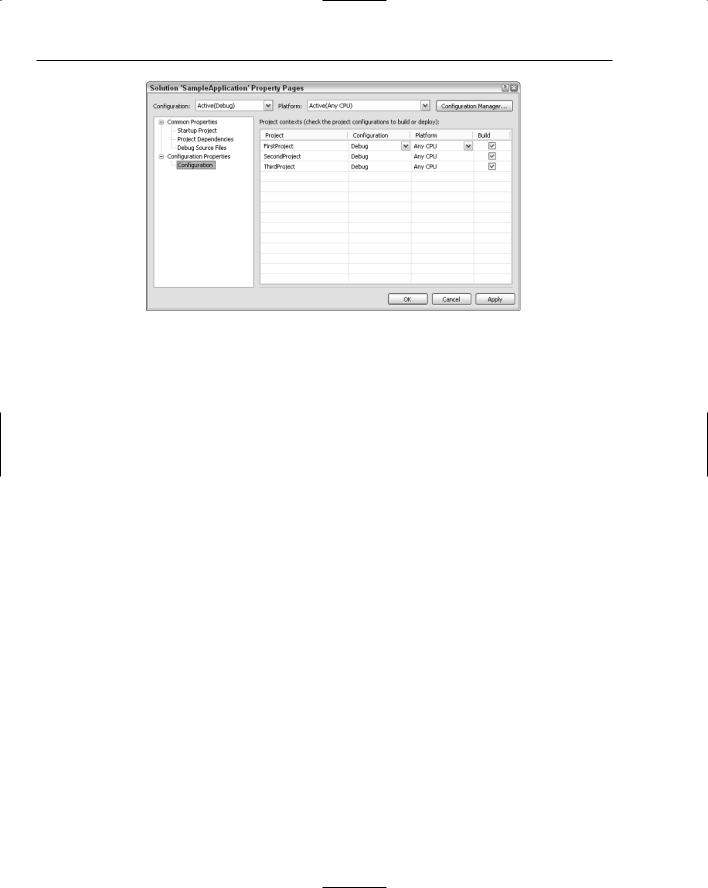
The solution Properties dialog can be reached by right-clicking on the Solution node in the Solution Explorer and selecting Properties. This dialog contains two nodes to partition Common and Configuration properties, as shown in Figure 7-2.
If your dialog is missing the Configuration Properties node, you need to check the Show Advanced Build configurations property in the Projects and Solutions node of the Options window, accessible from the Tools menu. Unfortunately, this property is not checked for some of the setting profiles — for example, the Visual Basic Developer profile. Checking this option not only displays this node, but also displays the configuration selection drop-down in the Project Settings window, discussed later in this chapter.
81
Chapter 7
Figure 7-2
The following sections describe the Common and Configuration properties nodes in more detail.
Common Properties
There are three options when defining the Startup Project for an application, and they are somewhat self-explanatory. Selecting Current Selection will start the project that has current focus in the Solution Explorer. Single Startup will ensure that the same project starts up each time. This is the default selection, as most applications have only a single startup project. The last option, Multiple Startup Projects, allows for multiple projects to be started in a particular order. This can be useful if you have a client/server application specified in a single solution and you want them both to be running. When running multiple projects, it is also relevant to control the order in which they start up. Use the up and down arrows next to the project list to control the order in which projects are started.
The Project Dependencies section is used to indicate other projects on which a specific project is dependent. For the most part, Visual Studio will manage this for you as you add and remove project references for a given project. However, sometimes you may want to create dependencies between projects to ensure that they are built in the correct order. Visual Studio uses its list of dependencies to determine the order in which projects should be built. This window prevents you from inadvertently adding circular references and from removing necessary project dependencies.
In the Debug Source Files section, you can provide a list of directories through which Visual Studio can search for source files when debugging. This is the default list that is searched prior to the Find Source dialog being displayed. You can also list source files that Visual Studio should not try to locate. If you click Cancel when prompted to locate a source file, the file will be added to this list.
Configuration Properties
Both projects and solutions have build configurations associated with them that determine which items are built and how. Somewhat confusing is that there is actually no correlation between a project configuration, which essentially determines how things are built, and a solution configuration, which deter-
82

Projects and Solutions
mines which projects are built, other than they might have the same name. A new solution will define both Debug and Release (solution) configurations, which correspond to building all projects within the solution in Debug or Release (project) configurations.
For example, a new solution configuration called Test can be created, which consists of two projects: MyClassLibrary and MyClassLibraryTest. When you build your application in Test configuration, you want MyClassLibary to be built in Release mode so you’re testing as close to what you would release as possible. However, in order to be able to step through your test code, you want to build the test project in Debug mode.
When you build in Release mode, you don’t want the Test solution to be built or deployed with your application. In this case, you can specify in the Test solution configuration that you want the MyClassLibrary project to be built in Release mode, and that the MyClassLibraryTest project should not be built.
Switching between configurations can be easily achieved via the Configuration drop-down on the standard toolbar. However, it is not as easy to switch between platforms, as the Platform drop-down is not on any of the toolbars. To make this available, select View Toolbars Customize. From the Build category on the Commands, the Solution Platforms item can be dragged onto a toolbar.
You will notice that when the Configuration Properties node is selected, the Configuration and Platform drop-down boxes are enabled. The Configuration drop-down contains each of the available solution configurations (Debug and Release by default), Active, and All. Similarly, the Platform drop-down contains each of the available platforms (Any CPU by default), Active, and All. Whenever these drop-downs appear and are enabled, you can specify the settings on that page on a per-configuration and/or perplatform basis. You can also use the Configuration Manager button to add additional solution configurations and/or platforms.
When adding additional solution configurations, there is an option (checked by default) to create corresponding project configurations for existing projects (projects will be set to build with this configuration by default for this new solution configuration), and the option to base the new configuration on an existing configuration. If the Create Project Configurations option is checked and the new configuration is based on an existing configuration, the new project configurations will copy the project configurations specified for the existing configuration.
The options available for creating new platform configurations are limited by the types of CPU available: Itanium, x86, and x64. Again, the new platform configuration can be based on existing configurations, and the option to create project platform configurations is also available.
The other thing you can specify in the solution configuration file is the type of CPU for which you are building. This is particularly relevant if you want to deploy to 64-bit architecture machines.
All these solution settings can be reached directly from the right-click context menu from the Solution node in the Solution Explorer window. While the Set Startup Projects menu item opens the solution configuration window, the Configuration Manager and Project Dependencies items open the Configuration Manager and Project Dependencies window. Interestingly, an additional option in the right-click context menu doesn’t appear in the solution configuration, the Build Order. When selected, this opens the Project Dependencies window, which lists the build order in a separate tab. This tab is not particularly useful, as build order is actually controlled by dependency order, but it can be used to double-check that projects are being built in the correct order.
83

Chapter 7
Project Types
Projects can be broadly classified into four categories. The first three appear as true projects within the Solution Explorer to the extent that they have a project file (for example, .vbproj or .csproj) that conforms to the MSBuild schema. The last project type is that of a web project (including web service projects). Due to the dynamic nature of web applications, significant effort has gone into making web applications less reliant on a project file. These project types do not necessarily correspond to the project templates that appear in the New Project dialog. Selecting a project template will create a new project, of a specific project type, and populate it with initial classes and settings. Following are the four project types:
Windows Application: A Windows Application project type creates an executable (.exe) assembly that runs without a console window being displayed. This includes both Windows Forms and Windows Service applications.
Class Library: As its name suggests, the Class Library project type creates an assembly that can easily be referenced by other projects. A class library reuses the familiar .dll extension.
Console Application: Similar to the Windows Application, the Console Application creates an executable (.exe). However, this type of project runs with a console displayed for output purposes.
Web Applications: As mentioned earlier, Web Applications no longer have a project file, as the dynamic compilation process enables the site to be updated without manually recompiling.
Project File Format
Visual Studio 2005 is the first IDE that uses the new build engine, MSBuild, which is controlled via an XML document. Each project file is now an XML document that conforms to the MSBuild schema (see
C:\WINDOWS\Microsoft.NET\Framework\v2.0.50727\MSBuild\Microsoft.Build.Core.xsd). To view the project file in XML format, right-click the project and select Unload. Then right-click the project again and select Edit <project name>. This will display the project file in the XML editor, complete with IntelliSense.
Project Proper ties
The project properties can be reached by either right-clicking on the Project node in Solution Explorer and then selecting Properties, or by double-clicking on My Project (Properties in C#) just under the Project node. In contrast to solution properties, the project properties do not display in a modal dialog. Instead they appear as an additional tab alongside your code files. This was done in part to make it easier to navigate between code files and project properties, but it also makes it possible to open project properties of multiple projects at the same time. Figure 7-3 illustrates the project settings for a project called FirstProject. This section walks you through the vertical tabs on the project editor for a VB.NET project. C# projects have a different layout and use different terms for the properties, but they still generate a build file that conforms to the MSBuild schema.
84

Projects and Solutions
Figure 7-3
The project properties editor contains a series of vertical tabs that group the properties. As changes are made to properties in the tabs, a star is added to the corresponding vertical tab. This functionality is limited, however, as it does not indicate which fields within the tab have been modified.
Application
The Application tab, visible in Figure 7-3, enables the developer to set the information about the assembly that will be created when the project is compiled. These include attributes such as the output type (i.e., Windows or Console Application, Class Library, Windows Service, or a Web Control Library), application icon, and startup object.
Assembly Information
Attributes that previously had to be configured by hand in the AssemblyInfo file contained in the project can also be set via the Assembly Information button. This information is important, as it shows up when an application is installed and when the properties of a file are viewed in Windows Explorer. Figure 7-4 shows the assembly information for a sample application.
Each of the properties set in the Assembly Information dialog is represented by an attribute that is applied to the assembly. This means that the assembly can be queried in code to retrieve this information. Alternatively, the My namespace (covered in Chapter 24) can be used to retrieve this information.
85