

Professional Visual Studio 2005 (2006) [eng]
.pdfChapter 7
Public Class RegistrySettingsProvider
Inherits SettingsProvider
‘’’ <summary>
‘’’ Get the settings for this application ‘’’ </summary>
Public Overrides Function GetPropertyValues( _
ByVal context As SettingsContext, _
ByVal collection As SettingsPropertyCollection) _ As SettingsPropertyValueCollection
Dim values As New SettingsPropertyValueCollection
For Each settingProperty As SettingsProperty In collection
Dim settingValue As New SettingsPropertyValue(settingProperty) settingValue.IsDirty = False
settingValue.SerializedValue = _ My.WebServices.Settings.GetPropertyValue(settingProperty.Name)
values.Add(settingValue)
Next
Return values End Function
‘’’ <summary>
‘’’ Update the settings that have changed. ‘’’ </summary>
Public Overrides Sub SetPropertyValues( _
ByVal context As SettingsContext, _
ByVal collection As SettingsPropertyValueCollection) For Each propertyValue As SettingsPropertyValue In collection
My.WebServices.Settings.SetPropertyValue( _ propertyValue.Name, _ propertyValue.SerializedValue)
Next End Sub
End Class
Summar y
In this chapter you have seen how a solution and projects can be configured using the new user interfaces provided within Visual Studio 2005. In particular, this chapter showed you how to do the following:
Configure application information
Control how an application is compiled, debugged, and deployed
Include resources and settings with an application
Enforce good coding practices
Extend the application using a custom settings provider
In subsequent chapters, some of these topics, such as ClickOnce deployment and the use of resource files, will be examined in more detail.
96

Source Control
There are many different methodologies for building software applications, and while the theories about team structure, work allocation, design, and testing often differ, the one point that they agree on is that there should be a single repository for all source code for an application. Source control is the process of storing source code (referred to as checking code in) and accessing it again (referred to as checking code out) for editing. When we refer to source code, we mean any resources, configuration files, code files, or even documentation that is required to build and deploy the application.
Source code repositories also vary in structure and interface. Basic repositories provide a limited interface through which files can be checked in and out. The storage mechanism can be as simple as a file share, and no history may be available. Yet this repository still has the advantage that all developers working on a project can access the same file, with no risk of changes being overwritten or lost. Most sophisticated repositories not only provide a rich interface for checking in and out, such as merging and other resolution options, they are also able to be used from within Visual Studio 2005 to manage the source code. Other functionality that a source control repository can provide includes versioning of files, branching, and remote access.
Most organizations start using a source control repository to provide a mechanism for sharing source code between participants in a project. Instead of developers having to manually copy code to and from a shared folder on a network, the repository can be queried to get the latest version of the source code. When a developer finishes his or her work, any changes can simply be checked in to the repository. This ensures that everyone in the team can access the latest code. Of course, having the source code checked into a single repository makes backing up the data easy.
One of the biggest benefits of using a source control repository comes from the history that it tracks of changes made to files. This is important for a number of reasons. Although most developers would like to think that they write perfect code, the reality is that quite often a change might break something else. Being able to review the history of changes made to a project makes it possible to identify which changes caused the breakage. Tracking changes to a project can also be used for reporting and reviewing purposes, as each change is date stamped and its author indicated.
Chapter 8
Selecting a Source Control Repositor y
Visual Studio 2005 does not ship with a source control repository, but it does include rich support for checking files in and out, as well as merging and reviewing changes. To make use of a repository from within Visual Studio 2005, it is necessary to specify which repository to use. Previous versions have exclusively used the SCC API, published by Microsoft, to allow third-party source control repositories to be accessed from within Visual Studio. Any source control repository that exposes its functionality through this API can be used within the Visual Studio environment. Visual Studio 2005 still supports this API, although it also supports an interface to Team Foundation.
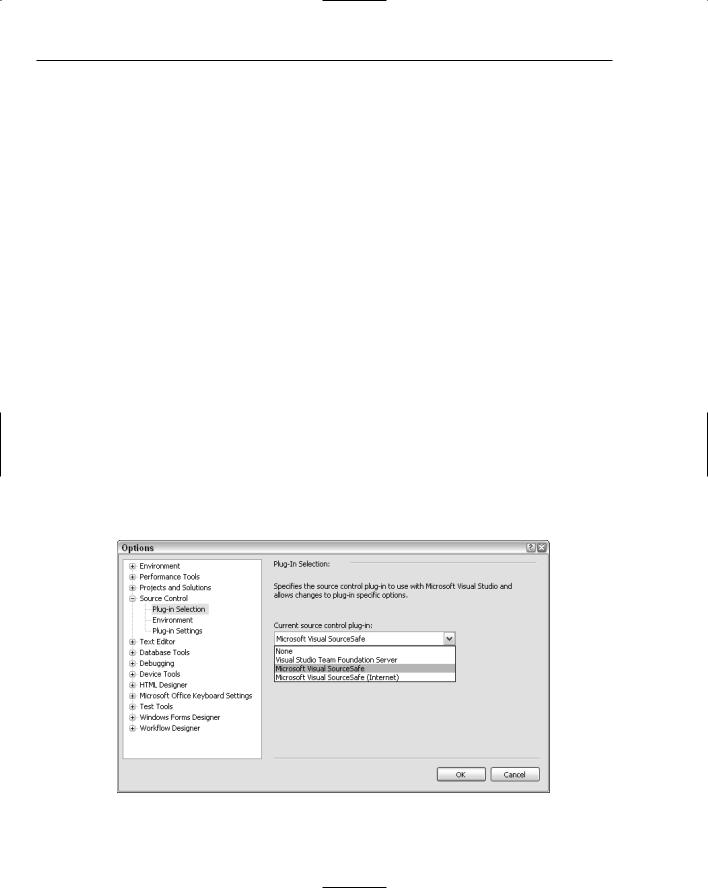
Feedback from customers using previous versions of Visual Studio has been focused around the need for a simpler and less cluttered IDE. To make Visual Studio 2005 easier to navigate and work with, functionality that is not used is removed from the menus. By default, Visual Studio 2005 does not display the source control menu item. In order to get this item to appear, you have to configure the source control provider information under the Options item on the Tools menu. The Options window, with the Source Control tab selected, is shown in Figure 8-1.
Initially, very few settings for source control appear. However, once a provider has been selected, additional nodes are added to the tree to control how source control behaves. It is worth noting that these options are specific to the source control provider that has been selected.
For the purposes of looking at source control within Visual Studio 2005, we will examine the integration of Visual SourceSafe. Later in the chapter we will cover the use of Team Foundation, as it offers a more comprehensive source control repository. As shown in Figure 8-1, there is also an Internet-based interface for Visual SourceSafe. This is a significant improvement in the latest version of SourceSafe that permits it to be used across a standard web interface.
Once a source control repository has been selected from the Plug-in menu, it is necessary to configure the repository for that machine. This includes specifying the path to the repository, the user with which to connect, and the settings to use when checking files in and out of the repository.
Figure 8-1
98
Source Control
Environment Settings
Most source control repositories define a series of settings that must be configured in order for Visual Studio 2005 to connect to and access information from the repository. These settings are usually unique to the repository, although some apply across most repositories.
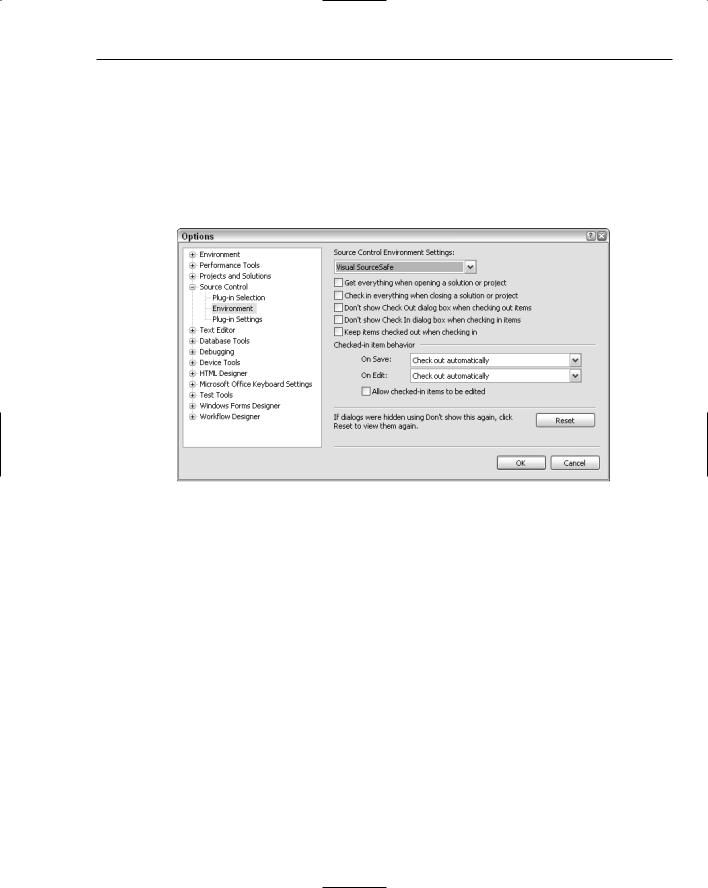
In Figure 8-2 the Environment tab is shown, illustrating the options that control when files are checked in and out of the repository. These options are available for most repositories. The drop-down menu at the top of the pane defines a couple of profiles, which provide suggestions for different types of developers.
Figure 8-2
Plug-In Settings
Most source control repositories need some additional settings in order for Visual Studio 2005 to connect to the repository. These are specified in the Plug-in Settings pane, which is customized for each repository. Some repositories, such as SourceSafe, do not require specific information regarding the location of the repository until a solution is added to source control. At that point, SourceSafe requests the location of an existing repository or enables the developer to create a new repository.
Accessing Source Control
This section walks through the process of adding a solution to a new Visual SourceSafe 2005 repository, although the same principles apply regardless of the repository chosen. This process can be applied to any new or existing solution that is not already under source control. We also assume here that not only is SourceSafe installed, it has been selected as the source control repository within Visual Studio 2005.
99

Chapter 8
Creating the Repository
The first step in placing a solution under source control is to create a repository in which to store the data. It is possible to place any number of solutions in the same repository, although this means that it is much harder to separate information pertaining to different projects. Furthermore, if a repository is corrupted, it may affect all solutions contained within that repository.
To begin the process of adding a solution to source control, navigate to the File menu and select Source Control Add Solution to Source Control, as shown in Figure 8-3.
Figure 8-3
If this is the first time you have accessed SourceSafe, this will open a dialog box that lists the available databases, which at this stage will be empty. Clicking the Add button will initiate the Add SourceSafe Database Wizard, which will step you through either referencing an existing database, perhaps on a server or elsewhere on your hard disk, or creating a new database.
To create a new SourceSafe database you need to specify a location for the database and a name. You will also have to specify the type of locking that is used when checking files in and out. Selecting the Lock- Modify-Unlock model allows only a single developer to check out a file at any point in time. This prevents two people from making changes to the same file at the same time, which makes the check-in process very simple. However, this model can often lead to frustration if multiple developers need to adjust the same resource. Project files are a common example of a resource that multiple developers may need to be able to access at the same time. In order to add or remove files from a project, this file must be checked out. Unless developers are diligent about checking the project file back in after they add a new file, this can significantly slow down a team.
An alternative model, Copy-Modify-Merge, allows multiple developers to check out the same file. Of course, when they are ready to check the file back in, there must be a process of reconciliation to ensure that their changes do not overwrite any changes made by another developer. Merging changes can be a difficult process and can easily result in loss of changes or a final code set that neither compiles nor runs.
100
Source Control
This model offers the luxury of allowing concurrent access to files, but suffers from the operational overhead during check in.
Adding the Solution
Once a SourceSafe repository has been created, the Add to SourceSafe dialog will appear, which prompts you for a location for your application and a name to give it in the repository. SourceSafe works very similarly to a network file share in that it creates folders under the root ($/) into which it places the files under source control. It doesn’t matter what location you specify within the repository. In the past it has been recommended practice to align the SourceSafe folder structure to the directory structure on your computer. With SourceSafe 2005, the issues that preceded this recommendation have been addressed, although many developers will continue to use this rule as it encourages the use of good directory and folder structures.
After specifying a name and location in the repository, SourceSafe will proceed to add each file belonging to the solution into the source control repository. This initiates the process of tracking changes for these files.
Solution Explorer
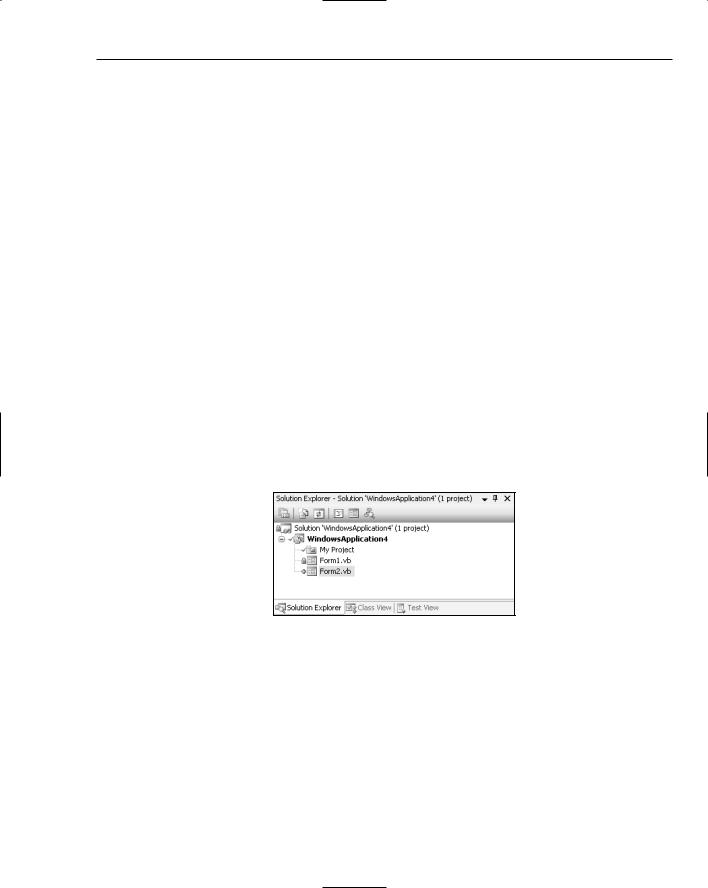
The first difference that you will see after adding your solution to source control is that Visual Studio 2005 adjusts the icons within the Solution Explorer to indicate their source control status. Figure 8-4 illustrates three file states. When the solution is initially added to the source control repository, the files all appear with a little padlock icon next to the file type icon. This indicates that the file has been checked in and is not currently checked out by anyone. For example, the Solution file and Form1.vb have this icon.
Figure 8-4
Once a solution is under source control, all changes are recorded. This includes when files are added and removed. Figure 8-4 illustrates the addition of Form2.vb to the solution. At the point this screen capture was taken, Form2.vb had been added to the solution, but this change was not yet updated in the repository. This is illustrated first by the plus sign next to Form2.vb, indicating that this is a new file, and second by the tick next to the WindowsApplication4 project (which includes the My Project node). The tick signifies that the file is currently checked out. In the rare case that two people have the same file checked out, this will be indicated with a double tick next to the appropriate item.
101
Chapter 8
Checking In and Out
Files can be checked in and out using the right-click shortcut menu associated with an item in the Solution Explorer. When a solution is under source control, this menu expands to include the items shown on the left in Figure 8-5.
Figure 8-5
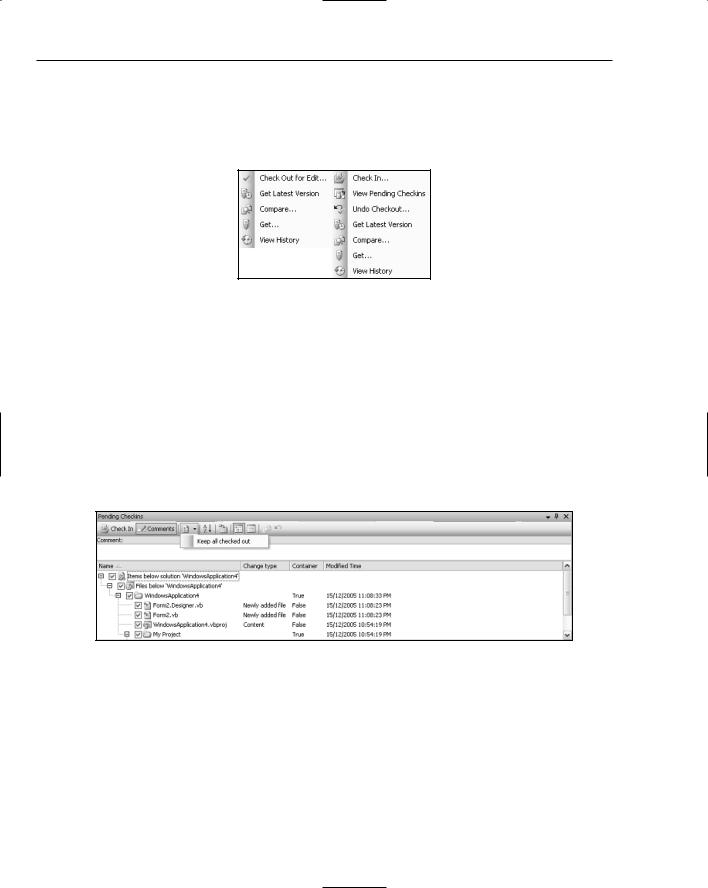
Prior to editing a file, it needs to be checked out. This can be done using the Check Out for Edit menu item. Once a file is checked out, the shortcut menu expands to include additional options, including Check In, View Pending Checkins, Undo Checkout, and more, as shown on the right in Figure 8-5.
Pending Changes
In a large application it can often be difficult to see at a glance which files have been checked out for editing, or recently added or removed from a project. The Pending Checkins window, shown in Figure 8-6, is very useful for seeing which files are waiting to be checked into the repository. It also provides a space into which a comment can be added. This comment is attached to the files when they are checked into the repository so that the reason for the change(s) can be reviewed at a later date.
Figure 8-6
To check a file back in, ensure that there is a check against the file in the list, add an appropriate comment in the space provided, and then select the Check In button. Depending on the options you have specified, you may also receive a confirmation dialog prior to the items being checked in.
One option that many developers prefer is to set Visual Studio to automatically check a file out when it is edited. This saves the often unnecessary step of having to check the file out prior to editing. However, it can result in files being checked out prematurely if a developer accidentally makes a change in the wrong file. Alternatively, a developer may decide that changes made previously are no longer required and wish to revert back to what is contained in the repository. The last button on the toolbar contained
102
Source Control
within the Pending Checkins window is an Undo Checkout button. This will retrieve the current version from the repository, in the process overwriting changes made by the developer. This option is also available via the right-click shortcut menu.
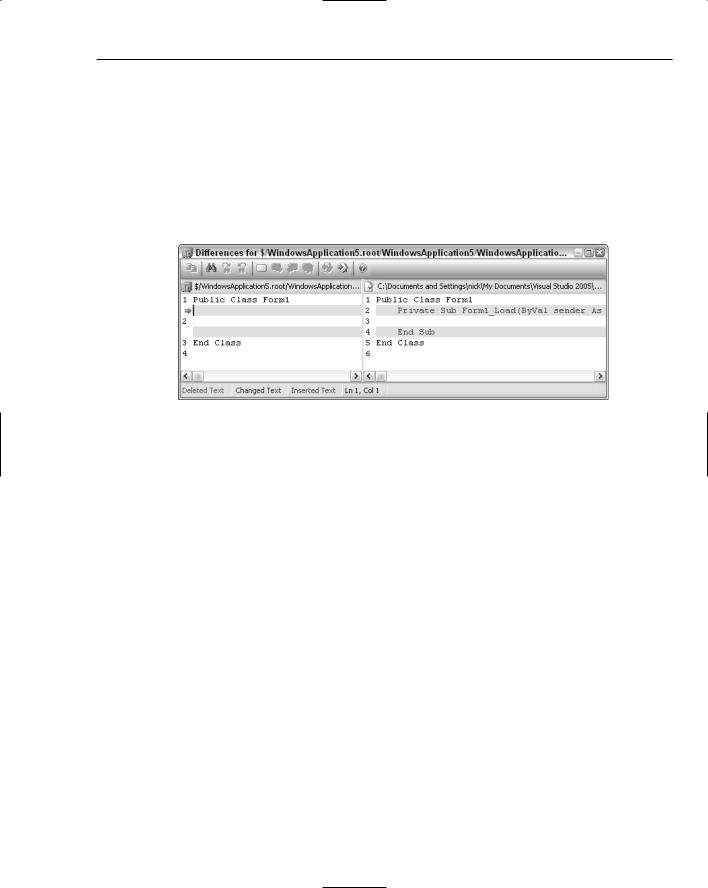
Prior to checking a file into the repository, it is a good idea for someone to review any changes that have been made. In fact, some organizations have a policy requiring that all changes be reviewed prior to being checked in. Selecting the Compare Versions menu item brings up an interface that highlights any differences between two versions of a file. Figure 8-7 shows that a Form Load event handler has been added to Form1.vb. Although not evident in Figure 8-7, these lines are marked in green. Red and blue lines indicate deleted and changed lines.
Figure 8-7
As source files can often get quite large, this window provides some basic navigation shortcuts. The Find option can be used to locate particular strings. Bookmarks can be placed to ease navigation forward and backward within a file. The most useful shortcuts are the Next and Previous difference buttons. These enable the developer to navigate through the differences without having to manually scroll up and down the file.
Merging Changes
Occasionally, changes might be made to the same file by multiple developers. In some cases these changes can be easily resolved if they are unrelated, such as adding methods to an existing class. However, when changes are made to the same portion of the file, there needs to be a process by which the changes can be mediated to determine the correct code.
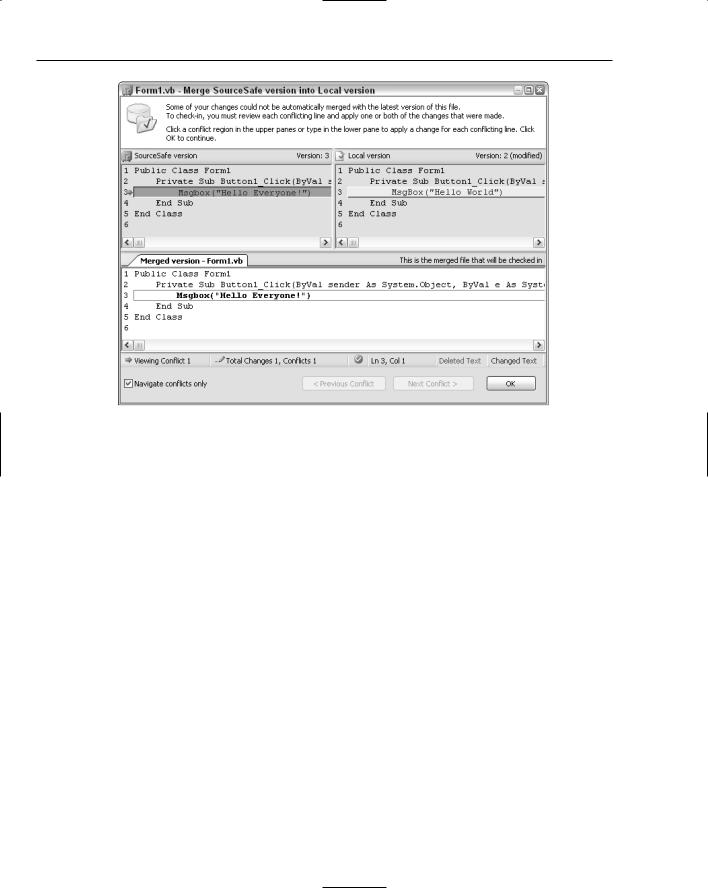
Figure 8-8 illustrates the Merge dialog that is presented to developers when they attempt to check in a file that has been modified by another developer. The top half of the dialog shows the two versions of the file that are in conflict. Each pane indicates where that file differs from the original file that the developer checked out, which appears in the lower half of the screen. In this case, both versions had a message box inserted, and it is up to the developer to determine which of the messages is correct.
Unlike the Compare Versions dialog, the Merge dialog has been designed to facilitate developer interaction. From the top panes, changes made in either version can be accepted or rejected by simply clicking on the change. The highlighting changes to indicate that a change has been accepted, and that piece of code is inserted into the appropriate place in the code presented in the lower pane. The lower pane also allows the developer to enter code, although it does not support IntelliSense or error detection.
103
Chapter 8
Figure 8-8
Once the conflicts have been resolved, clicking the OK button will ensure that the correct version is checked into the repository.
History
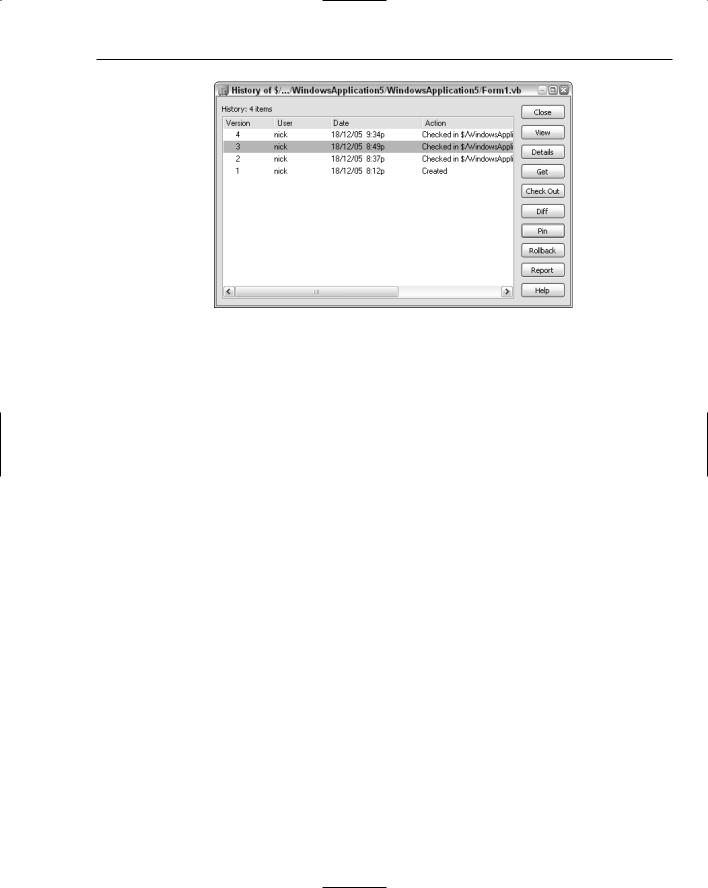
As a file is checked in and out of the SourceSafe repository, a history is recorded of each version of the file. Use the View History option on the right-click shortcut menu from the Solution Explorer to review this history. Figure 8-9 shows a brief history of a file that had three revisions checked in. This dialog enables developers to view previous versions, look at details (such as the comments), get the particular version (overwriting the current file), and check out the file. Additional functionality is provided to compare different versions of the file, pin a particular version, roll the file back to a previous version (which will erase newer versions), and report on the version history.
Pinning
The History window (refer to Figure 8-9) can be used to pin a version of the file. Pinning a version of a file makes that version the current version. When a developer gets the current source code from the repository, the pinned version is returned. Pinning a version of a file also prevents anyone from checking that file out. This can be useful if changes that have been checked are incomplete or are causing errors in the application. A previous version of the file can be pinned to ensure that other developers can continue to work while the problem is resolved.
104
Source Control
Figure 8-9
Source Control with Team Foundation
In early 2006, Microsoft will release Team Foundation Server, a server product that will support .NET developers through the provision of a project management solution. This product will include functionality such as work item tracking, build and test management, and a brand-new source control repository. Unlike SourceSafe, this product does not use the SCC API. Instead, in order to access the services exposed by the server, the Team Explorer plug-in needs to be installed for Visual Studio 2005. Once installed, the Visual Studio Team Foundation Server appears in the list of source control plug-ins. The settings exposed through the Options dialog are limited to providing the address of a proxy server and controlling whether deleted items are displayed in the list of files under source control.
The Team Foundation plug-in adds a number of windows and menu items that support the management of a software development process. Many of these fall outside the scope of this chapter and are covered in more detail in Chapter 56. Much of the source control interface is similar to that exposed by Visual SourceSafe. This section covers the additional functionality that Team Foundation provides over and above that provided by SourceSafe.
Source Control Explorer
The main addition to Visual Studio is the Source Control Explorer, shown in Figure 8-10, which can be found by selecting View Other Windows. This window shows an interface similar to Windows Explorer, with a Folders list on the left and a file list on the right side. The Source Location drop-down box enables the developer to navigate between Team Foundation Servers.
105