

Professional Visual Studio 2005 (2006) [eng]
.pdfChapter 11
menus, a toolbar at the top of the interface, a tabbed tool window docked by default to the left side of the main window, and a primary workspace that displays the documents you’re working in, as well as the Search pane.
The phrase “tool window” was not used by accident in the previous paragraph. The pane on the left side of Figure 11-1 works in exactly the same way as the tool windows of Visual Studio 2005 itself. In fact, it’s actually three tool windows: the Contents, Index, and Help Favorites tool windows. Each window can be repositioned independently — to float over the main interface, or be docked to any side of the Document Explorer user interface. The tool windows can be made to share the same space, as they do by default, or be docked above, below, or alongside each other, as the example in Figure 11-3 illustrates.
The help system can be used in a similar fashion to previous versions of Help. Utilizing the Contents tool window, you can browse through the hierarchy of topics until you locate the information you’re seeking. Alternatively, the Index window gives you direct access to the full index generated by the currently compiled local documentation. Finally, just as in previous versions, a particular topic contains multiple hyperlinks to other parts of the documentation that are related to the given topic.
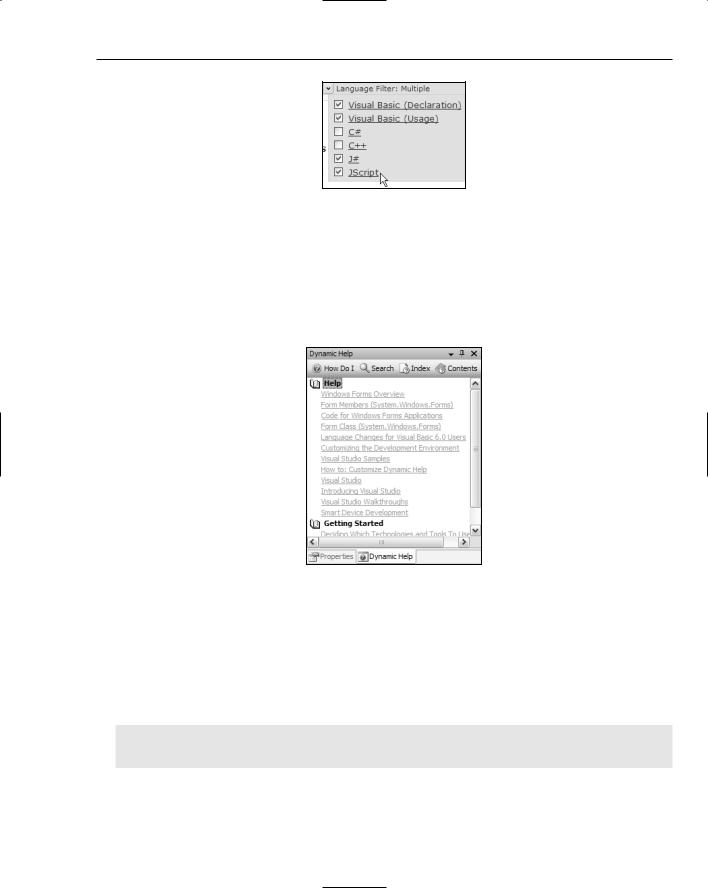
In addition to these traditional means of navigation, the Document Explorer also has a bar at the top of most help topics that provides other commands. Figure 11-1 illustrates this with the Class Statement topic; directly underneath the heading are two direct hotlinks to sections of the current topic, and two functions that can collapse the information or filter it based on a particular language, respectively.
Figure 11-4 shows the latter feature, Language Filter, in action. When the mouse pointer is placed over the Language Filter label, a drop-down list appears with the main Microsoft languages. If you know that the information you want to view is not related to specific languages, you can switch them off by unchecking their respective boxes.
Figure 11-3
146
Help and Research
Figure 11-4
Dynamic Help
The only help-related command in the Help menu that does not display the Document Explorer interface is Dynamic Help. Using this command will display the Dynamic Help tool window, shown in Figure 11-5. By default, this window shares space with the Properties tool window, but it can be repositioned just like any other part of the Visual Studio IDE.
Figure 11-5
The Dynamic Help window contents are constantly updated based on the context in which you are working. This feature works regardless of what mode you’re working under, so contextually it updates when you’re working in Design or Class Diagram modes, changing as you select or add controls or classes.
However, the Dynamic Help window works most effectively when you’re writing code. For instance, a simple class definition with one empty function will produce up to a dozen different sets of help information in the Dynamic Help window. To test this out yourself, create a class module and insert the following code:
Public Class Form1
Public Function x() As Boolean
147

Chapter 11
Return False
End Function
End Class
Position the cursor at the start of the keyword Public and simply scroll through the code by pressing the right arrow key. As the cursor moves from Public to Class to Form1, you’ll see the Dynamic Help window contents changing. Keep moving the cursor and you’ll see the list change for the keywords
Function, Boolean, Return, and even False and End.
Each of the links in the list will open the Document Explorer at the specific topic.
Using the Dynamic Help tool window has always been very CPU-intensive. With Visual Studio 2005, the performance of this window has noticeably improved but it can still adversely affect machines that only barely meet the system requirements of Visual Studio 2005.
The Search Window
While these small features of the help system are appreciated, the real advance made in the help engine is the Search window. Figure 11-6 shows the Search window in its default state, with the local help documentation selected and abstracts for each topic result displayed.
Enter the search terms in the top text field and click the Search button. If you wish, you can filter the results before you perform the search, or afterward, or change the way the results will be sorted (both techniques are discussed in a moment).
The search engine starts searching all four main categories of documentation — the local help, MSDN Online, the community of developer web sites approved through Codezone, and the Question database. As it receives information from each group, the corresponding tab is populated with the number of results and the headings of the first three topics. In addition, the main area of the Search results window is populated with the topics that met the criteria, with a heading and brief abstract showing you the first chunk of documentation that will be found in the topic.
As well as these two items, depending on the category you’re viewing, you’ll find a footer line containing extra information. Figure 11-6 shows the footer information for local documentation searches — language information and documentation source — but MSDN Online and Codezone Community categories will display a rating value, while the Questions results will feature author and date information as well as the rating and source values.
To view a topic that met the search terms, locate it in the results list and click the heading, which is a hyperlink (or double-click anywhere in the abstract area). This will open a new tab if the Search tab is the only one open, or reuse the most recently accessed tab if other documents are already being viewed. To force the Document Explorer to open the topic in a new tab, right-click it and select the Open in New Window command.
148

Help and Research
Figure 11-6
Sorting Results
Results can be sorted in a few different ways. Click the drop-down arrow in the Sort by list to choose from multiple options for sorting the results (see Figure 11-7). By default, results are sorted by rank, which tries to determine the most likely search result that you were looking for by comparing the number of times the search terms were found. If there are multiple terms, then results containing all of them will appear before results that only contain one.
Figure 11-7
149
Chapter 11
The full list of sort options is itself filtered by the context of your search. For instance, if you’re searching the local documentation, then several sort options, such as Rating and Author, are not available. The full list of sort options is shown in the following table:
Sort by |
Effect |
Rank |
A calculated value based on how many search terms are found and how |
|
many hits for each, as well as the importance of the hit. For example, a |
|
search term found in a heading may be considered more important than |
|
one in a footnote or a See Also section. |
Source |
Sorts the results based on the set of documentation the topic comes from |
Contains Code |
Tries to determine whether each topic contains code or not |
Title |
Sorts based on the heading |
Locale |
The locale of the topic. Mostly these are English-U.S., but especially |
|
when you view topics online you may find other locales. |
Rating |
For online searches, you can sort the results based on ratings given to |
|
them by other users. |
Author |
Sorts results by their author |
Topic Date |
Sorts the results into date order |
|
|
Filtering Results
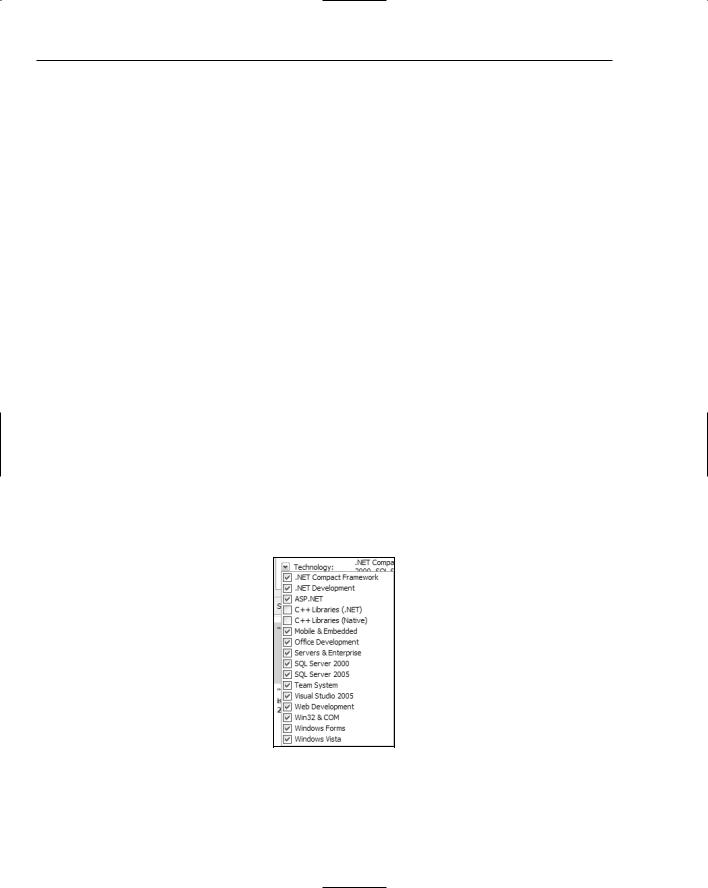
In addition to sorting the results, you can also filter them based on particular technologies. Figure 11-8 shows the extensive list from which you can choose when filtering the search results. This list is incredibly useful when you know the information you need is only related to specific technologies, enabling you to avoid false positives when you search.
Figure 11-8
150
Help and Research
Keeping Favorites
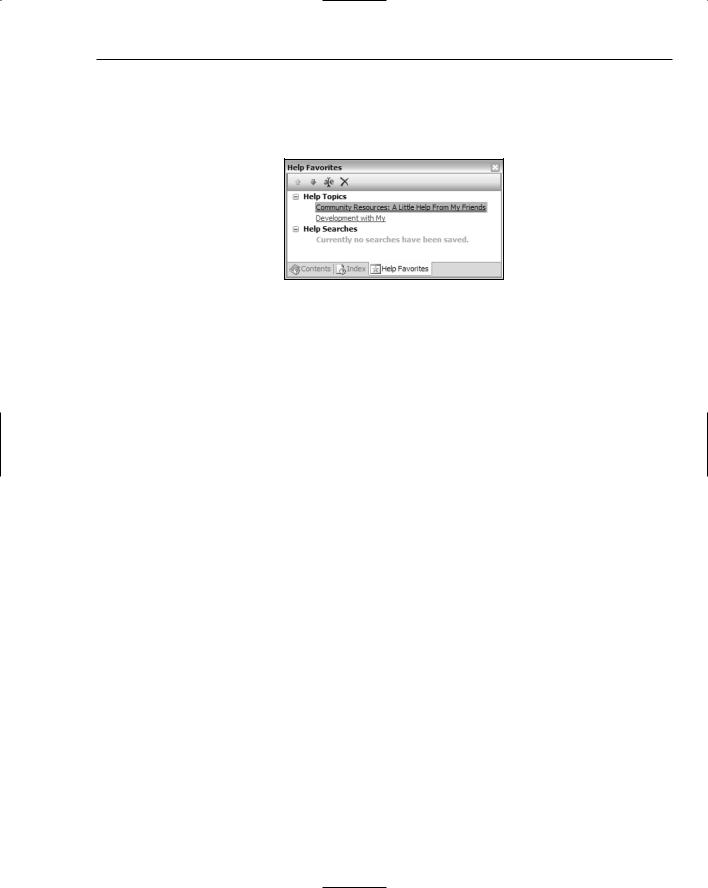
There will be times when you find topics that you want to keep for later review. The Document Explorer includes a Help Favorites tool window (shown in Figure 11-9) that enables you to do just that.
Figure 11-9
To add topics to the Help Favorites window, right-click on the result in the search results window and select the Add to Help Favorites command from the context menu. This menu is also available when you’re viewing the actual topic, or you can access the command from the toolbar as well.
The Document Explorer also enables you to save common searches, as evidenced by the appropriately named Help Searches section (refer to Figure 11-9). To add a search, click the Save Search button on the toolbar.
From the Help Favorites list, you can rename both topics and searches by right-clicking the entry and choosing Rename or clicking the Rename command on the Help Favorites toolbar. This can be useful for excessively long headings or some of those esoterically named topics sometimes found in MSDN documentation.
Customizing Help
Just as with Visual Studio 2005, you can customize the way the help system works through a number of options. Rather than go through each one here, this section provides a summary of the options you may want to take a closer look at.
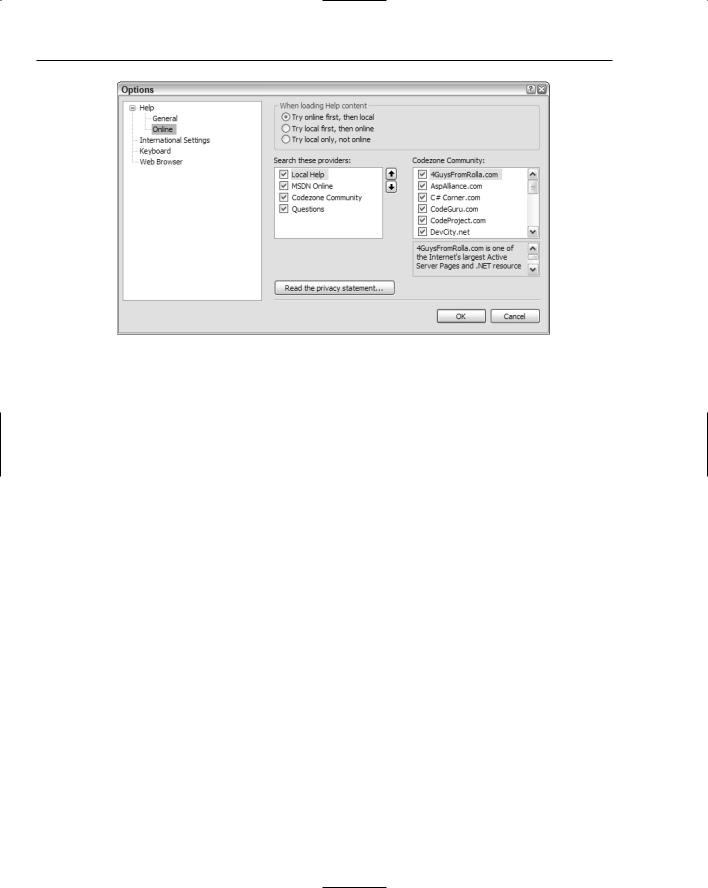
By default, the help system will look online for results and the contents of topics you’re trying to look up. Only if it cannot find the results in the online system (or cannot contact the online documentation) does the Document Explorer try the local, offline version. The advantage of this is that you’ll always have the most up-to-date information — a godsend for programmers who work with modern tools and find themselves frustrated with outdated documentation.
However, if you have a slow or intermittent Internet connection, you may want to change this option to use the local version of the documentation first, or even to not search the online documentation at all. Both of these options are available from the Online group in the Options window (see Figure 11-10). You can also filter the Codezone Community groups down to only the sites you prefer.
151
Chapter 11
Figure 11-10
The other main options group you may want to take a look at is the Keyboard group. This should be immediately familiar to you because it is a direct clone of the Keyboard group of options in Visual Studio 2005. It enables you to set keyboard shortcuts for any commands that can be performed in the Document Explorer, which can be useful for actions you want to perform often that may be difficult to access. For instance, adding documentation topics to the Help Favorites window (View AddToHelpFavorites) and saving commonly used searches to the same window (Help SaveSearch) are actions to which you can assign keyboard shortcuts.
Ask a Question
The final aspect of the help system that’s worth mentioning is the Ask a Question command. This is accessed via the Ask a Question button on the toolbar and redirects you to the main Microsoft Community Forums. From here you can perform searches against questions and answers others have submitted in a plain English format. The results are presented in a similar way to the Document Explorer, as shown in Figure 11-11. You may also choose to browse general groups of questions via the right-hand pane of the window.
152

Help and Research
Figure 11-11
Summar y
The new Document Explorer is a powerful interface to the documentation that comes with Visual Studio 2005. While it has some new features, the general presentation should be immediately familiar, so you can very easily get accustomed to researching your topics of interest. The ability to easily switch between online and local documentation ensures that you can balance the speed of offline searches with the up-to-date information found on the web; and the abstract paragraphs that are shown in all search results, regardless of their location, helps reduce the number of times you might click on a false positive.
All in all, the help and research engine for Visual Studio 2005 is more powerful than any other documentation system provided with Microsoft development tools. Of course, while getting help on the built-in functionality and features of Visual Studio 2005 is handy, it can be just as vital to keep track of your own applications and classes. The next chapter explains the Visual Studio 2005 XML comments system that enables you to create your own documentation.
153


XML Comments
Documentation is a critical, and often overlooked or abused, feature of the development process. Without documentation, other programmers, code reviewers, and management have a more difficult time analyzing the purpose and implementation of code. You can even have problems with your own code once it becomes complex, and having good internal documentation can aid in the development process.
XML comments are a way of providing that internal documentation for your code without having to go through the process of manually creating and maintaining documents. Instead, as you write your code, you include metadata at the top of every definition to explain what it is for, and let Visual Studio do the rest. Once the information has been included in your code, it can be consumed by Visual Studio in a variety of ways, such as providing additional IntelliSense information, or comprehensive documentation on an application solution.
What Are XML Comments?
XML comments are specialized comments that you include in your code listings. When the project goes through the build process, Visual Studio can optionally include a step to generate an XML file based on these comments to provide information about user-defined types such as classes and individual members of a class (user defined or not), including events, functions, and properties.
XML comments can contain any combination of XML and HTML tags, but Visual Studio will perform special processing on a particular set of predefined tags, as you’ll see throughout the bulk of this chapter. Any other tags will be included in the generated documentation file as is.
In previous versions of Visual Studio, XML comments were available for C# only, leaving Visual Basic (and other languages) without an efficient way of producing documentation. Visual Studio 2005 rectifies this oversight for Visual Basic, with the two main Microsoft languages using very similar syntax.