

Professional Visual Studio 2005 (2006) [eng]
.pdfChapter 12
‘’’ <c>True</c> which indicates that the routine was executed successfully, ‘’’ or <c>False</c> which indicates that the routine functionality failed. ‘’’ </returns>
Public Function MyFunction() As Boolean ‘...code...
Return False End Function
The <see> Tag
You can add references to other items in the project using the <see> tag. Like some of the other tags already discussed, the <see> tag requires a cref attribute with a value equal to an existing member, whether it is a property or method definition. The XML processor will produce a warning if a member does not exist. The <see> tag is used inline with other areas of the documentation such as <summary> or <remarks>. The syntax is as follows:
<see cref=”memberName” />
When Visual Studio processes the <see> tag it produces a fully qualified address that can then be used as the basis for a link in the documentation when transformed via style sheets. For example, referring to an application with a form containing a property named MyName would result in the following cref value:
<see cref=”P:applicationName.formName.CheckUser”/>
The following example uses the <see> tag in a Visual Basic code listing to provide a link to another function called CheckUser. If this function does not exist, Visual Studio will use IntelliSense to display a warning and add it to the Error List:
‘’’ <param name=”MyName”>The name of the user to log in.</param>
‘’’ <param name=”MyPassword”>The password of the user to log in.</param> ‘’’ <returns><c>True</c> if login attempt was successful, otherwise returns ‘’’ <c>False</c>.</returns>
‘’’ <remarks>
‘’’ Use <see cref=”CheckUser” /> to verify that the user exists ‘’’ before calling LoginProc.
‘’’ </remarks>
Public Function LoginProc(ByVal MyName As String, ByVal MyPassword As String) _ As Boolean
‘...code...
Return False End Function
The <seealso> Tag
The <seealso> tag is used to generate a separate section containing information about related topics within the documentation. Rather than being inline like <see>, the <seealso> tags are defined outside the other XML comment blocks, with each instance of <seealso> requiring a cref attribute containing the name of the member to which to link. The full syntax appears like so:
<seealso cref=”memberName” />
166
XML Comments
Modifying the previous example, the next listing shows how the <seealso> tag can be implemented in Visual Basic code:
‘’’ <param name=”MyName”>The name of the user to log in.</param>
‘’’ <param name=”MyPassword”>The password of the user to log in.</param> ‘’’ <returns><c>True</c> if login attempt was successful, otherwise returns ‘’’ <c>False</c>.</returns>
‘’’ <remarks>
‘’’ Use <see cref=”CheckUser” /> to verify that the user exists ‘’’ before calling LoginProc.
‘’’ </remarks>
‘’’ <seealso cref=”MyName” />
‘’’ <seealso cref=”MyPassword” />
Public Function LoginProc(ByVal MyName As String, ByVal MyPassword As String) _ As Boolean
‘...code...
Return False End Function
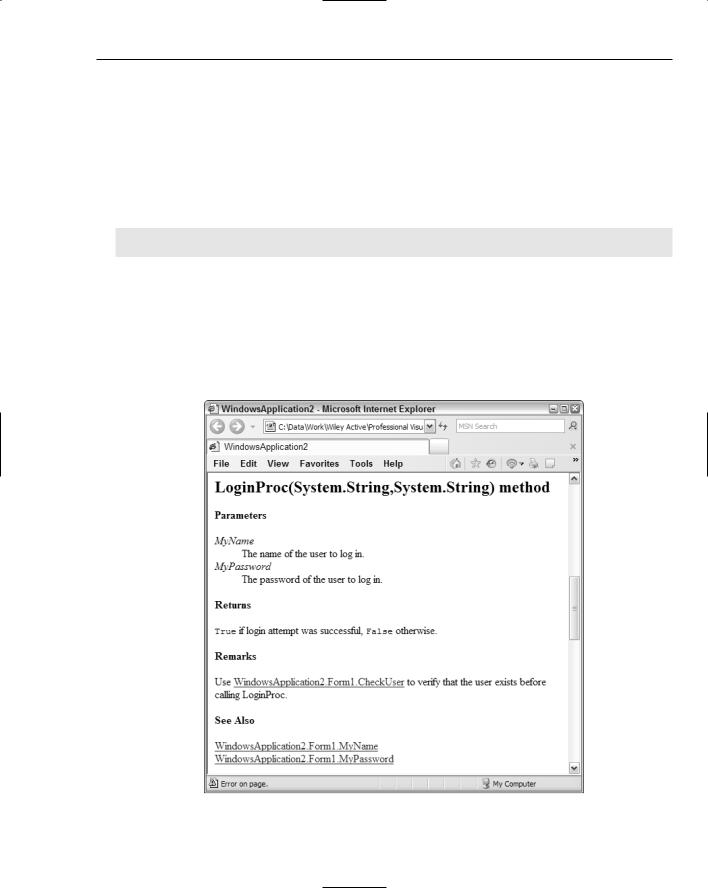
The result of this XML comment block transformed with a simple XSL file appears in Figure 12-7. Notice how the links for the <see> and <seealso> tags are formatted as hyperlinks and contain the full address to the specific member topic.
Figure 12-7
167

Chapter 12
The <summary> Tag
The <summary> tag is used to provide the brief description that appears at the top of a specific topic in the documentation. In addition, the <summary> area is used for Visual Studio’s IntelliSense engine when using your own custom-built code. The syntax to implement <summary> is as follows:
<summary>
Text goes here. </summary>
The <typeparam> Tag
New to Visual Studio 2005, the <typeparam> tag provides information about the type parameters when dealing with a generic type or member definition. The <typeparam> tag expects an attribute of name containing the type parameter being referred to:
<typeparam name=”typeName”> Description.
</typeparam>
You may use <typeparam> in either C# or Visual Basic, as the following listing shows:
‘’’ <typeparam name=”T”>
‘’’ Base item type (must implement IComparable). ‘’’ </typeparam>
Public Class myList(Of T As IComparable) ‘ code.
End Class
The <value> Tag
Normally used to define a property’s purpose, the <value> tag gives you another section in the XML where you can provide information about the associated member. When used in conjunction with a property, you would normally use the <summary> tag to describe what the property is for, whereas the <value> tag is used specifically to name what the property contains:
<value>The text to display</value>
Using XML Comments
Once you have the XML comments inline with your code, you’ll most likely want to generate an XML file containing the documentation. In Visual Basic this setting is on by default, with an output path and filename specified with default values. However, C# has the option turned off as its default behavior, so if you want documentation you’ll need to turn it on manually.
To ensure that your documentation is being generated where you require, open the property pages for the project through the Solution Explorer’s right-click context menu. Locate the project for which you want documentation, right-click its entry in the Solution Explorer, and select Properties. Alternatively, in Visual Basic you can simply double-click the My Project entry in the Solution Explorer.
168
XML Comments
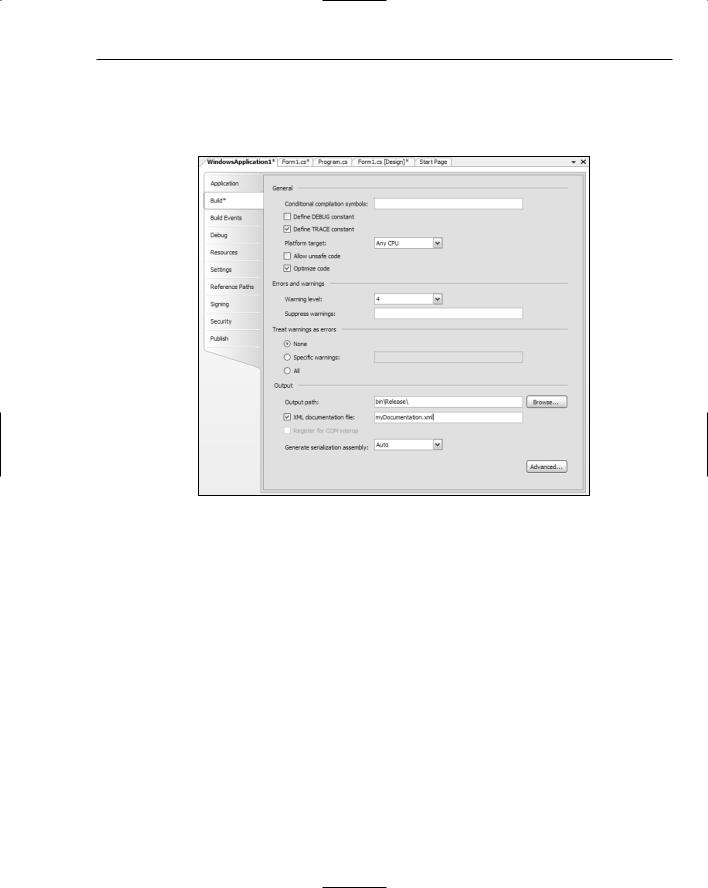
The XML documentation options are located in the Build section (see Figure 12-8). Below the general build options is an Output section containing a checkbox to generate the XML documentation file. When this checkbox is enabled, the text field next to it becomes available for you to specify the filename for the XML file that will be generated.
Figure 12-8
Once you’ve saved these options, the next time you perform a build, Visual Studio will add the /doc compiler option to the process so that the XML documentation is generated as specified.
The XML file that is generated will contain a full XML document that you can apply XSL transformations against, or process through another application using the XML Document Object Model. All references to exceptions, parameters, methods, and other “see also” links will be included as fully addressed information, including namespace, application, and class data.
IntelliSense Information
The other useful advantage of using XML comments is how Visual Studio 2005 consumes them in its own IntelliSense engine. As soon as you define the documentation tags that Visual Studio understands, it will generate the information into its IntelliSense, which means you can refer to the information elsewhere in your code.
IntelliSense can be accessed in two ways. If the member referred to is within the same project or is in another project within the same solution, you can access the information without having to build or generate the XML file. However, you can still take advantage of IntelliSense even when the project is external to your current application solution.
169

Chapter 12
The trick is to ensure that when the XML file is generated by the build process, it must have the same name as the .NET assembly being built. For example, if the compiled output is myApplication.exe, then the associated XML file should be named myApplication.xml. In addition, this generated XML file should be in the same folder as the compiled assembly so that Visual Studio can locate it.
Summar y
XML comments are not only extremely powerful, but also very easy to implement in a development project. Using them will enable you to generate comprehensive internal documentation for every member and class within your development solutions, as well as enhance the existing IntelliSense features by including your own custom-built tooltips and Quick Info data.
170

Control and
Document Outline
Sometimes your application source code is a little overwhelming to review and find exactly what you’re looking for. Very large programs often have many modules containing just as many if not more classes, while forms can have upwards of hundreds of components on the form layout.
When Visual Studio .NET first arrived on the scene, a feature known as document outlining came to at least partially save the day. This chapter introduces the Document Outline window and demonstrates how effective it can be at managing both source and design files.
Document Outline
The primary purpose of the Document Outline window was to present a navigable view of HTML pages so that you could easily locate the different HTML elements and the containers they were in. Because it was difficult to get HTML layouts correct, especially with the many .NET components that could be included on an ASP.NET page, the Document Outline view provided a handy way to find the correct position to place a specific component.
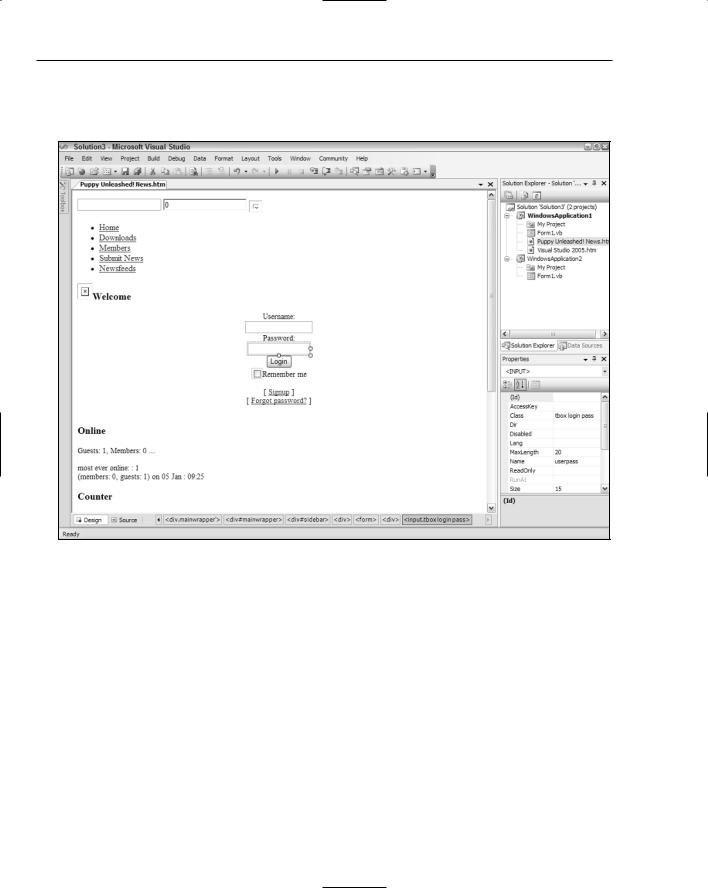
Figure 13-1 shows a typical HTML page with standard tags used in most web pages. DIV, TABLE, and other tags are used to define layout, while a FORM tag, along with its subordinate components for a login form, are also displayed.
Without the Document Outline window, the only way to determine the hierarchical position of a particular component is to select it and examine the bottom of the workspace area. Beside the Design and Source buttons is an area populated with the current hierarchy for the selected component. In the example shown in Figure 13-1, you can see that the selected item is an INPUT tag with a class of tbox login pass. In the current case, this helps locate the component, as that class value is unique, but a more logical property would be the ID or Name property so that you could be sure you had the correct HTML element.
Chapter 13
As you click on each component, you can see where it sits in the HTML page’s structure, but that’s pretty much all the help you’re going to have without something new added to the IDE, and that’s where the Document Outline window comes into the picture.
Figure 13-1
The Document Outline window presents that same information about the HTML page but does so exhaustively and with a much more intuitive interface. To use it, you must first have Visual Studio 2005 to display the tool window, which by default is docked to the left-hand side of the main IDE window. To do this, select View Other Windows Document Outline, or use the Ctrl+Alt+T keyboard shortcut.
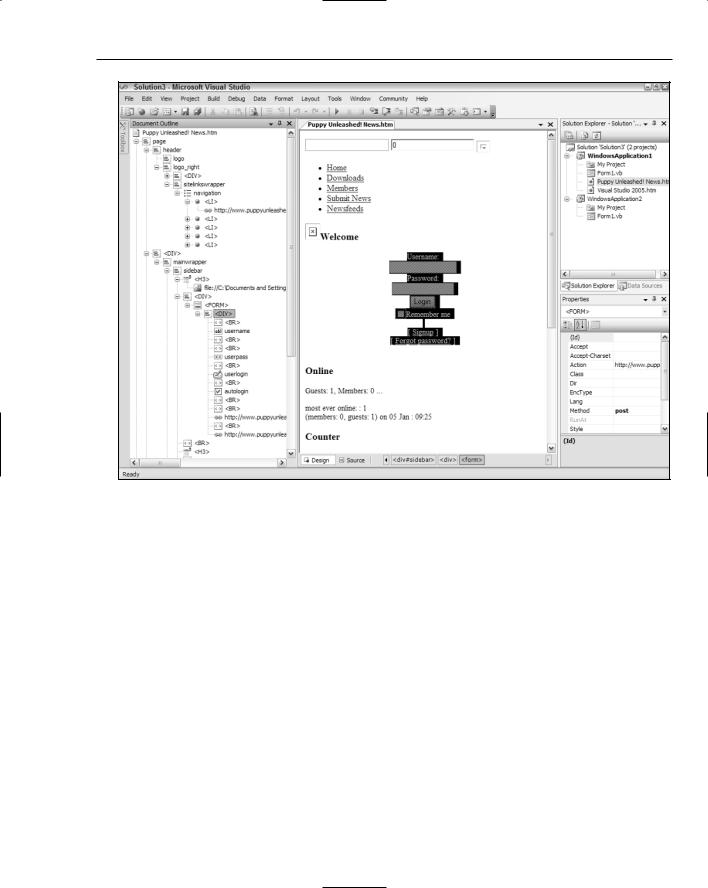
When the Document Outline window is displayed, Visual Studio analyzes the content of the current active file and populates it with a tree view containing every element and its containers. Figure 13-2 shows the Document Outline view of the same HTML file shown in Figure 13-1. This time, the Name or ID value of each element is used to identify the component, while unnamed components are simply listed with their HTML tag. The password field selected above can be seen in the tree with its name userpass and an icon indicating that not only is it a form text entry field, but also that it is a password field — a lot more information!
As you select each entry in the Document Outline window, the Design view is updated to select the component and its children. In Figure 13-2, the DIV tag containing the login form’s contents is selected, and it and all its contained HTML tags are highlighted in the Design view, giving you instant feedback as to what is included in that DIV area.
172
Control and Document Outline
Figure 13-2
Control Outline
The Document Outline window has been available in Visual Studio since the first .NET version for HTML files but has been of little use for other file views. When Visual Studio 2003 was released, an addin called the Control view was developed that allowed a similar kind of access to Windows forms.
The tool was so popular that Microsoft incorporated its functionality into the Document Outline tool window, so now you can browse Windows forms in the same way.
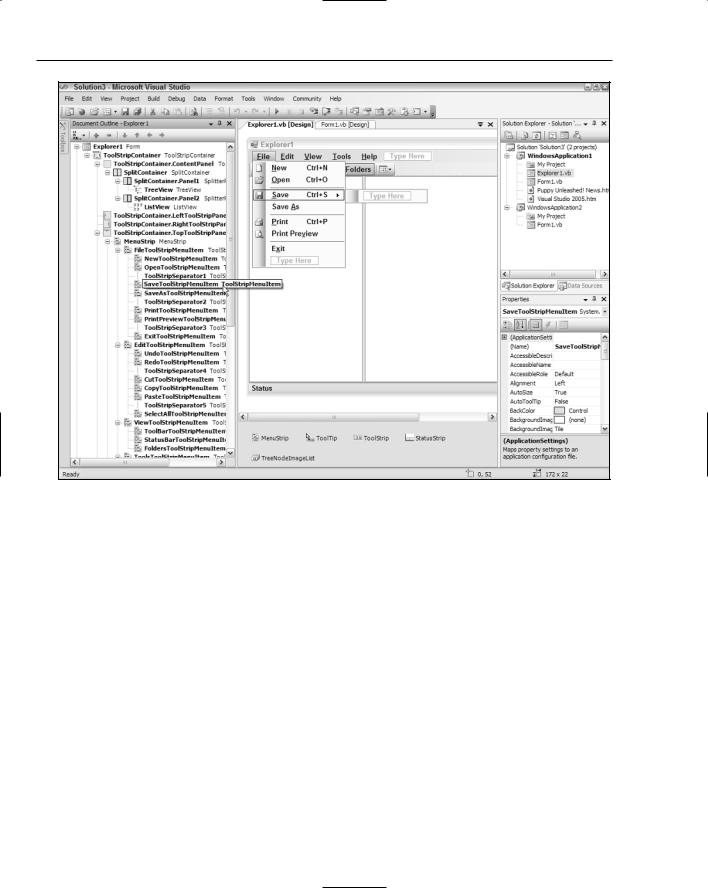
Figure 13-3 shows a typical complex form, with many panels to provide structure and controls to provide the visual elements. Each component is represented in the Document Outline by its name and component type. As each item is selected in the Document Outline window, the corresponding visual element is selected and displayed in the Design view.
This means that when the item is in a menu — as is the case in Figure 13-3 — Visual Studio will automatically open the menu and select the menu item ready for editing. As you can imagine, this is an incredibly useful way of navigating your form layouts, and it can often provide a shortcut way of locating wayward items.
173
Chapter 13
Figure 13-3
Extra Commands in Control Outline Mode
The Document Outline window has more functionality when used in Control Outline mode than just a simple navigation tool. Right-clicking an entry gives you a small context menu of actions that can be performed against the selected item. The most obvious is to access the Properties window.
One tedious chore is renaming components after you’ve added them to the form. You could select each one in turn and set its Name property in the Properties window, but using the Document Outline window, you can simply choose the Rename option in the context menu, and Visual Studio will automatically rename the component in the design code, thus updating the Name property for you without you needing to scroll through the Properties list.
Complex form design can sometimes produce unexpected results. This often happens when a component is placed in an incorrect or inappropriate container control. In such a case you’ll need to move the component to the correct container. Of course, you have to locate the issue before you even know that there is a problem.
174

Control and Document Outline
The Document Outline window can help with both of these activities. First, using the hierarchical view, you can easily locate each component and check its parent container elements. The example shown in Figure 13-3 indicates that the TreeView control is in Panel1, which in turn is in SplitContainer, which is itself contained in a ContentPanel object. In this way you can easily determine when a control is incorrectly placed on the form’s design layout.
When you need to move a component it can be quite tricky to get the layout right. In the Document Outline window it’s easy. Simply drag and drop the control to the correct position in the hierarchy. For example, dragging the TreeView control to Panel2 results in it sharing the Panel2 area with the
ListView control.
You also have the option to cut, copy, and paste individual elements or whole sets of containers and their contents by using the right-click context menu. The copy and paste function is particularly useful, as you can duplicate whole chunks of your form design in other locations on the form without having to use trial and error to select the correct elements in the Design view, or resort to duplicating them in the code-behind in the Designer.vb file.
When you cut an item, remember to paste it immediately into the destination location.
Summar y
The Document Outline window is a very useful but often overlooked tool. In Visual Studio 2005 it has become even more powerful, enabling you to control your form design intuitively and accurately by seeing each level of container and its children in a tree view so that you don’t have to use guesswork to select them when editing forms.
175