

ASP.NET 2.0 Everyday Apps For Dummies (2006)
.pdfChapter 9: Building a Content Management System 297
Designing the Database
The Content Management System stores its content in a database named, appropriately enough, Content. The Content database consists of just three tables:
Departments
ContentTypes
ContentItems
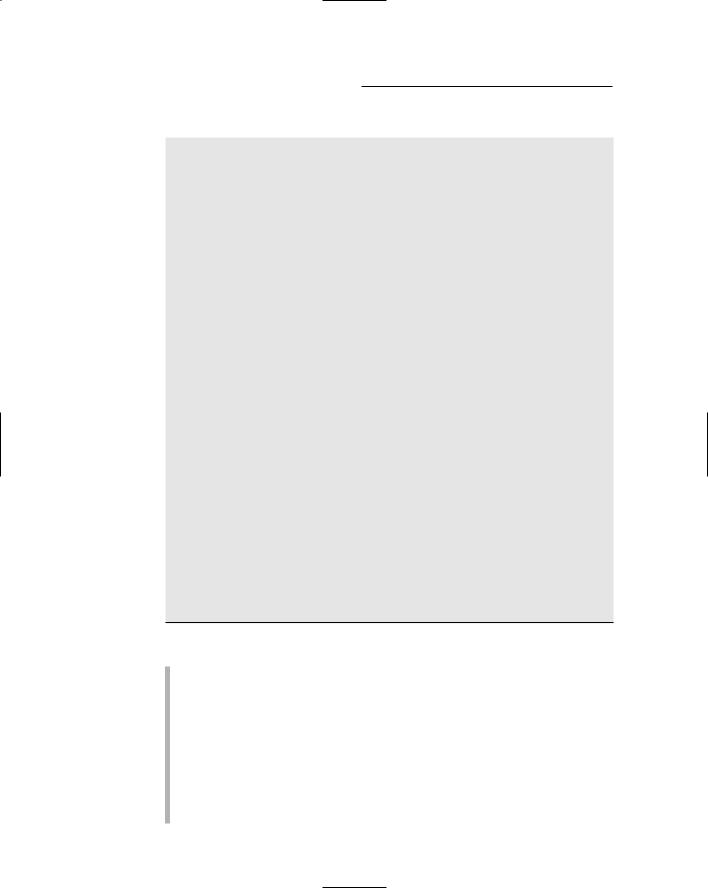
Figure 9-8 shows a diagram of this database, and the following sections describe each table individually.
ContentItems |
|
contentid |
Departments |
deptid |
deptid |
typeid |
name |
title |
description |
[content] |
|
Figure 9-8:
A diagram |
ContentTypes |
|
of the |
typeid |
|
Content |
||
name |
||
database. |
||
|
The Departments table
The Departments table stores the information about the departments represented in the Content Management System. Table 9-1 lists the columns defined for this table.

298 Part V: Building Community Applications
Table 9-1 |
The Departments Table |
|
Column name |
Type |
Description |
deptid |
VARCHAR(10) |
An alphanumeric code (up to |
|
|
10 characters) that uniquely |
|
|
identifies each department. |
|
|
This is the primary key for the |
|
|
Departments table. |
name |
VARCHAR(255) |
The department name. |
|
|
|
description |
VARCHAR(255) |
A short description of the |
|
|
department. This text is dis- |
|
|
played next to the department |
|
|
name on the Home page. |
The ContentTypes table
The ContentTypes table stores information about the different types of content that can be managed by the Content Management System. Table 9-2 lists the columns defined for this table.
Table 9-2 |
The ContentTypes Table |
|
Column name |
Type |
Description |
typeid |
VARCHAR(10) |
An alphanumeric code (up to 10 |
|
|
characters) that uniquely identi- |
|
|
fies each content type. This is |
|
|
the primary key for the |
|
|
ContentTypes table. |
|
|
|
name |
VARCHAR(255) |
The name of the content type. |
|
|
|
The ContentItems table
The ContentItems table stores the actual content that’s managed by the Content Management System. Its columns are listed in Table 9-3.

Chapter 9: Building a Content Management System 299
Table 9-3 |
The ContentItems Table |
|
Column name |
Type |
Description |
contentid |
INT IDENTITY |
A column that uniquely identifies |
|
|
each content item. This identity |
|
|
column is the primary key for the |
|
|
ContentItems table. |
|
|
|
deptid |
VARCHAR(10) |
An alphanumeric code (up to 10 |
|
|
characters) that indicates which |
|
|
department this content item |
|
|
belongs to. This is a foreign key. |
|
|
|
typeid |
VARCHAR(10) |
An alphanumeric code (up to |
|
|
10 characters) that indicates |
|
|
the content type. This is a for- |
|
|
eign key. |
|
|
|
title |
VARCHAR(255) |
The title for this content item. |
|
|
|
content |
TEXT |
The text displayed for the |
|
|
content. |
Creating the Database
On the CD that comes with this book, you’ll find the script shown in Listing 9-1, which creates the Content database. To run this script, open a commandprompt window and change to the directory that contains the script. Then enter this command:
sqlcmd -S localhost\SQLExpress -i CreateContentDB.sql
(I assume you’re running SQL Server Express on your own computer. If not, you’ll need to change localhost\SQLExpress to the correct name.)
Listing 9-1: The CreateContentsDB.sql script
USE master |
1 |
GO |
|
IF EXISTS(SELECT * FROM sysdatabases |
2 |
WHERE name=’Content’) |
|
DROP DATABASE Content |
|
|
|
(continued)
300 Part V: Building Community Applications
Listing 9-1 (continued)
GO
CREATE DATABASE Content
ON (NAME=Product,
FILENAME = ‘C:\APPS\Content.mdf’,
SIZE=10 )
GO
USE Content |
|
|
CREATE TABLE Departments ( |
|
|
deptid |
VARCHAR(10) |
NOT NULL, |
name |
VARCHAR(255) |
NOT NULL, |
description VARCHAR(255) |
NOT NULL, |
|
PRIMARY KEY(deptid) |
|
|
) |
|
|
GO |
|
|
CREATE TABLE ContentTypes ( typeid VARCHAR(10) NOT NULL, name VARCHAR(255) NOT NULL, PRIMARY KEY(typeid)
)
GO
CREATE TABLE ContentItems ( |
|
|
contentid |
INT IDENTITY, |
|
deptid |
VARCHAR(10) |
NOT NULL, |
typeid |
VARCHAR(10) |
NOT NULL, |
title |
VARCHAR(255) |
NOT NULL, |
content |
TEXT |
NOT NULL, |
PRIMARY KEY(contentid), |
|
|
FOREIGN KEY(deptid) REFERENCES Departments(deptid), |
||
FOREIGN KEY(typeid) REFERENCES ContentTypes(typeid) |
||
) |
|
|
GO |
|
|
3
4
5
6
7
The following comments draw out the pertinent details of this listing:
1 Sets the database context to master.
2 Deletes the existing Content database if it exists.
3 Creates a database named Content, placing the database file
C:\Apps.
4 Sets the database context to Content.
5 Creates the Departments table.
6 Creates the ContentTypes table.
7 Creates the ContentItems table.

Chapter 9: Building a Content Management System 301
Adding Test Data
The InsertData.sql script, also found on the companion CD, has a series of INSERT statements that insert some test data for you to work with. First it creates the following four departments:
deptid |
name |
description |
hr |
Human Resources |
We put people first! |
sales |
Sales |
These guys could sell water to a |
|
|
dead fish. |
distr |
Distribution |
The masters of shipping and |
|
|
handling. |
it |
Information |
Garbage In, Garbage Out. |
|
Technology |
|
Then it creates some content types: |
|
|
typeid |
name |
|
news |
News |
|
events |
Events |
|
faq |
FAQ |
|
meeting |
Meeting Materials |
|
Finally, it adds three FAQ items for the Human Resources department:
Title: How many breaks do we get each day?
Text: There’s a five-minute break, and that’s all you take, for a cup of cold coffee and a piece of cake.
Title: What time does the workday start?
Text: Up at eight, you can’t be late, for Matthew and Son, he won’t wait.
Title: When does the workday end?
Text: The files in your head, you take them to bed, you’re never ever through.
To run the InsertData.sql script, open a command window, change to the directory that contains the script, and run this command:
sqlcmd -S localhost\SQLExpress -i InsertData.sql
Note that you’ll need to change the server name if it is other than localhost\ SQLExpress.

302 Part V: Building Community Applications
SQL statements for working with the database
The Content Management system uses a variety of SQL statements to retrieve and update data in the Content database. Here’s a closer look at what these SQL statements do:
The query that lists the departments on the Home page is simple:
SELECT [deptid], [name], [description]
FROM [Departments] ORDER BY [name]
The Department Home page uses the following query to retrieve name and description for the selected department:
SELECT [deptid], [name]
FROM [Departments] WHERE [deptid] = @deptid ORDER BY [name]
A similar query retrieves the description, as well as the department ID and name:
SELECT [deptid], [name]
FROM [Departments] WHERE [deptid] = @deptid ORDER BY [name]
The following query is used to list the content types on the Department Home page:
SELECT [typeid], [name]
FROM [ContentTypes]
ORDER BY [name]
This next query is for use on the Content List page to get content items for a given department and content type:
SELECT [contentid], [title]
FROM [ContentItems]
WHERE [deptid] = @deptid
AND [typeid] = @typeid

Chapter 9: Building a Content Management System 303
Finally, the Content Detail page uses the following SQL statements to select, update, delete, and insert content items:
SELECT [contentid], [title], [content]
FROM [ContentItems]
WHERE ([contentid] = @contentid)
UPDATE [ContentItems] SET [title] = @title,
[content] = @content
WHERE [contentid] = @original_contentid
DELETE FROM [ContentItems]
WHERE [contentid] = @original_contentid
INSERT INTO [ContentItems]
([title], [content], [typeid], [deptid]) VALUES (@title, @content, @typeid, @deptid)
Connecting to the database
The connection string for the Content Management System is stored in the
<connectionStrings> section of the web.config file, like this:
<connectionStrings>
<add name=”ConnectionString” connectionString=”Data
Source=localhost\SQLExpress;
Initial Catalog=Content;Integrated Security=True”/> </connectionStrings>
You may have to modify the connection strings to match your server and database names.
Creating the User Accounts
The Content Management System relies on ASP.NET 2.0’s built-in authentication database to store information about users and roles. First, you must modify the web.config file to configure the application to use forms-based security, to deny access to users who haven’t logged on, and to enable roles. To do that, add the following lines to the <system.web> section of the web.config file:

304 Part V: Building Community Applications
<authorization> <deny users=”?” />
</authorization>
<roleManager enabled=”true” /> <authentication mode=”Forms” />
When you’ve configured the application to use forms-based security, you can create roles and user accounts by using the Web Site Administration Tool. If you want to get right into that, choose Web Site ASP.NET Configuration from within Visual Studio, and then follow these steps:
1.From the main page of the Web Site Administration Tool, click Security. This brings up a page with security-configuration options.
2.Click the Create or Manage Roles link.
This brings up the page that lets you manage roles.
3.Create a role for each department.
If you’re using the sample data provided on the CD, you should create roles named hr, sales, distr, and it.
4.Click the Back button to return to the main Security page, and then choose Create User.
This brings up a page that lets you create user accounts.
5.Create one or more user accounts using any names and passwords you wish.
Note that the password must include at least one non-alphanumeric character, such as a dollar sign ($) or ampersand (&). Otherwise the Create User page won’t accept your password.
Note also that you can using the check boxes in the Roles list to select which department(s) the user is a member of.
6.Close the browser window to close the Web Site Administration Tool.
Building the Master Page
Listing 9-2 shows the .aspx code for Master Page, MasterPage.master. This Master Page provides two content areas, one for a heading and one for content information, as well as a sidebar navigation area that contains a link for each department. An HTML table is used to control the basic layout of the page.

Chapter 9: Building a Content Management System 305
Listing 9-2: The Master Page (MasterPage.master)
<%@ Master Language=”C#” |
1 |
AutoEventWireup=”true” |
|
CodeFile=”MasterPage.master.cs” |
|
Inherits=”MasterPage” %> |
|
<!DOCTYPE html PUBLIC “-//W3C//DTD XHTML 1.1//EN” |
|
“http://www.w3.org/TR/xhtml11/DTD/xhtml11.dtd”> |
|
<html xmlns=”http://www.w3.org/1999/xhtml” > |
|
<head runat=”server”> |
|
<title>Company Intranet</title> |
|
</head> |
|
<body> |
|
<form id=”form1” runat=”server”> |
|
<div> |
|
<table width=”800” border=0> |
|
<tr height=”50px”> |
|
<td width=”150px” valign=”Bottom”> |
|
<asp:LoginStatus ID=”LoginStatus1” |
2 |
runat=”server” /><br /><br /> |
|
</td> |
|
<td width=”650px”> |
|
<asp:contentplaceholder |
3 |
id=”ContentPlaceHolder1” |
|
runat=”server” /> |
|
</td> |
|
</tr> |
|
<tr height=”550px”> |
|
<td width=”150px” valign=”top”> |
|
<asp:Repeater ID=”Repeater1” |
4 |
runat=”Server” |
|
DataSourceID=”SqlDataSource1” > |
|
<ItemTemplate> |
|
<asp:LinkButton |
5 |
ID=”LinkButton1” |
|
runat=”server” |
|
Text=’<% #Eval(“name”) %>’ |
|
PostBackUrl=’<% #Eval(“deptid”, |
|
“DeptHome.aspx?dept={0}”) %>’ /> |
|
<br /> |
|
</ItemTemplate> |
|
</asp:Repeater> |
|
<asp:SqlDataSource |
6 |
ID=”SqlDataSource1” |
|
runat=”server” |
|
ConnectionString=”<%$ ConnectionStrings: |
|
ConnectionString %>” |
|
SelectCommand=”SELECT [deptid], [name] |
|
|
|
(continued)

306 Part V: Building Community Applications
Listing 9-2 (continued)
FROM [Departments] ORDER BY [name]”> </asp:SqlDataSource>
</td>
<td width=”650px” valign=”top”> <asp:contentplaceholder 7
id=”ContentPlaceHolder2” runat=”server” />
</td>
</tr>
</table>
</div>
</form>
</body>
</html>
Okay, heads up for the key points of this listing:
1 The Master directive indicates that the file is a Master Page. Note that if you want to use Visual Basic rather than C# for the application’s code-behind files, you should change the AutoEventWireup attribute to false. That won’t matter for this application, though, since the Master Page doesn’t require a code-behind file.
2 A LoginStatus control is used to let the user log out of the application. When the user clicks the Logout link, the user will be redirected to the Login page and will have to log in again (perhaps with a different account) to continue using the application.
3 The first ContentPlaceHolder control provides a heading
area that displays the department name or some other heading information.
4 This Repeater control provides the sidebar menu that lists the departments. It’s bound to the data source named
SqlDataSource1.
5 The LinkButton control is a bit tricky because it uses the Eval method two times. The first call binds the Text property of the link to the name field in the data source. As a result, the link displays the department name. The second call to Eval uses a format string to create a PostBack URL that includes the deptid
field from the data source in a query string. For example, if the department ID is sales, the PostBack URL for the link will be
DeptHome.aspx?dept=sales.
Note that in the actual source file for the Master Page, the expression in the PostBackUrl attribute is contained on one line, not broken into two lines as shown here. I kept it on one line in the source file so the expression will be acceptable for both C# and Visual Basic, which requires continuation characters when you use line breaks within an expression.