

ASP.NET 2.0 Everyday Apps For Dummies (2006)
.pdfChapter 6: Building a Shopping Cart Application 217
After defining the INSERT statement, the InsertCustomer method uses the cmd.Parameters collection to set the parameters required by the INSERT statement. Then, it calls the ExecuteNonQuery method to execute the INSERT statement. If a customer with the specified e-mail address already exists in the Customers table, this statement will fail, throwing a specific SqlException whose Number property is 2627. In that case, the InsertCustomer method issues the following SQL statement to update the customer with the new data:
UPDATE Customers
SET lastname = @LastName, firstname = @FirstName, address = @Address, city = @City,
state = @State, zipcode = @ZipCode, phone = @PhoneNumber
WHERE email = @Email
5 The InsertOrder method inserts data into the Orders table by executing this SQL statement:
INSERT INTO Orders
(orderdate, custemail, subtotal, salestax, shipping)
VALUES (@OrderDate, @Custemail, @subtotal, @salestax, @shipping)
After the order has been inserted, the ExecuteScalar method is called to execute this SQL statement:
SELECT @@IDENTITY
This statement returns the identity value generated by the INSERT statement. The ExecuteScalar method returns this value as an object, so it must be converted to an integer by using
Convert.ToInt32.
6 The InsertItem method inserts a single item into the
OrderItems table. It does so by calling ExecuteNonQuery to execute the following SQL command:
INSERT INTO OrderItems (ordernum, productid,
name, price, quantity) VALUES (@OrderNum, @ProductID,
@Name, @Price, @Quantity)

218 Part III: Building E-Commerce Applications
Listing 6-22: The OrderDB class (VB version)
Imports Microsoft.VisualBasic |
|
Imports System.Data.SqlClient |
|
Imports System.Web.Configuration |
|
Public Class OrderDB |
1 |
Shared tran As SqlTransaction |
2 |
Shared con As SqlConnection |
|
Public Shared Function WriteOrder( _ |
3 |
ByVal o As Order) As Boolean |
|
Dim cs As String |
|
cs = WebConfigurationManager _ |
|
.ConnectionStrings(“ConnectionString”) _ |
|
.ConnectionString |
|
con = New SqlConnection(cs) |
|
con.Open() |
|
tran = con.BeginTransaction() |
|
Try |
|
InsertCustomer(o.Cust) |
|
Dim oNum As Integer |
|
oNum = InsertOrder(o) |
|
For Each item As CartItem _ |
|
In o.Cart.GetItems() |
|
InsertItem(item, oNum) |
|
Next |
|
tran.Commit() |
|
con.Close() |
|
Return True |
|
Catch ex As Exception |
|
tran.Rollback() |
|
Return False |
|
End Try |
|
End Function |
|
Private Shared Sub InsertCustomer( _ |
4 |
ByVal cust As Customer) |
|
Dim cmd As New SqlCommand() |
|
cmd.Connection = con |
|
cmd.Transaction = tran |
|
Try |
|
cmd.CommandText = “INSERT INTO Customers “ _ |
|
+“(lastname, firstname, “ _
+“address, city, state, zipcode,” _
+“phone, email) “ _
+“VALUES (@LastName, @FirstName, “ _
+“@Address, @City, @State, @ZipCode,” _
+“@PhoneNumber, @Email)” cmd.Parameters.AddWithValue( _ “@LastName”, cust.LastName) cmd.Parameters.AddWithValue( _
“@FirstName”, cust.FirstName)

Chapter 6: Building a Shopping Cart Application 219
cmd.Parameters.AddWithValue( _ “@Address”, cust.Address) cmd.Parameters.AddWithValue( _
“@City”, cust.City) cmd.Parameters.AddWithValue( _
“@State”, cust.State) cmd.Parameters.AddWithValue( _
“@ZipCode”, cust.ZipCode) cmd.Parameters.AddWithValue( _
“@PhoneNumber”, cust.PhoneNumber) cmd.Parameters.AddWithValue( _
“@Email”, cust.Email) cmd.ExecuteNonQuery()
Catch ex As SqlException
If ex.Number = 2627 Then ‘Duplicate Key cmd.CommandText = “UPDATE Customers “ _
+“SET lastname = @LastName, “ _
+“firstname = @FirstName, “ _
+“address = @Address, “ _
+“city = @City, “ _
+“state = @State, “ _
+“zipcode = @ZipCode, “ _
+“phone = @PhoneNumber “ _
+“WHERE email = @Email “ cmd.ExecuteNonQuery()
Else
Throw ex
End If
End Try
End Sub
Private Shared Function InsertOrder( _ |
5 |
ByVal o As Order) As Integer |
|
Dim cmd As New SqlCommand() |
|
cmd.Connection = con |
|
cmd.Transaction = tran |
|
cmd.CommandText = “INSERT INTO Orders “ _ |
|
+“(orderdate, custemail, “ _
+“subtotal, salestax, “ _
+“shipping) “ _
+“VALUES (@OrderDate, @Custemail, “ _
+“@subtotal, @salestax, “ _
+“@shipping)” cmd.Parameters.AddWithValue( _
“@OrderDate”, DateTime.Now) cmd.Parameters.AddWithValue( _ “@Custemail”, o.Cust.Email) cmd.Parameters.AddWithValue( _
“@subtotal”, o.SubTotal) cmd.Parameters.AddWithValue( _ “@salestax”, o.SalesTax)
(continued)
220 Part III: Building E-Commerce Applications
Listing 6-22 (continued)
cmd.Parameters.AddWithValue( _ “@shipping”, o.Shipping)
cmd.ExecuteNonQuery() cmd.CommandText = “SELECT @@IDENTITY”
Return Convert.ToInt32(cmd.ExecuteScalar()) End Function
Private Shared Sub |
InsertItem( _ |
6 |
ByVal item |
As CartItem, _ |
|
ByVal oNum |
As Integer) |
|
Dim cmd As New |
SqlCommand() |
|
cmd.Connection |
= con |
|
cmd.Transaction = tran
cmd.CommandText = “INSERT INTO OrderItems “ _
+“(ordernum, productid, “ _
+“name, price, quantity) “ _
+“VALUES (@OrderNum, @ProductID, “ _
+“@Name, @Price, @Quantity)” cmd.Parameters.AddWithValue( _
“@OrderNum”, oNum) cmd.Parameters.AddWithValue( _
“@ProductID”, item.ID) cmd.Parameters.AddWithValue( _
“@Name”, item.Name) cmd.Parameters.AddWithValue( _
“@Price”, item.Price) cmd.Parameters.AddWithValue( _
“@Quantity”, item.Quantity) cmd.ExecuteNonQuery()
End Sub
End Class
Part IV
Building Back-End
Applications
In this part . . .
Many Web applications have two faces: a public face that’s available to anyone who wanders by,
and a back-end interface that only certain users — those responsible for maintaining the application — can access. In this part, I present two typical back-end applications. The first, a database-maintenance application, lets qualified users add, modify, and delete information in a database. The second is a reporting application that generates a report from a database (strictly to those who need to see it, of course).
Chapter 7
Building a Product
Maintenance
Application
In This Chapter
Designing the Product Maintenance application
Creating the database for the Product Maintenance application
Looking at the new FormView control
Building the Product Maintenance application’s Web pages
Not all Web applications are intended for use by a company’s customers. Just as important are those “behind the scenes” applications that the
company’s employees use to keep the Web site and its related databases up to date. Some of the most important behind-the-scenes applications are those that do database maintenance — in particular, those that let users update the contents of individual database tables.
In this chapter, I present a simple Product Maintenance application that lets the user update, delete, or insert data into the Product and Category tables of the database used by the Product Catalog and Shopping Cart applications (Chapters 5 and 6).
To keep this application simple, the database it uses doesn’t include the FeaturedProducts table used by the applications in Chapters 5 and 6.
224 Part IV: Building Back-End Applications
The Application’s User Interface
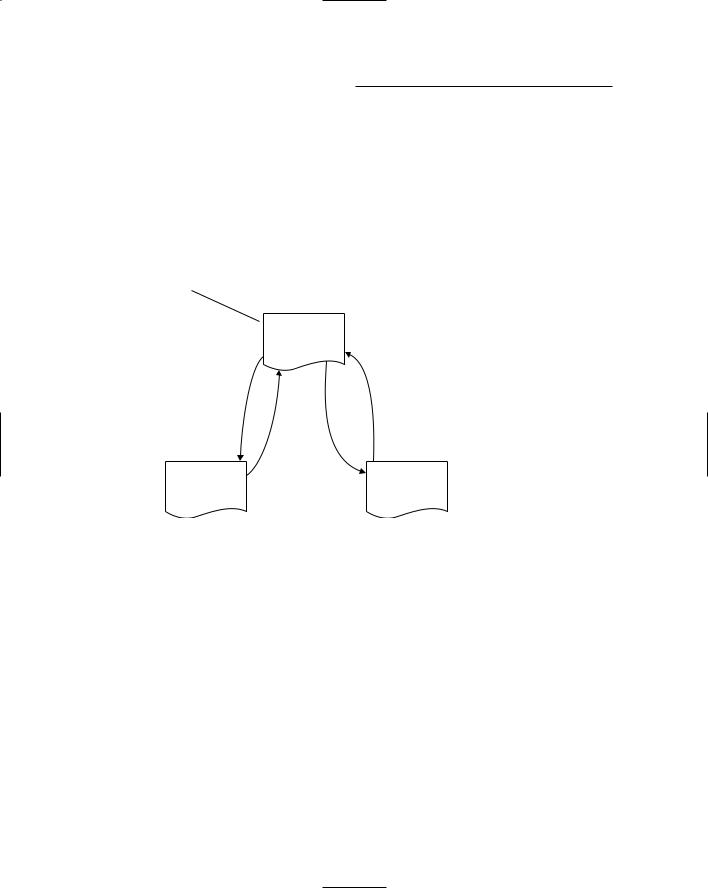
Figure 7-1 shows how the pages of the Product Maintenance application work together. This application’s user interface has just three pages. Default.aspx is simply a menu page with links to the other two pages. CatMaint.aspx lets the user add, delete, or modify existing category records. And ProdMaint. aspx lets the user maintain product records.
User starts application
Default.aspx  Menu page
|
|
|
Finished |
|
|
Maintain |
|
|
|
|
|
|
||
Figure 7-1: |
Categories |
|
|
|
|
|
|
||
The user |
|
Finished |
|
|
interface for |
|
|
||
CatMaint.aspx |
|
ProdMaint.aspx |
||
the Product |
Maintain |
|||
Mainte- |
Category |
Product |
||
Products |
||||
nance |
Maintenance |
|
Maintenance |
|
application. |
page |
|
page |
|
|
|
|
|
|
|
|
|
|
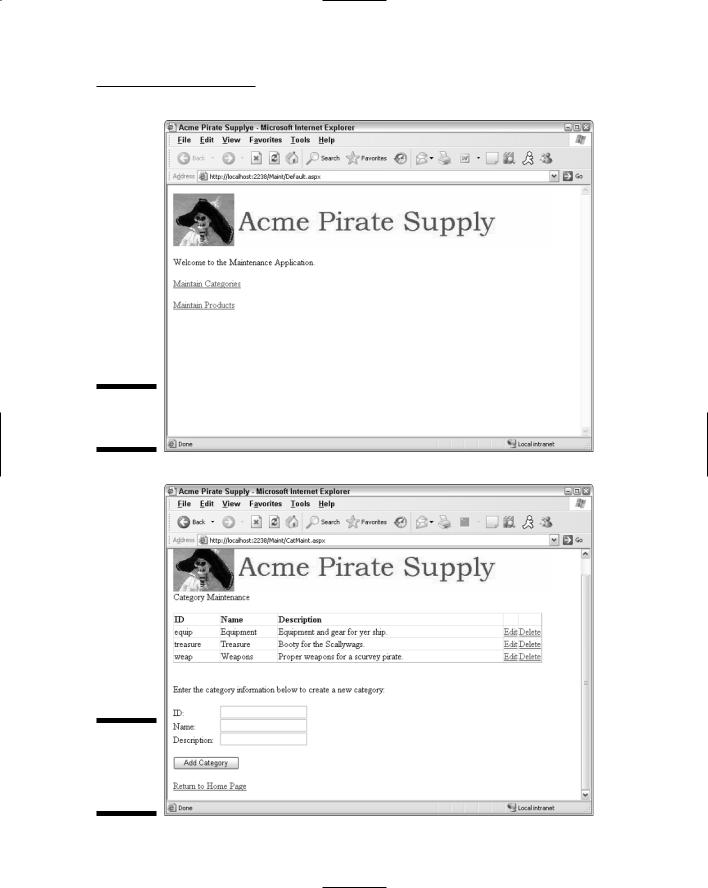
The Menu page
Figure 7-2 shows the Menu page (default.aspx), which displays links to the Category Maintenance and Product Maintenance pages. This is the default start page for the application.
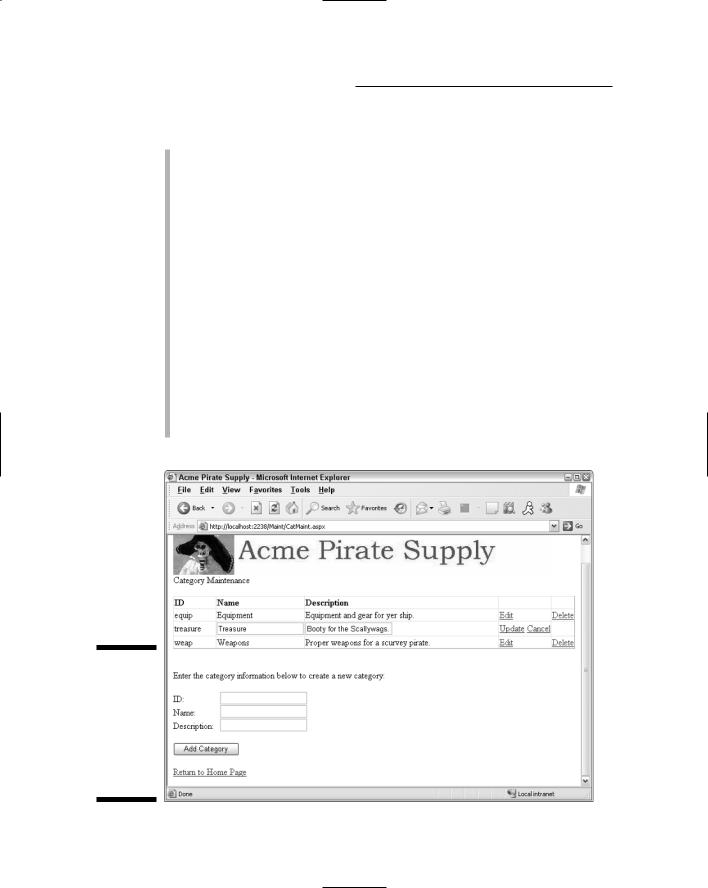
The Category Maintenance page
The Category Maintenance page (CatMaint.aspx) is shown in Figure 7-3. As you can see, this page lets the user maintain the data in the Categories database table. The user can reach this page by clicking the Maintain Categories link on the Menu page.
Chapter 7: Building a Product Maintenance Application 225
Figure 7-2:
The Menu
page.
Figure 7-3:
The Category Maintenance page.
226 Part IV: Building Back-End Applications
Here are some interesting things to note about the Category Maintenance page:
A GridView control is used to list all categories in the Categories table. Although it isn’t apparent from this figure, the GridView control’s builtin paging feature is used to display no more than 10 categories at a time.
The GridView control includes links that let the user edit or delete a category. If the user clicks the Edit link, the GridView control is placed in Edit mode, as shown in Figure 7-4. Then the user can change the information for the category and click Update to update the database. Or, the user can click Cancel to skip the update. (Note that the CategoryID column can’t be updated.)
The text boxes at the bottom of the page let the user enter the data for a new category. Then the user can click the Add Category button to add the new category to the database. This separate data-entry area is required because although the GridView control supports edits and deletions, it doesn’t allow insertions.
Each of the text boxes at the bottom of the page is followed by a RequiredFieldValidator to ensure that the user enters data for all three fields.
The link at the bottom of the page lets the user return to the Menu page.
Figure 7-4:
The Category Maintenance page with the
GridView control in Edit mode.