

ASP.NET 2.0 Everyday Apps For Dummies (2006)
.pdfChapter 7: Building a Product Maintenance Application 227
The Product Maintenance page
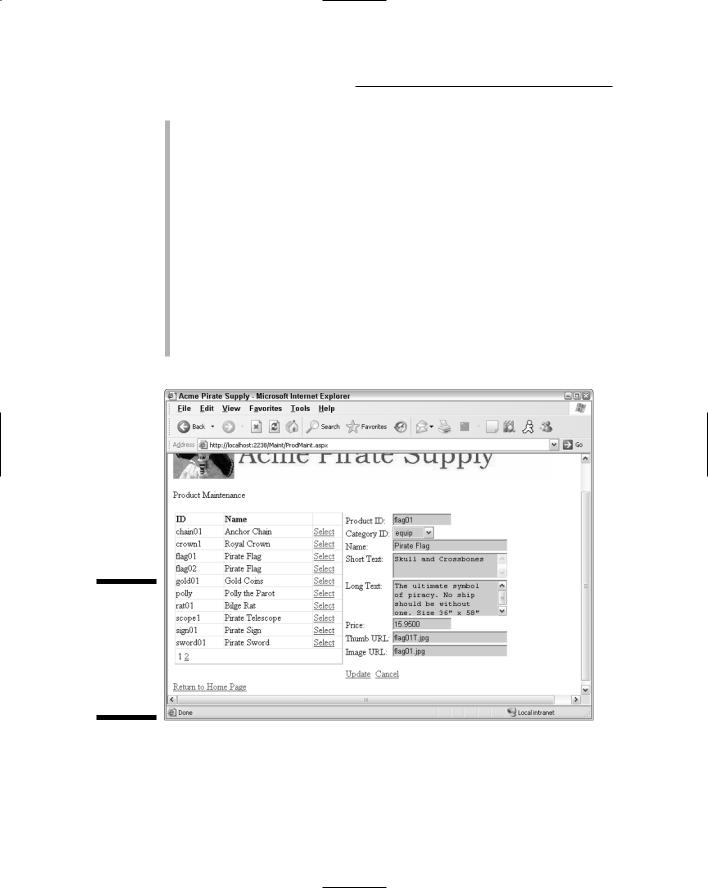
The Product Maintenance page (ProdMaint.aspx), which lets the user add, change, or delete data from the Products table, is shown in Figure 7-5. The user can reach this page by clicking the Maintain Products link on the Menu page.
Here are some key points to notice about this page:
A GridView control on the left side of the page displays the products in the Products table. This GridView control uses paging to display ten products on each page. Also, a Select link is shown for each product.
To the right of the GridView control is a FormsView control that displays the data for the selected product. The FormsView control — a new control introduced with ASP.NET 2.0 — makes it easy to display and update data for a single row of a data source.
When the Product Maintenance page is first displayed — and no product has yet been selected — the FormsView control simply displays the text Please select a product. The product data isn’t displayed until the user clicks the Select link for one of the products displayed by the GridView control.
Figure 7-5:
The Product Maintenance page.
228 Part IV: Building Back-End Applications
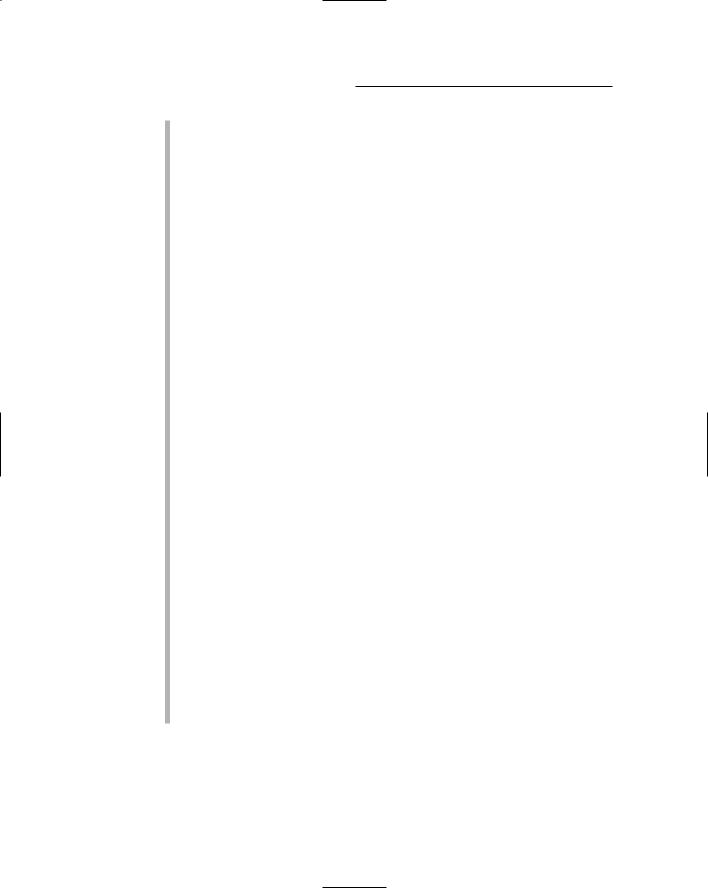
The user can edit the data for the selected product by clicking the Edit link at the bottom of the FormView control. This places the FormView control into Edit mode, as shown in Figure 7-6. Then the user can change the data for the product and click Update. Or, the user can click Cancel to leave Edit mode without updating the data.
Notice that in Edit mode, the Category ID field is displayed by a dropdown list rather than a text box. This drop-down list shows all categories from the Categories table.
Although you can’t tell from the figure, each of the text boxes in the
FormView control is followed by a RequiredFieldValidator. That way, the user must enter data for each field.
Unlike the GridView control, the FormView control does allow for insertions. If the user clicks New, the FormView control enters Insert mode, as shown in Figure 7-7. Then the user can enter the data for a new product and click Insert to insert the row.
Figure 7-6:
The Product Maintenance page with the
FormView control in Edit mode.

Chapter 7: Building a Product Maintenance Application 229
Figure 7-7:
The Product Maintenance page with the
FormView control in Insert mode.
Designing the Application
The Product Maintenance application uses a very simple design. The Menu page uses simple links that post back to the Category Maintenance or Product Maintenance pages. Then these pages use ASP.NET data binding and data sources to connect to and update the databases. This simple design avoids the need for query strings, session states, or other similar features.
There are a few additional considerations to think about whenever you create a maintenance application such as this one. For example, try these on for size:
How will the user look up the data to be updated? In this application, a
GridView control is used to display the Categories and Products tables. That’s feasible for this application because there are only a few categories and products. However, what if the database has thousands, or tens of thousands, of products? In that case, you’ll want to let the user enter the product ID of the product into a text box to call up a specific product. (Better yet, you can add a search feature to the application.)
230 Part IV: Building Back-End Applications
Will you let the user change the primary key fields? If you do, you must ensure that foreign key constraints are properly handled. For example, if you allow a user to change the category ID for a category, how will you handle products assigned to that category? You have three possible approaches:
•Cascade the update, so the category IDs change automatically for any related products.
•Don’t allow the category ID to be changed if it appears in any product rows.
•Don’t allow the user to change the category ID. That’s the approach taken for this application.
How will you handle concurrency conflicts that result when two users attempt to update the same data at the same time? For example, suppose two users simultaneously display the Category Maintenance page and the first user changes the description of the treasure category, while the second user deletes it. If the second user’s deletion is posted before the first user’s update, the update fails because the row no longer exists in the database.
The most common way to handle this situation is to use optimistic concurrency checking, a technique in which the original values of each column are saved when the data is initially retrieved. Then the WHEN clauses of the UPDATE or DELETE statements use these values to make sure some other user hasn’t changed the data before applying an update or deleting a row. This is the technique used for the Categories table in this application.
The alternative to optimistic concurrency checking is to not do any concurrency checking at all. In that case, the last update posted is the one that’s applied. This is the technique used for the Products table in this application.
How will you handle security? You don’t want to let just anyone modify the data in your database. So you’ll certainly want to provide security to authenticate users of your maintenance application. Although the application presented in this chapter doesn’t provide for user authentication, you can easily integrate this application with
the Login application that was presented in Chapter 4 by simply moving this application’s pages to the Admin folder of the Login application. (In addition, you may want to change the name of menu page from
Default.aspx to Admin.aspx.)
Chapter 7: Building a Product Maintenance Application 231
Designing the Database
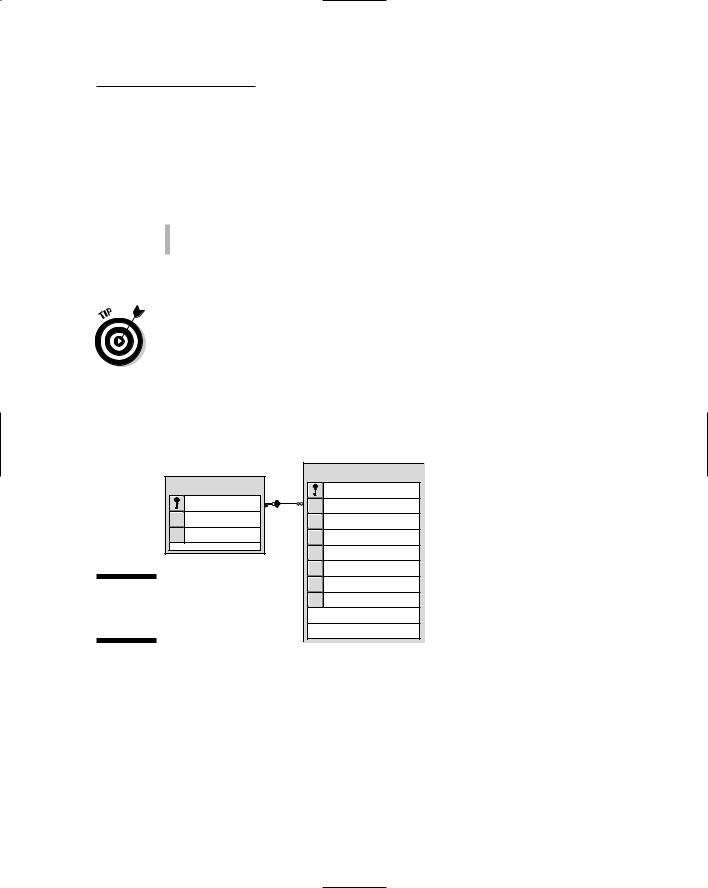
The Product Maintenance application obviously uses a database to store the products and categories that the application maintains. Figure 7-8 shows a diagram of this database, named Maint. The Maint database uses just two tables:
Categories
Products
These tables are described in detail in the following sections.
In a real-world application, this maintenance application would maintain the same database used by the front-end applications, such as the Shopping Cart application presented in Chapters 5 and 6. In fact, you can use the Maintenance application presented here with the Cart database you created in Chapter 6.
If you want to do that, you can skip the sections in this chapter that show you how to create the Maint database and insert data into it. Then, in the web.config file, you simply connect to the Cart database rather than the Maint database. I’ll show you how to do that in the section “Connecting to the database” later in this chapter.
Categories |
Products |
|
productid |
||
catid |
catid |
|
name |
name |
|
[desc] |
shorttext |
|
|
longtext |
|
|
price |
|
Figure 7-8: |
thumbnail |
|
image |
||
The Maint |
||
|
||
database. |
|
The Categories table
The Categories table stores the information about the categories of products offered by the store. Table 7-1 lists the columns defined for the Categories table.

232 Part IV: Building Back-End Applications
Table 7-1 |
|
The Categories Table |
Column name |
Type |
Description |
catid |
VARCHAR(10) |
An alphanumeric code (up to 10 characters) |
|
|
that uniquely identifies each category. This is |
|
|
the primary key for the Categories table. |
|
|
|
name |
VARCHAR(50) |
A text field that provides the name of the |
|
|
category. |
|
|
|
desc |
VARCHAR(MAX) |
A text field that provides a description of the |
|
|
category. |
The Products table
The Products table holds one row for each product. The columns required for this table are listed in Table 7-2.
Table 7-2 |
The Products Table |
|
Column name |
Type |
Description |
productid |
VARCHAR(10) |
An alphanumeric code (up to 10 characters) |
|
|
that uniquely identifies each product. This is |
|
|
the primary key for the Products table. |
|
|
|
catid |
VARCHAR(10) |
A code that identifies the product’s category. |
|
|
A foreign key constraint ensures that only |
|
|
values present in the Categories table |
|
|
can be used for this column. |
|
|
|
name |
VARCHAR(50) |
A text field that provides the name of the |
|
|
product. |
shorttext |
VARCHAR(MAX) |
A text field that provides a short description |
|
|
of the product. |
|
|
|
longtext |
VARCHAR(MAX) |
A text field that provides a longer description |
|
|
of the product. |
|
|
|
price |
MONEY |
The price for a single unit of the product. |
|
|
|
thumbnail |
VARCHAR(40) |
The name of the thumbnail image file. |
|
|
|
image |
VARCHAR(40) |
The name of the main image file. |
|
|
|

Chapter 7: Building a Product Maintenance Application 233
Creating the database
Although you can use Visual Studio to create the Maint database, it’s better to create it from a script. Then, as you test the application, you can run the script to recreate the database, restoring it to its original state. The SQL script that does these tasks appears in Listing 7-1.
To run this script, open a command-prompt window and change to the directory that contains the script. Then enter this command:
sqlcmd -S localhost\SQLExpress -i CreateDB.sql
Note that this command assumes you’re running SQL Server Express on your own computer. If you’re using SQL Server on a different server, you’ll need to change localhost\SQLExpress to the correct name. If you’re not sure what name to use, ask your database administrator.
Listing 7-1: The CreateDB.sql script
USE master
GO
IF EXISTS(SELECT * FROM sysdatabases WHERE name=’Cart’)
DROP DATABASE Maint GO
CREATE DATABASE Maint
ON (NAME=Product,
FILENAME = ‘C:\APPS\Maint.mdf’,
SIZE=10 )
GO
USE Maint
CREATE TABLE Categories ( catid VARCHAR(10) NOT NULL, name VARCHAR(50) NOT NULL,
[desc] VARCHAR(MAX) NOT NULL, PRIMARY KEY(catid) )
GO
CREATE TABLE Products ( |
|
|
productid VARCHAR(10) |
NOT NULL, |
|
catid |
VARCHAR(10) |
NOT NULL, |
name |
VARCHAR(50) |
NOT NULL, |
shorttext |
VARCHAR(MAX) NOT NULL, |
|
1
2
3
4
5
6
(continued)
234 Part IV: Building Back-End Applications
Listing 7-1 (continued)
longtext |
VARCHAR(MAX) NOT NULL, |
|
price |
MONEY |
NOT NULL, |
thumbnail |
VARCHAR(40) |
NOT NULL, |
image |
VARCHAR(40) |
NOT NULL, |
PRIMARY KEY(productid),
FOREIGN KEY(catid) REFERENCES Categories(catid) )
GO
Here’s an explanation of the key lines of this script:
1 Sets the database context to master.
2 Deletes the existing Maint database if it exists.
3 Creates a database named Maint, placing the database file in
C:\Apps.
4 Sets the database context to Maint.
5 Creates the Categories table.
6 Creates the Products table.
Adding some test data
The CreateDB script creates the Maint database, but doesn’t add any data to it. To add data, you can run the InsertData.sql script that’s included on the CD that comes with this book. This script creates the sample data shown in Table 7-3 and Table 7-4. (Note that the shorttext and longtext columns aren’t listed in Table 7-4.)
You can run the InsertData.sql script by opening a command window, changing to the directory that contains the script, and running this command:
sqlcmd -S localhost\SQLExpress -i InsertData.sql
Be sure to change the server name if you’re not running SQL Server Express on your own computer.
Table 7-3 |
Test Data for the Categories Table |
|
catid |
name |
desc |
booty |
Booty |
Treasure for the Scallywags. |
|
|
|
equip |
Equipment |
Equipment and gear for yer ship. |
|
|
|
weap |
Weapons |
Proper weapons for a scurvy pirate. |
|
|
|
Chapter 7: Building a Product Maintenance Application 235
Table 7-4 |
|
Test Data for the Products Table |
|||
productid |
catid |
name |
price |
thumbnail |
Image |
chain01 |
equip |
Anchor Chain |
6.95 |
chainT.jpg |
chain.jpg |
|
|
|
|
|
|
crown1 |
booty |
Royal Crown |
14.95 |
crown1T.jpg |
crown1.jpg |
|
|
|
|
|
|
flag01 |
equip |
Pirate Flag |
15.95 |
flag01T.jpg |
flag01.jpg |
|
|
|
|
|
|
flag02 |
equip |
Pirate Flag |
12.95 |
flag02T.jpg |
flag02.jpg |
|
|
|
|
|
|
gold01 |
booty |
Gold Coins |
8.95 |
gold01T.jpg |
gold01.jpg |
|
|
|
|
|
|
polly |
equip |
Polly the Parrot |
15.95 |
pollyT.jpg |
polly.jpg |
|
|
|
|
|
|
rat01 |
equip |
Bilge Rat |
9.95 |
rat01T.jpg |
rat01.jpg |
|
|
|
|
|
|
scope1 |
equip |
Pirate Telescope |
15.95 |
scope1T.jpg |
scope1.jpg |
|
|
|
|
|
|
sign01 |
equip |
Pirate Sign |
25.95 |
sign01T.jpg |
sign01.jpg |
|
|
|
|
|
|
sword01 |
weap |
Pirate Sword |
29.95 |
sword01T.jpg |
sword01.jpg |
|
|
|
|
|
|
sword02 |
weap |
Broad Sword |
9.95 |
sword02T.jpg |
sword02.jpg |
|
|
|
|
|
|
SQL statements for the Categories table
The Product Maintenance application uses several SQL statements to retrieve, update, delete, and insert data from the Categories table. These SQL statements have distinct purposes, described in the following paragraphs:
To retrieve all rows from the Categories table, the following SELECT statement is used:
SELECT [catid], [name], [desc]
FROM [Categories] ORDER BY [catid]
To delete a row, the following DELETE statement is used:
DELETE FROM [Categories]
WHERE [catid] = @original_catid
AND [name] = @original_name
AND [desc] = @original_desc
As you can see, this statement — as well as the UPDATE statement presented next — lists all three of the Categories columns in the WHERE clause. That way, if any other user has changed any of the columns in the database row since the row was originally retrieved, the delete (or update) will fail. This technique is called optimistic concurrency checking.

236 Part IV: Building Back-End Applications
To update a row, the following UPDATE statement is used:
UPDATE [Categories] SET [name] = @name,
[desc] = @desc
WHERE [catid] = @original_catid
AND [name] = @original_name
AND [desc] = @original_desc
Again, the original values for all three columns of the table are listed in the WHERE clause to provide optimistic concurrency checking. Notice also that the catid column is not listed in the SET clause. That’s because the application doesn’t let the user change the category ID.
To insert a row, the following INSERT statement is used:
INSERT INTO [Categories]
([catid], [name], [desc]) VALUES (@catid, @name, @desc)
SQL statements for the Products table
The Product Maintenance application also uses several SQL statements to retrieve, update, delete, and insert data from the Products table. Note that the UPDATE and DELETE statements for the Products table — unlike those for the Categories table — don’t use optimistic concurrency. (I’ll leave it to you to modify the application to provide optimistic concurrency checking for the Products table.)
The following paragraphs describe the SQL statements used for the
Products table:
This SELECT statement selects the products to display in the GridView control:
SELECT [productid], [name]
FROM [Products] ORDER BY [productid]
This SELECT statement retrieves the product selected by the user in the GridView control so it can be displayed in the FormView control:
SELECT [productid], [catid],
[name], [shorttext], [longtext], [price], [thumbnail], [image]
FROM [Products]
WHERE ([productid] = @productid)