

ASP.NET 2.0 Instant Results
.pdfWrox Blog
UPDATE
BlogEntry
SET
Title = ?, Body = ?, CategoryId = ?, DatePublished = ?
WHERE
Id = ?;
The stored procedure for SQL Server contains the following code:
@id int,
@title nvarchar(200), @body nvarchar(MAX), @categoryId int, @datePublished datetime
AS
UPDATE
BlogEntry
SET
Title = @title,
Body = @body,
CategoryId = @categoryId,
DatePublished = @datePublished
WHERE
Id = @id
Except for the way the parameters are named, these procedures are identical. These different parameter names are once again taken care of by the ReturnCommandParamName.
Because the parameters have no name in an Access database, it’s important they are added in the right order. The Id parameter is used in the WHERE clause at the end of the UPDATE statement, so its parameter must be added last as well.
Once all the parameters have been set up correctly, the database is updated by calling ExecuteNonQuery() on the Command object.
When the code in the SaveBlogEntry methods has finished, control is returned to the BlogEntries control that then executes EndEditing() so the list with blog entries is refreshed:
myBlogEntry.DatePublished = calDatePublished.SelectedDate
BlogManager.SaveBlogEntry(myBlogEntry)
EndEditing()
End If
EndEditing() hides the Edit panel and shows the List panel again. It then calls LoadData() to ensure the blog list displays up-to-date information.
With the SaveBlogEntry method you have come to the end of the BlogEntries control. With the code you have seen you can now create new blog items and manage existing ones. You can also list the blog items in the BlogEntries control using the filters from the BlogEntriesFilter control.
197

Chapter 6
Structured Error Handling and Logging
Chapter 5 told you that this chapter would cover a way to handle errors in ASP.NET applications. However, so far you haven’t seen any code that puts that into practice. Yet the Wrox Blog does deploy a nice way of catching and logging errors. At the same time, end-users are shielded from nasty error messages and instead get a friendly page stating that somehow an error occurred. “How does this work?” you may ask. To understand how this error-handling mechanism works, you need to look at two important areas: configuration and handling and logging errors.
Configuration
First, there is an important setting in the Web.config file called <customErrors>. When you add a new Web.config file to your application, this element is commented out so it doesn’t do anything. However, in the Wrox Blog, the comment tags are removed and the element is changed so it now looks like this:
<customErrors mode=”On” defaultRedirect=”Error.aspx”> <error statusCode=”404” redirect=”Error.aspx”/>
<error statusCode=”500” redirect=”Error.aspx”/> </customErrors>
Now whenever an error occurs, ASP.NET looks at this element to see how to handle it. The defaultRedirect is the page in your site you want to redirect the user to whenever an error occurs that isn’t handled. On this page, you can display a message telling users that the server encountered an error, that you are aware of it, and you are busy fixing it while they are reading that message.
You also see different <error> nodes for each type of error. You can use these settings to redirect to different pages for different errors. For example, when a page cannot be found, the web server throws a 404 error. You can then set up an <error> node with a statusCode of 404 that redirects to PageNot Found.aspx where you can tell the users the page could not be found and offer them a way to search the site, for example. You could do the same with 500 errors (server errors) and redirect to another page instead. Any error code not specifically set by an <error> element is sent to the page specified in defaultRedirect. In the case Wrox Blog application, the different error codes all point to the same file.
Sending your users to a friendly error page is only one piece of the puzzle. All it does is shield the user from ugly-looking error messages. However, with only these settings, you’ll never be aware the errors occurred in the first place, so you can’t fix them. This is where the Global.asax file comes into play again.
Handling and Logging Errors
Whenever an unhandled exception in your site occurs — for instance, because the database is down, a user entered bad data in the system, or because a requested page could not be found or processed — two things happen. One of the things the ASP.NET run time does is redirect the user to the specified error page as you saw in the previous section. However, before it does that, it fires the Application_Error event that you can handle in the Global.asax file. Inside that event you can get access to the error that occurred with Server.GetLastError(). Once you have a reference to that error, you can build up a message with the error details and send it to yourself by e-mail. This is exactly what is being done in the Global.asax for the Wrox Blog:
Sub Application_Error(ByVal sender As Object, ByVal e As EventArgs)
Dim sendMailOnErrors As Boolean = True
If sendMailOnErrors Then
198

Wrox Blog
Dim subject As String = “Error in page “ & Request.Url.ToString() Dim errorMessage As StringBuilder = New StringBuilder
Dim myException As Exception = HttpContext.Current.Server.GetLastError()
If myException IsNot Nothing Then Do While myException IsNot Nothing
errorMessage.Append(“<strong>Message</strong><br />” & _ myException.Message & “<br /><br />”)
errorMessage.Append(“<strong>Source</strong><br />” & _ myException.Source & “<br /><br />”)
errorMessage.Append(“<strong>Target site</strong><br />” & _ myException.TargetSite.ToString() & “<br /><br />”) errorMessage.Append(“<strong>Stack trace</strong><br />” & _
myException.StackTrace & “<br /><br />”) errorMessage.Append(“<strong>ToString()</strong><br />” & _
myException.ToString() & “<br /><br />”) myException = myException.InnerException
Loop Else
errorMessage.Append(“No exception information available.”) End If
Dim mySmtpClient As SmtpClient = New SmtpClient() Dim myMessage As MailMessage = New MailMessage( _
AppConfiguration.EmailFrom, AppConfiguration.EmailTo, subject, _ errorMessage.ToString().Replace(ControlChars.CrLf, “<br />”))
myMessage.IsBodyHtml = True
mySmtpClient.Send(myMessage) End If
End Sub
This code starts off by declaring a variable that determines whether or not error messages should be sent by e-mail. You can use this variable to quickly turn off error handling when you’re developing new things. You could also move it to a key in the Web.config file and create an entry in the AppConfiguration class for it.
The error (the exception in .NET terminology) is retrieved with HttpContext.Current.Server
.GetLastError(). There is one thing you should be aware of when you call this method. Whenever an exception occurs in your site somewhere, ASP.NET wraps that exception inside a general Http UnhandledException. By default, this exception doesn’t provide you with much detail. However, the original exception (such as a NullReferenceException, an ArgumentException, or any of the other exception types) is available in the InnerException of the error returned from GetLastError(). The loop in the code gets the exception’s InnerException as long as there is one; this way, you can get detailed information not only about the generic outer exception, but also about each inner exception it contains.
If you’re not interested in the hierarchy that leads to the innermost exception, you can use GetBase Exception() to get the exception that is the root cause of the problem, like this:
Dim myException As Exception = _
HttpContext.Current.Server.GetLastError().GetBaseException()
All the error information from the exceptions is appended to a StringBuilder using the .Append() method. At the end, that error message is added as the body of the e-mail message using its ToString()
199

Chapter 6
method. Notice the use of AppConfiguration.EmailFrom and AppConfiguration.EmailTo to get the e-mail address from the Web.config file through the AppConfiguration class.
Finally, the mail message is sent using mySmtpClient.Send(myMessage). This method uses the SMTP server defined in the <mailSettings> element in the Web.config file:
<system.net>
<mailSettings>
<smtp deliveryMethod=”Network”>
<network host=”smtp.YourProvider.Com” port=”25” /> </smtp>
</mailSettings>
</system.net>
If you can’t get the error handling to work, check that you defined a valid SMTP server in the configuration file. Also, make sure that EmailFrom and EmailTo defined in the same file contain valid e-mail addresses.
You can expand the code in Application_Error so it sends you even more useful information. To diagnose complicated errors it can be useful to have an overview of information like the user’s cookies, session variables, and various server settings found in Request.ServerVariables. With these additions, you can make the error message even more usable.
With this code setup, you get an e-mail with detailed error information whenever an error occurs on the server. This should enable you react quickly and efficiently, fixing possible bugs before they get worse and trouble many users.
This also concludes the detailed discussion of the Wrox Blog, its design, and its code. In the next section you learn how to install the Wrox Blog and embed it in your own site.
Setting up the Wrox Blog
You can choose to install the Wrox Blog application manually or by using the installer application supplied on this book’s CD-ROM. The installer not only installs the necessary files for the Wrox Blog, but also creates a sample web site that uses the user controls of the Wrox Blog. Running the installer creates a virtual directory under IIS called Blog. The folder that is created by the installer contains the full source for the Wrox Blog.
Alternatively, you can choose to unpack the supplied zip file to a folder on your machine. This gives you a bit more choice with regard to where the files are placed, but you’ll have to add the necessary files to an existing or new web site manually.
For both installation methods it’s assumed that the .NET 2.0 Framework, which is an installation requirement for Visual Web Developer, has already been installed. It’s also assumed that you have installed SQL Server 2005 Express Edition with an instance name of SqlExpress. If you chose a different instance name, make sure you use that name in the connection string for the Wrox Blog in the Web.config file.
Using the Installer
To install the Wrox Blog follow these steps:
200
Wrox Blog
1.Open the folder Chapter 06 - Wrox Blog\Installer from the CD-ROM that came with this book and double-click setup.exe to start up the installer.
2.In the Setup wizard, accept all the defaults by clicking Next until the application has been installed completely. Click Close to close the installer.
3.Next, open up the Web.config file in the Blog’s folder (by default, located at C:\Inetpub\ wwwroot\Blog) and verify that the two connection strings for the Access database and SQL Server are correct. For the Access database, verify that the path to the .MDB file is correct. For SQL Server, ensure that the name of the SQL Server instance is correct.
4.Set the DefaultConnectionString key to the connection you want to use. When you set it to
AccessConnectionString, make sure you set the enabled attribute of the <roleManager> element to False. When you use a SQL Server connection, set that same attribute to True.
5.Now browse to http://localhost/Blog. The Wrox Blog application should appear. Click the Login link and log in with a username of Administrator and a password of Admin123#.
Manual Installation
If you want to add the Blog application to a new or an existing application, you shouldn’t use the supplied installer; you’ll have to follow these steps instead:
1.Start by creating a brand new web site in Visual Web Developer.
2.Open the folder Chapter 06 - Wrox Blog\Source from the CD-ROM that comes with this book and extract the contents of the file Chapter 06 - Wrox Blog.zip to a folder on your hard drive.
3.Open aWindows Explorer and browse to the folder that contains the unpacked files. Next, arrange both Visual Web Developer and the Windows Explorer in such a way that both are visible at the same time.
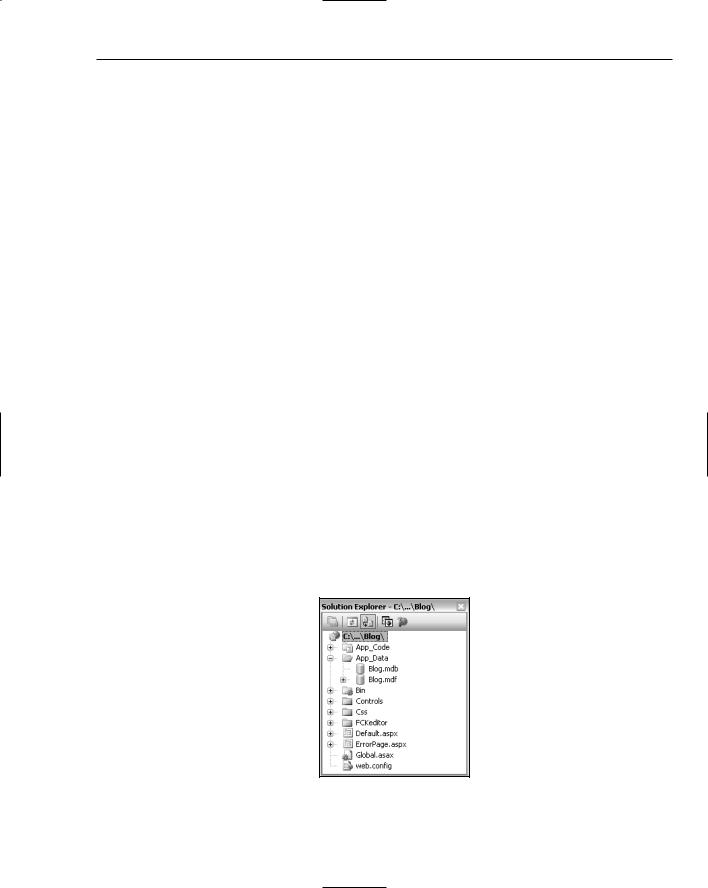
4.In the Windows Explorer, select the folders App_Code, App_Data, Bin, Controls, Css, and FCKeditor, as well as the files ErrorPage.aspx, ErrorPage.aspx.vb, Web.config, and Global.asax. Then drag the selected folders and files from the explorer window onto the project in the Solution Explorer in Visual Web Developer. When prompted if you want to overwrite any of the files, click Yes. You should end up with a Solution Explorer that looks like Figure 6-12.
Figure 6-12
201

Chapter 6
5.Open the file Default.aspx and create a skeleton for your page that can hold the BlogEntries Filter and BlogEntries controls. You can use tables or any other HTML tag to control the page layout.
6.Next, switch to Design View for the page, and from the Controls folder on the Solution Explorer, drag the BlogEntriesFilter.ascx on the design surface at the location where you want the control to appear. Repeat this step for the BlogEntries.ascx control. You should end up with markup similar to this:
<table>
<tr>
<td>
<Wrox:BlogEntriesFilter ID=”BlogEntriesFilter1” runat=”server” /> </td>
<td>
<Wrox:BlogEntries ID=”BlogEntries1” runat=”server” /> </td>
</tr>
</table>
7.Open the Web.config file and locate the <connectionStrings> element. Make sure that the connections for SQL Server and the Access database are set up correctly. If necessary, change the path to the Access database and the name of your SQL Server instance. Also check that the Default ConnectionString setting points to the database you want to use. Finally, when you’re using SQL Server, make sure you set the enabled attribute of the <roleManager> to True. When you use an Access database, set the enabled attribute to False.
8.You can now open the page in the browser by pressing F5 in Visual Web Developer. If everything went as planned, you should now see the BlogEntriesFilter control and the list with blog entries appear.
Note that you cannot edit blog entries at this stage because you have no way of authenticating the user. If you want to use the supplied Microsoft Access database, you can simply copy the page Login.aspx (and its code-behind file) from the supplied code file into your new web project and request it in the browser. You can then log in with the account Administrator with the password Admin123#.
If you’re using a SQL Server database, you can configure the application so it supports the Membership and Role providers. To do that, choose Website ASP.NET Configuration from the main menu in Visual Web Developer. Then click the Security tab in the browser window that opened and create a new security role called Administrator. Next, create a new account and assign it to the role you just created.
If you need more information about how the Web Site Administration Tool works, click the “How do I use this tool?” link in the upper-right corner of the screen.
Once the application is configured correctly, create a new file and call it Login.aspx. From the Toolbox, drag a Login control on the page. Alternatively, you can use the Login.aspx file from the code that comes with this book and modify it to suit your needs. If you’re using SQL Server and you get an error stating that sprocUserGetRoles could not be found, make sure you have set the enabled attribute of the <roleManager> to True in the Web.config file.
Now that you’ve set up the Wrox Blog successfully, browse to this book’s download page at www.wrox.com and check out how you can modify your blog.
202

Wrox Blog
Summar y
In this chapter you saw how to create and use a blogging application that can easily be incorporated in an existing web site. You saw how to use the blog application from an end-user’s point of view.
You learned how the Wrox Blog application is designed and what classes it contains. You also read about the challenges developers face when writing database-independent code and the possible solutions to overcome these problems.
In the code explanation section you learned how to write code that can work with a SQL Server and an Access database at the same time. Using the new factories pattern of the .NET 2.0 Framework enables you to greatly decrease the complexity of writing code that can be run against multiple databases. In this section you also saw how the classes and pages that make up the Wrox Blog application work internally, and how they communicate with each other.
203


7
Wrox Photo Album
In recent years, the phenomenon of photo album web sites has provided viewers access to digital images that capture the essence of an amateur or professional photographer’s work. From personal family pictures to highly specialized artistic imaging, the Web is a great way to share photography from any source to the known digital world. A popular approach to sharing pictures over the Internet is to use an online photo album or catalogue of sorts. In this way, pictures can be logically grouped into collections and include contextual information for a viewer to properly observe the photograph in all its glory.
Although they usually serve the same overall purpose, photo album web sites exist in all sorts of styles and flavors. From thumbnail generators to photograph-editing batched systems, these image manipulation applications provide a wide array of features. However different and extensive they may be, they all usually provide a list of essential features, including the following:
View thumbnails of digital photos in a grid-like fashion.
Click a single photo to view a larger or full-size version.
Upload a new digital picture file.
Enter a name and/or description for the picture.
Classify the picture as a specific category or type.
Edit an existing picture’s contextual information.
Delete an existing picture.
These features alone would substantiate a useful web site package that any reasonable web developer would consider as a valid third-party software purchase. However, it is often difficult to modify such software applications or tools, because they often lock the developer into the standardized views and limit control over the display and position of the images on the web page. From the format of the font to the size of the thumbnails, there are usually undesirable constraints to customizing the web site design and implementation, unless the programmer has access to the source code files where the changes can occur. These considerations would point to the selection of an open source codebase to develop an online photo album, allowing for a maximum amount of customization with a nominal amount of time and effort.

Chapter 7
The Wrox Photo Album is a great sample project that allows for easy customizations to be made on the display and functionality of a photo album web site. It implements not only the new development approaches to security and data, but also the desirable features that the user would expect for a better- than-average online photo album.
This chapter takes a practical approach to understanding some of the newer concepts now available in ASP.NET 2.0 by analyzing the implemented features within the Wrox Photo Album. Some of the new features you tackle include data binding, themes, security, page markup, and navigation.
In the section “Wrox Photo Album Design,” you explore the design of the application in great detail. This includes the structure of the web site, the pages and user controls, the database and data model used, file management, and image storage considerations.
The section titled “Code and Code Explanation” performs a thorough and complete examination of the areas of development necessary for storing and displaying photo albums online in the most effective fashion. It reviews the classes involved, as well as the specific areas of focus in which a developer could modify the application to his or her specific needs.
The final section reviews how to extract and customize the photo album in a development environment, and how to install it to production. First things first, though: You need to know how to use the photo album before you can modify or enhance it.
Using the Wrox Photo Album
Using the Wrox Photo Album is actually quite simple. If you have ever used a photo album or similar sort of digital image application in the past, you’d agree that the features and functionality of this photo album exist in similar fashion. Many of the common features shared across different picture viewing applications exist in the Wrox Photo Album as you would expect, in a predictable fashion.
If the Wrox Photo Album web site has been successfully installed (refer to the section “Setting up the Project” later in this chapter), you can browse to view the site by going to http://localhost/photoalbum. The screen displayed in Figure 7-1 appears.
At the top of the menu are several links to choose from:
Photo Albums
About Me
Contact Me
Site Map
Admin
These are considered the main menu items of the web site and can be edited within the site’s XML site map navigation file. The next section discusses the editing process in greater detail.
206