

ASP.NET 2.0 Instant Results
.pdf
|
|
|
|
Wrox Blog |
|
|
|
|
|
|
|
|
|
|
|
Method |
|
Return Type |
Description |
|
|
|
|
|
|
Public Shared |
Function |
DataSet |
Returns the available categories as a DataSet. |
|
GetCategories |
() As |
|
|
|
DataSet |
|
|
|
|
Public Shared |
Sub |
n/a |
This method saves a blog entry in the |
|
SaveBlogEntry |
(ByVal |
|
database. This can be a completely new or an |
|
myBlogEntry As |
|
|
updated blog item. |
|
BlogEntry) |
|
|
|
|
|
|
|
|
To simplify the data access code so it can work with multiple databases, there is also a DalHelpers class (see Figure 6-8) that serves as a helpers class for the data access layer (DAL). This class has a single method called ReturnCommandParamName.
Figure 6-8
The ReturnCommandParamName method accepts the name of a parameter that must be passed to a stored procedure (in SQL Server) or a query (in Microsoft Access) and returns the correctly formatted parameter name. For SQL Server this is the name prefixed with an at symbol (@), whereas for Access this is a single question mark symbol (?) without the initial name. You see later why and how this code is used.
The UserManagerDB Class
Just as the UserManager class in the business layer, the UserManagerDB class has a single method called GetUserRoles, as shown in Figure 6-9.
Figure 6-9
To simplify the code to log in a user, the traditional LoginUser and GetRoles methods have been combined into one method. The GetUserRoles method functions as a LoginUser method in that it accepts the user’s name and a hashed password. It then returns the roles for the user as an ArrayList if the user is found in the database, or Nothing otherwise.
177
Chapter 6
The Data Model
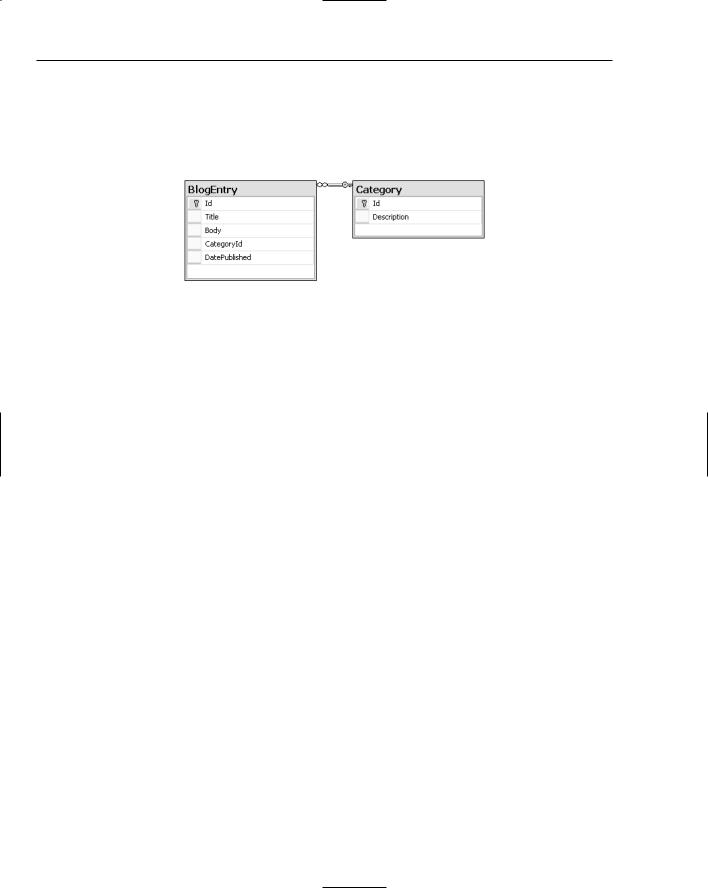
Because the Wrox Blog can work with SQL Server and a Microsoft Access database, you’ll find both these databases in the App_Data folder if you installed the application with the supplied installer. It should come as no surprise that both databases have a similar data model. Figure 6-10 shows the database model for SQL Server 2005 as it looks in Visual Web Developer.
Figure 6-10
The BlogEntry table contains five columns, each of which is described in the following sections. Note that the table lists both the data type for each column in SQL Server and in Microsoft Access.
The BlogEntry Table
The BlogEntry table stores the blog entries for the entire application. It should come as no surprise that this table has five columns that exactly map to each of the five public properties of the BlogEntry class. These five columns are discussed in the following table.
Column Name |
Data Type SQL |
Data Type |
Description |
|
Server |
Microsoft Access |
|
|
|
|
|
Id |
int (Identity) |
AutoNumber |
The unique ID of each blog |
|
|
|
entry. This ID is generated |
|
|
|
automatically by the database |
|
|
|
each time a new record is |
|
|
|
inserted. |
Title |
nvarchar(200) |
Text (200) |
The title of the blog item. |
|
|
|
The title is displayed in the |
|
|
|
BlogEntries list. |
Body |
nvarchar(MAX) |
Memo |
Used to store the body text of |
|
|
|
the blog entry. |
CategoryId |
int |
Number |
The ID of the category to |
|
|
|
which the item belongs. |
DatePublished |
datetime |
Date/Time |
Stores the date and time the |
|
|
|
blog item was published. |
|
|
|
|
Each record in the BlogEntry table is linked to a specific category in the Category table through its CategoryId column.
178

Wrox Blog
The Category Table
The Category table is a simple lookup table that holds an ID and a description for each category.
Column Name |
Data Type |
Data Type |
Description |
|
SQL Server |
Microsoft Access |
|
Id |
int(Identity) |
AutoNumber |
The unique ID of each category. This |
|
|
|
ID is generated automatically by the |
|
|
|
database each time a new record is |
|
|
|
inserted. |
Description |
nvarchar(100) |
Text (100) |
The description of the category as it |
|
|
|
is displayed in the BlogEntries- |
|
|
|
Filter user control on the site. |
|
|
|
|
The code in the business and data access layers is only used to insert and update blog items and to retrieve a read-only list of categories. If you want to manage the categories in the database with a web interface, you need to implement some CMS functionality, similar to that presented in Chapter 5.
Stored Procedures and Queries
To make the data access layer easier to write and maintain, it does not contain direct SQL statements. Instead, the code calls stored procedures (when SQL Server is used) or queries (in Microsoft Access) to get the data from and into the database. To a large extent, stored procedures and queries can perform the same actions. In the case of the Wrox Blog, they are used to select single and lists of records from the BlogEntry and Category tables, and to insert and update records in the BlogEntry table. You need to be aware of a few differences between the two types when you try to write provider-independent code. Take a look at the following snippet, which shows the stored procedure required to insert a new item in the BlogEntry table in SQL Server:
CREATE PROCEDURE sprocBlogEntryInsertSingleItem
@title nvarchar(200), @body nvarchar(MAX), @categoryId int, @datePublished datetime
AS
INSERT INTO
BlogEntry
(
Title, Body, CategoryId, DatePublished
)
VALUES
(
@title, @body, @categoryId, @datePublished
)
179
Chapter 6
The same code in an Access query looks like this:
INSERT INTO
BlogEntry (Title, Body, CategoryId, DatePublished)
VALUES (?, ?, ?, ?);
As you can see, for a stored procedure you need to declare each parameter and its type explicitly. In an Access query, all you need to do is supply a question mark at the places where you want to insert a parameter. Sometimes when you save a query in Microsoft Access, it adds square brackets around the question mark parameter placeholders, causing the application to break. When this happens, remove the brackets and save the query again.
In addition to the name, the order in which parameters are sent to the database is important as well. SQL Server uses named parameters, so it doesn’t care in which order the parameters are added. However, since Access has no way to figure out to which parameter you are referring because they all have the same name (only a question mark), you must pass the parameters in the order that the query expects them. In the preceding example, you’d need to pass the Title first, then the Body, the CategoryId, and finally the DatePublished.
In addition to these two tables that are present in both databases, the Microsoft Access database also has three tables to store users, roles, and the roles to which the users are assigned. The names of these tables match those in the SQL Server database that are created by the .NET 2.0 Framework.
Helper Classes
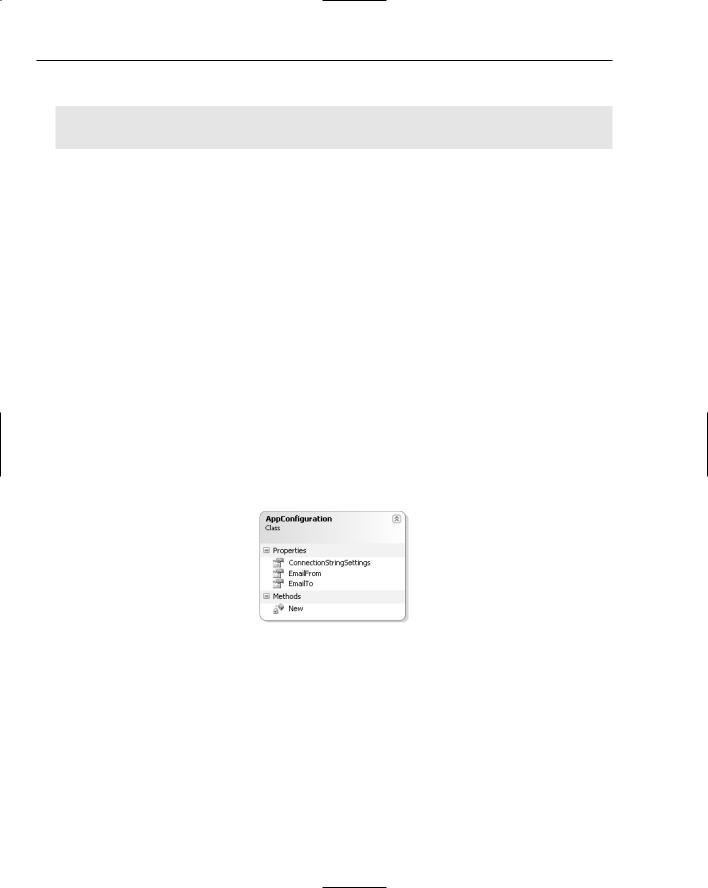
The final class that is hosted in the special App_Code folder is called AppConfiguration (see Figure 6-11). It has three read-only and shared properties called ConnectionStringSettings, EmailFrom, and EmailTo.
Figure 6-11
The ConnectionStringSettings property provides access to the active connection used in the application. This property plays a vital role in accessing different types of databases and is examined in great depth in the next section.
The other EmailFrom and EmailTo properties are used for sending e-mails with error information. You see where they are used exactly later in this chapter.
180

Wrox Blog
Code and Code Explanation
In this section you learn how all the different parts of the Wrox Blog, including the user controls Blog Entries and BlogEntriesFilter and the code in the App_Code folder, work and interact together. This section begins with some important files that are used by the entire application and then discusses the Controls folder that contains the user controls.
Root Files
Before dissecting the user controls and their code-behind that make up the largest part of the Wrox Blog, you should first look at the few files that are located in the root of the site. These files play an important role in authenticating a user. As stated previously, the ASP.NET run time takes care of user authentication and role membership when a SQL Server database is used. To accommodate for Microsoft Access as well, you need to write some custom code that authenticates a user and stores the roles the user is assigned to in a cookie so the roles are available to other pages throughout the lifetime of the user’s session. Even though this authentication solution requires some custom code, you can still make use of the many available
.NET classes.
Web.config
Just as with other ASP.NET applications, the Web.config file in the Wrox Blog is used for settings that apply to the entire application. In the Wrox Blog, this file contains a few important settings. At the top of that file, you’ll find an <appSettings> key called DefaultConnectionString. The value of this key contains the name of one of the two connection strings defined in the same file. Both settings are used in the data access layer and are discussed later. The EmailFrom and EmailTo keys are used when sending error messages, described near the end of the chapter. Similar to the previous chapter, the FCKeditor:UserFilesPath key holds the path to the folder where files uploaded with the FCKeditor are stored.
Further down in the Web.config file, you also see two nodes called <membership> and <roleManager>. These nodes set up the membership and role providers for use with SQL Server, similar to those you saw in the previous chapter. On the roleManager node you see an important attribute called enabled.
When this attribute is set to true, the Wrox Blog assumes that the ASP.NET authentication scheme is used, and will not attempt to authenticate the user manually but instead use the SQL Server database for authentication. When the attribute is false, the code in the Login.aspx page overrides the default login behavior and fires the custom code to authenticate the user against the Microsoft Access database.
Login.aspx
The markup of this file contains a small bit of HTML and a single Login control. Normally, this control takes care of authenticating a user against a SQL Server database using the built-in providers. However, in the Authenticate event of this control you’ll see some code that overrides this behavior when the role manager is not enabled and fires when the user tries to log in. To ensure the custom code in the Authenticate event runs only when the Access database is in use, the following code in the Page_Load event dynamically hooks up the Authenticate event to the Login1_Authenticate method:
181

Chapter 6
Protected Sub Page_Load(ByVal sender As Object, ByVal e As System.EventArgs) _ Handles Me.Load
If Page.IsPostBack AndAlso Roles.Enabled = False Then
AddHandler Login1.Authenticate, AddressOf Login1_Authenticate
End If
End Sub
When Roles are enabled for the application, the code in the If block won’t run, allowing ASP.NET to fire its own code to authenticate a user against a SQL Server database. If Roles are disabled, this code causes the Authenticate event to fire the code defined in the Login1_Authenticate event handler.
The code inside that event handler retrieves the roles for the current user and stores them in an encrypted cookie. On subsequent requests to pages in the site, these roles are retrieved from the cookie again and assigned to the current user. This way, you have to access the database for role information only once, which greatly enhances the performance of your site. The code responsible for retrieving and storing the roles looks like this:
If Roles.Enabled = False Then
Dim userName As String = Login1.UserName
Dim passwordHash As String = _
FormsAuthentication.HashPasswordForStoringInConfigFile( _
Login1.Password, “MD5”)
Dim userRoles As ArrayList = UserManager.GetUserRoles(userName, passwordHash) ‘ The rest of the code is shown later
First, the code checks to see if roles are enabled for this application. This is controlled by the Enabled attribute on the roleManager element in the Web.config file. When this attribute is False, it is assumed that not SQL Server but a Microsoft Access database is used and that the custom authentication code should fire.
The username and password are retrieved from the standard Login control. This is a good example of mixing the available ASP.NET 2.0 functionality with custom code. Instead of writing a login page from scratch, you simply drop a Login control on your page, and overwrite the Authenticate event, while you still have access to the control’s UserName and Password properties.
Passwords are not stored as plain text in the database; instead, only a hash of the password is saved. To compare that hash to the password the user entered, that password must be hashed as well using
FormsAuthentication.HashPasswordForStoringInConfigFile. To create a hash for a password when you want to create a new user in the database, you can use that same method.
The username and password are then sent to the GetUserRoles method in the UserManager class. This method in turn sends them to the GetUserRoles method in the UserManagerDB class that tries to retrieve the roles for the user from the database. When the user is found and has roles assigned, those roles are returned as an ArrayList; otherwise the method returns Nothing. You see exactly how this method accesses the database in the section “Writing Provider-Independent Code” later in the chapter. The query that’s responsible for retrieving the roles looks like this:
SELECT aspnet_Roles.Description
FROM
182

Wrox Blog
aspnet_Users INNER JOIN (aspnet_Roles INNER JOIN aspnet_UsersInRoles ON aspnet_Roles.Id=aspnet_UsersInRoles.RoleId) ON aspnet_Users.Id=aspnet_UsersInRoles.UserId
WHERE
aspnet_Users.UserName=? And aspnet_Users.PasswordHash=?;
This query links the Users, Roles, and UsersInRoles tables together and returns the description of each role the user is assigned to. It uses a WHERE clause to filter the list to only the specified user and password hash. If the username or password is incorrect, no records are returned; otherwise a list with one or more role names is returned from the query.
Remember, you’ll find this query only in the Access database. For SQL Server, the ASP.NET run time takes care of user authentication and role membership.
The GetUserRoles method in the UserManagerDB class passes the results up to the UserManager class, which returns the results to the calling code in the Login page where the remainder of the Authenticate event fires:
If userRoles IsNot Nothing Then
Dim userData As String = String.Empty For Each myRole As String In userRoles
userData &= myRole & “,” Next
userData = userData.TrimEnd(“,”c)
Dim ticket As New FormsAuthenticationTicket( _ 2, _
userName, _ System.DateTime.Now, _
System.DateTime.Now.AddMinutes(30), _ Login1.RememberMeSet, _
userData, _ FormsAuthentication.FormsCookiePath)
Dim encTicket As String = FormsAuthentication.Encrypt(ticket)
Response.Cookies.Add(New HttpCookie( _
FormsAuthentication.FormsCookieName, encTicket))
Response.Redirect(FormsAuthentication.GetRedirectUrl(userName, True))
Else
e.Authenticated = False
End If
End If
If the GetUserRoles method did not return Nothing (which means the user was found and had roles assigned) the ArrayList is used to build up a comma-separated list of roles. This list is then added to the userData field of a FormsAuthenticationTicket, a class that is used to create a wrapper around critical information for authentication that can be stored in a cookie. Its constructor expects a version number, the name of the user, the start and expiration date of the authentication period, a Boolean to indicate whether to create a persistent cookie, and the path to which the cookie should apply.
183

Chapter 6
As the second-to-last parameter, the constructor also expects a userData parameter. In this parameter you can store user-related data that is saved with the cookie and can be retrieved on subsequent requests. In the preceding code, the comma-separated list of role names is stored in the cookie. These role names are retrieved later inside the Global.asax files and assigned to the user again.
When the ticket has been constructed, it’s encrypted with the Encrypt method of the Forms Authentication class and stored in a cookie. At the end of the code, the user is redirected to the page he initially requested, or to the default homepage using GetRedirectUrl.
If authentication failed because the username or password were incorrect or the user did not have any roles assigned, the Authenticated property of the AuthenticateEventArgs parameter is set to False. This ensures that the Login control displays an error message to the user, saying that the login attempt failed.
Global.asax
The Global.asax file is responsible for retrieving the roles from the cookie that has been created by the Login page. Inside the Global file, you can write code for the Application_AuthenticateRequest event that is triggered for each request to the site. It fires before any code in the page itself runs, so it’s a perfect location to retrieve the roles from the cookie and assign them to the user:
Sub Application_AuthenticateRequest(ByVal sender As Object, ByVal e As EventArgs) If User IsNot Nothing AndAlso User.Identity.IsAuthenticated Then
If System.Web.Security.Roles.Enabled = False Then
Dim id As FormsIdentity = CType(User.Identity, FormsIdentity) Dim ticket As FormsAuthenticationTicket = id.Ticket
Dim roleAsString As String = ticket.UserData
Dim roles() As String = roleAsString.Split(New Char() {“,”}) Context.User = New GenericPrincipal(Context.User.Identity, roles)
End If End If
End Sub
The code first checks if the User object exists and is authenticated. It also checks if the role manager is enabled, because when it is, ASP.NET takes care of role management and this custom code doesn’t need to run.
If all these conditions are met, the FormsAuthenticationTicket is retrieved from the current user’s Identity. ASP.NET handles all the steps required to create this identity and to retrieve and decrypt the cookie. Once the ticket is stored in a local variable, the comma-separated string with the role names can be retrieved from the UserData property. This string is then converted to an array using the Split method and assigned to the user for the current request by creating a new GenericPrincipal and passing the array of roles to its constructor.
Once the code in this event has finished, you can check whether a user is in a specific role with the following code:
If Context.User.IsInRole(“Administrator”) Then
‘ Run code for an Administrator
End If
184

Wrox Blog
The Global.asax file contains another method called Application_Error that is used to send application errors by e-mail. This method is discussed a bit later, but first you need to look at how you can write provider-independent code.
Writing Provider-Independent Code
In the discussion of the Login page you saw the GetUserRoles method in the UserManagerDB class. The discussion of how the database is accessed was skipped, so you could focus on the authentication mechanism instead. However, now is the time to look at that method in great detail because the concepts used in this method are used in all the data access code. The following code block lists the entire GetUserRoles function, which is then discussed line by line:
Public Shared Function GetUserRoles( _
ByVal userName As String, ByVal passwordHash As String _ ) As ArrayList
Dim myFactory As DbProviderFactory = _
DbProviderFactories.GetFactory( _
AppConfiguration.ConnectionStringSettings.ProviderName)
Dim myConnection As DbConnection = myFactory.CreateConnection
myConnection.ConnectionString = _ AppConfiguration.ConnectionStringSettings.ConnectionString
myConnection.Open()
Dim myCommand As DbCommand = myConnection.CreateCommand()
myCommand.CommandText = “sprocUserGetRoles” myCommand.CommandType = CommandType.StoredProcedure
Dim param As DbParameter
param = myCommand.CreateParameter()
param.ParameterName = DalHelpers.ReturnCommandParamName(“userName”) param.DbType = DbType.String
param.Value = userName myCommand.Parameters.Add(param)
param = myCommand.CreateParameter()
param.ParameterName = DalHelpers.ReturnCommandParamName(“passwordHash”) param.DbType = DbType.String
param.Value = passwordHash myCommand.Parameters.Add(param)
Dim arrRoles As ArrayList = Nothing
Dim myDataReader As DbDataReader = myCommand.ExecuteReader( _ CommandBehavior.CloseConnection)
If myDataReader.HasRows Then arrRoles = New ArrayList() Do While myDataReader.Read()
185

Chapter 6
arrRoles.Add(myDataReader.GetString( _ myDataReader.GetOrdinal(“Description”)))
Loop
End If
Return arrRoles
End Function
Right below the function header, you see code that creates a variable of type DbProviderFactory that gets a value by calling GetFactory on the DbProviderFactories class. You can see this DbProviderFactory as a class this is capable of creating different instances of database-related objects like connections and commands. To tell it what kind of object you want to create (such as a SqlConnection or an OleDb Connection) you need to pass it a ProviderName. If you’re targeting SQL Server, you should pass it
System.Data.SqlClient, and for an Access database you should pass System.Data.OleDb.
When you think about how you want to pass the right ProviderName to this method, your first idea might be to store it in the Web.config with a key like DefaultProvider. Then you can use Configuration Manager.AppSettings.Get(“DefaultProvider”) to get the provider name from the Web.config file and pass it to the constructor of the factory. Although this would certainly work, ASP.NET 2.0 offers a much more elegant solution to the problem. This is where the ConnectionStringSettings property in the custom AppConfiguration class comes in. In .NET 1.x the only way to store a connection string was to add it to the general <appSettings> section in the Web.config. ASP.NET 2.0, however, has a new <connectionStrings> element available in the Web.config file that allows you to get strongly typed information about the chosen connection. Take a look at the ConnectionStringSettings property to see how this works:
Public Shared ReadOnly Property ConnectionStringSettings() As _
ConnectionStringSettings
Get
Dim connectionStringKey As String = _
ConfigurationManager.AppSettings.Get(“DefaultConnectionString”)
Return ConfigurationManager.ConnectionStrings(connectionStringKey)
End Get
End Property
This code first retrieves the default connection string key from the database. This is a custom key defined in the Web.config file that can hold either SqlServerConnectionString (for the SQL Server connection) or AccessConnectionString (for the Access database connection). This key is then used to retrieve the connection string settings that belong to that key. The ConnectionStringSettings class exposes both the ConnectionString and the ProviderName, provided that you supplied that name on the connection string in the Web.config file. Both connection strings in the Web.config file have that name set. Here’s how the connection string for SQL Server with the providerName attribute looks:
<add name=”SqlServerConnectionString” connectionString=”server=(local)\SqlExpress; AttachDbFileName=|DataDirectory|Blog.mdf;Integrated Security=true;
User Instance=true” providerName=”System.Data.SqlClient”
/>
If you look at the code that instantiates the factory, you’ll see how it all fits together:
Dim myFactory As DbProviderFactory = _
DbProviderFactories.GetFactory( _
AppConfiguration.ConnectionStringSettings.ProviderName)
186