

ASP.NET 2.0 Instant Results
.pdfWrox CMS
<asp:DropDownList ID=”lstContentTypes” runat=”server” DataSourceID=”sdsContentTypes”
DataTextField=”Description” DataValueField=”Id” AutoPostBack=”true”> </asp:DropDownList>
The DataSourceID of the control is set to the SqlDataSource so the control knows where to get its data. The DataTextField and DataValueField are then set to the two columns that are available in the DataSet that is returned by the SqlDataSource. AutoPostBack is set to True to ensure that the page will reload whenever you choose a new content type from the drop-down list.
The SqlDataSource gets its data by calling a stored procedure called sprocContentTypeSelectList. This is done with the following markup:
<asp:SqlDataSource ID=”sdsContentTypes” runat=”server” ConnectionString=”<%$ ConnectionStrings:Cms %>” SelectCommand=”sprocContentTypeSelectList” SelectCommandType=”StoredProcedure”>
</asp:SqlDataSource>
This markup is very similar to the code you saw earlier used to retrieve the menu items from the database. The stored procedure used by the data source is very simple; all that it does is request a list with the available content types:
CREATE PROCEDURE sprocContentTypeSelectList
AS
SELECT
Id, Description, SortOrder
FROM
ContentType
WHERE
Visible = 1
ORDER BY
SortOrder
With the drop-down list in place, the next thing to look at is the GridView. Just as with the drop-down, the GridView is bound to a SqlDataSource by setting its DataSourceID property:
<asp:GridView ID=”gvCategories” runat=”server” AutoGenerateColumns=”False” DataKeyNames=”Id” DataSourceID=”sdsCategories” AllowPaging=”True” AllowSorting=”True”>
... control’s inner content goes here </asp:GridView>
The DataKeyNames property is set to Id, which is the ID of the category in the database to tell the GridView what the primary key of table is. In addition, AllowPaging and AllowSorting are set to True. This way, the data in the GridView gets easier to manage because you can now sort specific columns and see the data displayed in smaller pages instead of having to scroll through a long list with items.
147
Chapter 5
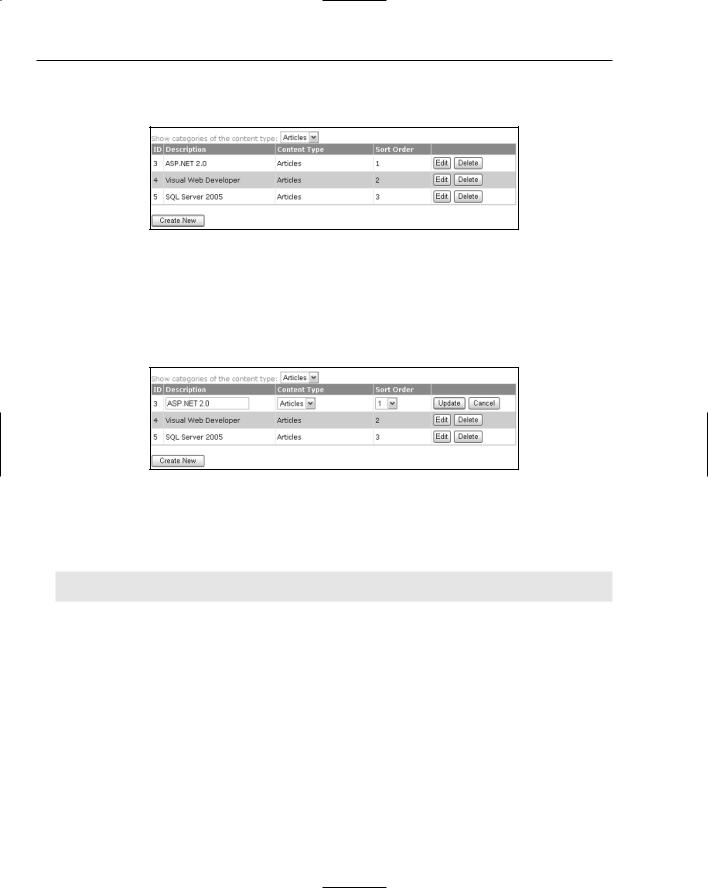
To understand what data needs to be displayed in the GridView, take a look at the page as it is displayed in the Management section (see Figure 5-9).
Figure 5-9
Above the GridView you see the drop-down discussed earlier. In the GridView you see columns that display the category’s ID, its own description, the description of the content type it belongs to, the sort order, and two buttons to edit and delete the categories. When you click the Edit button, the GridView jumps in edit mode and displays editable controls for the description, content type, and sort order, as shown in Figure 5-10.
Figure 5-10
To display the items in both read-only and edit mode, the GridView contains a mix of BoundField, TemplateField, and CommandField controls. It’s a bit too much code to repeat all of it here, but a few of them are examined in more detail. First, take a look at the ID column:
<asp:BoundField DataField=”Id” HeaderText=”ID”
ReadOnly=”True” SortExpression=”Id” />
The field is bound to the Id column in the database by setting the DataField attribute. The ReadOnly attribute is set to True to ensure the column is not editable when the GridView is in edit mode. Because the database automatically assigns new IDs to the category, there is no point in allowing the user to change the value. By setting SortExpression to Id you accomplish two things. First, the HeaderText for the column changes from a simple label to a clickable hyperlink. Secondly, when the column is clicked, the data is sorted on the column specified by the SortExpression attribute.
For the description column a TemplateField is used that displays a simple label in read-only mode and a text box when the item is edited. To ensure that the field is not left empty, the text box is hooked up to a RequiredFieldValidator control.
The column for the content type is a bit more complex, because it displays a drop-down control in edit mode. Fortunately, the code you require for such a column is still pretty easy:
148

Wrox CMS
<asp:TemplateField HeaderText=”Content Type”> <ItemTemplate>
<asp:Label ID=”Label1” runat=”server”
Text=’<%# Bind(“ContentTypeDescription”) %>’> </asp:Label>
</ItemTemplate>
<EditItemTemplate>
<asp:DropDownList ID=”DropDownList1” runat=”server” DataSourceID=”sdsContentTypes” DataTextField=”Description” DataValueField=”Id” SelectedValue=’<%# Bind(“ContentTypeId”) %>’>
</asp:DropDownList>
</EditItemTemplate> <ItemStyle Width=”175px” />
</asp:TemplateField>
Just as with the Description, a TemplateField control is used. In read-only mode (defined by the ItemTemplate) a Label is displayed with its text bound to the ContentTypeDescription column that is retrieved from the database.
The EditItemTemplate holds a single <asp:DropDownList> with its DataSourceID set to sdsContentTypes. This is the same SqlDataSource that is used to display the drop-down at the top of the page. To preselect the right item in the list when the GridView is put in edit mode, and to get the right value back when the item is saved in the database, the SelectedValue of the control is set to
<%# Bind(“ContentTypeId”) %>.
The <ItemStyle> element defined in the TemplateField is used to set the width of the column in read-only and edit mode.
The SortOrder column is similar to the ContentType column. The only difference is that this column doesn’t use a separate data source to get its data; the items in the drop-down list are hard-coded in the page.
The final column you need to look at is the column with the Edit and Delete buttons. Again, the markup for the column is remarkably simple:
<asp:CommandField ShowDeleteButton=”True” ShowEditButton=”True” ButtonType=”Button” >
<ItemStyle Width=”150px” /> </asp:CommandField>
The CommandField control has a ShowDeleteButton and a ShowEditButton property, both of which are set to True. When you click the Edit button, the control switches to edit mode, the Delete button disappears temporarily, and the Edit button is replaced with an Update and a Cancel button. When you make a change in the data and then click the Update button, the GridView triggers the UpdateCommand of the SqlDataSource it is bound to. When you click the Delete button, it triggers the DeleteCommand on the associated data source. To see how that works, it’s time to look at the code for the SqlDataSource control that is used by the GridView:
<asp:SqlDataSource ID=”sdsCategories” runat=”server” ConnectionString=”<%$ ConnectionStrings:Cms %>” DeleteCommand=”sprocCategoryDeleteSingleItem”
149

Chapter 5
DeleteCommandType=”StoredProcedure”
InsertCommand=”sprocCategoryInsertUpdateSingleItem”
InsertCommandType=”StoredProcedure”
SelectCommand=”sprocCategorySelectlist”
SelectCommandType=”StoredProcedure”
UpdateCommand=”sprocCategoryInsertUpdateSingleItem”
UpdateCommandType=”StoredProcedure”
... Parameters are defined here </asp:SqlDataSource>
In addition to the familiar connection string, the SqlDataSource has a number of Command and CommandType attributes defined. For each of the four main data actions — selecting, inserting, updating, and deleting — the control has a command that points to an associated stored procedure. For each of these commands, the CommandType has been set to StoredProcedure.
Within the SqlDataSource tags, the parameters for the stored procedure are defined. The <SelectParameters> element defines the parameters passed to the Select stored procedure to select a list of categories. As you recall, this list is filtered on the content type specified by the drop-down
list at the top of the page:
<SelectParameters>
<asp:ControlParameter ControlID=”lstContentTypes” Name=”contentTypeId” PropertyName=”SelectedValue” Type=”Int32” DefaultValue=”-1” />
</SelectParameters>
The only parameter is one of type ControlParameter that looks at the lstContentTypes dropdown. When the data source is about to get the data from the database, it looks at that control, gets its SelectedValue, and then passes that to the stored procedure.
To allow updating of data, the data source also has UpdateParameters defined:
<UpdateParameters>
<asp:Parameter Name=”returnValue” Type=”Int32” Direction=”ReturnValue” /> <asp:Parameter Name=”id” Type=”Int32” />
<asp:Parameter Name=”description” Type=”String” /> <asp:Parameter Name=”contentTypeId” Type=”Int32” /> <asp:Parameter Name=”sortOrder” Type=”Int32” />
</UpdateParameters>
For each of the parameters of the stored procedure, one Parameter object is defined. Note that there is no need to tie these parameters to controls. Instead, the GridView uses Bind to bind its controls to the parameters of the data source by their name. So, the Bind expression for the ContentType drop-down in the edit template binds directly to this parameter by its name.
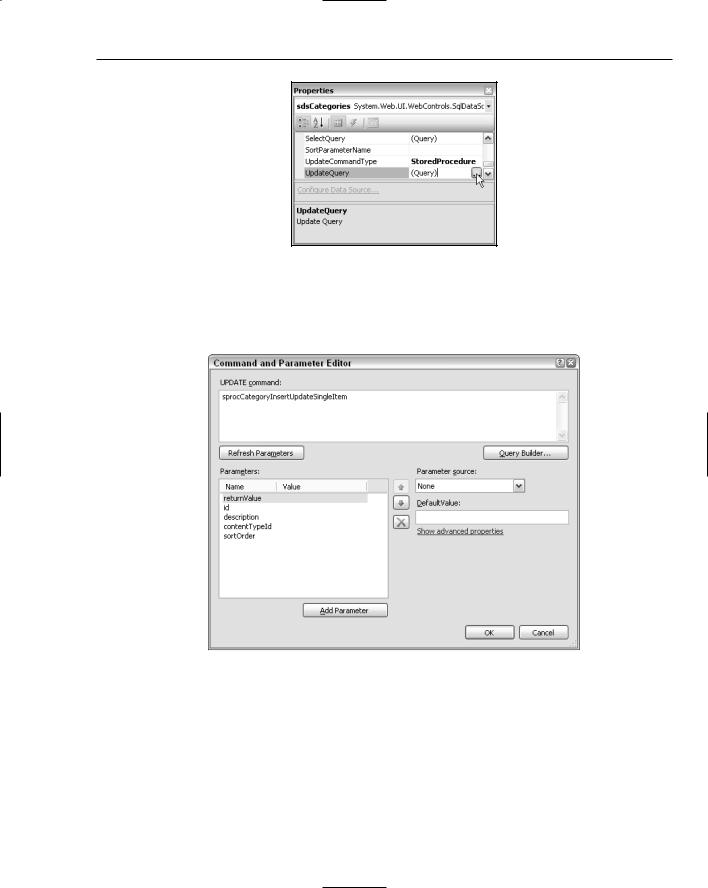
Note the additional returnValue parameter that is used to get the return value from the stored procedure. When you use the Configure Data Source command from the Smart Tasks panel for the data source, you don’t get a chance to add this parameter. However, you can either type the parameter directly in Source View, or click the ellipses (see Figure 5-11) after the UpdateQuery (or other queries) on the Properties Grid for the data source control in Design View.
150
Wrox CMS
Figure 5-11
This brings up the Command and Parameter Editor shown in Figure 5-12 that allows you to reorder, delete, and create new or change existing parameters. To change the Direction for a parameter, you need to click the Show Advanced Properties link and then choose an option from the Direction drop-down.
Figure 5-12
With the GridView and its fields collection bound to the data source control, which in turn is bound to stored procedures in the database, you have everything in place to allow updating and deletion of data. There are, however, two other things you need to examine. The first thing is how to handle duplicate records. The other is how to insert new categories. Take a look at solving the duplicates problem first.
Each category within a specific content type must have a unique description because it doesn’t make sense to have two menu items with the same name. The stored procedure that inserts and updates
151

Chapter 5
categories handles this by finding out if there is already a category with the same name before the insert or update takes place:
IF NOT EXISTS (SELECT Id FROM Category
WHERE Description = @description AND ContentTypeId = @contentTypeId)
BEGIN
-- Insert the item here
END
ELSE
BEGIN
SET @returnValue = -1 -- record already exists
END
Only when the IF NOT EXISTS check returns True is the new item inserted. Otherwise, the stored procedure returns -1 to the SqlDataSource through its returnValue parameter you saw earlier. In the code-behind for the Categories page, that return value is examined. If it’s not -1, the insert or update succeeded. Otherwise, an error message is displayed to the user, indicating the database action didn’t succeed. The place where the parameter is examined is inside the Inserted and Updated events of the data source:
Protected Sub sdsCategories_AfterInsertOrUpdate(ByVal sender As Object, _ ByVal e As System.Web.UI.WebControls.SqlDataSourceStatusEventArgs) _ Handles sdsCategories.Inserted, sdsCategories.Updated
Dim id As Integer = Convert.ToInt32(e.Command.Parameters(“@returnValue”).Value) If id = -1 Then
lblErrorMessage.Text = “There is already a category with this description.” & _ “Your changes have not been applied.<br />”
lblErrorMessage.Visible = True End If
End Sub
Note the comma-separated list of the Handles clause; this allows you to hook up one event handler to multiple events of the same or different controls.
Because the GridView does not support inserting data, a FormView control is used to allow the user to insert a new category. Very similar to the way the GridView is set up, the FormView contains an InsertItemTemplate with controls that expose their values to the SqlDataSource control to allow the insert to happen. The InsertItemTemplate contains a text box for the Description, a
RequiredFieldValidator, and two drop-downs for the content type and the sort order columns. To view the FormView so you can insert a new item, click the Create New button on the Categories page. This fires the btnNew_Click method in the code-behind that hides the List panel and then shows the New panel, allowing you to insert the new category.
Just like the GridView, the FormView is bound to the sdsCategories data source, this time using its InsertCommand to send the details the user entered to the stored procedure that eventually inserts the new category. When you click the Insert button, the values you entered in the FormView are sent to the SqlDataSource, which forwards them to the database. Just as with the GridView, the sdsCategories_ AfterInsertOrUpdate method is used to determine whether a duplicate category has been inserted.
152

Wrox CMS
Now that you’re able to define the appearance of the site by managing the items in the main and submenu, it’s time to look at how you can create the actual content for the site. The next section looks at the ContentList.aspx and AddEditContent.aspx pages that allow you to manage content items.
Managing Content
When you click the Manage Content button in the Admin menu, you’re taken to ContentList.aspx that displays a list with the available content items in the database. To make it easy to distinguish between active and deleted content, the page has a drop-down with an Active and Deleted item. Whenever you choose a new item from that drop-down the page is refreshed and displays a list with either previously deleted or active content items. The page also contains a SqlDataSource with its Select and Delete commands set to stored procedures in the database to allow you to get a list of content items, or to delete a single item.
The GridView that is used on this page has some similarities with the one used to display the categories. Two important differences exist, though, which are examined now. First of all, the GridView is not editable, so you’ll see no TemplateFields with an EditItemTemplate.
The other difference is the way in which the buttons to delete and edit existing items are set up. With the categories page you used a single CommandField with ShowDeleteButton and ShowEditButton both set to True. For the content page, however, each button has its own column:
<asp:ButtonField ButtonType=”Button” CommandName=”Edit” HeaderText=”Edit” Text=”Edit”>
<ItemStyle Width=”100px” /> </asp:ButtonField>
<asp:CommandField ButtonType=”Button” ShowDeleteButton=”True”> <ItemStyle Width=”100px” />
</asp:CommandField>
The Delete button is still generated by a CommandField with ShowDeleteButton set to True. When you click the Delete button, the GridView triggers the DeleteCommand on the associated SqlDataSource control to delete the item from the database. This works exactly the same as deleting categories.
When you start editing a content item, things behave a bit differently, though. Because a content item requires some fields other than the default single-line text boxes or even a few drop-down controls you can add in the EditItemTemplate of the GridView, it’s not really an option to edit a content item inline in the grid. Instead, when you click the Edit button, the GridView control’s RowCommand is triggered and you’re taken to a separate page, AddEditContent.aspx, that allows you to enter content using complex controls. You’ll see that page later. The code that sends you to this page looks like this:
Protected Sub gvContent_RowCommand(ByVal sender As Object, _
ByVal e As System.Web.UI.WebControls.GridViewCommandEventArgs) _
Handles gvContent.RowCommand
Select Case e.CommandName.ToLower()
Case “edit”
Dim recordIndex As Integer
Dim recordId As Integer
recordIndex = Convert.ToInt32(e.CommandArgument)
recordId = Convert.ToInt32(gvContent.DataKeys(recordIndex).Value) Response.Redirect(“AddEditContent.aspx?Id=” & recordId.ToString())
End Select End Sub
153

Chapter 5
The ButtonField for the Edit button you saw earlier has its CommandName set to Edit. Inside the RowCommand event, this command name is made available through the CommandName property of the GridViewCommandEventArgs passed to the method. When the command name matches Edit, you know the Edit button has been clicked. You can then use the CommandArgument to find the zero-based index of the clicked row in the grid. So, when you click the third item, the CommandArgument will have a value of 2. You can then use this index to ask the GridView for the DataKey that belongs to the clicked item. The DataKeys collection of the GridView returns the primary key of a content item in the database, which is exactly what you need because AddEditContent.aspx expects that ID in case you’re editing a content item. Finally, when you have the key, you can construct a URL with the ID appended to the query string and send the user to that page.
Earlier you learned that the FormView is a great control that allows you to enter data into the database with little to no code. However, its usage is often limited to simpler data access scenarios like the Categories page in the Management folder. One of the biggest drawbacks of the control is the fact that you need to define separate templates for insertion and for updating data. With complex, multi-control data pages, setting up such a form can become tedious and error-prone.
To avoid these problems, a different approach was taken with the AddEditContent page. Instead of relying exclusively on built-in controls to get data from and in the database, a single Content class was created that represents a content item in the database. Additionally, the ContentDB class was designed, which is responsible for communicating with the database. Inside the page, you use these classes to get a content item from the database, and then use regular controls like text boxes and drop-downs in the page directly. To see how this all works, look at the markup of the AddEditContent.aspx page.
At the bottom of the page, you see two SqlDataSource controls that are used to display the available content types and categories in a drop-down. The data source for the categories, called sdsCategories, is tied to the content types drop-down with a single SelectParameter. This ensures that whenever you choose a new content type from the drop-down, the page will refresh and show an updated list with categories for that content type. The two drop-down controls are exactly the same as the others you have seen so far. They have their DataSourceID set to the relevant SqlDataSource control, and their DataTextField and DataValueField properties point to the columns held in the DataSet returned by the data sources. So far, there is nothing new in the page. But how do the other controls in the page get their values? To understand how that works, open up the code-behind for AddEditContent.aspx and look at the Page_Load event:
Protected Sub Page_Load(ByVal sender As Object, _ ByVal e As System.EventArgs) Handles Me.Load
If Request.QueryString.Get(“Id”) IsNot Nothing Then contentId = Convert.ToInt32(Request.QueryString.Get(“Id”))
End If
If Not Page.IsPostBack And contentId > 0 Then
Dim myContentItem As Content = Content.GetItem(contentId) If myContentItem IsNot Nothing Then
Me.Title = “Edit “ & myContentItem.Title txtTitle.Text = myContentItem.Title txtIntroText.Value = myContentItem.IntroText txtBodyText.Value = myContentItem.BodyText chkVisible.Checked = myContentItem.Visible
lstContentTypes.DataBind()
154

Wrox CMS
lstContentTypes.SelectedValue = myContentItem.ContentTypeId.ToString()
lstCategories.DataBind()
lstCategories.SelectedValue = myContentItem.CategoryId.ToString()
End If
End If
End Sub
Inside this method, the code tries to retrieve the requested contentId from the query string if it has been provided. If there is no query string it means a new item should be inserted, so the next If block won’t run. If there is a query string, however, a few actions are carried out. First of all, a call is made to the GetItem method of the Content class. This method expects the ID of the content item in the database, and then returns a strongly typed Content item. You look at the Content object and its associated ContentDB class in full detail after finishing the discussion of the Page_Load method. Once you have a valid Content object, you can use its public properties like Title, IntroText, and BodyText to set the initial values of the controls and the title of the page. The txtIntroText and txtBodyText controls are in fact complex HTML editors powered by the FCKeditor. Again, this is examined in full detail a little later.
Unlike the text controls such as the Title text box, the drop-down controls require a bit more thought. The Categories drop-down is bound to the Content Type drop-down so it always displays categories from the currently selected content type. This means that you should fill and preselect the content type list before you can work with the categories. The code in the Page_Load method does exactly that:
lstContentTypes.DataBind()
lstContentTypes.SelectedValue = myContentItem.ContentTypeId.ToString()
First, a call is made to the DataBind method of the lstContentTypes control. This in turn triggers its associated SqlDataSource control that gets the items from the database, which are then added as <asp:ListItem> controls to the drop-down. The second line of code then sets the SelectedValue of the control equal to the ContentType of the content item.
The next two lines then get the items for the second drop-down that displays the available categories:
lstCategories.DataBind()
lstCategories.SelectedValue = myContentItem.CategoryId.ToString()
When the call to DataBind of the categories drop-down is made, its related SqlDataSource is triggered. As stated previously, this control has a single SelectParameter that looks at the selected value of the Content Type drop-down. Because just before the call to DataBind, you have set that SelectedValue, the data source will now get the right categories belonging to the selected content type. When the items have been added to the drop-down list, the last line sets its SelectedValue to the one retrieved from the CategoryId of the Content object, just as with the content type.
Now that you know how the data from the Content object is displayed in the various controls, you may be wondering how the content item is created in the first place. As you saw in the section “Design of the Wrox CMS” earlier in this chapter, the Content class has a number of public properties and a shared method called GetItem that accepts the ID of a content item and returns an instance of the Content class. All the GetItem method in the business layer does is delegate its responsibility to a method with the same name in the ContentDB class:
155

Chapter 5
Public Shared Function GetItem(ByVal id As Integer) As Content
Return ContentDB.GetItem(id)
End Function
This GetItem method in the ContentDB class in turn gets the item from the database and returns it to the calling code:
Public Shared Function GetItem(ByVal id As Integer) As Content Dim theContentItem As Content = Nothing
Using myConnection As New SqlConnection(AppConfiguration.ConnectionString) Dim myCommand As SqlCommand = New SqlCommand _
(“sprocContentSelectSingleItem”, myConnection)
myCommand.CommandType = CommandType.StoredProcedure myCommand.Parameters.AddWithValue(“@id”, id) myConnection.Open()
Using myReader As SqlDataReader = _ myCommand.ExecuteReader(CommandBehavior.CloseConnection)
If myReader.Read Then
theContentItem = New Content(myReader.GetInt32(myReader.GetOrdinal(“Id”))) theContentItem.Title = myReader.GetString(myReader.GetOrdinal(“Title”)) theContentItem.IntroText = _
myReader.GetString(myReader.GetOrdinal(“IntroText”)) theContentItem.BodyText = _
myReader.GetString(myReader.GetOrdinal(“BodyText”)) theContentItem.ContentTypeId = _
myReader.GetInt32(myReader.GetOrdinal(“ContentTypeId”)) theContentItem.CategoryId = _
myReader.GetInt32(myReader.GetOrdinal(“CategoryId”)) theContentItem.Visible = _
myReader.GetBoolean(myReader.GetOrdinal(“Visible”))
End If myReader.Close()
End Using End Using
Return theContentItem End Function
The code starts off by declaring a new variable of type Content and setting it to Nothing. If the item cannot be found in the database, this value will be returned from the method, so the calling ASPX page can take that into account.
Next, an instance of a SqlConnection and a SqlCommand are created. The new Using statement ensures the connection object is disposed of automatically when the block of code has finished. The name of the stored procedure you want to execute is passed to the constructor of the Command object, together with the connection. The CommandType of the Command object is set to StoredProcedure and a single parameter that holds the ID of the content item in the database is created.
Then the connection is opened and the command’s ExecuteReader method is fired, resulting in a SqlDataReader. If the Read() method returns True, it means a record has been found, so you can instantiate a new Content object and set each of its public properties retrieved from the SqlDataReader. Notice the use of the GetOrdinal methods. By design the Get* methods, like GetInt32 and GetString
156