

ASP.NET 2.0 Instant Results
.pdfWrox CMS
have to jump through all kinds of hoops, resulting in bloated markup and far from straightforward code in the code-behind of your pages.
The second problem with the SqlDataSource controls is the fact that they usually embed SQL statements directly in the markup of your pages. This breaks about every rule of good multi-tiered design because this forces you to update possibly many pages in your site whenever you make even a little change to the structure of your database.
Despite these disadvantages, using the SqlDataSource control can be a great way to rapidly develop relatively small web sites that require little to no changes in the database structure. To show you how they work and how to use them, they are used for most of the data access in the Wrox CMS. The only exception is the AddEditContent.aspx page. Instead of working with a SqlDataSource control, the Wrox CMS uses a few custom classes and methods to get information from and in the database.
To minimize the impact of the SQL statements all over the page, stored procedures are used in all of the SqlDataSource controls in the Wrox CMS. Instead of storing the entire INSERT or UPDATE statement in the ASPX portion of the page, you now only store the name of a procedure in the database. Whenever a change is made to either the database structure or the queries, all that needs to be updated are a few stored procedures.
In later chapters — including Chapter 9 and Chapter 12 — you use ObjectDataSource controls to enforce a three-tiered architecture.
The decision to use the SqlDataSource controls in your pages results in very slim business and data access layers. The next section discusses the only class in the business layer. The section following that describes the database and the classes in the data access layer.
The Business Layer
As stated earlier, no SqlDataSource controls are used to create and update content items in the Content table. The two drop-downs with the content types and categories that are related to each other result in bloated code that is very hard to understand and maintain. Instead, a simple, straightforward class — called Content — was designed that represents a content item in the database. The class exposes a number of properties like its Title, IntroText, and its CategoryId and has two methods to get the content item in and out of the database. You can find the definition of the Content class in the file Content.vb in the App_Code\BusinessLogic folder of the web site. Figure 5-5 shows the design of the Content class.
Figure 5-5
137

Chapter 5
The following table lists each of the seven public properties the class exposes:
Property |
Data Type |
Description |
|
|
|
BodyText |
String |
The BodyText property holds the full text for the |
|
|
content item and is displayed on the detail page only. |
CategoryId |
Integer |
Indicates to which category the content item belongs. |
ContentTypeId |
Integer |
Indicates to which content type the content item belongs. |
Id |
Integer |
This is the unique ID of the content item and is |
|
|
assigned by the database automatically whenever a |
|
|
new item is inserted. |
IntroText |
String |
This property contains the introduction text for the |
|
|
content item. This intro text is displayed, possibly with |
|
|
a different formatting, on the content list page and at |
|
|
the top of the content detail page. |
Title |
String |
This is the title of the content item as it appears on the |
|
|
content list and detail pages. |
Visible |
Boolean |
Determines whether the item is visible in the public |
|
|
area of the web site. |
|
|
|
In addition to these seven properties, the Content class has a total of four methods: the two constructors, a Save method, and a GetItem method, each of which is discussed in the following table:
Method |
Return Type |
Description |
|
|
|
Public Sub |
n/a |
The default constructor for the Content class. Initializes |
New() |
|
a new instance with all of its properties set to their |
|
|
default values. |
Public Sub |
n/a |
This overloaded constructor initializes a new instance |
New (ByVal id |
|
of the Content class with all of its properties set to |
As Integer) |
|
their default values except for the Id that is filled with |
|
|
the ID passed to constructor. This overload is used to |
|
|
re-create existing items when updating them in the |
|
|
management section. |
Public Sub |
n/a |
Saves a new or an existing content item in the database |
Save() |
|
by calling the Save method in the ContentDB class, |
|
|
which is discussed later. |
Public Shared |
An instance of |
Gets an existing content item from the database by |
Function |
the Content |
calling GetItem in the ContentDB class. |
GetItem |
class or |
|
(ByVal id As |
Nothing when |
|
Integer) As |
the item could |
|
Content |
not be found. |
|
|
|
|
138
Wrox CMS
The Data Access Layer
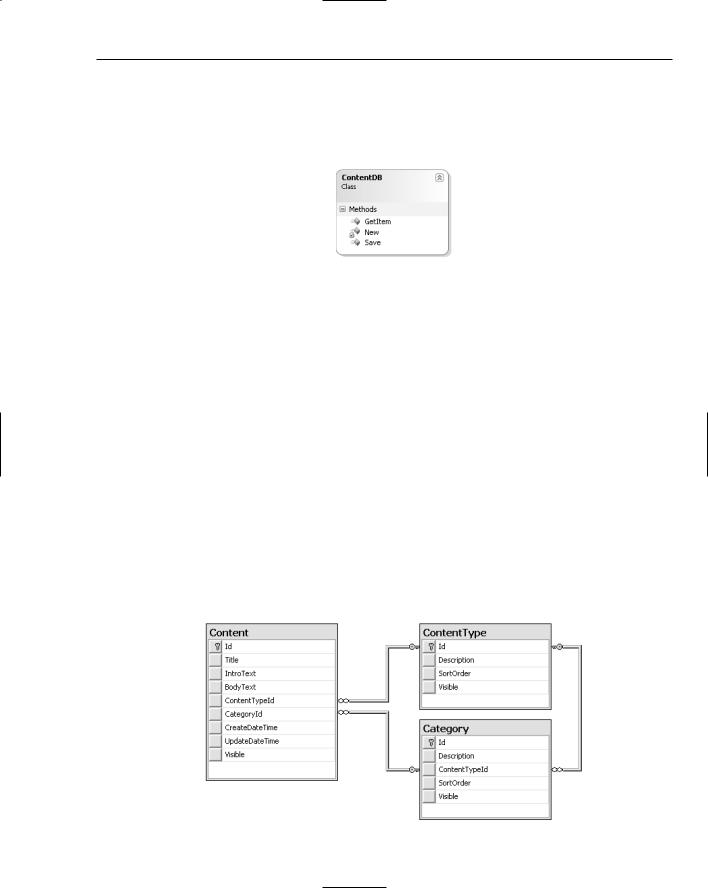
Because most of the pages in the site use SqlDataSource controls for their data access, you need only one class in the data access layer: the ContentDB class, shown in Figure 5-6, which is responsible for retrieving and saving a single content item from the database.
Figure 5-6
Because the ContentDB class exposes only shared members, it has no public constructor. It also has no public properties, but it does have two public methods, outlined in the following table:
Method |
Return Type |
Description |
|
|
|
Public Shared Sub Save |
n/a |
Saves a new or an existing |
(ByVal contentItem As |
|
content item in the database. |
Content) |
|
|
Public Shared Function |
An instance of the Content |
Gets an existing content item |
GetItem (ByVal id As |
class or Nothing when the |
from the database. |
Integer) As Content |
item could not be found. |
|
|
|
|
In addition to this single class, the data access layer contains the database that is discussed next.
The Data Model
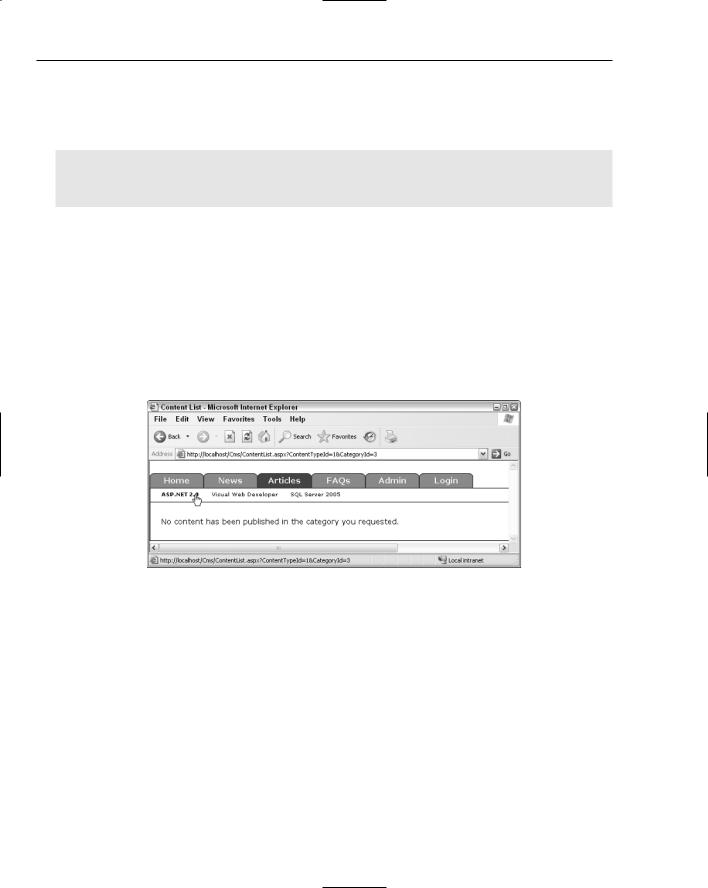
The database for the Wrox CMS has three tables and a number of stored procedures that are responsible for getting the data in and out of those tables. Figure 5-7 shows the three tables and their relations to each other.
Figure 5-7
139

Chapter 5
The Content table is the main entity in the database, because it stores the content that is displayed on the web site. The following table lists all of the Content table’s columns and their usage:
Column Name |
Data Type |
Description |
|
|
|
Id |
int |
The unique ID of each content item. This ID is |
|
|
generated automatically by the database each time a |
|
|
new record is inserted. |
Title |
nvarchar(100) |
The title of the content item. The title is displayed on |
|
|
the content list and detail pages. |
IntroText |
nvarchar(MAX) |
Used to store the introduction text of the content item |
|
|
that is displayed on the content list page and above |
|
|
the full text on the details page. |
BodyText |
nvarchar(MAX) |
The full text for the article, not including the intro- |
|
|
duction text. This text is displayed on the content |
|
|
detail page, right below the intro text. |
ContentTypeId |
int |
The type of content to which this item belongs. |
CategoryId |
int |
The ID of the category to which the item belongs. |
CreateDateTime |
datetime |
The date and the time the item was inserted. |
UpdateDateTime |
datetime |
The date and the time the item was last updated. |
Visible |
bit |
Indicates whether the item is visible in the public |
|
|
section of the site. |
|
|
|
Each content item is linked to the ContentType table with its ContentTypeId. This relation allows you to find a list of all content items within a certain content type without specifying a category first. In addition to its internal ID and its Description, the ContentType table also has SortOrder and Visible columns. The SortOrder column allows you to control the order of the items in the main menu, and the Visible column allows you to hide the entire content item from the menu.
A content item is also linked to a category in the Category table by its CategoryId. The Category table is similar to the ContentType table, but it has an additional ContentTypeId that enables you to link categories to content types.
To simplify the maintenance of the site, the SQL statements have been moved to separate stored procedures. That means you won’t find a single SELECT or UPDATE or other SQL statement anywhere in the code. If you want to see or change the stored procedures in the database, look under the Stored Procedures node of the database on the Database Explorer (which you can open with Ctrl+Alt+s) in Visual Web Developer. Each of the relevant stored procedures is discussed as part of the page or pages that use them later in this chapter.
Helper Class
The final class located in the special App_Code folder is the AppConfiguration class. This class belongs more to the web site than to the business or data access layer, so it has been put in the App_Code folder
140

Wrox CMS
directly. This isn’t a requirement, so you could move it to one of the existing folders, or create an entirely new folder such as Configuration or Helpers and place it there. The class is called AppConfiguration and not Configuration, for example, to avoid a naming conflict with the existing ASP.NET System
.Configuration namespace. The AppConfiguration class exposes a single shared property called ConnectionString, which is essentially a wrapper around the ConnectionString held in the Web
.config file. The pages in the site that use SqlDataSource controls use their own binding syntax to get their ConnectionString property from the Web.config directly. However, the two methods in the data access layer use the AppConfiguration class to retrieve information about the connection. Instead of writing code that directly accesses the Web.config file, these methods can now access this property. You see this property in use in the next section when the code in the business, data access, and presentation layers is discussed.
Code and Code Explanation
This section walks you through each of the important pages in the Wrox CMS web site. It starts off by looking at a few files located in the root of the site that are used by the other pages. Then you see in great detail the files in the Management folder that allow you to manage the content in the database.
Finally, this section closes with an examination of the two files that are responsible for displaying the content in the public section of the site.
Root Files
The root of the CMS web site contains two master files, a config file, a login page, the default page, and two files that are used to display the content in the database. This section discusses all of these files, except for the last two, which are dealt with after the Management folder has been discussed.
Web.config
This global configuration file contains one appSetting key and one connectionString. The appSetting key is used by the FCKeditor, the inline HTML editor discussed later. The connection string is used by the various pages and data access classes in the application.
Under the <system.web> node, you’ll find two configuration sections that configure the Membership and Role providers. The CMS uses these providers to enable users of the CMS to log in to access the protected Management folder and its contents. Because the site uses a custom database, and not the default aspnetdb.mdf as defined in the machine.config that applies to the entire server, you need to configure the application to use the custom database instead. Both the <membership> and the <roleManager> nodes are very similar to the ones you find in machine.config. In fact, the only changes made to the settings copied from the global machine.config are the name and connectionStringName attributes of the <providers> node that instructs ASP.NET to use the custom connection string and database instead:
<providers>
<add
name=”SqlProvider”
type=”System.Web.Security.SqlRoleProvider” connectionStringName=”Cms” />
</providers>
141

Chapter 5
Right under the provider settings, you’ll find these settings:
<authentication mode=”Forms”> <forms loginUrl=”~/Login.aspx” />
</authentication>
<authorization> <allow users=”*”/>
</authorization>
<pages theme=”Cms”>
The first element, <authentication>, tells .NET to use Forms Authentication. Whenever you’re trying to request a protected page as an anonymous user, you’re taken to the Login.aspx page located in the root of the site that allows you to log on. The second node, <authorization>, allows access to all pages in the site to all users. The Management folder is blocked for users that are not in the Administrator role with a <location> tag that you see next.
The <pages> node tells ASP.NET to use the theme defined in the App_Themes folder. The site features a very simple theme, with a single .skin file that defines the looks of GridView controls used in the site. The GridView.skin file contains a few style definitions with CssClass attributes that point to classes defined in the Styles.css file in the CSS folder.
The final section in the Web.config file you need to look at is the <location> tag at the bottom of the file:
<location path=”Management”> <system.web>
<authorization>
<allow roles=”Administrator” />
<deny users=”*”/> </authorization>
</system.web>
</location>
This code instructs ASP.NET to block access to all users that are not in the Administrator role. When you try to access one of those pages in that folder, you’re taken to Login.aspx instead.
The remainder of the elements in the Web.config file is placed there by Visual Web Developer when you create a new ASP.NET 2.0 web site.
SiteMaster.master and AdminMaster.master
These two master files determine the look and feel of all the pages in the site. The SiteMaster.master file is used for the public pages in the site, whereas AdminMaster.master defines the look for the pages in the Management folder. The two files have a lot in common; the only difference is that inside the AdminMaster.master file there is a new HTML table and a user control that displays the sub-menu for the Management section. Although ASP.NET 2.0 allows you to use nested master files, the CMS web site
doesn’t use that feature. With a nested template, you lose design-time capabilities in Visual Web Developer, which can be a real productivity killer because you’ll need to hand-code the pages yourself. So, instead SiteMaster.master was created first and then its contents were copied to the AdminMaster.master file.
142

Wrox CMS
In addition to some regular HTML tags, the SiteMaster.master contains a user control called SiteMenu that displays the main and sub-menus. The SiteMenu control that you find in the Controls folder contains two Repeater controls for the two menus. Each menu item in the main and sub-menus links to the ContentList page and passes it the ID of the selected content type and, if present, of the category through the query string. This allows that page, and any user controls in it, to see which content type and category is currently being displayed. The SiteMenu control also contains two SqlDataSource controls that get their data from stored procedures in the database. Take a look at the data source for the sub-menu that displays the categories to see how this works:
<asp:SqlDataSource ID=”sdsSubMenu” runat=”server” ConnectionString=”<%$ ConnectionStrings:Cms %>”
ProviderName=”System.Data.SqlClient” SelectCommand=”sprocCategorySelectlist” SelectCommandType=”StoredProcedure”
>
... Select Parameter is shown later </asp:SqlDataSource>
The markup for this control contains a few important bits of information. First of all, there is the ConnectionString attribute. To assign the proper connection string at run time, a new form of data binding is used. The new <%$ %> expression syntax is used to bind attributes to connection strings, resources, and application settings in the Web.config file. In this case, a connection string with the name Cms is retrieved from the application’s configuration file.
The next important pieces are the SelectCommand and SelectCommandType attributes. These tell the .NET Framework to run the stored procedure called sprocCategorySelectlist in the database defined by the connection string.
The stored procedure is pretty straightforward: it requests all the categories that belong to a certain content type:
CREATE PROCEDURE sprocCategorySelectlist
@contentTypeId int
AS
SELECT Category.Id,
Category.Description,
Category.ContentTypeId,
ContentType.Description AS ContentTypeDescription, Category.SortOrder
FROM
Category INNER JOIN
ContentType ON Category.ContentTypeId = ContentType.Id WHERE
(Category.ContentTypeId = @contentTypeId) AND Category.Visible = 1
ORDER BY SortOrder
RETURN
143
Chapter 5
In addition to the fields of the Category table, the description of the content type is retrieved as well, aliased as ContentTypeDescription. This description is used in the Management section of the site, to show the name of the content type that the category belongs to. The stored procedure expects the ID of the content type as a parameter. In the code for the SqlDataSource that parameter is set up as follows:
<SelectParameters>
<asp:QueryStringParameter Name=”contentTypeId”
QueryStringField=”ContentTypeId” Type=”Int32” /> </SelectParameters>
With this code, a single Parameter object is defined that gets its value from a QueryStringField called ContentTypeId. When the SqlDataSource is about to retrieve the data from the database, it gets the value from the query string and then stores it in this parameter so it gets passed to the stored procedure.
By using the query string as a parameter, the SqlDataSource control will always retrieve the categories that belong to the currently requested content type.
The other data source control, which gets the items for the main menu, works the same way. However, because this control always needs to return all content types, it does not have any select parameters.
When you view a page that is using the SiteMenu control, you’ll see something like Figure 5-8.
Figure 5-8
All the menu items between Home and Admin come from the ContentType table, whereas the submenus come from the Categories table. You can also see that in the link for the sub-menu both the ContentTypeId and the CategoryId are passed to the ContentList page. The final thing you should notice in Figure 5-8 is that one main menu and one sub-menu (Articles and Visual Web Developer) appear as selected by using a different color or font type. This is done by some code in the Load event in the code-behind file of the user control.
When the two Repeater controls for the menus get their data from the SqlDataSource controls they fire their ItemDataBound event for each item added to the repeater. This event is a great place to preselect the menu items because you have access to both the query string holding the ID of the chosen content type and category and to the item that is about to be displayed. The following code shows how a sub-menu gets a bold typeface when it is selected:
144

Wrox CMS
Protected Sub repSubMenu_ItemDataBound(ByVal sender As Object, _ ByVal e As System.Web.UI.WebControls.RepeaterItemEventArgs) _ Handles repSubMenu.ItemDataBound
If e.Item.ItemType = ListItemType.Item Or _ e.Item.ItemType = ListItemType.AlternatingItem Then
Dim myDataRowView As DataRowView = DirectCast(e.Item.DataItem, DataRowView)
If Convert.ToInt32(myDataRowView(“Id”)) = _ Convert.ToInt32(Request.QueryString.Get(“CategoryId”)) Then
Dim lnkSubmenu As HyperLink = _ DirectCast(e.Item.FindControl(“lnkSubmenu”), HyperLink)
lnkSubmenu.CssClass = “Selected” End If
End If End Sub
This code examines the ItemType of the item that is currently being data-bound. When an Item or Alternating item is created, the code retrieves the item’s DataItem, which in this case holds a DataRowView. Then DirectCast is used to cast the generic DataItem object to a DataRowView. Using DirectCast is very similar to CType but it performs a bit faster. The downside of DirectCast is that it can only cast objects of exactly the same type. You can’t use it to cast an object to another type higher or deeper in the inheritance hierarchy. In this case, however, that is no problem because the DataItem is a
DataRowView so you can safely use DirectCast.
Once you have the DataRowView object, you can retrieve its ID column that holds the ID for the category you’re adding to the Repeater. If the ID of that category matches the ID of the category you’re currently displaying (determined by looking at the CategoryId query string), the code gets a reference to the hyperlink in the menu called lnkSubmenu, again using DirectCast. And finally, the hyperlink’s CssClass is set to Selected. The behavior for the Selected class (a bold font in this case) is defined in the Core.css file:
#SubMenu a.Selected
{
font-weight: bold;
}
This code applies a bold font to all <a> tags that fall within the #SubMenu div tag and that have a Selected class applied which happens to be the selected sub-menu item.
The menu items Home, Admin, and Login are not database-driven, so you cannot preselect them in an ItemDataBound event. Instead, in Page_Load of the SiteMenu control you examine the
AppRelativeCurrentExecutionFilePath property of the HttpRequest class. By using string comparing you can see if you need to preselect one of the static menu items:
If Request.AppRelativeCurrentExecutionFilePath.ToLower() = “~/default.aspx” Then liHome.Attributes(“class”) = “Selected”
End If
This code applies the class Selected to the static Home menu item when the currently requested page is ~/default.aspx, which is the homepage for the CMS web site. The same principle is applied to preselect the other two menu items.
145

Chapter 5
Login.aspx
This page allows you to log in to the site and is shown automatically whenever you try to access one of the pages in the Management folder as an unauthenticated user. The page takes full advantage of the ASP.NET 2.0 security framework offered by the Membership and Role providers. All that this page requires is one simple <asp:Login> control like this:
<asp:Login ID=”Login1” runat=”server” />
Although the control doesn’t look too good with only this markup, it is still fully functional. The purposes of this CMS don’t require any visual customization, but if you want you can apply a host of behavior and appearance changes to the control through the Visual Web Developer IDE.
The final two pages located in the root, ContentList.aspx and ContentDetail.aspx, are discussed after the Management folder that’s coming up next.
The Management Folder
All the files in the Management folder are used for maintaining the content types, categories, and the actual content that gets displayed in the public area of the web site. The folder contains five pages: the default homepage of the management section, one page to manage content types, one to manage categories, and two pages to manage the content items. The homepage does nothing more than display simple static text and the Admin menu. The other pages are much more interesting so they are explained in more detail. Because managing content types is very similar to managing categories, the ContentType page is skipped in favor of the Categories page, because that’s the more comprehensive of the two. All of the concepts used in the Categories page are used in the ContentType page as well.
Managing Categories
As you have seen before, the categories are displayed as text menu items whenever you choose a specific content type. Each category is tied to a specific content type by its ContentTypeId. To control the order in which the items appear on the sub-menu, a Category also has a SortOrder column.
To allow you to manage existing categories and create new ones all in the same page, Categories.aspx is divided in two sections using <asp:Panel> controls. The first panel, called pnlList, holds a GridView that displays the existing categories. A drop-down above the GridView allows you to filter categories that belong to a specific content type. The second panel, pnlNew, is used to insert new categories. The panel holds a FormView control that is bound to a SqlDataSource to handle the insertion in the database. At any time, only one of the two views is visible to make it easier to focus on the task at hand. You get a deeper look at the pnlList panel first, and then you see how you can insert new categories with the controls in the second panel.
Besides a few static controls for informational and error messages, pnlList holds two important controls: a drop-down called lstContentTypes and a GridView called gvCategories. The drop-down control lists the available content types in the site. The GridView, in turn, displays the categories that belong to the content type selected in the drop-down control.
When the page loads, the drop-down gets its data from a SqlDataSource called sdsContentTypes. Both the drop-down and the data source have very simple markup:
146