ASP.NET 2.0 Instant Results
.pdfWrox CMS
of the SqlDataReader, accept only a zero-based integer with the index of the requested column. This means that to get at the Title of the content item, you’d need to use something like myReader
.GetString(1). This results in quite unreadable code, because you’ll quickly forget which column has what index number. Fortunately, the SqlDataReader also has a GetOrdinal method that accepts a column’s name and returns its ordinal position in the result set. This makes the previous bit of code much easier to read and maintain: myReader.GetString(myReader.GetOrdinal(“Title”)). Using the
GetOrdinal method may cause a tiny bit of overhead, but compared to the benefits of better code, this is a cheap price to pay.
Once all the public properties of the content item have been set, the SqlDataReader is closed and the content item is returned to the calling code.
Undoubtedly you have noticed the fancy HTML editor used in the AddEditContent.aspx page. This editor is not a part of the .NET Framework, nor is it an integral part of ASP.NET. Instead, the editor, called FCKeditor, is developed by a group of people lead by Frederico Caldeira Knabben (hence the FCK in FCKeditor) and made available to the public as an open source project. You can find the latest version of the editor at www.fckeditor.com. Because the (easy) installation process for the editor is explained in the section “Setting up the Wrox CMS,” this section focuses exclusively on how to use it.
Using the FCKeditor is about as simple as installing it. For ASP.NET pages, the creators of the editor developed a separate .NET assembly (a .dll file) that must be placed in the Bin folder of the application. You can use that same DLL to customize the toolbox of Visual Web Developer, so you can drag instances of the editor from your toolbox onto the page. To customize the toolbox, open up the toolbox (Ctrl+Alt+x), right-click it, and select Choose Items. In the dialog that follows, click Browse and then select the
file FredCK.FCKeditorV2.dll located in the Bin folder of your application (located at C:\Inetpub\ wwwroot\Cms\Bin after a default installation of the Wrox CMS). The editor will end up as an item called FCKeditor with the default gear icon on the toolbox. Now whenever you need an HTML editor, drag an instance of it on your page instead of a standard text box.
The editor is very easy to work with, both from an end-user’s and a programmer’s point of view. Just like a regular .NET control it exposes properties such as width and height. However, when working with the editor, you’ll find a few differences that are worth discussing. First of all the editor doesn’t have a Text property like a default text box does, but has a Value property instead. For all practical purposes, these properties can be treated the same in that the Value allows you to set and get the HTML-formatted text from the control.
Another important thing to notice is the way the editor works with validator controls. By default, the ASP.NET validators are triggered when the associated form control loses focus; for example, when you tab away or click a Submit button. However, with the FCKeditor this seems to happen too late. The editor works by copying the formatted HTML from the editor to a hidden form field, which in turn is validated. This copying also takes place when the editor loses focus, but after the controls have been validated. For your end-user, this results in a message that the field used for the editor is required when in fact it already has a valid value. The quickest way to fix that is to simply press Submit again. Obviously, this is not a good solution for a real-world application. The next best thing is to disable client-side validation in pages that use the editor. That technique was applied to the AddEditContent.aspx page by simply setting the CausesValidation attribute of the Save button to False. Making this change won’t prevent validation from occurring. Back at the server, each of the controls is still checked for their values; the validation just doesn’t fire at the client anymore.
157

Chapter 5
Notice the use of a property called ToolbarSet to give the control for the IntroText a different set of buttons than the one for the BodyText. The configuration for the FCKeditor, stored in the file FCKeditor\ fckconfig.js, allows you to define various toolbar sets and refer to them by name. The Default toolbar set contains all of the available buttons, whereas WroxCms and Basic use a limited set. To create a new toolbar set, make a copy of Default, and then remove whatever button you don’t need.
Because the FCKeditor controls can contain HTML tags and possibly JavaScript, the ASP.NET framework by default blocks these values and instead throws an HttpRequestValidationException exception with a message like “A potentially dangerous Request.Form value was detected.” To prevent that error from occurring, the ValidateRequest is set to False in the page directive for the AddEditContent.aspx page.
The final part of the AddEditContent.aspx page you need to look at is saving an item in the database. When you fill in all the required fields in the page, possibly formatting the IntroText and BodyText parts of the item using the FCKeditor, and press the Save button, the following code in the Click event handler of the Save button fires:
Protected Sub btnSave_Click(ByVal sender As Object, ByVal e As System.EventArgs) _ Handles btnSave.Click
Page.Validate()
If Page.IsValid Then
Dim myContentItem As Content
If Request.QueryString.Get(“Id”) IsNot String.Empty Then
myContentItem = New Content(Convert.ToInt32(Request.QueryString.Get(“Id”))) Else
myContentItem = New Content() End If
myContentItem.Title = txtTitle.Text myContentItem.IntroText = txtIntroText.Value myContentItem.BodyText = txtBodyText.Value myContentItem.Visible = chkVisible.Checked
myContentItem.ContentTypeId = Convert.ToInt32(lstContentTypes.SelectedValue) myContentItem.CategoryId = Convert.ToInt32(lstCategories.SelectedValue) myContentItem.Save()
Response.Redirect(“ContentList.aspx”) End If
End Sub
First Page.Validate() is called to see if each of the controls in the page has a valid value. If the page is valid, you can create a new instance of a Content item instance. This can happen in two different ways, depending on whether you’re currently editing an existing item or creating a brand new one. In the class design for the Content class, the ID of the Content class is read-only to prevent calling code from changing it during the object’s lifetime. That’s why an overloaded constructor of the Content class is called, which receives the ID of the content item in case you’re updating an existing item. Otherwise, when you’re creating a new content item, the code simply calls the default constructor to get a new Content instance.
The code then assigns each of the public properties of the Content class a value by retrieving them from the relevant controls. Notice again the use of the .Value instead of .Text to get the values of the two FCKeditors. Once all properties have been set, call the Save method on the Content class. Similar to the GetItem method, this method simply calls the Save method in the ContentDB class and passes itself to it using the keyword Me:
158

Wrox CMS
Public Sub Save()
ContentDB.Save(Me)
End Sub
Just like the GetItem method you saw earlier, Save sets up a SqlConnection and a SqlCommand. It then assigns the Command object the relevant parameters whose values it derives from the Content item passed to the method. In the end, ExecuteNonQuery is used to send the command to the database:
If contentItem.Id > 0 Then myCommand.Parameters.AddWithValue(“@id”, contentItem.Id)
End If
myCommand.Parameters.AddWithValue(“@title”, contentItem.Title) myCommand.Parameters.AddWithValue(“@introText”, contentItem.IntroText) myCommand.Parameters.AddWithValue(“@bodyText”, contentItem.BodyText)
myCommand.Parameters.AddWithValue(“@contentTypeId”, contentItem.ContentTypeId) myCommand.Parameters.AddWithValue(“@categoryId”, contentItem.CategoryId) myCommand.Parameters.AddWithValue(“@visible”, contentItem.Visible)
myConnection.Open()
myCommand.ExecuteNonQuery()
myConnection.Close()
When this method is finished, control is returned to the calling ASPX page, which simply redirects the user back to the ContentList page where the content item is now visible.
If you have some previous experience with programming you may recognize some problems with the data access code you just saw. First of all, there is no error handling. Instead of using a Try/Catch block the code is simply executed, letting any error bubble up to the final ASPX page. This isn’t considered good programming practice, as it’s very hard to see where, when, and how the errors in your site occur. In the next chapter you see a neat way to catch any error that occurs at run time and use it to construct a detailed error e-mail that can be sent to the site’s administrator or a developer.
The second thing you may have noticed is that the code you saw is strongly tied to SQL Server. Although developing for a single database type is quick and easy, it may not always be a good solution. In the next chapter you learn how to write data access code that works with SQL Server and Microsoft Access without any modifications.
Inserting new content or managing existing items is the final step in the Content Management process. All that’s left now is to look at how to present the content in the front end of the site. With the more advanced technologies of inserting, updating, and deleting content behind you, displaying content is now a piece of cake.
Displaying Content on the Web Site
The display of the content in the public area of the site is handled by two pages: ContentList.aspx and ContentDetail.aspx. The first is responsible for displaying a list of content items published in the
requested content type and category. It displays a short version of each content item in a DataList control that holds HyperLink controls that take you to the detail page. This detail page then shows the full details of the content item.
159

Chapter 5
The ContentList.aspx page contains a single SqlDataSource control with two select parameters: one for the content type and one for the category. Both these parameters are retrieved from the query string, when available:
<asp:SqlDataSource ID=”sdsContentList” runat=”server” ConnectionString=”<%$ ConnectionStrings:Cms %>” SelectCommand=”sprocContentSelectListByContentTypeAndCategoryId” SelectCommandType=”StoredProcedure” CancelSelectOnNullParameter=”False”>
<SelectParameters>
<asp:QueryStringParameter Name=”contentTypeId” QueryStringField=”ContentTypeId” Type=”Int32” />
<asp:QueryStringParameter Name=”categoryId” QueryStringField=”CategoryId” Type=”Int32” DefaultValue=”” />
</SelectParameters>
</asp:SqlDataSource>
When this data source is about to get the data from the database, it gets the values for the content type and the category from the query string first and assigns them to the parameters. Notice the use of the CancelSelectOnNullParameter attribute on the SqlDataSource control. The default of this parameter is True, which means the control won’t get data from the database if any of the parameters contains a null value. In this situation, this is not what you want. When one of the content types is clicked, and no category has been selected yet, you want to display all the content items that belong to the chosen content type, regardless of their category. The stored procedure in the database returns all the items for a certain content type when the CategoryId parameter is null so you must ensure that the code still accesses the procedure even if there is no query string for the category. You accomplish this by setting
CancelSelectOnNullParameter to False.
The SqlDataSource that gets the content items from the database is used by a DataList in the page. It has a simple ItemTemplate that displays the item’s Title, IntroText, and a “Read more” link:
<asp:DataList ID=”dlContent” runat=”server” DataKeyField=”Id” DataSourceID=”sdsContentList”>
<ItemTemplate>
<h2 class=”ItemTitle”><asp:Literal ID=”lblTitle”
runat=”server” Text=’<%# Bind(“Title”) %>’></asp:Literal></h2> <div class=”IntroText”>
<asp:Literal ID=”lblIntroText” runat=”server”
Text=’<%# Eval(“IntroText”) %>’></asp:Literal></div><br /> <asp:HyperLink ID=”hyperReadMore” runat=”server”
NavigateUrl=’<%# “~/ContentDetail.aspx?Id=” &
Eval(“Id”) & “&ContentTypeId=” & Eval(“ContentTypeId”)& “&CategoryId=” & Eval(“CategoryId”) %>’ Text=”Read more...”></asp:HyperLink><br /><br />
</ItemTemplate>
<SeparatorTemplate> <hr />
</SeparatorTemplate>
</asp:DataList>
Each content item in the list is separated from the previous using an <hr /> tag in the <SeparatorTemplate>. The contents of this separator can be fully customized. You could put anything you want between two items, including images, banners, or plain HTML.
160

Wrox CMS
Notice the use of Eval instead of Bind to bind the data to the controls in the template. Because you need to display read-only data, there is no need to set up two-way data-binding, and you can use the faster Eval method.
If you request the list page in the browser and then click a main menu, you’ll see a list with content items appear. The “Read more” link below each item takes you to the ContentDetails page. This page holds three <asp:Literal> controls that display the relevant content from the database:
<h1 class=”ItemTitle”><asp:Literal ID=”litTitle” runat=”server”></asp:Literal></h1> <div class=”IntroText”><asp:Literal ID=”litIntrotext”
runat=”server”></asp:Literal></div>
<div class=”BodyText”><asp:Literal ID=”litBodyText” runat=”server”></asp:Literal></div>
The Literal controls are wrapped inside <h1> and <div> elements so it’s easy to apply a CSS class that changes their formatting at run time. The Styles.css file has an ItemTitle class that gives the text a large and bold font, whereas the IntroText class changes the text to an italic font. You can use any CSS you see fit to format the text by changing the classes defined in the Styles.css file in the CSS folder.
The three Literal controls get their value from an instance of the Content class using the same GetItem method you saw earlier. When the details page loads, the following code is executed in its
Page_Load event:
Protected Sub Page_Load(ByVal sender As Object, ByVal e As System.EventArgs) _ Handles Me.Load
If Request.QueryString.Get(“Id”) IsNot Nothing Then contentId = Convert.ToInt32(Request.QueryString.Get(“Id”)) Dim contentItem As Content = Content.GetItem(contentId) If contentItem IsNot Nothing Then
Me.Title = contentItem.Title litTitle.Text = contentItem.Title litIntrotext.Text = contentItem.IntroText litBodyText.Text = contentItem.BodyText
End If End If
End Sub
Similar to the AddEditContent.aspx page, this code gets a new instance of the Content class by calling GetItem and passing it the ID of the content item retrieved from the query string. If the method returns a Content instance, the page’s Title and the Text property of the three Literal controls are filled with the Title, IntroText, and BodyText properties. The Literal controls can also hold HTML that comes from the FCKeditor used to format the content item in the management section.
The Wrox CMS is only the beginning of the things you can do with fully database-driven web sites. Both the presentation and the functionality of the site are pretty simple at this point, to allow you to focus
on important concepts and technologies without being caught up by complex design and formatting markup. But it’s easy to come up with a list of new features and enhancements to the Wrox CMS that make it even more useful than it already is.
For examples of possible modifications to the Wrox CMS, look at the companion CD-ROM or go to www.wrox.com and find this book’s download page.
161

Chapter 5
Setting up the Wrox CMS
You can set up the Wrox CMS in two ways: by using the supplied installer or by manually setting up the site with the code that comes with this book.
You can use the installer when you have IIS running on your machine and want to use it for the Wrox CMS. Running the installer creates a virtual directory called Cms under your default web site. The folder that is created during setup contains the full source of the application and all other files required to run the application, including the database.
Alternatively, you can choose to unpack the source from the CD-ROM or code download to a folder of your choice. This gives you a bit more choice with regard to where the files are placed, but you’ll have to set up IIS manually, or browse to the site from within Visual Web Developer.
For both installation methods it’s assumed that the .NET 2.0 Framework, which is an installation requirement for Visual Web Developer, has already been installed. It’s also assumed that you have installed SQL Server 2005 Express Edition with an instance name of SqlExpress. If you chose a different instance name, make sure you use that name in the connection string for the Wrox CMS in the Web.config file.
Using the Installer
To install the Wrox CMS, open the folder Chapter 05 - Wrox CMS\Installer and double-click setup.exe. This starts the installer. By default the web site will be installed as a virtual directory called CMS under the default web site. You should leave all values in the setup dialog to their defaults and click Next until the installer has finished. Once the site is installed, refer to the section “Changing IIS Settings” later in the chapter for further installation instructions.
Manual Installation
You can also manually install the Wrox CMS by extracting the files from the accompanying CD-ROM or code download to your local hard drive. To install manually, locate the folder Chapter 05 - Wrox CMS and then open the Source folder. In that folder you’ll find a zip file called Chapter 05 - Wrox CMS.zip. Extract the contents of the zip file to a location on your hard drive, for example C:\Inetpub\wwwroot\. Make sure you extract the files with the option Use Folder Names or something similar to maintain the original folder structure. You should end up with a folder like C:\Inetpub\wwwroot\Cms that in turn contains a number of files and other folders. The remainder of this section assumes you extracted the CMS to C:\Inetpub\wwwroot\Cms.
Changing IIS Settings
Regardless of the installation method you chose, you might need to configure IIS to work properly with your site. If you have previous versions of the .NET Framework on your machine, IIS will be configured to use that version of the framework, and not version 2.0. Follow these steps to configure IIS:
1.Click Start Run, type inetmgr in the dialog box, and press Enter.
2.Expand the tree on the left until you see your server. Right-click it and choose Properties.
162
Wrox CMS
3.
4.
Click the ASP.NET tab.
From the ASP.NET version drop-down, choose 2.0.50727 and click OK.
You may need to restart IIS for the changes to take effect.
Changing Security Settings
The final configuration change you need to make is to enable Write permissions on the UserFiles folder that is used by the FCKeditor and the App_Data folder where the database is stored. You’ll need to give permissions to the account that the web site runs under. On Windows XP this is the ASPNET account, and on Windows Server 2003 the account is called Network Service. If you’re running the site on the built-in development web server from within Visual Web Developer, the account used is the one you use to log on to your machine.
In all cases, follow these steps to set the permissions:
1.Open a Windows Explorer and locate the UserFiles folder in your CMS web site. If the folder isn’t there, create it first.
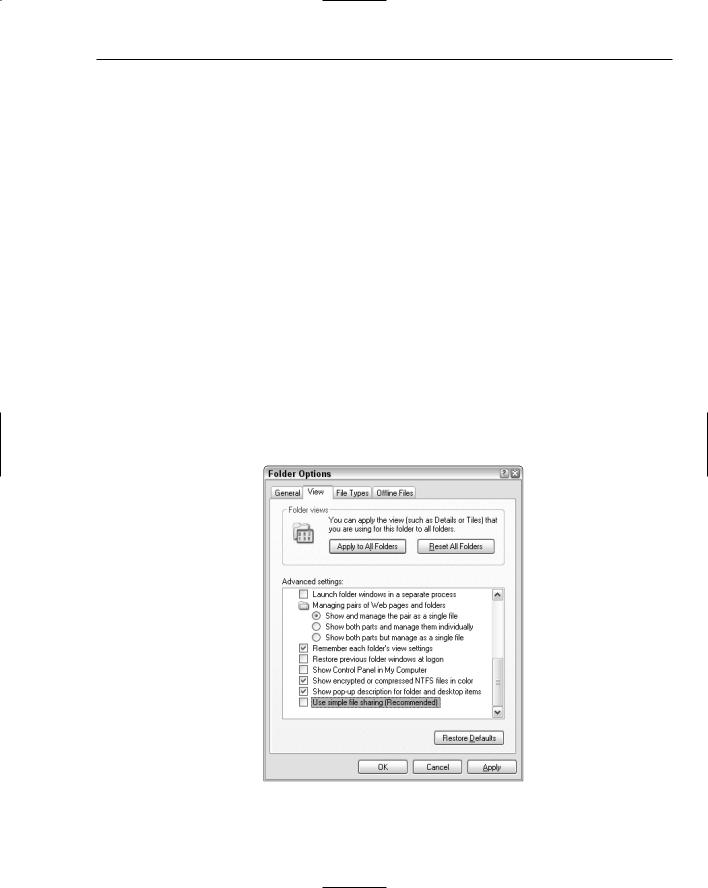
2.Right-click the UserFiles folder, choose Properties, and click the Security tab. If you don’t see the Security tab, choose Tools Folder Options in Windows Explorer, open the View tab, scroll all the way down to the bottom of the Advanced settings list, and uncheck Use Simple File Sharing, as shown in Figure 5-13.
Click OK to dismiss the Folder Options dialog.
Figure 5-13
163
Chapter 5
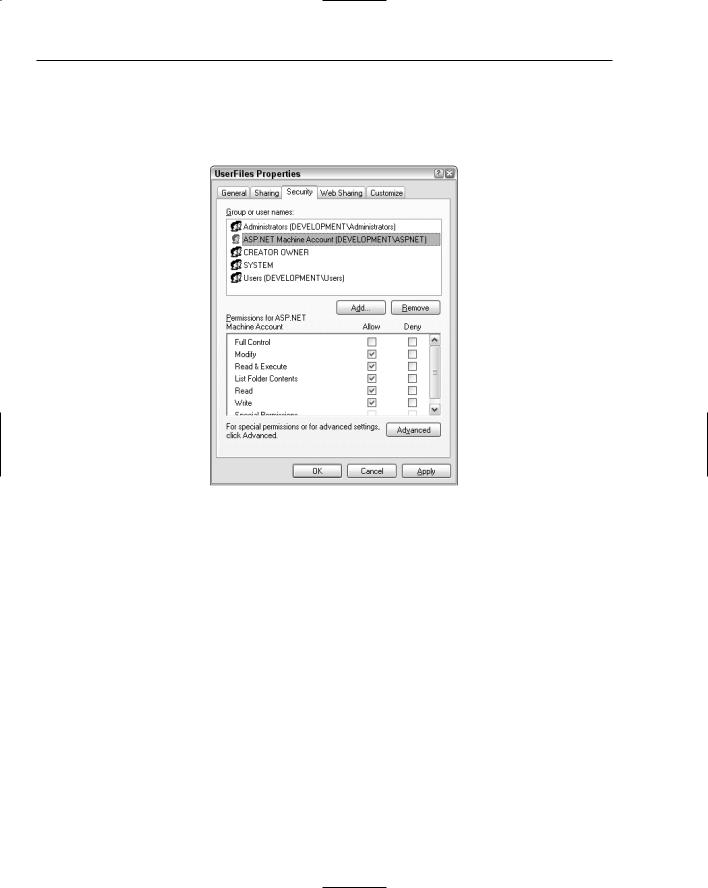
3.Back on the Security tab for the UserFiles folder, click the Add button, type the name of the account that requires the permissions, and click OK.
4.Next, make sure the account you just added has at least Read and Modify permissions in the Permissions For list, as shown in Figure 5-14.
Figure 5-14
5.Finally, click OK to apply the changes.
6.Repeat the first five steps, but this time configure the settings for the App_Data folder that holds the CMS database.
Testing Out the Site
With the configured database and file system, you’re now ready to launch the application. Back in Visual Web Developer, press Ctrl+F5 to open up Wrox CMS. To manage the categories and the content in the Management section of the site, click the Admin tab. Because the Management folder is protected with a setting in the Web.config file, you’ll need to log in first. If you used the installer to set up the Wrox CMS, you can log in with a username of Administrator and a password of Admin123#. If you can’t access the Management section, make sure you created the Administrator role. Also make sure you assigned the account you created to that role.
The first time the page loads, it might take a while before you see the CMS homepage appear. The connection string in the Web.config file instructs SQL Server Express to attach the CMS database automatically, which takes some time. If you get a time-out error, refresh your browser to try again.
164

Wrox CMS
If after waiting a long time you get a “The page cannot be displayed” error instead of the CMS homepage, close your browser and go back to Visual Web Developer. Choose Website Start Options and then make sure the NTLM authentication checkbox is unchecked. Then press Ctrl+F5 again to open the web site.
Summar y
In this chapter you learned how to design, build, and use a content management system. With this content management system, you have easy access to the content you publish, allowing you to add and update content online.
The chapter started with a tour of the web site and the CMS. You saw how the site uses content types and categories that are displayed as main and sub-menu items. You also saw how the site displays these content items, and how you can change these items using the CMS.
In the section “Design of the Wrox CMS” you saw how the site is organized by looking at the individual files in the web site and the classes in the business and data access layer. That section also explained the design of the database for the web site.
You then got a good look at the inner workings of the pages and classes that make up the CMS. You learned how to use SqlDataSource controls to get data in and out of the database. You also learned how to create a custom class that can access the database, to avoid some of the problems that the SqlDataSource controls have. Besides the individual pages, user controls, and classes that make up the site, you also saw how to embed the FCKeditor in your application, to allow your end-users to format their content using a fancy HTML editor.
At the end of the chapter you saw two different ways to install the Wrox CMS. The automated installer gives you a quick and easy way to get the CMS up and running with little effort. The manual process in turn gives you finer control over how and where the application is installed.
165