

Beginning Microsoft Word Business Documents - From Novice To Professional (2006)
.pdf
C H A P T E R 8
■ ■ ■
Creating a Grant or
Business Proposal
The many different sections and variety of information contained in a business proposal make its formatting an intricate process. But by planning the document before you start creating it, you will simplify the process.
A sample business proposal is available with the downloads for this book at the Apress web site (http://www.apress.com).
Getting Started with Word’s Outline View
If your business proposal is lengthy, it’s best to start with an outline. This is particularly true if you need to include a table of contents. The outline will allow you to organize the different parts of the document, and you will also see at a glance the sections you are including, so you won’t inadvertently omit a portion of the document. The outline levels will help you create a table of contents that updates automatically as the document evolves.
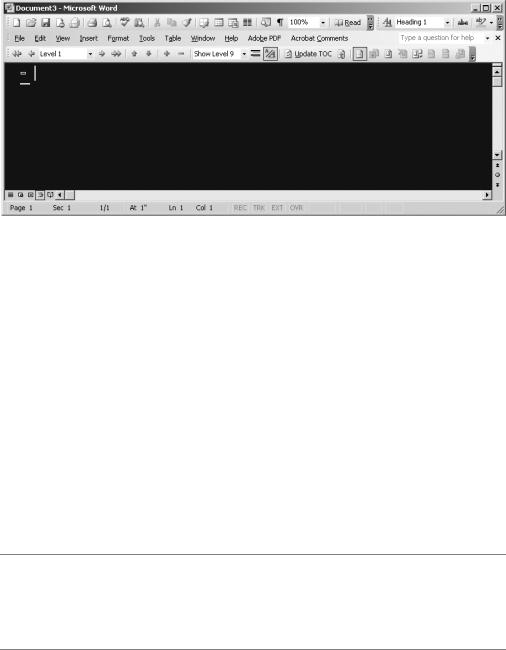
With Word’s Outline view, you can create an outline with ease. To switch to Outline view, click the View menu and select Outline. The Outline view differs substantially from other document views. You will also notice that the Outlining toolbar appears below the Standard and Formatting toolbars, as shown in Figure 8-1. It contains a number of options that will help you work with your outline.
■Note When you change document views, you may not see certain elements of your document. Also, with the exception of Print Layout view, the document views do not accurately represent how your finished document will appear. Keep this in mind as you work. If you need to gauge how your finished document will look, you can toggle back and forth between document views via the View menu or the view buttons in the lower left of the Word window. The Print Preview button on the Standard toolbar also shows you how your document will look.
137
138 |
C H A P T E R 8 ■ C R E A T I N G A G R A N T O R B U S I N E S S P R O P O S A L |
Figure 8-1. Word’s Outline view
In Outline view, enter each section heading on a new line. You should also enter headings for the subsections. Notice that a small minus sign appears in the left margin of each line.
Once you have entered the section headings and subsection headings, you are ready to assign each heading a level. Think of it as a standard outline, even though you might not use Roman numerals, numbers, and letters.
By default, Word assigns each line to Level 1. You will probably find that most of the sections of your business proposal remain at Level 1. However, some sections will require subsections. So you will need to move some sections to a lower level.
There are several ways to change a heading level. The easiest way to do so is to place the cursor at the beginning of the heading. Then use the Tab key to change the level. Press the Tab key once to lower the heading one level. You will notice that the minus sign in the left margin on the preceding level changes to a plus sign, as illustrated in Figure 8-2.
Should you need to promote a heading up a level, press Shift+Tab to move it.
■Note When you switch to Print Layout view, you will notice that Word has automatically applied formatting to your document. This is normal. Word uses the heading styles incorporated in the Normal.dot template, the template upon which all blank documents are based. If you do not want to use the default styles, don’t worry. The styles can be altered later when you format the document.
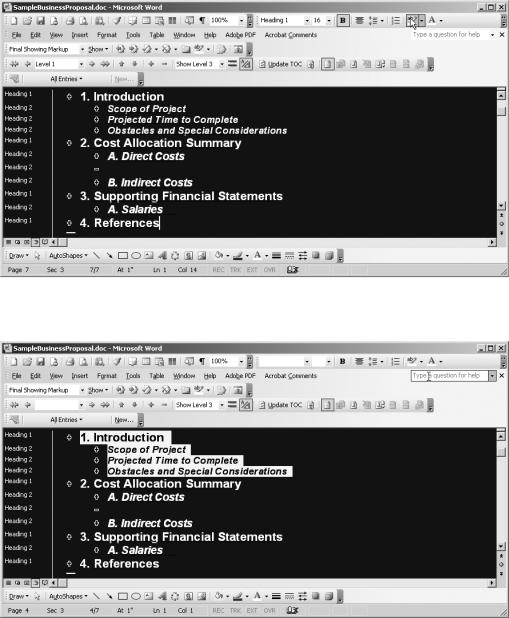
The headings subordinate to the heading you move will not move automatically. If you want the subheadings to maintain the same relative position, use the plus sign in the left margin. Click it to highlight the level and its subordinate levels. When you change the level, the relative position of the other levels also changes (see Figure 8-3).
C H A P T E R 8 ■ C R E A T I N G A G R A N T O R B U S I N E S S P R O P O S A L |
139 |
Figure 8-2. Showing sublevels in Outline view
Figure 8-3. Several outline levels selected

140 |
C H A P T E R 8 ■ C R E A T I N G A G R A N T O R B U S I N E S S P R O P O S A L |
■Tip When working in Outline view, you can expand or collapse a portion of your outline by double-clicking the plus sign in the margin. If you want to collapse your entire outline, use the Outlining toolbar. The Show Level drop-down box allows you to select the levels you would like to view. You can select Levels 1 through 9, as listed in Figure 8-4, or you can opt to show all levels.
Figure 8-4. The Show Level drop-down box on the Outlining toolbar
If you need to change the order of one of the headings, click the plus or minus sign in the margin. Then drag it to the correct location. When you move a level, you will also move the sublevels that have been highlighted.
Creating a Table of Contents
Once you have created your outline, you’re ready for the table of contents. You may find it counterintuitive to create the table of contents before the rest of the document. When you create a table of contents manually, it makes sense to insert it when the document is finalized. That way, you don’t need to worry about updating page numbers.
Word will create a table of contents automatically. By using this feature, you will avoid the problems associated with creating one manually. First, Word uses the headings you entered in Outline view to create the table of contents. You won’t need to waste time entering the information a second time.
Word also makes it easy to format the table, providing several predefined options. But, best of all, Word will automatically update the page numbering for you. So, as your document grows in length, the table of contents will reflect the changes.
■Tip You may still wonder why it makes sense to create the table of contents now. The answer is simple. You can use the table of contents to navigate through your document because it is linked to the sections of the business proposal. Simply hold the mouse pointer over one of the entries in the table of contents. Then hold the Ctrl key and click the mouse. Word takes you to that section of your document.
C H A P T E R 8 ■ C R E A T I N G A G R A N T O R B U S I N E S S P R O P O S A L |
141 |
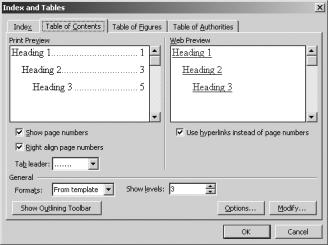
To insert your table of contents, place the cursor at the beginning of the first line of your outline. Then click Insert Reference Index and Tables to bring up the Index and Tables dialog box. Open the Table of Contents tab, as shown in Figure 8-5.
Figure 8-5. The Table of Contents tab in the Index and Tables dialog box
The Print Preview box will show you how the table of contents will appear in final form. Word will not show the actual headings in the Print Preview box. Rather, it shows the position of the different heading levels, substituting “Heading 1,” “Heading 2,” and so forth in place of headings.
Word has six predefined formats for you to choose. You can also opt to apply text formatting from the document template, which allows you to base the formatting on styles you specify.
The predefined formats will save you some time. However, they may not be appropriate for a business proposal. If you decide to use one, opt for the Classic format.
You are also able to change certain elements in the table of contents. You can alter the appearance of page numbers and leader lines and select how many levels the table of contents will contain.
With a professional document such as a business proposal, you should emphasize function over form. So design the table of contents with readability in mind.
Page numbers are a necessity, so make sure to select Show page numbers in the Index and Tables dialog box. You probably also want to select Right align page numbers, as this will give the table a clean, organized look.
If you align the page numbers along the right margin, you will do well to add tab leader lines, which will guide the reader’s eye to the correct page number. Of course, Word provides a few different choices for how the leader lines appear. A dotted leader line is both unobtrusive and effective. Use the drop-down box to select the style you want.
142 |
C H A P T E R 8 ■ C R E A T I N G A G R A N T O R B U S I N E S S P R O P O S A L |
■Note Switching between predefined formats may change the other options in the dialog box. So if you make a change, don’t forget to reselect any options that have changed.
Finally, use the Show levels drop-down box to select how many heading levels to show. Moderation is best. However, you want your reader to find the relevant section easily.
When you’ve specified the options for the table, click OK. Your table of contents appears at the top of the document, above the document outline.
If you switch to Print Layout view, you will notice that the table of contents is on the same page as the outline. You will want to insert a page break between the table of contents and the rest of the business proposal.
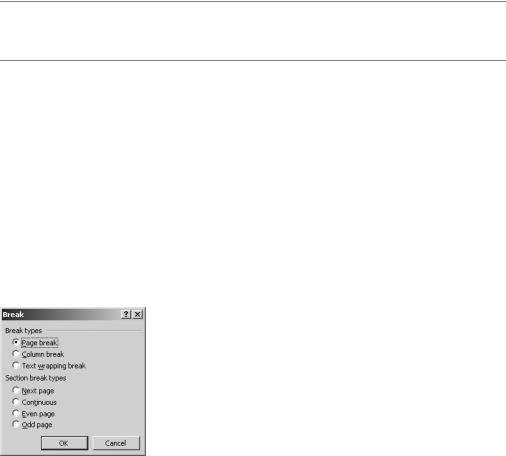
To insert a page break, position the cursor at the end of the table of contents. Click Insert Break. In the Break dialog box, shown in Figure 8-6, select Page break and click OK. This ensures that the business proposal will begin on a new page. The break will not appear in Outline view.
Figure 8-6. The Break dialog box
As you work on the business proposal, Word may not update the page numbers or headings in the table of contents. This is normal. Word will make the appropriate changes when you print the document.
If it is important to you that the table of contents be updated as you work, you can tell Word to update it. On the Outlining toolbar, click Update TOC. The Update Table of Contents dialog box appears, as shown in Figure 8-7.
You will have two choices on what to update. Choose Update page numbers only if you only want to update the page numbers. If you’ve made changes to the headings, select Update entire table. Click OK.

C H A P T E R 8 ■ C R E A T I N G A G R A N T O R B U S I N E S S P R O P O S A L |
143 |
Figure 8-7. The Update Table of Contents dialog box
Adding a Cover Page
Next, you should create a cover page for your business proposal. Position the cursor at the beginning of the first line of your outline. Enter the information you would like to appear on the cover page. Each line on the cover page should appear on its own line in Outline view.
Once you have entered the information for the cover page, you need to assign it to the correct level in the outline. Highlight the cover page information. Then on the Outlining toolbar, click the Outline Level drop-down box and select Body text.
Finally, you want to make sure the cover page information appears on its own page. Position the cursor at the end of the final line of the cover page. Click Insert Break. In the Break dialog box, select Page break and click OK. You will not see the page break in Outline view.
Entering the Main Body Text
Now you are ready for the main document. At this stage, you should enter text only. You will insert your charts, tables, and graphs later.
Also, avoid applying any formatting to the document. This includes bold, italics, and underlining. You do not want to use indentation yet, nor should you use the Tab key to indent text.
Right now, your primary concern is to enter the text data in your business proposal. You will apply formatting to paragraphs and text in one stage. This ensures that you will achieve clean, consistent formatting throughout the business proposal. You will use Word’s style feature to apply the formatting, so Word will not retain manually applied formats.
Specifying Page Setup
Now you are ready to specify the page setup for the entire document. You may decide later to alter the page setup in specific parts of your business proposal. Or you may already know that the page setup will differ in certain areas. This is okay. For now, you are setting the predominant page layout for your business proposal.
144 |
C H A P T E R 8 ■ C R E A T I N G A G R A N T O R B U S I N E S S P R O P O S A L |
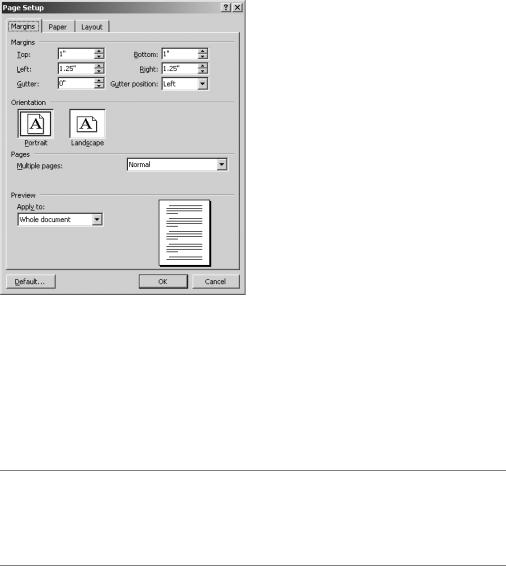
Access the Page Setup dialog box by clicking File Page Setup. Click the Margins tab to open the settings for the margins, which you can see in Figure 8-8.
Figure 8-8. The Margins tab of the Page Setup dialog box
The default settings for the Normal.dot template are 1 inch at the top and bottom of the page and 1.25 inches at either side of the page. In most situations, these settings are appropriate for a business proposal. However, if you plan to bind the business proposal, you may want to increase the left margin by .25 inch. This ensures that the binding will not obstruct any of the printing.
■Caution Avoid increasing the margins without a good reason, such as accommodating a binding. Otherwise, the margins will become distracting, and your business proposal may look insubstantial. Similarly, do not decrease the margins to fit more on the page. This will make the business proposal look cramped and difficult to read.
If you plan to add a header and footer, take that into consideration. Word will place the header and footer outside the margins you specify. You should also consider any footnotes you have added to the document.
C H A P T E R 8 ■ C R E A T I N G A G R A N T O R B U S I N E S S P R O P O S A L |
145 |
The page orientation should be portrait. Also, check that the drop-down box labeled Pages reads Normal. The other options are not appropriate for a business proposal. In the drop-down box labeled Apply to, select Whole document.
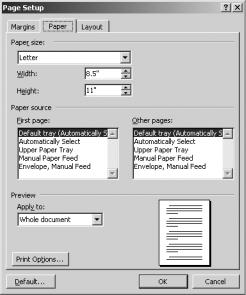
Next, click the Paper tab, shown in Figure 8-9, in the Page Setup dialog box. In the Paper size section, use the drop-down box to specify the paper size; in this case, select the Letter size option, unless you must submit your business proposal on A4 or A6 paper.
Figure 8-9. The Paper tab of the Page Setup dialog box
Use the boxes in the Paper source section to specify the printer’s paper tray(s) for the first page of the business proposal and for the subsequent pages. In the Preview section, opt to apply the changes to the whole document.
Click the Print Options button to review the settings, as shown in Figure 8-10. Deselect Draft output if it has been selected. Select Update fields; this tells Word to check that the fields are current when the document prints. Similarly, select Update links. You should also select Drawing objects.
Once you have made your selections, click OK.
On the Layout tab, shown in Figure 8-11, check the document’s vertical alignment. You want the text aligned to the top of the page, so select Top in the drop-down box. Once again, opt to apply the changes to the whole document. Click OK.