

Beginning Microsoft Word Business Documents - From Novice To Professional (2006)
.pdf26 |
C H A P T E R 2 ■ C R E A T I N G A B U S I N E S S P L A N |
Formatting Your Business Plan with Styles
When you’re applying styles to your document, you have several tools that will help you. First, there is the Styles and Formatting task pane. To open it, click View Task Pane (or press Ctrl+F1). The task pane will appear in the right side of the Word window. Click the arrow at the top of the task pane and select Styles and Formatting. To open the Styles and Formatting task pane faster, simply click the Styles and Formatting button on the Formatting toolbar.
The Styles and Formatting task pane provides an easy way to create and apply styles. Once you select the portion of your document you would like to format, simply click a style in the task pane. Conveniently, the task pane identifies the section’s current style, as you see in Figure 2-14.
Figure 2-14. The Styles and Formatting task pane showing the current style
The Formatting toolbar also provides an easy way to check a selection’s style and to apply styles. Simply select a portion of your document and use the Style drop-down box to apply a style (see Figure 2-15). When you select a portion of your document, its style will appear in the Style box.
Figure 2-15. The Style box on the Formatting toolbar
You can also view applied styles at a glance by activating the Styles area. By default, Word hides the Styles area. But to activate it, click Tools Options and open the View tab,
C H A P T E R 2 ■ C R E A T I N G A B U S I N E S S P L A N |
27 |
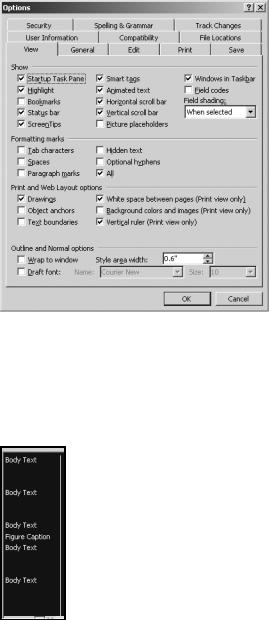
as shown in Figure 2-16. On the bottom of the tab, use the controls in the box labeled Style area width to specify the width for the Styles area. Click OK.
Figure 2-16. The View tab of the Options dialog box
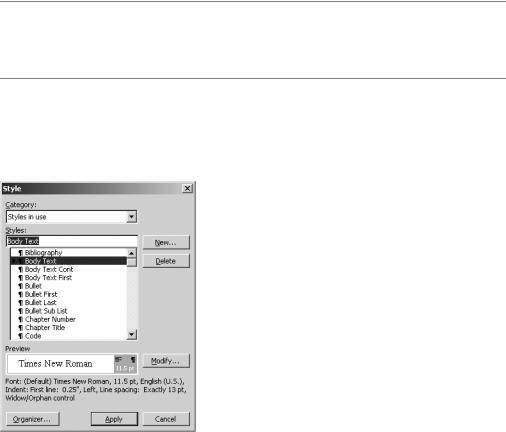
The Styles area will appear along the left side of the window, as you see in Figure 2-17. A thin frame separates the Styles area from the rest of the document. You can click and drag the frame to increase or decrease the size of the Styles area.
Figure 2-17. The Styles area
28 |
C H A P T E R 2 ■ C R E A T I N G A B U S I N E S S P L A N |
■Note The Styles area does have limitations. First, you can only display it in Outline or Normal view. Second, it only shows styles applied to paragraphs. The Styles area will not display styles you apply to characters or portions of a paragraph. It is a handy feature, nonetheless.
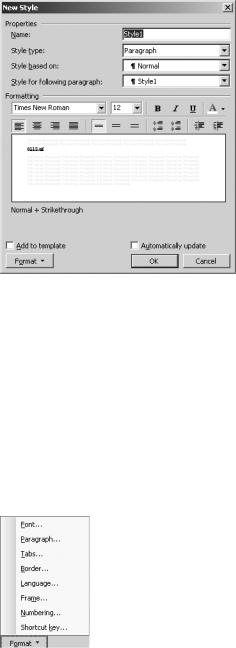
You can also use the Styles area to change a paragraph’s style. Double-click the style name in the Styles area. In the Style dialog box, shown in Figure 2-18, select the new style and then click apply.
Figure 2-18. The Style dialog box
Word includes a variety of styles for you to use. But you may want to create your own styles. Fortunately, creating a style is not as difficult as you would assume.
The easiest way to create a style is to base it on a portion of the document. First, apply the formats you want to include in the style to part of your document. Paragraph styles can include character formatting such as bold, italics, underline, font color, and font size. Additionally, you can include alignment, margins, line spacing, and indents.
Once you have formatted the text, you have three options for defining the style. First, you can click in the Styles box on the Formatting toolbar and type a name for the style. Or, in the Styles and Formatting task pane, click the New Style button. Type a name for the style in the Name box, as shown in Figure 2-19, and click OK. Lastly, you can use the Styles area. Double-click the style name next to the formatted paragraph. In the Style dialog box, click New. Type a name for the style in the Name box and click OK.
C H A P T E R 2 ■ C R E A T I N G A B U S I N E S S P L A N |
29 |
Figure 2-19. The New Style dialog box
You can also create a style by specifying the formatting manually in the New Style dialog box. To access the New Style dialog box, click the New Style button on the Styles and Formatting task pane.
Enter a name for the style in the box labeled Name. Next specify the type of style in the Style type box. You can select Paragraph, Character, Table, or List. Your choices will vary based on the type of style you create.
Use the controls to specify the formats to include in the style. If you don’t see the options you need, click the Format button. A list pops up with more formatting options (see Figure 2-20). The preview area shows you how the style will look.
Figure 2-20. The Format list on the New Style dialog box
You can tell Word to update the style when you make changes to text formatted with the style. Simply select Automatically update. When you have finalized your choices, click OK.
30 |
C H A P T E R 2 ■ C R E A T I N G A B U S I N E S S P L A N |
You can also create a new style based on an existing style. In the New Style dialog box, select the style you want to use in the drop-down list labeled Style based on.
■Caution If you modify a base style, Word will update all styles you created from the base style. To avoid this, select (no style) in the drop-down list box labeled Style based on in the New Style dialog box.
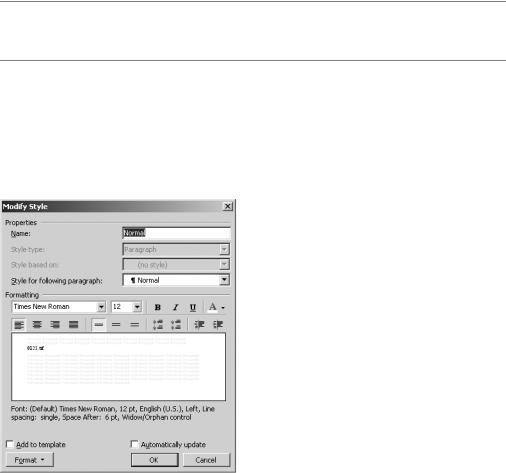
There is a good chance you will decide to modify a style you created. To do this, you need to access the Modify Style dialog box, as shown in Figure 2-21. In the Styles and Formatting task pane, hold the mouse over the style you would like to modify. Click the arrow that appears and select Modify. The Modify Style dialog box, which is similar to the New Style dialog box, will open.
Figure 2-21. The Modify Style dialog box is similar to the New Style dialog box.
Alternatively, you can modify a style by formatting a portion of your document with the formats you would like to include in the style. Then hold the mouse over the style you would like to modify in the Styles and Formatting task pane. Click the arrow that appears and select Update to Match Selection.
C H A P T E R 2 ■ C R E A T I N G A B U S I N E S S P L A N |
31 |
■Tip If you want to change all instances of a particular style, select a portion of the document formatted with the style. In the Styles and Formatting task pane, click the Select All button. Then click the new style you would like to apply. Also, you can delete all text formatted with the selected style by pressing Delete or Backspace.
Inserting a Table
Tables will play an important role in your business plan. Use tables to organize data in balance sheets, sales projections, and other financials.
The easiest way for you to create a table in Word is to use the Insert Table button on the Standard toolbar.
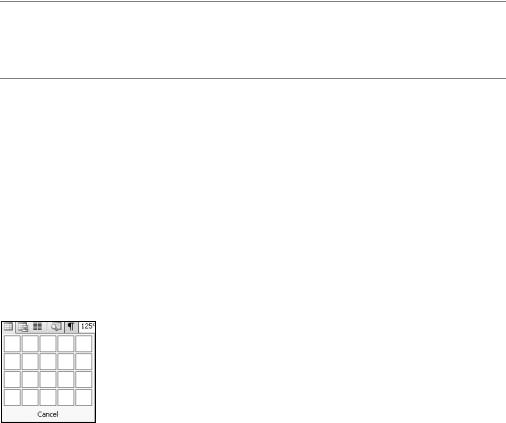
Position the cursor where you would like the table. Then click the Insert Table button. Use the drop-down grid to select the number of rows and columns for the table, as shown in Figure 2-22. When you release the mouse, Word inserts the table at the appropriate location in your document.
Figure 2-22. Using the Insert Table button to create a table
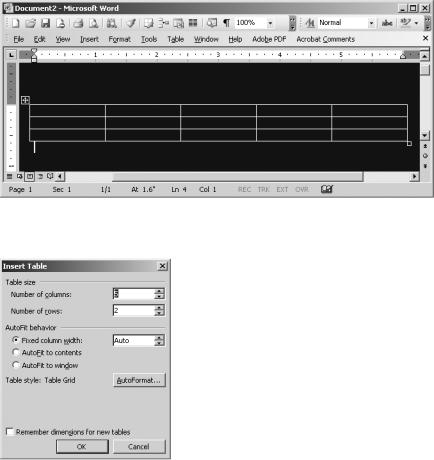
As Figure 2-23 illustrates, you will notice that tables you create with this method span the entire width of the document, no matter how many columns they contain.
For more control over your columns, use the Insert Table dialog box. It allows you to specify a number of different formatting options for your table.
To access the Insert Table dialog box, place the cursor where you would like to position the table. Then click Table Insert Table. In the Insert Table dialog box, specify the number of columns and rows you would like the table to contain, as shown in Figure 2-24. You can also set options for the column width. By default, Word automatically sets the width of the columns. However, you can use the Fixed column width box to specify the width of the columns in inches. Or, you can have Word automatically fit the table to the window or table contents by selecting one of the AutoFit options.
32 |
C H A P T E R 2 ■ C R E A T I N G A B U S I N E S S P L A N |
Figure 2-23. A table created with the Insert Table button
Figure 2-24. The Insert Table dialog box
Notice the AutoFormat button on the Insert Table dialog box. This opens a dialog box that allows you to specify predetermined formats to the table. In the Table AutoFormat dialog box, shown in Figure 2-25, you first select a table style. Word displays the table formatting in the Preview box. At the bottom of the dialog box, you can use the selections to add or remove formatting from specific rows and columns. When you’re done, click OK. Then click OK in the Insert Table dialog box.
To enter data in the table, simply click in a cell and begin typing.
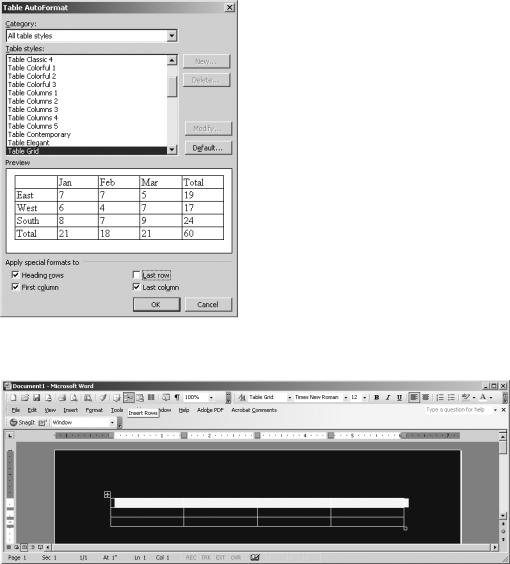
If you decide you want to add more rows or columns to your table, you can do so quite easily. To add a row, click to the left of the row below which you would like to add a new row. Once the row is selected, the Insert Table button on the Standard toolbar changes to the Insert Rows button, as you see in Figure 2-26.
C H A P T E R 2 ■ C R E A T I N G A B U S I N E S S P L A N |
33 |
Figure 2-25. The Table AutoFormat dialog box
Figure 2-26. Adding a row to a table
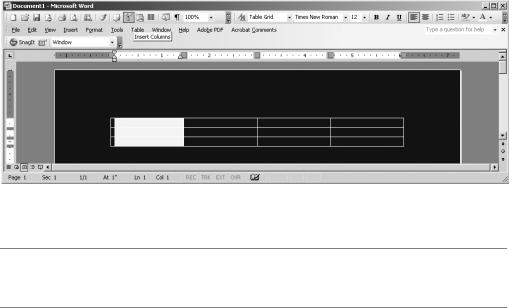
To add a column, click the border above the column beside which you would like to insert an additional column. The Insert Table button on the Standard toolbar changes to the Insert Columns button. Word inserts the column to the left of the selected column (see Figure 2-27).
34 |
C H A P T E R 2 ■ C R E A T I N G A B U S I N E S S P L A N |
Figure 2-27. Adding a column to a table
■Tip For more flexibility in choosing where to insert rows and columns, use the Insert submenu on the
Table menu instead of the toolbar buttons.
To remove rows or columns, select the row or column you would like to delete. Then click Table Delete and specify what to delete.
Modifying a Table’s Layout
After you’ve created your table, you can make changes to the layout if you need. You can resize the columns and rows by clicking and dragging the borders. Also, you can merge or split cells as you would in Excel.
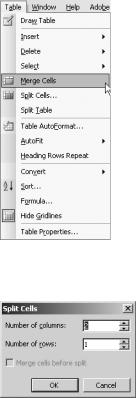
To merge cells, select the rows or columns you would like to combine. Then on the Table menu, click Merge Cells, as shown in Figure 2-28.
To split cells, select the row or column you would like to divide. Click Table Split Cells. In the Split Cells dialog box, shown in Figure 2-29, specify the number of rows or columns you would like to create. After you’ve specified the options, click OK.
C H A P T E R 2 ■ C R E A T I N G A B U S I N E S S P L A N |
35 |
Figure 2-28. Merging table cells
Figure 2-29. The Split Cells dialog box
Formatting Tables
If you didn’t specify an AutoFormat when you created your table, or if you want to change the format you applied, you can still format your table.
To apply formatting to the characters in your table, select the text and use the buttons on the Formatting toolbar to change character attributes.
If you want to change text alignment or table alignment, or apply borders and shading, you’ll need to use the Table Properties dialog box, as shown in Figure 2-30. You can access this by selecting a portion of your table, right-clicking, and selecting Table Properties.