

Beginning Microsoft Word Business Documents - From Novice To Professional (2006)
.pdf
Acknowledgments
I would like to thank the team at Apress, whose dedication and professionalism made this book possible. Working with you has been a pleasure.
Thank you Hannah, Michael, and Monica for your lasting friendships and for listening to my plights and gripes about deadlines and long hours.
And, of course, many thanks to P. for her loyal companionship.
xi

Introduction
Thank you for your interest in this book. My goal in writing this book is to help you create professional documents in Microsoft Word with a minimum of effort.
The step-by-step instructions will show you everything you need to know about creating business documents in an easy-to-follow manner.
Who Should Read This Book
This book is designed for intermediate Word users or anyone who wants to increase their Word skills. Because the book is geared specifically to business documents, it is best suited for people who must create these documents on a regular or frequent basis.
How to Use This Book
Each chapter shows you how to create a certain type of document or a related type of document.
I recommend that all readers familiarize themselves with Chapter 1, which lays the groundwork for the subsequent chapters. From there, you can read any chapter that suits your needs.
Like Chapter 1, Chapters 9 and 10 will be pertinent to many readers. These chapters will help readers who are working on unwieldy documents or who would like to increase their efficiency by automating tasks.
Within each chapter, you will find tips, notes, and cautions. These expand on topics discussed in the body of the chapter. They offer advice for getting the most out of the features or for avoiding problems with certain features.
Additionally, sidebars offer expanded explanations and advice for certain features. Together these will help you get the most out of Word by avoiding the program’s potential pitfalls.
Finally, sample documents for each chapter are available at the Apress web site (http://www.apress.com). You can download these documents and alter them to suit your needs.
xii
■I N T R O D U C T I O N |
xiii |
What You’ll Find in This Book
Following is a chapter-by-chapter breakdown of this book:
•Chapter 1, Planning and Creating a Document: Every reader should take a look at this chapter, as it covers everything you need to know about creating a basic document in Word. This document serves as the basis for every document created in the subsequent chapters. What’s more, you can use this basic document to create any type of document.
•Chapter 2, Creating a Business Plan: If your company is a new startup, a business plan is essential, as it will help investors assess the viability of the business. This chapter guides you through the process of creating such a document.
•Chapter 3, Creating Marketing Brochures and Newsletters: This chapter shows you how to use the advanced formatting features required for marketing brochures and newsletters.
•Chapter 4, Creating Forms for Printing or Distributing Electronically: If you need a form to gather information electronically, read this chapter. It shows you how to use Word’s form tools to get the job done. It’s also handy for creating printed forms, such as job applications.
•Chapter 5, Creating Legal Documents: There are a variety of different legal filings, and the formatting will vary from court to court. However, this chapter shows you formatting elements you can use with any type of legal filing.
•Chapter 6, Creating Data Sheets: If you’re creating a data sheet, it may seem like you need to use a desktop publishing program to accomplish a clean layout. That is not the case. You can accomplish the task quite easily in Word, and this chapter shows you how.
•Chapter 7, Creating Organization Charts: Rather than use Word’s Drawing Objects to create a chart of a company’s structure, use the Organization Chart feature. You can create a customized organization chart in a snap!
•Chapter 8, Creating a Grant or Business Proposal: Grants and business proposals are essential to most businesses and nonprofit organizations. When asking for a grant or project, correct formatting is crucial, as it will make your business appear more professional and competent. This chapter shows you everything you need to know.
xiv■I N T R O D U C T I O N
•Chapter 9, Automating Document Creation: Once you’ve created your document, chances are you will be creating more in the future. Or, you may want to create multiple, yet differing, copies all at once. This chapter will help you do that. Learn how to use Mail Merge and other features to automate the document creation process.
•Chapter 10, Working with Large Documents: Finally, Chapter 10 will give you advice for working with very long documents. In a business environment, this is a must read. It also shows you how to use tools specially designed for use in a collaborative environment.

C H A P T E R 1
■ ■ ■
Planning and Creating
a Document
If you are creating a document with many different sections and a variety of information, the formatting can become an intricate process. But by planning the document before you start creating it, you will simplify the process.
This chapter will show you how to plan and create a basic document. The subsequent chapters will take you through the steps of customizing the basic document to create specific types of business documents.
Getting Started with Word’s Outline View
With a multipart document, it’s best to start with an outline, as it will allow you to organize the different parts of the document. You will also see at a glance the sections you are including, so you won’t inadvertently omit a portion of the document.
More importantly, outlines are particularly helpful when you need to include a table of contents with your document. The outline levels will help you create a table of contents that updates automatically as the document evolves.
With Word’s Outline view, you can create an outline with ease. To switch to Outline view, click the View menu and select Outline. The Outline view differs substantially from other document views. You will also notice that the Outlining toolbar appears below the Standard and Formatting toolbars, as shown in Figure 1-1. It contains a number of options that will help you work with your outline.
■Note When you change document views, you may not see certain elements of your document. Also, with the exception of Print Layout view, the document views do not accurately represent how your finished document will appear. Keep this in mind as you work. If you need to gauge how your finished document will look, you can toggle back and forth between document views. You can do this via the View menu or the view buttons in the lower left of the Word window. The Print Preview button on the Standard toolbar also shows you how your document will look.
1

2 |
C H A P T E R 1 ■ P L A N N I N G A N D C R E A T I N G A D O C U M E N T |
Figure 1-1. Word’s Outline view
In Outline view, enter each section heading on a new line. You should also enter headings for the subsections. Notice that a small minus symbol appears in the left margin of each line.
Once you have entered the section headings and subsection headings, you are ready to assign each heading a level. Think of it as a standard outline, even though you might not use Roman numerals, numbers, and letters.
By default, Word assigns each line to Level 1. You will probably find that most of the sections of your document remain at Level 1. However, some sections will require subsections. So you will need to move the sections to a lower level.
There are several ways to change a heading level, the easiest being to place the cursor at the beginning of the heading and then use the Tab key to change the level. Press the Tab key once to lower the heading one level. You will notice that the minus sign in the left margin on the preceding level changes to a plus sign, as Figure 1-2 illustrates.
■Tip Should you need to promote a heading up a level, press Shift+Tab to move it. The headings subordinate to the heading you move will not move automatically. If you want the subheadings to maintain the same relative position, use the plus sign in the left margin. Click it to highlight the level and its subordinate levels. When you change the level, the relative position of the other levels also changes.
If you need to change the order of one of the headings, click the plus or minus sign in the margin. Then drag it to the correct location. A dotted line will show you the new location for the heading. When you move a level, you will also move the sublevels.

C H A P T E R 1 ■ P L A N N I N G A N D C R E A T I N G A D O C U M E N T |
3 |
Figure 1-2. Showing sublevels in Outline view
■Note When you switch to Print Layout view, you will notice that Word has automatically applied formatting to your document. This is normal. Word uses the heading styles incorporated in the Normal.dot template, the template upon which all blank documents are based. If you do not want to use the default styles, don’t worry. The styles can be altered later when you format the document.
■Tip When working in Outline view, you can expand or collapse a portion of your outline by double-clicking the plus sign in the margin. If you want to collapse your entire outline, use the Outlining toolbar. The Show Level drop-down box, shown in Figure 1-3, allows you to select the levels you would like to view. You can select Levels 1 through 9, or you can opt to show all levels.
Figure 1-3. The Show Level drop-down box on the Outlining toolbar
4 |
C H A P T E R 1 ■ P L A N N I N G A N D C R E A T I N G A D O C U M E N T |
Entering the Main Body Text
Now you are ready for creating the main document. At this stage, you should enter text only. You will insert charts, tables, graphs, and other document elements later.
Also, avoid applying any formatting to the document. This includes bold, italics, and underline. You do not want to use indentation yet, nor should you use the Tab key to indent text.
Right now, your primary concern is to enter the text data in your document. You will apply formatting to paragraphs and text in one stage. This ensures that you achieve clean, consistent formatting throughout the document. Use Word’s style feature to apply the formatting, so Word will not retain manually applied formats.
Specifying Page Setup
Now you are ready to specify the page setup for the entire document. You may decide later to alter the page setup in specific parts of your document, or you may already know that the page setup will differ in certain areas. This is okay. For now, you are setting the predominant page layout for your document.
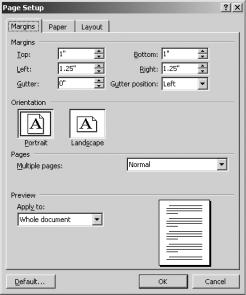
Access the Page Setup dialog box by clicking File Page Setup. Click the Margins tab to open the settings for the margins, as shown in Figure 1-4.
Figure 1-4. The Margins tab of the Page Setup dialog box
C H A P T E R 1 ■ P L A N N I N G A N D C R E A T I N G A D O C U M E N T |
5 |
The default settings for the Normal.dot template are 1 inch at the top and bottom of the page and 1.25 inches at either side of the page. In most situations, these settings are appropriate for documents. However, if you plan to bind the document, for example, you may want to increase the margins. This ensures that the binding will not obstruct any of the printing.
■Caution Avoid increasing the margins without a good reason, such as accommodating a binding. Otherwise, the margins will become distracting, and your document may look insubstantial. Similarly, do not decrease the margins to fit more on the page. This will make the document look cramped and difficult to read.
If you plan to add a header and footer, take that into consideration. Word will place the header and footer outside the margins you specify. You should also consider any footnotes you have added to the document.
The default page orientation is portrait, but you can change it to landscape. Also, check that the drop-down box labeled Pages reads Normal. In the drop-down box labeled Apply to, select Whole document.
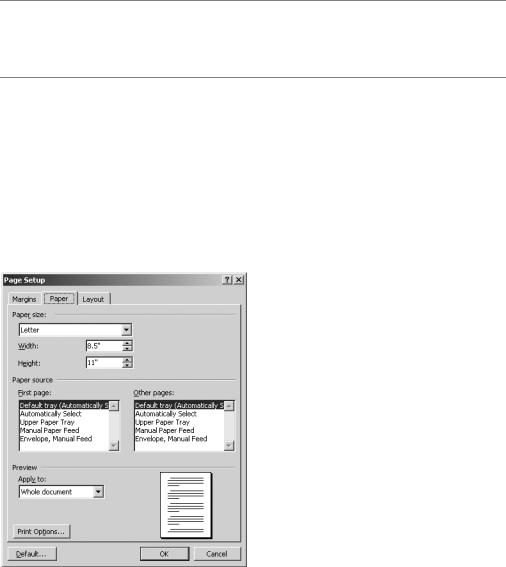
Next, click the Paper tab in the Page Setup dialog box (see Figure 1-5). In the Paper size section, use the drop-down box to specify the paper size. Letter size will be most common.
Figure 1-5. The Paper tab of the Page Setup dialog box