

Beginning Microsoft Word Business Documents - From Novice To Professional (2006)
.pdf46 |
C H A P T E R 2 ■ C R E A T I N G A B U S I N E S S P L A N |
Figure 2-47. The Page Setup dialog box
Figure 2-48. The Page Number Format dialog box
To add page number to the remainder of the business plan, place your cursor at the top of the first page. Click View Header and Footer. Click the Page Setup button on the Header and Footer toolbar. Use the controls to specify the distance from the edge of the paper. In the Preview section, select This point forward. Click OK.
C H A P T E R 2 ■ C R E A T I N G A B U S I N E S S P L A N |
47 |
Scroll down and click within the footer box. On the Formatting toolbar, click the Right Alignment button. Then on the Header and Footer toolbar, click the Insert Page Number button. Click the Format Page Number button. In the Page Number Format box, select the number format. You should select standard numbering. Under Page numbering, select Start at and use the controls to select the appropriate page number. Click OK.
The process for adding headers is the same as for footers.

C H A P T E R 3
■ ■ ■
Creating Marketing Brochures
and Newsletters
At first glance, marketing brochures and newsletters seem like very different types of documents. However, both include identical elements, such as pictures, columns, and borders. The steps for formatting brochures and newsletters are similar, even though the results will look very different.
With brochures and newsletters, you should start by creating a basic document. Add as much of the document text and as many of the formatting styles as you can. However, formatting a brochure or newsletter will require much more advanced features. You may find that you need to go back and tweak some of your earlier work. This is to be expected with intricately formatted documents.
You’ll find a sample marketing brochure with the downloads for this book at the Apress web site (http://www.apress.com).
Specifying Page Setup
After entering the body text, you are ready to specify the page setup for the entire document. You may decide later to alter the page setup in specific parts of your newsletter or brochure. Or you may already know that the page setup will differ in certain areas. This is okay. For now, you are setting the predominant page layout for your document.
Access the Page Setup dialog box by clicking File Page Setup. Click the Margins tab to open the settings for the margins, as shown in Figure 3-1.
The default settings for the Normal.dot template are 1 inch at the top and bottom of the page and 1.25 inches at either side of the page. You can enter new margin sizes if you wish.
You may also want to change the page orientation. In most documents, the vertical edge of the page is longer than the horizontal edge. This is portrait orientation. But in some situations, you want the horizontal edge to be longer. This is called landscape orientation.
49

50 |
C H A P T E R 3 ■ C R E A T I N G M A R K E T I N G B R O C H U R E S A N D N E W S L E T T E R S |
Figure 3-1. The Margins tab of the Page Setup dialog box
In the Orientation section, select Portrait or Landscape by clicking the appropriate button. If you want the document from the cursor position forward to change to Landscape
orientation, you must specify it. In the Preview section, select This point forward in the drop-down box. Otherwise the change will apply to the entire document.
■Tip You can apply Landscape orientation to one or more pages in the middle of your document. The easiest way to do this is to select a portion of your document. Then follow the preceding steps. In the Preview section, choose Selected text from the drop-down box. Also, if you have created sections in your document, you can click in a section, follow the preceding steps, but select This section in the Preview section.
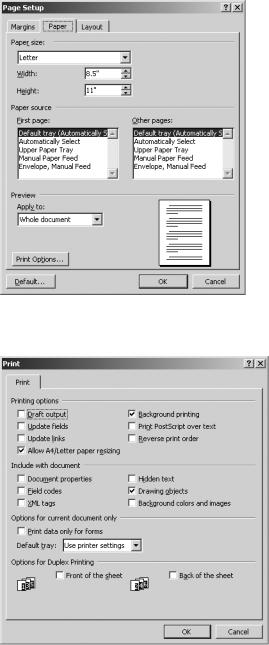
Next, click the Paper tab in the Page Setup dialog box to display the options shown in Figure 3-2. In the Paper size section, use the drop-down box to specify the paper size.
Use the boxes in the Paper source section to specify the printer’s paper tray(s) for the first page of the newsletter or brochure and for the subsequent pages. In the Preview section, opt to apply the changes to the whole document.
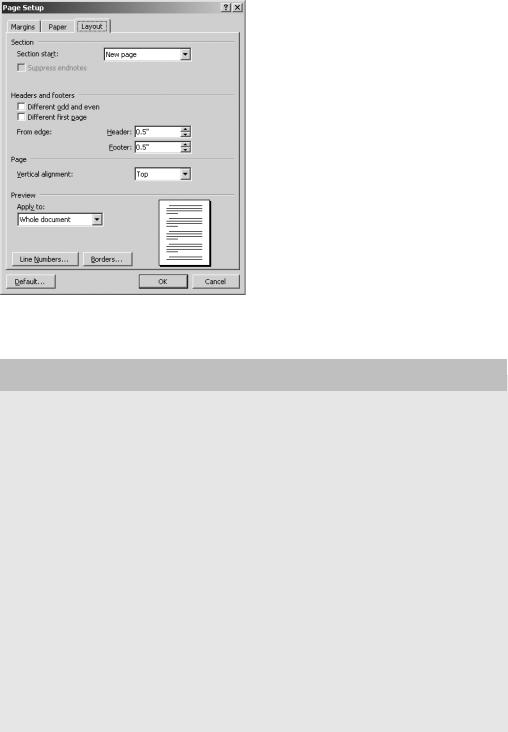
Click the Print Options button to review the settings, as you see in Figure 3-3. Deselect Draft output if it has been selected. You should select Drawing objects.
Once you have made your selections, click OK.
C H A P T E R 3 ■ C R E A T I N G M A R K E T I N G B R O C H U R E S A N D N E W S L E T T E R S |
51 |
Figure 3-2. The Paper tab of the Page Setup dialog box
Figure 3-3. The Print dialog box
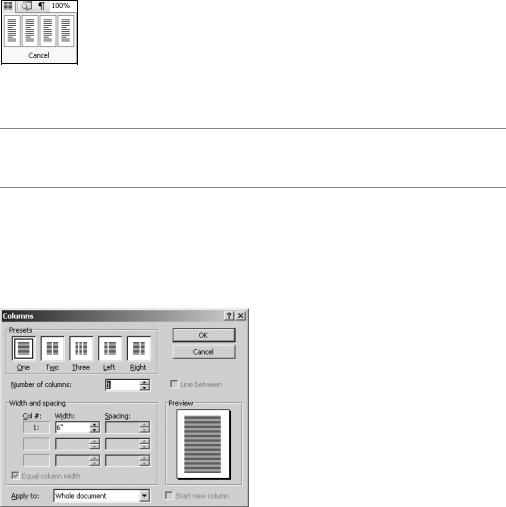
On the Layout tab, as shown in Figure 3-4, check the document’s vertical alignment. Select the alignment in the drop-down box. Opt to apply the changes to the whole document or that point forward. Click OK.
52 |
C H A P T E R 3 ■ C R E A T I N G M A R K E T I N G B R O C H U R E S A N D N E W S L E T T E R S |
Figure 3-4. The Layout tab of the Page Setup dialog box
TAKING ADVANTAGE OF WORD’S SECTIONS FEATURE
When you’re working in Word, you will find it advantageous to divide your document into sections. You can insert a section break by clicking Insert Break. In the Break dialog box, you have a
number of options in the section labeled Section break types. They are as follows:
•Next page: This inserts a section break in the document. Text following the break will begin on a new page.
•Continuous: Word inserts a section break at the cursor position. Text following the break does not move. It remains on the current page.
•Even page: Word inserts a section break in the document. Text following the break will move to the subsequent even page.
•Odd page: This inserts a section break at the cursor position. Text following the break will move to the next odd page.
In printed documents, one section is not distinguishable from the next. However, by dividing your document into sections, you are simplifying the formatting process. Word often gives you the option of applying page formatting at the section level. You determine what constitutes a section of the document.
C H A P T E R 3 ■ C R E A T I N G M A R K E T I N G B R O C H U R E S A N D N E W S L E T T E R S |
53 |
Inserting Columns in Your Newsletter or Brochure
Columns can give your document a clean, refined look. Also, text is easier to read when you break it up into shorter lines. Columns can be tricky if you don’t use them correctly. But when you understand a few key points, they’re relatively simple.
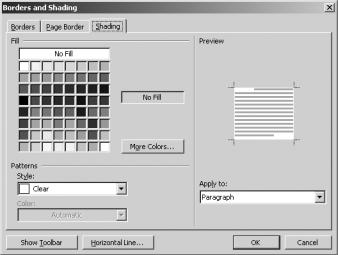
The easiest way to apply columns to a portion of your document is to use the Columns button on the Standard toolbar. Select a portion of your document and click the button. A drop-down menu gives you the option of dividing the section into four columns, as you see in Figure 3-5. However, if you hold the left mouse button and drag to the right, you are given the option of adding six columns. Simply highlight the number of columns you want to apply.
Figure 3-5. Creating columns using the Columns toolbar button
■Tip Columns provide an easy way to create trifold brochures. Set your document orientation to Landscape in the Page Setup dialog box. Then divide the entire document into three columns.
This doesn’t give you many choices. For more advanced options, click Format Columns. You can select from the Presets column designs, as shown in Figure 3-6. Or, you can
specify the number of columns you want by using the Number of columns box. Word supports up to 12 columns in Portrait orientation and 18 columns in Landscape orientation.
Figure 3-6. The Columns dialog box

54 |
C H A P T E R 3 ■ C R E A T I N G M A R K E T I N G B R O C H U R E S A N D N E W S L E T T E R S |
By default, Word makes each column identical in width. But you can set the width for each column independently. Deselect Equal column width. Then use the controls to specify width, in inches, for each column. The Spacing boxes let you set the distance between the columns.
If you would like a line between each column, select Line between. Use the Preview section to see how your columns will look.
■Tip For greater control over the appearance of columns, you can insert column breaks. This will push all text after the break into the next column. So you won’t need to enter returns to move text. To insert a column break, click Insert Break. Select Column break and click OK.
Finally, choose Selected text in the Apply to drop-down box. Or, you can select Whole document to apply it to the entire document. If text isn’t selected, your choices are This point forward or Whole document. Click OK.
■Caution Columns can become problematic in some situations. That’s because Word must create a new section when you change the number of columns in your document. So keep this in mind if you’re working with other elements that change from section to section.
Applying Borders and Shading
You can spice up the appearance of your document by adding borders and shading to portions of it. The colors and lines will add graphical impact.
As with any type of creative formatting, use borders and shading sparingly. Otherwise, the elements will overwhelm the document and distract your readers. Additionally, when you’re creating a document for a professional audience, avoid ornate or overly whimsical border types.
Adding Shading
To add shading, select the portion of your document you would like to highlight with a color. Then click Format Borders and Shading.
On the Shading tab, shown in Figure 3-7, use the color grid to select a fill color. You can click the More Colors button if you would like a wider range of colors, or if you would like to create a custom color.
C H A P T E R 3 ■ C R E A T I N G M A R K E T I N G B R O C H U R E S A N D N E W S L E T T E R S |
55 |
Figure 3-7. The Shading tab of the Borders and Shading dialog box
Word also allows you to apply a pattern to the shaded area. Use the Style drop-down box in the Patterns area to select a pattern. You can also select the alternating color for the pattern. Simply use the drop-down box labeled Color to select one.
Word will apply shading in one of two ways. First, you can opt to apply the shading at the text level by select Text in the Preview section. This does not apply the shading to spaces at the end of lines or to spacing between lines. If a paragraph is double-spaced, for example, there will be gaps between the lines of text. Plus, the ends of lines will look jagged.
For a cleaner look, apply the shading at the paragraph level by selecting Paragraph in the Preview section. The shading will extend from margin to margin in the selected area. Furthermore, you don’t need to worry about gaps between lines of text.
Once you have applied your shading, click OK.
Applying a Border to a Portion of Your Brochure or Newsletter
Applying a border to a portion of your document is similar to applying shading. Select the portion of your document you would like to highlight with a border. Then click Format Borders and Shading.
On the Borders tab, select a line style in the Style section, shown in Figure 3-8. Simply scroll through the options and select one of the line styles.
Next, use the Color drop-down box to specify the border line color. Click the More Line Colors button at the bottom of the list for a greater range of options. This also allows you to create a custom color to use.