

Beginning Microsoft Word Business Documents - From Novice To Professional (2006)
.pdf166 |
C H A P T E R 8 ■ C R E A T I N G A G R A N T O R B U S I N E S S P R O P O S A L |
Figure 8-42. The Page Setup dialog box
Figure 8-43. The Page Number Format dialog box
To add page numbers to the remainder of the business proposal, place your cursor at the top of the first page. Click View Header and Footer. Click the Page Setup button on the Header and Footer toolbar. Use the controls to specify the distance from the edge of the paper. In the Preview section, select This point forward. Click OK.
Scroll down and click within the footer box. On the Formatting toolbar, click the Right Alignment button. Then on the Header and Footer toolbar, click the Insert Page Number button. Click the Format Page Number button. In the Page Number Format box, select the number format. You should select standard numbering. Under Page numbering, select Start at and use the controls to select the appropriate page number. Click OK.

C H A P T E R 9
■ ■ ■
Automating Document Creation
Templates go a long way to simplifying the document creation process. But Word offers other tools that will make the process even easier. You can use these tools on their own or in conjunction with templates.
Using Mail Merge to Complete Documents
Mail Merge is one of the easiest ways to automate the creation of documents. Mail Merge takes information from a data file and inserts it in a file that contains other text.
Mail Merge vs. Templates
At first blush, the difference between Mail Merge and templates may not seem terribly important. The goal of each is to simplify the document creation process.
But there is an important difference between the two. First, templates will ensure consistent formatting. They will even help you with standard text that appears in all documents created from a particular template.
On the other hand, Mail Merge aims to help you create multiple documents that contain the same text, but are customized for individual readers. Of course, adept users can add extra text to specific documents via the use of a field, but most users won’t do this. Templates and Mail Merge are not mutually exclusive. It is not uncommon to use a
template as the main document for a Mail Merge operation: the template ensures that the text is formatted correctly, while the Mail Merge portion ensures that the correct text is entered.
Choosing a Data Source
You have a number of different options when it comes time to choose a data source for your Mail Merge. Word includes a built-in data source. You can also use contacts from Outlook or a table from an Access database. But perhaps the best source is an Excel spreadsheet.
167
168 |
C H A P T E R 9 ■ A U T O M A T I N G D O C U M E N T C R E A T I O N |
It is easy to enter and arrange data in an Excel spreadsheet. Also, data can be imported to and exported from Excel. So here, you will use an Excel spreadsheet as an example.
Setting Up Mail Merge
Your data should be organized neatly into rows and columns. Think of each row as a single record and each column as a field you are going to insert into your document.
Create a header row for the sheet you intend to use for the Mail Merge. A header row is a row containing labels that identify the data in the cells below. Excel can be finicky sometimes about differentiating between data and labels, so provide clues: bold text, a cell border, and cell shading that are unique to the header row will ensure Excel differentiates it from the rest of your data.
Later, when you merge the data with the main document, the labels will appear as the names of the merge fields, so there will be no confusion as to what data you are inserting into your document. Furthermore, labeling your columns helps prevent user error.
The data you intend to use for the Mail Merge must be on one sheet. If it is spread across multiple sheets, you will need to combine the sheets or perform multiple Mail Merges. Also, make sure the sheets are clearly named, as you must select the sheet you intend to use without viewing it.
For the main document, you can use either a new, blank document, a template, or a document you’ve already created.
With the document open, activate the Mail Merge toolbar by right-clicking the gray space around the toolbars and selecting Mail Merge from the pop-up list.
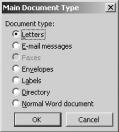
On the Mail Merge toolbar, click the Main document setup button. In the Main Document Type dialog box, shown in Figure 9-1, select the type of document you wish to create. If you are unsure which to select, choose Letters, as this option will work for most types of documents. Then click OK.
Figure 9-1. The Main Document Type dialog box
Once you have created the main document, it is time to associate your data source with the document. On the Mail Merge toolbar, click the Open Data Source button.
C H A P T E R 9 ■ A U T O M A T I N G D O C U M E N T C R E A T I O N |
169 |
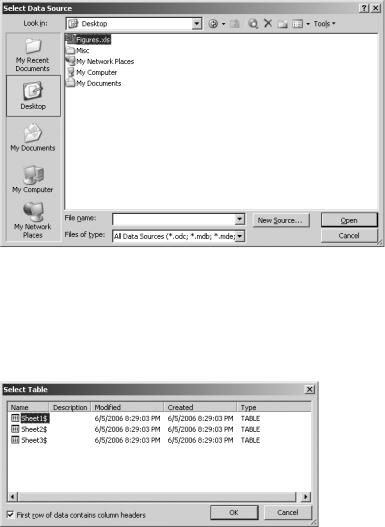
When the Select Data Source dialog box appears, navigate through the folders until you find your Excel workbook (see Figure 9-2). If you are unable to find your Excel file, make sure you have selected All Data Sources in the drop-down box beside the Files of type label. When you find your file, open it by double-clicking it or by selecting it and then clicking Open.
Figure 9-2. The Select Data Source dialog box
In the Select Table dialog box, shown in Figure 9-3, select the sheet that contains the data you wish to merge with your document. Before you click OK, make sure the box beside the option First row of data contains column headers is checked.
Figure 9-3. The Select Table dialog box
Now that the data source has been associated with the main document, you can begin entering text and/or editing your document. You cannot, however, make changes to your data source in Excel. If you need to make changes to the data, you must close the main document in Word before you can open the data source in Excel.
170 |
C H A P T E R 9 ■ A U T O M A T I N G D O C U M E N T C R E A T I O N |
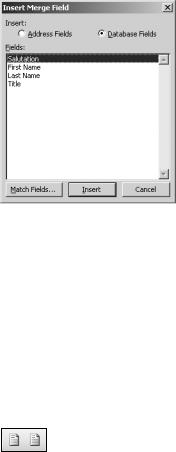
To insert merge fields into your document, click the Insert Merge Fields button on the Mail Merge toolbar. The Insert Merge Field dialog box will appear, as shown in Figure 9-4.
Figure 9-4. The Insert Merge Field dialog box
Highlight the name of the field you wish to insert from the list and click Insert. The box will stay open, allowing you to insert more fields. When you are done, click Close.
If you insert more than one field in succession, Word will not automatically add space between the fields in your document; you must do this yourself after you close the dialog box. In your document, you will see each field name surrounded by double arrows.
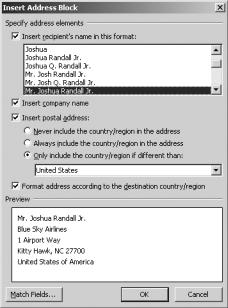
Microsoft recently added Mail Merge features that allow you to insert address blocks and greeting lines (see Figure 9-5). By clicking the respective button on the toolbar, Word will allow you to insert several fields at once, arranged in common variations.
Figure 9-5. The Insert Block toolbar buttons
Furthermore, when you click either button, Word displays a dialog box that gives you some options on which fields you would like inserted, how you would like them to be arranged, what punctuation to include, etc. (See Figure 9-6 for the dialog box that appears when you click the Insert Address Block button.) This is easy enough if you are using a data source created in Word, but it can get confusing if you are using an Excel worksheet.
C H A P T E R 9 ■ A U T O M A T I N G D O C U M E N T C R E A T I O N |
171 |
Figure 9-6. The Insert Address Block dialog box
Earlier I recommended that you use a header row in your worksheet. Well, if you named a field something other than what Word uses as a field name for similar data, Word might match the fields incorrectly.
This means if you use the Insert Address Block or Insert Greeting Line buttons, the data might appear in a different order than you specify—simply because the labels don’t match. Fortunately, Microsoft anticipated this and built in a Match Fields feature that allows you to match your field names to the ones Word uses in the blocks.
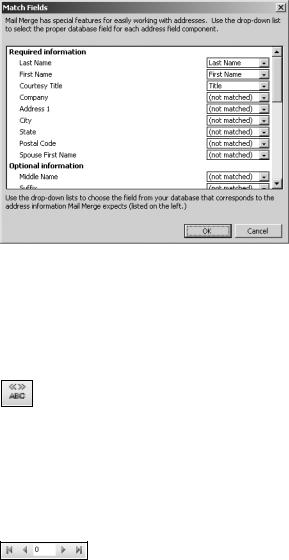
To match fields, click the Match Fields button on the Mail Merge toolbar. In the Match Fields dialog box, shown in Figure 9-7, you will see a list of Word’s field names on the left. On the right side of the box, you will see a column of drop-down boxes. The name in each drop-down box is the field that Word is using for each respective field in the Address Block or Greeting Line block. To make any changes, simply select the field name from the dropdown box. Once you are done making changes, click OK.
You can also bring up the Match Fields dialog box by clicking the Match Fields button at the bottom of either the Insert Address Block or Insert Greeting Line dialog boxes, both of which appear when you click the respective toolbar button.
172 |
C H A P T E R 9 ■ A U T O M A T I N G D O C U M E N T C R E A T I O N |
Figure 9-7. The Match Fields dialog box
To preview your merged documents, click the View Merged Data button on the Mail Merge toolbar (see Figure 9-8). This button works like a toggle switch, so if you want to go back to viewing just the fields and not the data they contain, click it again.
Figure 9-8. The View Merged Data button
You can navigate through the merged documents by using the navigational buttons on the Mail Merge toolbar, as shown in Figure 9-9. They are, from left to right, First Record, Previous Record, Go To Record, Next Record, and Last Record.
Figure 9-9. The Mail Merge navigational buttons
I recommend that before you merge your documents, you preview them all, or as many as you can, to verify that everything merged correctly—pay particular attention to things such as punctuation and spacing around the merged data.

C H A P T E R 9 ■ A U T O M A T I N G D O C U M E N T C R E A T I O N |
173 |
■Note Word does not carry over the formatting of the data in the data source. If you want to apply special formatting such as italics, bold, or underline, you must do so in Word. If you are viewing the document with fields, you must select the double arrows on both sides of the field to which you want to apply the formatting. If you are viewing the merged data in the document, simply highlight the text you wish to change. Remember that any change will carry throughout all the merged documents, not just the individual one.
■Tip There is a way to have the merge fields appear exactly as they do in Excel, retaining the formatting of the Excel worksheet.
With the main document open, click the Tools menu and select Options. On the General tab, select Confirm Conversion at Open. Click OK.
When you select an alternative data source such as Excel, Word will ask you to choose the type of data source. When present with the choice, select MS Excel Files via DDE. The formatting from the worksheet will be carried over to the Word file.
Inserting Fields
Word also provides a number of different fields you can insert in your document. Unlike Mail Merge fields, Word determines the field values automatically or uses the field to perform an action. You probably already use fields in your document without realizing it. For example, Word uses field codes when you insert page numbers and create tables of contents.
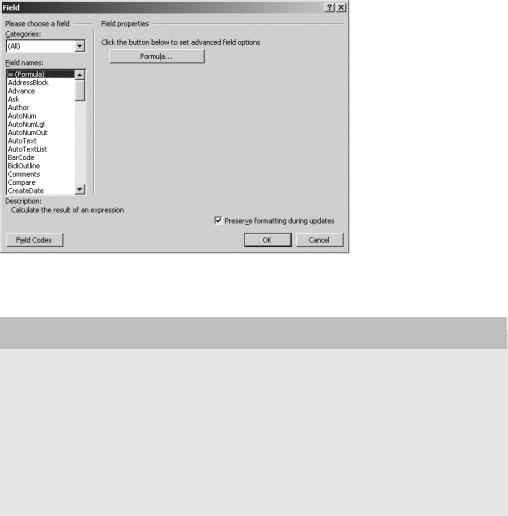
To insert a field in your document, click Insert Field. In the Field dialog box, shown in Figure 9-10, you can use the Categories box to choose the type of field you would like to insert.
Depending on the type of field you are using, you will have a number of different options for the field. For example, with the Ask field, you can enter a prompt and a default response for the field. After you’ve specified the options for your field, click OK to insert it in your document. If you are unsure of a field’s function, consult Word’s Help feature by pressing F1.
Additionally, you can add arguments and switches to your fields. Because there are a variety you can add, and they largely depend on the field you’re using, I won’t cover them here. For more information, consult Word’s Help feature.
Fields don’t always automatically update. So, if you make changes that affect the contents of a field, the changes may not be apparent to you. In that case, you should update the field. To update a single field, select it and press F9. You can update all the fields in your document by pressing Ctrl+A to select the entire document and pressing F9 to update the fields.
Finally, you may wish to lock one or more fields in your document. To lock a field, select it and press Ctrl+F11. To unlock a field, press Ctrl+Shift+F11.
174 |
C H A P T E R 9 ■ A U T O M A T I N G D O C U M E N T C R E A T I O N |
Figure 9-10. The Field dialog box
VIEWING FIELDS
When you insert a field in your document, you will see the contents of the field rather than the field code. But sometimes it is helpful to see the field code rather than its contents. To view the code for a single field, select the field and press Shift+F9. To show the codes for all the fields in the document, press Alt+F9. These hotkeys work as toggles.
You may also want to apply shading to the fields in your document. This will help you distinguish them easily from the rest of your document. To do so, click Tools Options. Open the View tab. In the drop-down box labeled Field shading, select Never, Always, or When selected. Click OK. With shading enabled, fields will contain a pale gray border on the computer screen.
AutoText
AutoText is an easy way to speed up the creation of your documents. You can automatically insert predefined text in parts of your document.
Using Preinstalled AutoText Entries
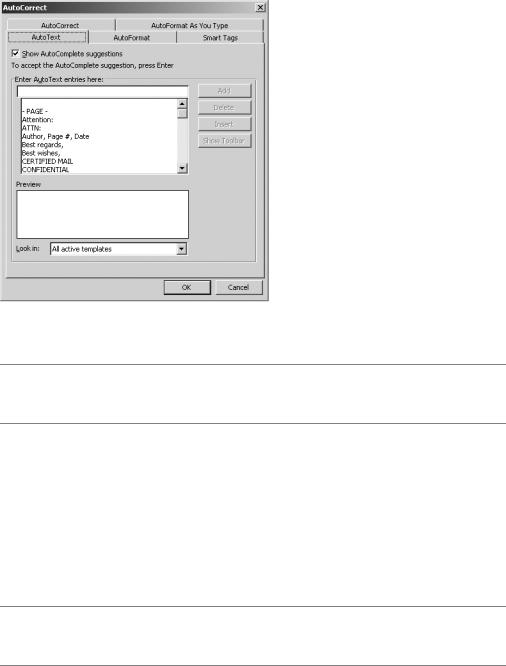
Word has a number of AutoText entries preinstalled that you can use. To access them, click Insert AutoText. On the submenu, you can select from a list of entries (see Figure 9-11). Click an entry, and Word automatically inserts it into your document.
C H A P T E R 9 ■ A U T O M A T I N G D O C U M E N T C R E A T I O N |
175 |
Figure 9-11. The AutoText options tab of the AutoCorrect dialog box
■Tip The AutoText submenu detaches from the Insert menu. Click the dotted bar at the top of the menu and drag it into the document window. There, you now have easy access to the entries.
Defining Your Own AutoText Entries
By customizing AutoText entries, you can make creating documents even easier. To add AutoText entries, you must first open the Normal.dot template, the template upon which all Word documents are based.
The default location for the Normal.dot template in Windows XP is C:\Documents and Settings\user name\Application Data\Microsoft\Templates. Navigate to it via the Open dialog box in Word and open it.
■Note If you try to open the Normal.dot template from Windows Explorer, a new, blank Word document will open, and you won’t be able to make changes to the template.
To add your own AutoText entries, click Insert AutoText and select AutoText on the submenu. In the Box labeled Enter AutoText Entries here, type your AutoText entry (see Figure 9-12). Then click Add. Repeat for each entry you’d like to create. Once you’re done, click OK.