

Beginning Perl Web Development - From Novice To Professional (2006)
.pdf20 C H A P T E R 1 ■ T H E C G I M O D U L E
■Note There are certainly other valid methods for performing this operation, setting the date, and setting the expiration date. However, it's not very common to set a cookie expiration manually. Instead, it's much more likely that you'll be using the CGI module for this purpose.
On the other hand, the CGI module makes setting the expiration date rather easy. Instead of having to worry about the format or calculate the date in the future, you can simply call the expires() function of the cookie method with an argument indicating when the cookie will expire. Listing 1-9 shows an example that sets the same expiration date as Listing 1-8.
Listing 1-9. Setting Cookie Expiration Using the CGI Module
#!/usr/bin/perl -T
use strict;
use CGI qw/:standard/;
my $cookie = cookie(-name=>'testcookie',value=>'testcookievalue',-expires=>'+7d'); print header (-cookie=>$cookie),
start_html('CGI Cookie Test'), p("You've received a cookie\n"), end_html;
exit;
Notice first that the code is much, much simpler. You don’t need to set the month names, get the date in a week’s time, or format the date correctly. Notice also that the only difference in this code from the code in Listing 1-6 is that the code for the expiration date has been added:
my $cookie = cookie(-name=>'testcookie',value=>'testcookievalue',-expires=>'+7d');
Using this syntax, you can expire a cookie with just about any given time period. The time periods for cookie expiration are shown in Table 1-2.
Table 1-2. Time Period Abbreviations for the CGI Module’s Header and Cookie Functions
Abbreviation |
Definition |
Example |
|
d |
Days |
+1d (expire 1 day from now) |
|
h |
Hours |
+8h |
(expire 8 hours from now) |
M |
Months |
+1M |
(expire 1 month from now) |
m |
Minutes |
-1m (expire immediately) |
|
now |
Immediately |
now (expire immediately) |
|
s |
Seconds |
+30s (expire 30 seconds from now) |
|
y |
Years |
+1y |
(expire 1 year from now) |
|
|
|
|

C H A P T E R 1 ■ T H E C G I M O D U L E |
21 |
Setting Multiple Cookies
You may find that one cookie isn’t sufficient for your application. In that case, you have two primary solutions:
•You could simply set multiple cookies, each corresponding to a different setting or preference. This method works well for a few cookies, but remember that there’s a limit of 20 cookies per domain.
•If the application has a large number of cookies, a better solution is to create a session ID, store that session ID in a database, and tie that database into the settings and preferences that need to be stored for the application.
Storing a session ID in a database has the advantage of giving your application virtually unlimited settings that it can store in the background, since only one cookie is sent to the browser. Also, since only one cookie is sent to the browser, you will save bandwidth, thus making the site seem quicker to the user. Granted, this is less important for LAN-based applications, but any savings of bandwidth are good savings. This section shows how to set and read multiple cookies using the CGI module.
You can send multiple cookies to the browser by first creating the cookies, as you’ve done, and then passing the cookies as an array reference to the cookie() function. Listing 1-10 shows an example.
Listing 1-10. Sending Multiple Cookies Using CGI.pm
#!/usr/bin/perl -T
use strict;
use CGI qw/:standard/;
my $cookie1 = cookie(-name=>'testcookie',value=>'testcookievalue',expires=>'+7d'); my $cookie2 = cookie(-name=>'secondcookie',value=>'secondcookievalue', expires=>'+1d');
print header (-cookie=>[$cookie1,$cookie2]), start_html('CGI Cookie Test'),
p("You've received a cookie\n"), end_html;
exit;
This code has only two differences from the code in Listing 1-9:
my $cookie2 = cookie(-name=>'secondcookie',value=>'secondcookievalue', expires=>'+1d');
print header (-cookie=>[$cookie1,$cookie2]),
The first line creates a scalar containing a cookie with a name of secondcookie, a value of secondcookievalue, and an expiration of one day into the future. Notice that the expiration of $cookie2 is different from that of the other cookie in this example.

22 C H A P T E R 1 ■ T H E C G I M O D U L E
The second line of code looks strikingly similar to the call to the header() function from previous examples. Notice that this time, the call is setting two cookies, separated by a comma, within a set of brackets, which you’ll recognize as an anonymous array. As you might come to expect by now, trying to accomplish this same task without the help of the CGI module is possible but much more time-consuming.
Reading the values from multiple cookies calls for the same process as reading one cookie (shown earlier in Listing 1-7), except that you read all of them! Listing 1-11 shows the code to read both of the cookies sent by the example in Listing 1-10.
Listing 1-11. Retrieving Multiple Cookies
#!/usr/bin/perl -T
use strict;
use CGI qw/:standard/;
my $retrievedcookie1 = cookie('testcookie'); my $retrievedcookie2 = cookie('secondcookie');
print header, start_html,
p("You sent a couple cookies and their values were $retrievedcookie1 and $retrievedcookie2\n"),
end_html;
exit;
This code has only two changes from the code to retrieve one cookie. One is the addition to create a scalar to retrieve the second cookie:
my $retrievedcookie2 = cookie('secondcookie');
And the other to print the results to the resulting web page:
p("You sent a couple cookies and their values were $retrievedcookie1 and $retrievedcookie2\n"),
Setting the Secure Flag
Setting the secure flag in a cookie makes that cookie readable only if done so over an SSL connection (using HTTPS). This is useful if your cookie will be used to store personal information (which I wouldn’t generally recommend for anything but a few applications, and then only if the cookie is a session cookie and not a cookie to be stored on a hard drive).

C H A P T E R 1 ■ T H E C G I M O D U L E |
23 |
You set the secure flag as another argument within the call to the cookie function, as in this example:
cookie(-name=>'cookiename',-value=>'cookievalue',-secure=>1);
Note that if you don’t have an SSL-enabled web server, you won’t be able to test the secure
flag.
Environment Variables
Environment variables are values set by the environment where a process runs. In the case of a CGI script, the environment variables are set by the web server on which they run. These variables are automatically made available to your CGI script in the form of the %ENV hash.
Viewing Environment Variables
The script shown in Listing 1-12 makes it possible to view the environment variables available to a CGI script on your web server.
Listing 1-12. Viewing Environment Variables in a CGI Script
#!/usr/bin/perl -T
use strict;
use CGI qw/:standard/;
print header, start_html('Environment Variables'); foreach my $variable (keys %ENV) {
print p("$variable is $ENV{$variable}");
}
print end_html;
exit;
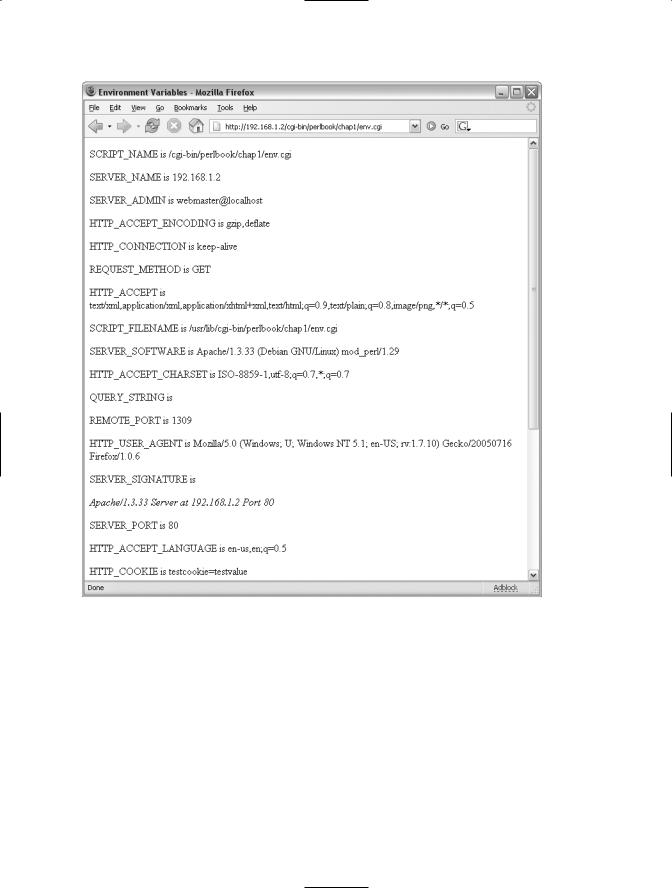
The only new items in this script are the three lines of the foreach loop, which is a standard Perl construct. Saving this script to your web server and accessing it through a browser will result in a page similar to that in Figure 1-6.
Some of the environment variables sent to your script by the web server are the result of settings on the server itself; others are sent from the server as read by the browser accessing the script. One environment variable is HTTP_USER_AGENT. This environment variable is sometimes used (and misused) to determine the browser software and version accessing the page. Chapter 2 examines the use of HTTP_USER_AGENT to present a page based on the value of the variable.
24 C H A P T E R 1 ■ T H E C G I M O D U L E
Figure 1-6. Environment variables in a web session
Carrying Values Between Forms
The ability to carry values between pages or forms within your application is key for all but the simplest of CGI programs. Earlier in the chapter, you saw how cookies might be used to carry values between forms. Here, I’ll show you how to use the form itself to carry these values.

C H A P T E R 1 ■ T H E C G I M O D U L E |
25 |
■Caution Values carried between pages through form variables—hidden or not, over SSL or not—can be faked, forged, or otherwise altered. Therefore, it is imperative that you do not rely on the data passed between forms, nor should you consider the data to be legitimate until you can check it for validity. More than one web site has been hacked this way. For example, customers have altered prices for products, and then ordered those products at that price. Always assume that data is invalid until proven otherwise.
Earlier, in Listing 1-4, you saw an example of how to accept a form value for a name and then respond with a message when the name is submitted. That code can be considered a simple two-page application. The first page presents the user with the text box, and the second page takes that result and performs an action, which is to send output to the browser. Now, assume that you want to create a third (and fourth, fifth, and so on) page, with each carrying over the values from the previous page. To do so, you need to make the second page present the user with another form for additional input. Listing 1-13 expands on the earlier example to ask the user for his favorite color and then presents the third page, based on the result.
Listing 1-13. Values Carried Between Pages
#!/usr/bin/perl -T
use strict;
use CGI qw/:standard/;
print header;
if (param('color')) {
print start_html('Hello'), "Hello ", param('name'),p,
"Your favorite color is: ",param('color'),p, hr;
}
elsif (param('name')) { print start_html('Hello'), "Hello ",
param('name'),
p, start_form,
"Please enter your favorite color: ",textfield('color'), hidden(-name=>'name',-value=>param('name')),
submit, end_form, hr;

26 C H A P T E R 1 ■ T H E C G I M O D U L E
}else {
print start_html('Hello'), start_form,
"Enter your name: ",textfield('name'), submit,
end_form, hr;
}
print end_html;
exit;
This code is somewhat different from the previous example. First, notice that this script produces a new page for each step in the process, rather than simply outputting to the same page regardless of location within the script.
After the requisite interpreter opening line and the request to use the CGI module, the first thing the script does is send a header to the browser. No matter which step the user is in within the application, it will need to send a header. There’s no reason to repeat the header code each time within the if-elsif-else conditionals.
The first conditional encountered within the program is one to look for the existence of the color parameter. If this parameter contains a value, then you know that the user has reached the final step within the application. If the script tested for the existence of the name parameter as before, it wouldn’t be able to tell whether the user was coming from the first or second step.
The elsif conditional houses the code that you’ll see on the second page of the script, after the user enters his name. This code is similar to the previous example, except that it now contains a hidden form variable that contains the name parameter from the previous step:
hidden(-name=>'name',-value=>param('name')),
Finally, the code within the else conditional is executed if neither color nor name contain a value. This means that the code is executed only when the user visits the page for the first time, prior to entering any input.
Interaction with the System
You already saw some system interaction when you looked at the %ENV environment variable hash sent by the web server to your CGI script. There’s virtually no limit to the amount of interaction that’s possible with both the local system and the remote system through Perl and its modules. At its most basic level, interaction with the system can simply mean reading or setting environment variables, reading from or writing to a file on the local filesystem, sending an e-mail from your script, or working with a database. You can also have more advanced system interaction, such as starting or killing processes, querying remote systems, or starting and stopping actions on the local server or remote servers.
With all of this power comes some danger as well. Any time your script interacts with the system on which it is housed, something could go seriously wrong. The problem may be the result of a bug in the code or a malicious use of the program to produce unexpected results.

C H A P T E R 1 ■ T H E C G I M O D U L E |
27 |
No matter where the problem lies, you’ll need to be mindful of the possible outcomes of working with system processes and files.
Chapter 4 looks at system interaction in detail, including some of the security risks when interacting with the system.
Debugging and Troubleshooting
An all-too frequent problem when programming CGI is the much-maligned Internal Server Error message. Figure 1-7 shows an example of such a message in a web browser.
Figure 1-7. The dreaded Internal Service Error message
Unfortunately, it’s sometimes difficult to determine the cause of the error. The task is much easier if you have access to the error log for the web server. An examination of the error log for the web server will usually get you much closer to finding the cause and then the solution to the error. Refer to your web server configuration file and/or web server administrator for the location (and for access to) the error log file for the web server.
A frequent error seen in the error logs for the web server is “Premature end of script headers.” Like the Internal Server Error message, this error could be the result of any number of

28C H A P T E R 1 ■ T H E C G I M O D U L E
problems within the CGI script. Usually, the server will output additional information. For example, while writing one of the scripts for this chapter, I forgot a comma within some CGI code. The result of this oversight was an Internal Server Error message in the browser, along with a “Premature end of script headers” error in the log file. But what was more interesting was another entry in the log file:
Bareword found where operator expected at /home/u030701/cgi/thirdpage.cgi line 16, near ")
hr"
(Missing operator before hr?)
With that information, I was able to quickly find the error within the script. However, sometimes debugging isn’t quite as easy as in this example. There are times when all you’ll see is a “Premature end of script headers” error or another cryptic message about a problem in the script. When this happens, only your good troubleshooting skills will help. Using numerous print statements and other temporary debugging tools to try to narrow down the location of the error is very helpful. In addition, it may be possible to run the script directly from the command line in order to better determine where the error lies. This is not always possible though, especially if the error is buried deep within the code. Here, I’ll suggest some other helpful troubleshooting tools.
Verbose Output
A helpful debugging tool is to use the -w option on the Perl interpreter invocation:
#!/usr/bin/perl -w
Using this option causes Perl to be verbose with undefined variables and other oddities that it notices within the program. If you’re having trouble identifying the location of a problem, using -w can help.
Syntax Check
In addition, you can perform a syntax check of the program without actually executing it by using the -c command-line option. For example, you could check the syntax of a program called webform.cgi with this command, issued from the shell:
perl -c webform.cgi
You’ll then receive an indication of any syntactical errors within the program. If you’re lucky, you’ll see something like this:
webform1.cgi syntax OK
If a syntax error is found, you’ll see output indicating the error and the line where the error was found. For example, I removed a right bracket to produce an error in a script (really, I removed it to produce the error—I didn't forget it!). When I ran the program with the -c option, I received this output:
syntax error at webform.cgi line 25, near "else" webform.cgi had compilation errors.
C H A P T E R 1 ■ T H E C G I M O D U L E |
29 |
The Carp Module
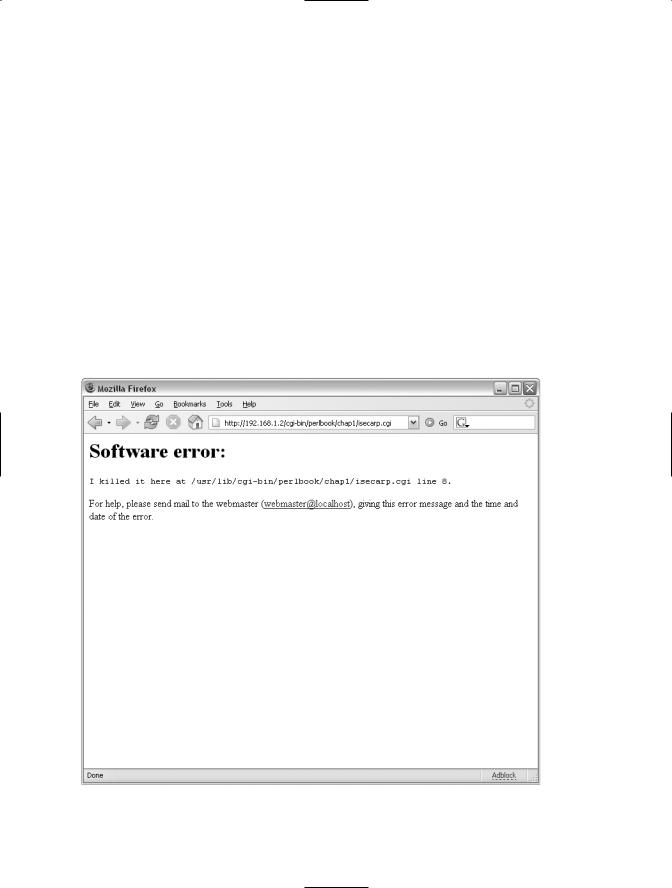
One of the most important and helpful modules available to help debug an error is the CGI::Carp module, or Carp for short. Using the Carp module, you can redirect more verbose error messages to the web browser or to a log file. Consider the code shown in Listing 1-14.
Listing 1-14. Using Carp for Debugging
#!/usr/bin/perl
use CGI::Carp qw(fatalsToBrowser); use CGI qw/:standard/;
print "Content-type: text/html\n\n";
die "I killed it here";
The result of viewing this code through a browser is shown in Figure 1-8.
Figure 1-8. Using Carp to send errors to the browser