- •Table of Contents
- •Please Read
- •Getting Started
- •Preparations
- •Shooting Still Images
- •Viewing Still Images
- •Erasing
- •Printing
- •Embedding the Date in the Image Data
- •Shooting Movies
- •Viewing Movies
- •Downloading Images to a Computer
- •System Map
- •Learning More
- •Components Guide
- •How to Use the Mode Switch
- •Indicators
- •Basic Operations
- •Menus and Settings
- •Information Displayed on the LCD Monitor and Menus
- •Using the LCD Monitor
- •Commonly Used Shooting Functions
- •Shooting with the Optical Zoom
- •Using the Flash
- •Shooting Close-Ups/Infinity Shot
- •Using the Self-Timer
- •Changing the Compression (Still Images)
- •Setting the Image Stabilizer Function
- •Adjusting the ISO Speed
- •Various Shooting Methods
- •Shooting in Modes for Special Conditions
- •Shooting in Manual Mode
- •Continuous Shooting
- •Setting the Flash
- •Movie Shooting
- •Switching between Focusing Modes
- •Selecting the Face to Focus On (Face Select and Track)
- •Locking the Exposure Setting (AE Lock)
- •Adjusting the Exposure Compensation
- •Switching between Metering Modes
- •Adjusting the Tone (White Balance)
- •Shooting in a My Colors Mode
- •Changing Colors
- •Setting the Display Overlays
- •Registering Settings to the Print/Share Button
- •Playback/Erasing
- •Viewing Magnified Images
- •Checking the Focus and Peoples’ Expressions (Focus Check Display)
- •Jumping to Images
- •Trimming a Portion of an Image
- •Viewing Movies
- •Editing Movies
- •Rotating Images in the Display
- •Playback with Transition Effects
- •Automated Playback (Slide Shows)
- •Red-Eye Correction Function
- •Adding Effects with the My Colors Function
- •Resizing Images
- •Attaching Sound Memos to Images
- •Sound-Only Recording (Sound Recorder)
- •Protecting Images
- •Erasing All Images
- •Print Settings/Transfer Settings
- •Setting the DPOF Print Settings
- •Setting the DPOF Transfer Settings
- •Configuring the Camera
- •Setting the Power Saving Function
- •Setting the World Clock
- •Formatting Memory Cards
- •Resetting the File Number
- •Creating an Image Destination (Folder)
- •Setting the Auto Rotate Function
- •Resetting Settings to Their Default Values
- •Connecting to a TV
- •Shooting/Playback Using a TV
- •Customizing the Camera (My Camera Settings)
- •Changing My Camera Settings
- •Registering My Camera Settings
- •Troubleshooting
- •List of Messages
- •Appendix
- •Safety Precautions
- •Handling Precautions
- •Using an AC Adapter Kit (Sold Separately)
- •Using an Externally Mounted Flash (Sold Separately)
- •Camera Care and Maintenance
- •Specifications
- •Index
- •Functions Available in Each Shooting Mode
58
Using the LCD Monitor
Switching the Information Displays
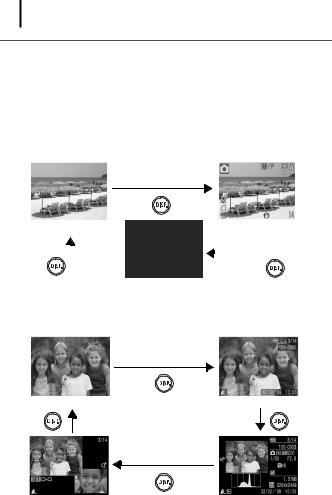
You can switch the LCD monitor information display each time you press the DISP. button. See Information Displayed on the LCD Monitor and Menus for details (p. 48). (The following are the screens that display when shooting in mode.)
Shooting Mode
No Information |
Information View |
|||
|
|
|
|
|
|
|
|
|
|
|
|
|
|
|
Off
Playback Mode, Rec. Review (Immediately after Shooting)
No Information |
Standard*1 |
Focus Check Display*2 |
Detailed |
*1 Playback Mode only
*2 Still images only
59
z The LCD monitor on or off setting is retained even after the camera power is turned off.
z The LCD monitor is set to the information view in the , , , , or Movie mode.
zIn , , , , , modes, the LCD monitor is always set to information view.
zThe LCD monitor will not switch to the Detailed Display or Focus Check Display while in the Magnified Display (p. 114) or Index Playback mode (p. 115).
Changing the LCD Monitor Brightness
The brightness of the LCD monitor can be changed in the following two ways.
•Changing Settings Using the Set up Menu (p. 55)
•Changing Settings Using the DISP. Button (Quick-bright LCD Function)
You can set the LCD monitor to the brightest setting regardless of the option selected in the Set up menu by pressing the DISP. button for more than one second.*
-To restore the previous brightness setting, press the DISP. button for more than one second again.
-The next time you turn on the camera, the LCD monitor will be at the brightness setting selected in the Set up menu.
*You cannot change the brightness of the LCD monitor with this function if you have already set it to its highest setting in the Set up menu.
Night Display
When shooting in dark conditions, the camera automatically brightens the LCD monitor to suit the brightness of the subject, making it easier to frame the subject (this setting cannot be turned off).
•Although noise may appear and the movement of the subject shown on the LCD monitor may appear somewhat jagged, there is no effect on the recorded image. The brightness of the image displayed in the monitor, and the brightness of the actual image recorded will be different.
Operations Basic