


64

 Using the Flash
Available Shooting Modes |
|
|
p. 220 |
|
|
|
|
1 Press the  button.
1.Use the  or
or  button to change the flash mode.
• : [Off]
• : [On]
• : [Auto]
•Pressing the MENU button while this
screen is displayed will allow you to set flash functions such as Slow Synchro, Red-Eye Corr., Red-Eye Lamp (p. 77).
You are recommended to shoot with the camera attached to a
tripod or other device if the camera shake warning icon  appears.


 Shooting Close-Ups/Infinity Shot
Available Shooting Modes |
|
|
p. 220 |
|
|
|
|
You can shoot close-ups or infinity shots.
Use this mode to shoot close-ups of flowers or small items. Image Area at Minimum Focusing Distance from End of Lens to Subject
Macro • Maximum wide angle setting: 35 x 26 mm (1.4 x 1.0 in.) Minimum focusing distance: 3 cm (1.2 in.)
•Maximum telephoto setting: 102 x 77 mm (4.0 x 3.0 in.) Minimum focusing distance: 30 cm (12 in.)
Infinity |
Use this mode to record subjects 3 m (9.8 ft.) or more from |
|
the end of the lens. |
||
|

65
1 Press the  /
/ button.
1.Use the  or
or  button to select
  or
or  .
.
To Cancel the Macro Mode
Press the  /
/ button and use the
  or
or  button to select
  (Normal).
zUse the LCD monitor to compose close-ups in Macro mode since the view through the viewfinder may not match the image taken.
zUsing the flash in Macro mode may cause image edges to darken.
Functions Shooting Used Commonly

66

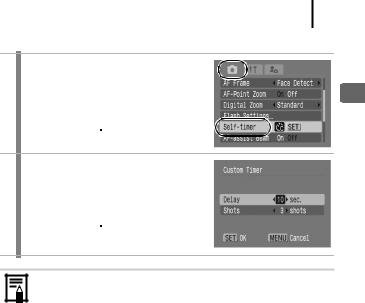
 Using the Self-Timer
Available Shooting Modes |
|
|
p. 220 |
|
|
|
|
You can set the time delay and the numbers of shots you wish to take in advance.
10 sec. Self-Timer: shoots 10 seconds after you press the shutter button.
• 2 seconds before the shutter releases, the self-timer lamp and sound speed up.
2 sec. Self-Timer: shoots 2 seconds after you press the shutter button.
• At the same time as the shutter button is pressed, the self-timer sound beeps rapidly*, the self-timer lamp blinks, and the shutter releases 2 seconds later.
Custom Timer: you can change the delay time (0–10, 15, 20, 30 sec.) and number of shots (1–10).
• When [Delay] is set to 2 or more seconds, the self-timer sound beeps quickly 2 seconds before the shutter releases*. When [Shots] is set to more than 1, the self-timer sound only beeps before the first shot.
* This may differ depending on your My Camera settings (p. 177).
1 Press the  button.
1.Use the  or
or  button to change the Self-timer mode.
•Pressing the MENU button while this screen is displayed will allow you to set the delay and number of shots as when Custom Timer is selected
(p. 67).
2 Shoot.
•When the shutter button is pressed fully, the self-timer lamp will blink*.
*When using the flash by setting [Red-Eye Lamp] to [On] in [Flash Settings] (p. 77), the self-timer lamp will stay lit for the last 2 seconds.
To Cancel the Self-Timer
Press the  button and use the
  or
or  button to select
  .
.
67
Setting the Delay Time and Number of Shots ( )
)
1 Select [Self-timer].
1.Press the  button.
2.In the  menu, use the
  or
or  button to select [Self-timer].
3. Press the  button.
2 Accept the setting.
1.Use the  or
or  button to select [Delay] or [Shots] and change the settings with the
  or
or  button.
2.Press the  button.
3.Press the  button.
If the [Shots] option is set to 2 or more shots, the following occurs.
-The exposure and white balance are locked at the settings selected for the first shot.
-If the flash is used, the interval between shots lengthens because the flash must charge.
-The interval between shots may lengthen when the built-in memory of the camera fills.
-Shooting will automatically cease if the memory card becomes full.
Functions Shooting Used Commonly

68
Changing the Recording Pixels
(Still Images)
Available Shooting Modes |
|
|
p. 220 |
|
|
|
|
1 Select the recording pixels.
1.Press the  button.
2.Use the  or
or  button to select
  and the
  or
or  button to change the option.
3. Press the  button.
Approximate Values for Recording Pixels
Recording Pixels |
|
|
Purpose* |
||
|
|
|
|
|
Printing to about A3-size |
(Large) |
8M |
3264 x 2448 |
High |
297 x 420 mm (11.7 x |
|
|
|
|
|
|
16.5 in.) |
|
|
|
|
|
Printing to about A4-size |
(Medium 1) |
|
|
|
|
210 x 297 mm (8.3 x |
5M |
2592 x 1944 |
|
|
11.7 in.) |
|
|
|
|
|
|
Printing to about Letter-size |
|
|
|
|
|
216 x 279 mm (8.5 x 11 in.) |
(Medium 2) |
3M |
2048 x 1536 |
|
|
Printing to about A5-size |
|
|
148 x 210 mm (6 x 8.3 in.) |
|||
|
|
|
|
|
|
|
|
|
|
|
Print postcard-size prints |
(Medium 3) |
2M |
1600 x 1200 |
|
|
148 x 100 mm (6 x 4 in.) |
|
|
Print L-size prints |
|||
|
|
|
|
|
|
|
|
|
|
|
119 x 89 mm (4.7 x 3.5 in.) |
|
|
|
|
|
|
(Small) |
|
|
Low |
Send images as e-mail |
|
0.3M |
640 x 480 |
attachments or shoot more |
|||
|
|
|
|
|
images |
|
|
|
To embed the date in images when |
|
|
|
shooting. Or, when printing L-size |
(Date Stamp) |
2M |
1600 x 1200 |
and postcard-size prints. (Or you |
|
|
can shoot while confirming the print |
|
|
|
|
|
|
|
|
area for a 3:2 aspect ratio print.) |