


Getting Started
22 Shooting Movies
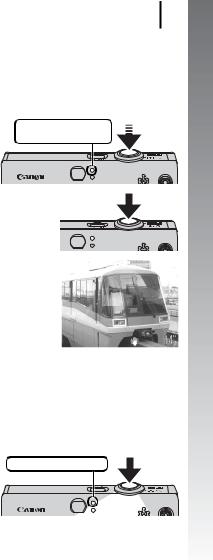
Shooting Movies ( Standard Mode)
Microphone
Power Button
Shutter Button
Indicator
Mode Switch
Button
 Buttons
1. Press the power button.
2. Select a shooting mode.
1. Set the mode switch 

 (Movie).
2.Press the  button.
3.Use the  or
or  button to select
  (Standard).
4.Press the  button.
3. Aim the camera at the subject.
zDo not touch the microphone while recording.
zDo not press any buttons other than the shutter button. The sound that buttons make will be recorded in the movie.
Shooting Movies 23
4. Press the shutter button lightly (press halfway) to set the focus.
•An electronic beep will sound twice and the indicator will light green when the camera focuses.
•The exposure, focus and white balance are automatically set when you press the button halfway.
Shooting preparations complete: Lights green
5. Without changing anything else, press the shutter button all the way (press fully) to shoot.
• Recording starts.
•During the recording, the elapsed recording time and [zRec.] will display in the LCD monitor.
Elapsed Time 
6. Press the shutter button again (press fully) to stop recording.
•The indicator will blink green and the data will be recorded onto the memory card.
•Recording will stop automatically when the maximum recording time elapses, or the built-in memory or memory card become full.
Started Getting
Recording: blinks green

Getting Started
24 Viewing Movies
Viewing Movies
Power Button
Mode Switch
 Button
Buttons
1. Press the power button.
2. Set the mode switch to  (Playback).
3. Use the  or
or  button to display a movie and press the
 button.
• Images with a 

 icon are movies.
4.Use the  or
or  button to select
  (Playback) and
press the 
 button.
•The movie will start playing.
•If you press the FUNC./SET button during playback, you can pause and restart the movie.
•You can adjust the playback volume
with the  or
or  button.

Downloading Images to a Computer 25
Downloading Images to a Computer
You are recommended to use the supplied software to download images to your computer.
Items to Prepare
•Camera and computer
•Canon Digital Camera Solution Disk supplied with the camera
•Interface cable supplied with the camera
 System Requirements
Please install the software on a computer meeting the following minimum requirements.
Windows
OS |
Windows Vista |
|
|
Windows XP Service Pack 2 |
|
|
Windows 2000 Service Pack 4 |
|
Computer Model |
The above OS should be pre-installed on computers with built-in |
|
|
USB ports. |
|
CPU |
Windows Vista |
Pentium 1.3 GHz or higher |
|
Windows XP/Windows 2000 |
Pentium 500 MHz or higher |
RAM |
Windows Vista |
512 MB or more |
|
Windows XP/Windows 2000 |
256 MB or more |
Interface |
USB |
|
Free Hard Disk |
• Canon Utilities |
|
Space |
- ZoomBrowser EX |
200 MB or more |
|
- PhotoStitch |
40 MB or more |
|
• Canon Camera TWAIN Driver |
25 MB or more |
Display |
1,024 x 768 pixels/High Color (16 bit) or better |
|
Macintosh
OS |
Mac OS X (v10.3 – v10.4) |
|
Computer Model |
The above OS should be pre-installed on computers with built-in |
|
|
USB ports. |
|
CPU |
PowerPC G3/G4/G5 or Intel Processor |
|
RAM |
256 MB or more |
|
Interface |
USB |
|
Free Hard Disk |
• Canon Utilities |
|
Space |
- ImageBrowser |
300 MB or more |
|
- PhotoStitch |
50 MB or more |
Display |
1,024 x 768 pixels/32,000 Colors or better |
|
Started Getting

Getting Started
26 Downloading Images to a Computer
 Preparing to Download Images
When using Windows 2000, make sure to install the software first before connecting the camera to the computer.
1. Installing the software.
Windows
1.Place the Canon Digital Camera Solution Disk in the computer’s CD-ROM drive.
2.Click [Easy Installation].
•Follow the onscreen messages to proceed with the installation.
3.Click [Restart] or [Finish] once the installation is complete.
•When the installation is finished, [Restart] or [Finish] will display. Click the button that appears.
4.Remove the CD-ROM from the drive when your normal desktop screen appears.
Macintosh
Double-click the  icon in the CDROM window. When the installer panel appears, click [Install]. Follow the onscreen instructions to proceed.

Downloading Images to a Computer 27
2. Connecting the camera to a computer.
1.Connect the supplied interface cable to the computer’s USB port and to the camera’s DIGITAL terminal.
•Hook your fingernail or the wrist strap toggle under the bottom edge of the camera’s terminal cover to open it, then insert the interface cable all the way into the connector.
USB Port |
DIGITAL Terminal |
Interface Cable
3. Preparing to download images to the computer.
1. Set the mode switch to |
Power Button |
Mode Switch |
(Playback). |
|
|
2. Press the power button.
If the Digital Signature Not Found window appears, click [Yes]. The USB driver will automatically finish installing onto the computer when you attach the camera and open a connection.
Started Getting

Getting Started
28 Downloading Images to a Computer
4. Displaying CameraWindow.
Windows
1.Select [Canon CameraWindow] and click [OK].
If this event dialog does not appear, click the [Start] menu and select [All Programs] or [Programs], followed by [Canon Utilities], [CameraWindow], [CameraWindow] and [CameraWindow].
CameraWindow will display.
Macintosh
CameraWindow will appear when you establish a connection between the camera and computer. If it fails to appear, click the [CameraWindow] icon on the Dock (the bar which appears at the bottom of the desktop).
Preparations for downloading images are now finished. Please proceed to the Downloading Images Using the Camera (Direct Transfer) section (p. 29) (except Windows 2000).
zPlease refer to the Software Starter Guide regarding how to download images using the computer.
zWith Windows 2000, you can download images using the computer.
Downloading Images to a Computer 29
Downloading Images Using the Camera (Direct Transfer)
Use this method to download images using camera operations (except Windows 2000).
Install the software before downloading images via the Direct Transfer method for the first time (p. 26).
Started Getting
 Button
 Button
Buttons

 Button
1. Confirm that the Direct Transfer menu is displayed on the camera’s LCD monitor.
•The  button will light blue.
•Press the MENU button if the Direct Transfer menu fails to appear.
Direct Transfer Menu
2. Press the  button.
•All images that have not already been transferred to the computer are transferred and saved to the computer.

Getting Started
30 Downloading Images to a Computer
You can also use the following options in the Direct Transfer menu to set the method for downloading images.
|
|
|
All Images |
Transfers and saves all images to the computer. |
|
|
|
|
|
|
|
|
New Images |
Transfers and saves to the computer only the |
|
|
|
||
|
|
|
images that have not been previously transferred. |
|
|
|
|
|
|
|
|
|
|
|
|
|
|
DPOF Trans. |
Transfers and saves to the computer only the |
|
|
|||
|
|
|
Images |
images with DPOF Transfer Order settings. |
|
|
|||
|
|
|
|
|
|
|
|
Select & |
Transfers and saves single images to the computer |
|
|
|||
|
|
|
Transfer |
as you view and select them. |
|
|
|||
|
|
|
|
|
|
|
|
|
Transfers and saves single images to the computer |
|
|
|
Wallpaper |
as you view and select them. The transferred |
|
|
|
||
|
|
|
images display as the background on the computer |
|
|
|
|
|
|
|
|
|
|
desktop. |
|
|
|
|
|
All Images/New Images/DPOF Trans. Images
1. Use the  or
or  button to select
  ,
, 

 or
or  and press the
  button.
•The images will download. The  button will blink blue while downloading is in progress.
•The display will return to the Direct Transfer menu when the download is complete.
•To cancel the download, press the
FUNC./SET button.
Select & Transfer/Wallpaper
1. Use the  or
or  button to select
  or
or  and press the
  (or
(or  ) button.

Downloading Images to a Computer 31
2. Use the  or
or  button to select images to download and press the
  button.
•The images will download. The  button will blink blue while downloading is in progress.
3.Press the  button after downloading finishes.
•You will return to the Direct Transfer menu.
Only JPEG images can be downloaded as wallpaper for a computer.
The option selected with the  button is retained even when the camera’s power is turned off. The previous setting will be in effect the next time the Direct Transfer menu is displayed. The image selection screen will appear directly when the [Select & Transfer] or the [Wallpaper] option was last selected.
Click  at the bottom right of the window to close the CameraWindow and the downloaded images will display on the computer.
Windows |
Macintosh |
Started Getting
ZoomBrowser EX |
ImageBrowser |
By default, images are saved on the computer in folders according to the shooting date.