


114
Playback/Erasing
Also refer to Viewing Still Images (p. 16).

 Viewing Magnified Images
1 Press the zoom lever toward  .
.
•

 will display and a magnified portion of the image will display.
•Images can be magnified up to a factor of approximately 10x.
Approximate Location  of the Displayed Area
2 Use the  ,
,  ,
,  or
or  button to change the display position.
•If you press the FUNC./SET button while in magnified display,
the camera switches to Image Advance mode and 
 will
will
display. You can use the  or
or  button to advance to the next or previous image at the same level of magnification. The image advance mode is canceled when you press the FUNC./ SET button again.
•You can change the magnification level with the zoom lever.
To Cancel the Magnified Display
Press the zoom lever toward  . (You can also cancel it immediately by pressing the MENU button.)
Movie frames and index playback images cannot be magnified.

115
 Viewing Images in Sets of Nine
(Index Playback)
|
|
|
|
1 Press the zoom lever |
Selected Image |
||
toward |
|
. |
|
|
|
||
•Up to nine images can be viewed at once in index playback.
•Use the  ,
,  ,
,  or
or  button to change the image selection.
Movie
To Cancel Index Playback
Press the zoom lever toward  .
.
Switching between Sets of Nine Images
The jump bar will display if you press the zoom lever toward  while in index playback and you can switch the display between sets of nine images.
•Use the  or
or  button to move to the previous or next set of nine images.
•Hold the FUNC./SET button down and
press the |
or |
button to jump to the |
first or last set. |
Jump Bar |
|
To Cancel Index Playback
Press the zoom lever toward  .
.
Playback/Erasing

116
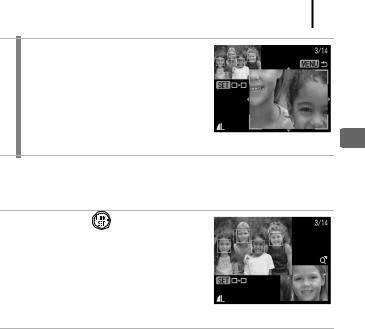
Checking the Focus and Peoples’ Expressions (Focus Check Display)
Focus Check display allows you to check the focus of images taken. Moreover, as you can change the display size and switch images, you can easily check facial expressions and whether a subject’s eyes are closed.
Displaying the Focus Check
1 Press the 
 button several times until the focus check screen appears.
•Frames are displayed on the image as follows.
Frame Color |
Content |
|
Orange |
Displays the range of the image displayed at |
|
bottom right. |
||
|
||
White |
Displays at the position at which the image is in |
|
focus. |
||
|
||
Gray |
Display around faces detected in Playback |
|
mode. |
||
|
•The orange frame allows you to change the display size, the display position and the display frame.
Changing the Display Size or Display Position
2 Press the zoom lever toward  .
.
•Bottom right will be displayed prominently and the display size and display position can be changed.
3 Make changes.
•Change the display size using the zoom lever.
•Change the display position using the  ,
,  ,
,  or
or  button.
•If you move the position of the orange frame, pressing the FUNC./ SET button will return the orange frame to its original position.
To Cancel the Focus Check Display
Press the MENU button.
Switching Frames
2 |
|
Press the |
button. |
|
|||
|
|
• When multiple frames display |
|
|
|
around focal points or multiple faces |
|
|
|
are detected, pressing the FUNC./ |
|
|
|
SET button switches the position of |
|
|
|
the orange frame. After you change |
|
|
|
the display size, the orange frame |
|
|
|
will adjust to the size of the face |
|
|
|
when you switch the position of the frame. |
|
|
|
|
|
117
Playback/Erasing