


131
 Automated Playback (Slide Shows)
Automated playback of images on the memory card.
Image settings for slide shows are based on the Digital Print Order Format (DPOF) standard.
|
|
|
All Images |
Plays all images on a memory card in order. |
|
|
|
|
|
|
|
|
Date |
Plays images bearing a specified date in order. |
|
|
|
|
|
|
|
|
My Category |
Plays the images in the selected category in order. |
|
|
|
Folder |
Plays images in a specified folder in order. |
|
|
|
|
|
|
|
|
Movies |
Plays movie files only, in order. |
|
|
|
|
|
|
|
|
Stills |
Plays still images only, in order. |
|
|
|
|
|
|
|
|
|
Plays the images selected for each slide show, |
|
– |
Custom 1–3 |
Custom 1, Custom 2 or Custom 3, in order |
|
|
|
|
|
(p. 134). |
1 Select [Slide Show].
1. Press the  button.
2.In the 

 menu, use the
  or
or  button to select
  .
.
3.Press the  button.
2 Select a playback method.
1.Press the  button.
2.Use the  or
or  button to select the slide show type.
•  ,
,  ,
,  : Press the FUNC./SET button to select a date, category or folder to be played back (p. 133).
• –
– : Press the FUNC./SET button to select the images to be played back (p. 134).
•If you want to add a transition effect to play back images, use
the  button to select [Effect] and choose the type of effect with the
  or
or  button (p. 132).
Playback/Erasing

132
3 Start the slide show.
1.Press the  button.
2.Use the  or
or  button to select [Start].
3. Press the  button.
•The following functions are available during slide shows.
-Pausing/resuming: Press the FUNC./SET button.
-Fast forwarding/rewinding: Press the  or
or  button (continue to hold the button to switch between images more rapidly).
To Stop the Slide Show
Press the MENU button.
Transition Effects
You can select the transition effect used when one image is replaced by another.
No transition effect.
The new image gradually brightens as it moves upward from the bottom.
The new image first appears in a cross shape and gradually expands to display the full image.
Portions of the new image move horizontally, then the image expands to display the full image.
In Single Image Playback mode, you can start a slide show from the current image displayed by holding the FUNC./SET button and pressing the  button. Please note that if you do this while the last image shot is displayed, the slide show will start from the first image using the same date.

133
Select a Date/Category/Folder to Play Back ( /
/ /
/ )
)
1 Select a playback method.
1.Use the  or
or  button to select
 ,
,  or
or  .
.
2. Press the  button.
2 Select images to play back.
1. Use the  or
or  button to select a date/category/folder to playback.
2. Press the  button.
•A 3 will appear on selected images.
•To cancel the selection: press the FUNC./SET button again.
•Multiple selections can be made for the date/category/folder.
•The images will play back in the order of selection.
•To check the images for each date/category/folder: use the
 or
or  button.
• Pressing the MENU button completes the setting.
Playback/Erasing

134
Selecting Images for Playback ( –
– )
)
Select only the images that you wish to play back and save them as a slide show (Custom 1, 2 or 3). Up to 998 images can be selected. They will be played back in their order of selection.
1 Select a playback method.
1. Use the  or
or  button to select
  ,
,  or
or  .
.
• Only the  icon will display at first.
2. Press the  button.
•When you set  , the icon will change to
 and
and  will display.
  and
and  will change in the same way when they are set.
|
|
2 Select images to play |
Check mark |
back. |
indicating selection |
1. Use the or button to choose |
Number indicating |
images to play back. |
the selection order |
|
2.Use the  button to select/ deselect the images.
•You can also select images in the Index Playback mode.
•Pressing the MENU button completes the setting.
Selecting All Images
1. After selecting  –
– in Step 1, use the
  button to select [Mark all] and press the FUNC./SET button.
2.Use the  button to select [Mark all], press the FUNC./ SET button.
3.Use the button to select [OK] and press the FUNC./
SET button.
To deselect all images, select [Reset].
135
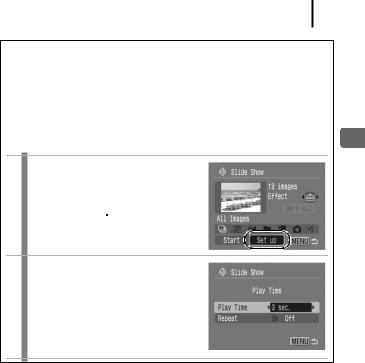
Adjusting the Play Time and Repeat Settings
•Play Time
Sets the duration that each image displays. Choose between 3–10 seconds, 15 seconds and 30 seconds. Displaying time can vary slightly depending on the image.
•Repeat
Sets whether the slide show stops when all the slides have been displayed or continues until stopped.
1 Select [Set up].
1.Use the  or
or  button to select [Set up].
2.Press the  button.
2 Configure the setting.
1.Use the  or
or  button to select [Play Time] or [Repeat].
2.Use the  or
or  button to select an option.
3.Press the  button.
Playback/Erasing