

NOTE:Refer to the Multi Function Display section for more details about the weather interface.
To enable/disable Stormscope (optional), NEXRAD (optional), or XM lightning (optional) data:
1.Press the INSET softkey.
PRIMARY FLIGHT DISPLAY
WORKING WITH MENUS
NOTE:Pressingasoftkeydoesnotdisplayamenu or sub-menu.
Much G1000 operation is accomplished using a menu interface. The G1000 has a bezel-mounted dedicated MENUkeythat displaysacontext-sensitivelistofoptions
2.Press the STRMSCP (optional), NEXRAD when pressed. This option list allows the pilot to access (optional), or XM LTNG (optional) softkey to additional features or make setting changes specifically
display weather information.
3.Press the STRMSCP, NEXRAD, or XM LTNG softkey again to remove the weather information from the map.
To pan the map:
NOTE: The joystick on the PFD operates independently from the one on the MFD.
1.Pushinthejoysticktodisplaythepanningpointer. This allows the pilot to move the map beyond its current limits without adjusting the range.
2.Push in and move the joystick to pan the map in the general direction of the desired location. Whenthepointerisplacedonanobject,thename oftheobjectishighlightedforapproximatelyfour seconds (even if the name was not originally displayed on the map). This feature applies to everythingdisplayedonthemapexceptforroute lines.
3.Push in the joystickagain to cancel the panning function and return to the present position on the map.
NOTE: The airspace boundary stays highlighted for approximately four seconds before returning to normal shading.
relating to the currently displayed window. There is no all-encompassing menu. Some menus provide access to additional sub-menus that are in turn used to view, edit, select, and review options.
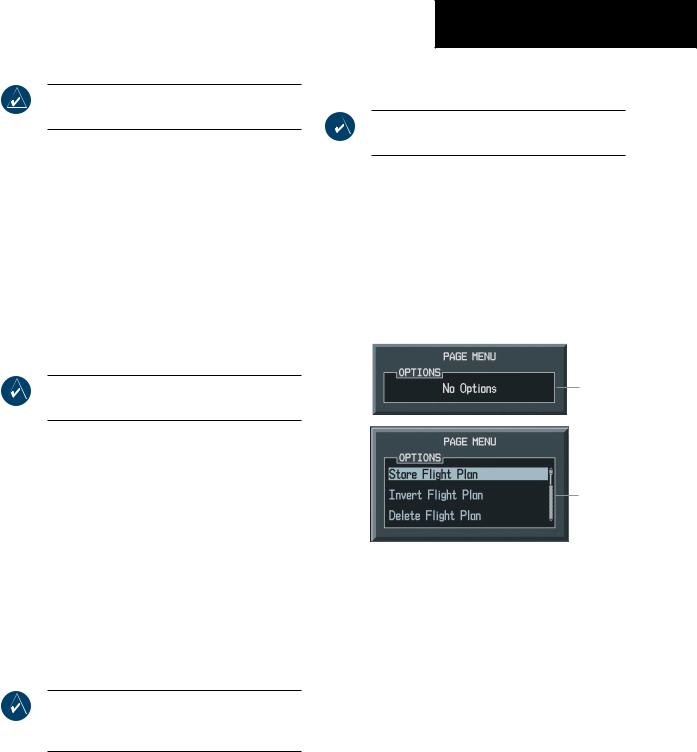
No Options
with NRST
Window
Displayed
Options with
FPL Window
Displayed
Figure 2-45 Page Menu Examples
To navigate the Page Menu Window:
1.Turn the FMS knob to scroll through a list of available options (a scroll bar always appears to the right of the window when the option list is longer than the window).
2.Press the ENT key to select the desired option.
3.TheCLR keyortheFMSknobmaybepressedto remove the menu and cancel the operation.
190-00498-00 Rev.A |
Garmin G1000 Pilot’s Guide for Cessna Nav III |
2-29 |

PRIMARY FLIGHT DISPLAY
AUXILIARY WINDOW KEYS
The main keys which are used in association with PFD Auxiliary Window operations are listed below:
1 DIRECT-TO – Activates the direct-to function and allows the user to enter a destination waypoint and establishes a direct course to the selected destination (specified by identifier chosen from the active route)
2 FPL – Displays the active Flight Plan Page for creating and editing the active flight plan or accessing stored flight plans
3 CLR – Erases information, cancels an entry, or removes page menus
4 MENU – Displays a context-sensitive list of options
This option list allows the user to access additional features or make setting changes which relate to certain pages.
The MENU key opens the PFD Setup Menu if no Auxiliary Window is open.
5 PROC – Selects approaches, departures and arrivals for the flight plan.
When using a flight plan, available procedures for departure and/or arrival airport are offered automatically. If a flight plan is not used, the desired airport, then the desired procedure may be selected. This key selects IFR departure procedures (SIDs), arrival procedures (STARs) and approaches (SIAPs) from the database and loads them into the active flight plan.
6ENT – Accepts a menu selection or data entry
This key is used to approve an operation or complete data entry. It is also used to confirm information.
1 |
4 |
2 |
5 |
3 |
6 |
Figure 2-46 PFD Auxiliary Window Keys
2-30 |
Garmin G1000 Pilot’s Guide for Cessna Nav III |
190-00498-00 Rev.A |
AUXILIARY WINDOWS
The lower right area of the PFD is a shared area that at any one time can present the following windows:
•TIMER/REFERENCES
•NEAREST
•DIRECT-TO
•FLIGHT PLAN
•PROCEDURES
Timer/References Window
NOTE: Refer to theAircraft Flight Manual (AFM) for limitations.
The Timer/References Window is enabled and disabled by pressing the TMR/REF softkey.
PRIMARY FLIGHT DISPLAY
Generic Timer
The Generic Timer displays time (hr:min:sec), timer count direction (UP or DOWN), and timer status (START, STOP, or RESET).
To change the Generic Timer:
1.Press the TMR/REF softkey, then turn the large FMS knob to select the time field (hr:min: sec).
2.Turn the FMS knobs to set the desired time, then press the ENT key. The UP/DOWN field is now highlighted.
3.Turn the small FMS knob to display the UP/ DOWN window.
4.Turn the FMS knob to select ‘UP’ or ‘DOWN’, then press the ENT key. ‘START?’ is now highlighted.
5.Press the ENT key to START,STOP,or RESET the timer (if the timer is counting DOWN, it must be reset manually).
6.Press the CLR key or the TMR/REF softkey to remove the window.
Figure 2-47 Timer/References Window
The following Vspeeds and Vspeed bugs can be set using the Timer/References Window:
• Best glide speed reference |
Figure 2-48 Timer Status Prompts |
• Best glide speed bug (ON, OFF) |
|
• Rotation speed reference (VR) |
|
• VR bug (ON, OFF) |
|
• Best angle-of-climb speed reference (VX) |
|
• VX bug (ON, OFF) |
|
• Best rate-of-climb speed reference (VY) |
|
• VY bug (ON, OFF) |
|
190-00498-00 Rev.A |
Garmin G1000 Pilot’s Guide for Cessna Nav III |
2-31 |

PRIMARY FLIGHT DISPLAY
Flight ID |
Vspeeds and Vspeed Bug Status |
NOTE: If the G1000 is set to variable (“PFD ENTRY”) and the flight ID entry field on the Timer/ReferencesWindow is not visible,the pilot should contact a Garmin-authorized Service Center.
Aircraft identification (ID) is transmitted from the GTX 33 transponder to the ground stations and other aircraft.
The flight ID is set to fixed (“SAME AS TAIL” and “CONFIG ENTRY”) or variable (“PFD ENTRY”) at the time of installation. The two fixed selections do not require any action from the pilot. The variable (“PFD ENTRY”) flight ID requires the pilot to enter the flight ID on the Timer/ References Window each time the G1000 is powered on.
To enter or change the Flight ID:
1.Press the TMR/REF softkey, then turn the large FMS knob to highlight the flight ID field.
2.Turn the FMS knobs to enter the desired flight ID.
3.Press the ENT key to update the flight ID.
NOTE:Defaultsettingsareautomaticallyrestored when power is cycled.
Vspeed values for the aircraft can be found in the Aircraft Flight Manual (AFM). The Vspeeds can be changed and the Vspeed bug can be turned ON or OFF.
To change Vspeeds and turn the Vspeed bug ON or OFF:
1.Press the TMR/REF softkey, then turn the large FMS knob to highlight the field of the Vspeed to be changed.
2.Turn the small FMS knob to select the desired speed and press the ENTkey (when a speed has been changed, an asterisk appears next to the speed). The ON/OFF field is now highlighted.
3.To change each setting individually, turn the small FMS knob in the direction of the green arrowhead.
4.AllVspeed references can be changed simultaneously by pressing theMENUkey and selecting ‘All References ON’ or‘All References OFF’,then by pressing the ENT key.
To restore all defaults:
1.From the Timer/References Window, press the
MENU key.
2.Turn the FMS knob to highlight ‘Restore Defaults’ and press the ENT key.
3.Press the TMR/REFsoftkey to remove the window.
2-32 |
Garmin G1000 Pilot’s Guide for Cessna Nav III |
190-00498-00 Rev.A |

Nearest Airports Window
PressingtheNRSTsoftkeyenables/disablestheNearest Airports Window. From the Nearest Airports Window, information for a selected airport can be viewed, the active primary communications frequency can be selected, and direct-to navigation can be activated.
The Nearest Airports Window displays the 25 nearest airports with the following information:
•Identifier
•Airport Symbol
•Bearing to
•Distance from
•Best approach available
•Primary communications frequency
•Length of longest hard surface runway (or soft surface, if no hard surface runway exists)
PRIMARY FLIGHT DISPLAY
To view information about an airport:
1.Press the NRST softkey to display a list of the Nearest Airports.
2.Turn the FMS knob to select the desired airport and press the ENT key. The airport information is displayed with ‘BACK’ highlighted at the bottom of the window.
3.When finished viewing the airport information,press the ENT key to return to the nearest airports list.
|
|
Airport Symbol |
||||||||||||
|
|
|
|
|
|
|
|
|
|
|
|
|
|
Best |
|
|
|
|
|
|
|
|
|
|
|
|
|
Approach |
|
Identifier |
|
|
|
|
|
|
|
|
|
|
|
|
Available |
|
|
|
|
|
|||||||||||
Primary |
|
|
|
|
|
|
|
|
Distance |
|||||
COM |
|
|
|
|
|
|
|
|
|
|
||||
Frequency |
|
|
|
|
|
|
|
|
Runway |
|||||
Bearing |
|
|
|
|
|
|
|
|
||||||
|
|
|
|
|
|
|
|
|||||||
|
|
|
|
|
|
|
|
|
Length |
|||||
|
|
|
|
|
|
|
||||||||
To |
|
|
|
|
Nearest Airports Window |
|||||||||
|
|
|
|
|||||||||||
|
|
Figure 2-49 |
||||||||||||
Figure 2-50 Airport Information Window
To select an airport by the airport identifier, location, and name fields from the Airport Information Window:
1.From the Nearest Airport Window, turn the large FMS knob to highlight the desired field.
2.Turn the FMS knobs to select the desired location, then press the ENT key.
3.Turn the large FMS knob to highlight ‘BACK’, then press the ENT key.
190-00498-00 Rev.A |
Garmin G1000 Pilot’s Guide for Cessna Nav III |
2-33 |

PRIMARY FLIGHT DISPLAY
To activate a Direct-to from the Nearest Airports Window:
1.From the Nearest Airports Window, turn the largeFMS knob to highlight the desired airport, then press the Direct-to key. The Direct-to Window appears.
2.Press the ENT key twice to activate.
To activate a Direct-to from the Airport
Information Window:
1.From the Airport Information Window, press the Direct-to key.
2.Press the ENT key twice to activate.
To select a COM frequency:
From the Nearest Airports Window, turn the large FMS knob to highlight the desired frequency, then press the ENT key. The frequency is tuned in the standby COM frequency field selected by the tuning box.
Direct-to Window
The Direct-to Window is enabled/disabled by pressing the Direct-to key.
Figure 2-51 Direct-to Window
The currently selected waypoint displays the following information:
•Identifier
•Waypoint symbol
•Waypoint location
•Facility name
•Flight plan waypoint list
•Nearest waypoint List
•Bearing to waypoint
•Distance from waypoint
•Latitude/longitude
•Course to selected waypoint
Direct-to Navigation
Selection of a waypoint for Direct-to navigation may be done in the following ways:
•By specifying the identifier, waypoint location or facility name
•By selecting from a list of waypoints in the active flight plan
•By selecting from a list of the 25 nearest airports
2-34 |
Garmin G1000 Pilot’s Guide for Cessna Nav III |
190-00498-00 Rev.A |

NOTE: When entering an all-letter/alphabetical airport identifier (only in the USA),the pilot must precede it with the letter “K” (KMCI). If the airport identifier is alpha-numeric, simply enter the three-digit identifier (51K). The full ICAO identifier must be entered for all waypoints.
To select a Direct-to by identifier:
1.Press the Direct-tokey,then turn the FMSknobs to select the desired waypoint identifier. Press the ENT key to confirm the selection.
2.Press the ENT key again to activate the direct-to.
To select a Direct-to by city or facility name:
1.Press the Direct-to key,then turn the largeFMS knob to highlight the city field (to the right of the identifier) or facility field (directly below the identifier) field.
2.Turn the FMS knobs to enter the city (to the right of the identifier field), or the facility (directly below the identifier field). Once the desired city or facility name is displayed, press the ENT key to confirm the selection.
3.Press the ENT key again to activate the direct-to.
To select a Direct-to from a list of waypoints in an active flight plan:
1.Press the Direct-to key,then turn the largeFMS knob to highlight the FPL field.
2.Turn the small FMS knob to display a selection window showing all waypoints in the active flight plan.
3.Turn the FMS knob to scroll through the list and highlight the desired waypoint, then press the ENT key.
4.Press the ENT key again to activate the direct-to.
PRIMARY FLIGHT DISPLAY
To select a Direct-to from the Nearest Airports list:
1.Press the Direct-to key,then turn the largeFMS knob to highlight the NRST field.
2.Turn the small FMS knob to display a selection window showing the 25 nearest airports.
3.Turn the FMS knob to scroll through the list and highlight the desired airport, then press the ENT key.
4.Press the ENT key again to activate the direct-to.
To select a specific course to a waypoint:
1.Press the Direct-tokey,then turn the FMSknobs to select the desired destination waypoint,then press the ENT key.
2.Turn the large FMS knob to highlight the ‘CRS’ field. Turn the FMS knobs to select the desired course and press the ENT key.
3.Press the ENT key to activate the direct-to using the selected course to the destination.
To cancel a Direct-to:
1.Press the Direct-to key, then press the MENU key to display the Direct-to Options menu.
2.Press the ENT key to cancel direct-to navigation. If a flight plan is still active, the G1000 resumes navigating the flight plan along the closest leg.
Figure 2-52 Cancel Direct-To NAV
190-00498-00 Rev.A |
Garmin G1000 Pilot’s Guide for Cessna Nav III |
2-35 |

PRIMARY FLIGHT DISPLAY
Flight Plan Window
NOTE: COM frequency and stored flight plans cannot be loaded from the PFD Flight Plan Window.
The Flight Plan Window is enabled and disabled by pressing the FPL key.
Figure 2-53 Flight Plan Window
Flight plans can be created, edited and activated from the PFD. The G1000 allows for the creation up to 99 flight plans, with up to 31 waypoints in each flight plan.
The Flight Plan Window on the PFD displays the following information:
•Flight plan title
•Indication of active leg (magenta line and arrow)
•Flight plan waypoint, including airport identifiers
•Leg distance
•Leg desired track
The following options are available for the Flight Plan Window:
•Activate Leg
•Store Flight Plan
•Invert Flight Plan
•Delete Flight Plan
•Load Departure
•Load Arrival
•Load Approach
•Remove Departure
•Remove Arrival
•Remove Approach
•Closest Point of FPL
•Change Fields
•Restore Defaults
Create New Flight Plan
NOTE:An‘active’ flight plan is created as soon as the first two waypoints are entered on theActive Flight Plan Page.
New flight plans can be created on the PFD and MFD. The system can store up to 99 flight plans with up to 31 waypoints in each flight plan.
To create a new flight plan:
1.Press the FPL key, then press the FMS knob to activate the cursor. The waypoint field is now highlighted.
2.Turn the small FMS knob to activate the Waypoint Information Window.
3.Turn the FMS knobs to enter the identifier of the airport/waypoint and press the ENT key. The system returns to the Flight Plan Window, with the cursor flashing on the next waypoint field.
4.Repeat step 3 above to enter the identifier for each additional waypoint.
2-36 |
Garmin G1000 Pilot’s Guide for Cessna Nav III |
190-00498-00 Rev.A |

Activate Leg
Activatelegselectsthehighlightedlegasthe“activeleg” (the flight plan leg which is currently used for navigation guidance).
To activate a flight plan along a specific leg:
1.From the active Flight Plan Window, press the FMS knob to activate the cursor, and turn the large FMS knob to highlight the desired destination waypoint.
2.Press the MENUkey,highlight‘Activate Leg’ and press the ENT key. A confirmation window is displayed with ‘ACTIVATE’ highlighted. Press the ENT key.
PRIMARY FLIGHT DISPLAY
To store a flight plan:
1.From the Flight Plan Window, once all of the waypoints have been entered,press the MENU key to display the page menu options.
2.Turn the FMS knob to select‘Store Flight Plan’, then press the ENT key. The Store Flight Plan Window is displayed with ‘OK’ highlighted.
3.Press the ENT key to store the flight plan.
4.To cancel,turn the largeFMS knob to highlight ‘CANCEL’ and press the ENT key.
|
|
Figure 2-55 Page Options Menu |
|
|
Invert Flight Plan |
Figure 2-54 Activate Leg Confirmation Window |
The Invert Flight Plan option reverses the active flight |
|
|
|
|
|
|
plan. After traveling along a flight plan, the pilot may |
Store Flight Plan |
wishtoreversetheroutefornavigationbacktotheoriginal |
|
|
|
departure point. |
NOTE: The active flight plan is erased when the unit is turned off and when another flight plan is activated.
Whenstoringflightplanswithanapproach,departure, or arrival, the G1000 uses the waypoint information from the current database to define the waypoints. If the navigation database is changed or updated, the G1000 automaticallyupdatestheinformationiftheprocedurehas not been modified. If an approach, departure, or arrival procedure is no longer available, the flight plan becomes locked until the procedure is deleted from the flight plan or until the correct navigation database is installed.
To activate an existing flight plan in reverse:
1.From the Flight Plan Window, press the MENU key to display the page menu options.
2.Turn the FMS knob to highlight ‘Invert Flight Plan’, then press the ENT key. The flight plan is now reversed and activated.
Figure 2-56 Invert Flight Plan Confirmation Window
190-00498-00 Rev.A |
Garmin G1000 Pilot’s Guide for Cessna Nav III |
2-37 |

PRIMARY FLIGHT DISPLAY
Delete Flight Plan
The entire flight plan or selected waypoints within the flight plan may be deleted.
To delete the entire flight plan:
1.From the Flight Plan Window, press the MENU key to display the page menu options.
2.Turn the FMS knob to highlight ‘Delete Flight Plan’, then press the ENT key. The ‘Delete All Waypoints in Flight Plan’ message is displayed with ‘OK’ highlighted.
3.Press the ENT key to delete all waypoints in the flight plan.
4.To cancel,turn the largeFMS knob to highlight ‘CANCEL’ and press the ENT key.
To delete selected waypoints in the flight plan:
1.From the Flight Plan Window, turn the large FMS knob to select the desired waypoint.
2.Press the CLR key. The ‘Remove Waypoint Name’ Window is displayed with ‘OK’ highlighted. Press the ENT key to delete the selected waypoint.
3.To cancel,turn the largeFMS knob to highlight ‘CANCEL’ and press the ENT key.
Figure 2-58 Delete Flight Plan Confirmation Window
Load Departure
Load departure allows the pilot to select a published standard instrument departure (SID) for the departure airport or replace the current departure with a new selection. When using a direct-to, the G1000 uses the nearest airport as a reference for displaying available departures.
NOTE: The PROC key can also be used to load a departure, an approach, or an arrival.
To select a departure for the departure airport:
1.From the Flight PlanWindow ,press the MENU key to display the page menu options.
2.Turn the FMS knob to highlight ‘Load Departure’, then press the ENT key. A window appears listing the available departures for the departure airport.
Figure 2-59 Departure
3.Turn the FMS knob to select the desired departure, then press the ENT key.
4.A window may appear listing runways for the departure. Turn the FMS knob to select the desired runway, then press the ENT key. The transition window is now displayed.
2-38 |
Garmin G1000 Pilot’s Guide for Cessna Nav III |
190-00498-00 Rev.A |

Figure 2-60 Departure Runway
NOTE: The runway window is not displayed for every departure. ‘ALL’ may appear in the runway field, indicating that the departure procedure applies to all runways. For airports with parallel runways,‘B’ may appear at the end of the runway designation to indicate that the departure procedure applies to both runways.
5.Turn the FMS knob to select the desired transition waypoint, then press the ENT key.
Figure 2-61 Departure Transition
6.With ‘LOAD?’ highlighted, press the ENT key.
Figure 2-62 Select Departure Window
PRIMARY FLIGHT DISPLAY
Load Arrival
Load Arrival allows the pilot to select a published standard terminal arrival route (STAR) for the destination airport or replace a current arrival with a new selection.
NOTE: The PROC key can also be used to load a departure, an approach, or an arrival.
NOTE:When adding an arrival to an active flight plan, the pilot may need to remove a duplicate destination waypoint from the flight plan list.
To select an arrival for a direct-to or flight plan destination airport:
1.From the Flight Plan Window, press the MENU key to display the page menu options.
2.Turn the FMS knob to highlight ‘Load Arrival’, then press the ENT key. A window appears listing the available arrivals for the destination airport.
3.Turn the FMS knob to select the desired arrival, then press the ENT key. A window appears listing available transitions for the arrival.
4.Turn the FMS knob to select the desired transition waypoint, then press the ENT key.
5.A window may appear listing runways for the arrival. Turn the FMS knob to select the desired runway, then press the ENT key.
NOTE: The runway window is not displayed for every arrival. ‘ALL’ may appear in the runway field, indicating that the arrival procedure applies to all runways. For airports with parallel runways,‘B’ may appear at the end of the runway designation to indicate that the arrival procedure applies to both runways.
6.With ‘LOAD?’ highlighted, press the ENT key.
190-00498-00 Rev.A |
Garmin G1000 Pilot’s Guide for Cessna Nav III |
2-39 |

PRIMARY FLIGHT DISPLAY
Load Approach
Load Approach allows the pilot to select a published instrumentapproachforthedestinationairport,orreplace the current approach with a new selection.
To select an approach for a direct-to or flight plan destination airport:
1.From the Flight Plan Window, press the MENU key to display the page menu options.
2.TurntheFMSknobtohighlight‘LoadApproach’, then press the ENT key. A window appears listing the available approaches for the destination airport.
3.Turn the FMS knob to select the desired approach, then press the ENT key. A window appears listing the available transitions for the approach.
4.Turn the FMS knob to select the desired transition or vectors, then press the ENT key.
NOTE:The‘Vectors’ optionassumes that the pilot will receive vectors from ATC to the final course segment of the approach.
5.With ‘LOAD?’ highlighted, press the ENT key to load the approach.
6.To activate the approach, turn the large FMS knob to highlight ‘ACTIVATE?’, then press the ENT key.
NOTE: ‘LOAD’ adds the approach to the flight plan without immediately using the approach for navigation guidance.This allows the pilot to continue navigating the original flight plan until cleared for the approach,but keeps the approach available for quick activation when needed. ‘ACTIVATE’ adds the approach to the flight plan and begins navigating the approach course.
Remove Departure,Arrival, or Approach
Remove Departure, Arrival, or Approach deletes the current standard instrument departure (SID), terminal arrival route (STAR), or selected approach from the active flight plan.
To remove a departure, an arrival, or an approach from a direct-to or active flight plan:
1.From the Flight Plan Window, press the MENU key to display the page menu options.
2.Turn the FMSknob to highlight‘Remove Departure’,‘RemoveArrival’, or ‘RemoveApproach’, then press the ENTkey. A confirmation window appears listing the procedure that is about to be removed, with ‘OK’ highlighted.
3.Press the ENT key to remove the procedure.
4.To cancel,turn the largeFMS knob to highlight ‘CANCEL’, then press the ENT key.
Closest Point of FPL
Closest Point of FPL calculates the bearing and closest distance at which a flight plan passes from a reference waypoint. It may also be used to create a new user waypoint along the flight plan at the location closest to a chosen reference waypoint.
Figure 2-63 Closest Point of FPL Window
2-40 |
Garmin G1000 Pilot’s Guide for Cessna Nav III |
190-00498-00 Rev.A |
To determine the closest point along the active flight plan to a selected waypoint:
1.From the Flight Plan Window, press the MENU key to display the page menu options.
2.Turn the FMS knob to highlight ‘Closest Point of FPL’, then press the ENT key. A window appears with the reference waypoint field highlighted.
3.Turn the FMSknobs to enter the identifier of the reference waypoint,then press the ENTkey. The G1000 displays the bearing (BRG) and distance (DIS) to the closest point along the flight plan from the selected reference waypoint.
4.To create a user waypoint at this location and add it to the flight plan,press the ENT key. The name for the new user waypoint is derived from the identifier or the reference waypoint.
Change Fields
Change Fields allows the pilot to select the desired data items to be displayed on the Flight Plan Window. The user-selectable data fields can be changed to display the following information:
•Cumulative Distance (CUM)
•Distance (DIS)
•Desired Track (DTK)
•En route Safe Altitude (ESA)
•Estimated Time of Arrival (ETA)
•Estimated Time En route (ETE)
PRIMARY FLIGHT DISPLAY
Figure 2-64 Change Fields on Flight Plan
To change a data field on the Flight Plan Window:
1.From the Flight Plan Window, press the MENU key to display the page menu options.
2.Turn the FMSknob to highlight‘Change Fields’, then press the ENT key. The cursor flashes on one of the data fields.
3.TurnthelargeFMSknobtohighlight the desired field to be changed.
4.Turn the small FMS knob to display a window with optional data items.
5.Turn the FMS knob to select the desired data item, then press the ENT key.
6.Press the small FMS knob to remove the cursor.
Restore Defaults
Restore Defaults restores all data fields to the factory default settings.
To restore factory default settings for data fields on the Flight Plan Window:
1.From the Flight Plan Window, press the MENU key to display the page menu options.
2.Turn the FMS knob to highlight ‘Restore Defaults’, then press the ENT key.
190-00498-00 Rev.A |
Garmin G1000 Pilot’s Guide for Cessna Nav III |
2-41 |
PRIMARY FLIGHT DISPLAY
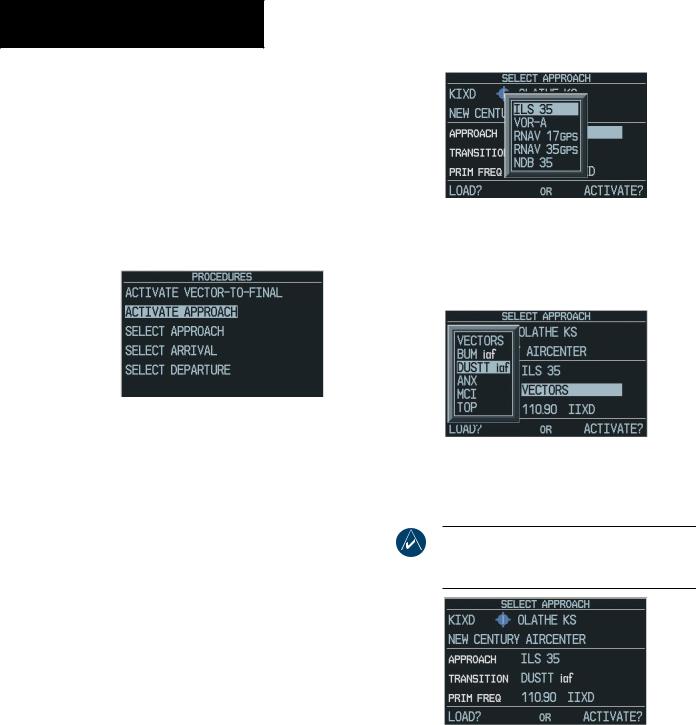
Procedures Window
The Procedures Window is enabled/disabled by pressing the PROC key. The following options are available from the Procedures Window:
•Activate Vector-To-Final
•Activate Approach
•Select Approach
•Select Arrival
•Select Departure
Figure 2-65 Procedures Window
Select Approach
Select Approach allows the pilot to choose a published instrument approach for the destination airport or replace the current approach with a new selection.
To select an approach for a direct-to or flight plan destination airport:
1.From an active flight plan, press the PROC key to display the Procedures options window.
2.Turn the large FMS knob to highlight ‘Select Approach’, then press the ENT key. A window appears listing the available approaches for the destination airport.
Figure 2-66 Approach
3.Turn the FMS knob to select the desired approach, then press the ENT key. A window appears listing the available transitions for the approach.
Figure 2-67 Approach Transition
4.Turn the FMS knob to select the desired transition or vectors, then press the ENT key.
NOTE:The‘Vectors’ optionassumes that the pilot will receive vectors from ATC to the final course segment of the approach.
Figure 2-68 Select Approach Window
2-42 |
Garmin G1000 Pilot’s Guide for Cessna Nav III |
190-00498-00 Rev.A |

5.With ‘LOAD?’ highlighted, press the ENT key to load the approach.
6.To activate the approach, turn the large FMS knob to highlight ‘ACTIVATE?’, then press the ENT key.
NOTE: ‘LOAD’ adds the approach to the flight plan without immediately using the approach for navigation guidance. This allows the pilot to continue navigating the original flight plan until cleared for the approach,but keeps the approach available for quick activation when needed. ‘ACTIVATE’ adds the approach to the flight plan and begins navigating the approach course.
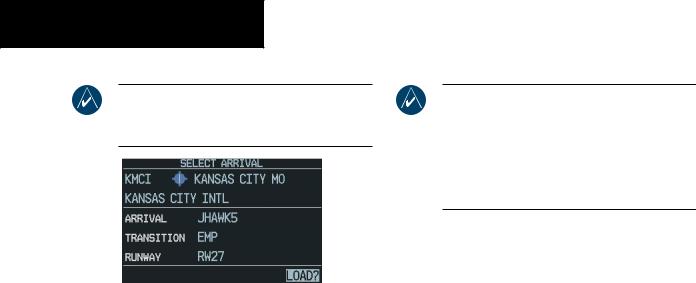
Select Arrival
Select Arrival allows the pilot to choose a published standard terminal arrival route (STAR) for the destination airport, or replace a current arrival with a new selection.
To select an arrival for a direct-to or flight plan destination airport:
1.From an active flight plan, press the PROC key to display the Procedures options window.
2.Turn the large FMS knob to highlight ‘Select Arrival’, then press the ENT key. A window appears listing the available arrivals for the destination airport.
Figure 2-69 Arrival
PRIMARY FLIGHT DISPLAY
3.Turn the FMS knob to select the desired arrival, then press the ENT key. A window appears listing the available transitions for the arrival.
Figure 2-70 Arrival Transition
4.Turn the FMS knob to select the desired transition, then press the ENT key.
5.A window may appear listing runways for the arrival. Turn the FMS knob to select the desired runway, then press the ENT key.
NOTE: The runway window is not displayed for every arrival. ‘ALL’ may appear in the runway field, indicating that the arrival procedure applies to all runways. For airports with parallel runways,‘B’ may appear at the end of the runway designation to indicate that the arrival procedure applies to both runways.
Figure 2-71 Arrival Runway
6.With ‘LOAD?’ highlighted, press the ENT key.
190-00498-00 Rev.A |
Garmin G1000 Pilot’s Guide for Cessna Nav III |
2-43 |
PRIMARY FLIGHT DISPLAY
NOTE:When adding an arrival to an active flight plan, the pilot may need to remove a duplicate destination waypoint from the flight plan list.
Figure 2-72 Select Arrival Window
Select Departure
Select Departure allows the pilot to choose a published standard instrument departure (SID) for the departure airport, or replace the current departure with a new selection. When using a direct-to, the G1000 uses the nearest airport as a reference when displaying available departures.
To select a departure for the departure airport:
1.From an active flight plan, press the PROC key to display the Procedures options window.
2.Turn the large FMS knob to highlight ‘Select Departure’, then press the ENT key. A window appears listing the available departures for the departure airport.
3.Turn the FMS knob to select the desired departure, then press the ENT key.
4.A window may appear listing runways for the departure. Turn the FMS knob to select the desired runway, then press the ENT key. The transition window is now displayed.
NOTE: The runway window is not displayed for every departure. ‘ALL’ may appear in the runway field, indicating that the departure procedure applies to all runways. For airports with parallel runways,‘B’ may appear at the end of the runway designation to indicate that the departure procedure applies to both runways.
5.Turn the FMS knob to select the desired transition, then press the ENT key.
6.With ‘LOAD?’ highlighted, press the ENT key.
Activate Approach
Activate Approach allows the pilot to activate the approach when ready to begin navigating the approach course (cleared for the approach).
To activate the approach for a direct-to or flight plan destination airport:
1.From an active flight plan, press the PROC key to display the Procedures options window.
2.Turn the large FMS knob to highlight ‘Activate Approach’, then press the ENT key.
Activate Vector-To-Final
Activate Vector-To-Final allows the pilot to activate the final coursesegmentoftheapproach. Thisoptionassumes that the pilot will receive vectors to the final approach fix (FAF) and provides guidance to intercept the final course, before reaching the FAF.
To activate the approach with vectors to final:
1.From an active flight plan, press the PROC key to display the Procedures options window.
2.Turn the FMSknob to highlight‘ActivateVector- To-Final’, then press the ENT key.
2-44 |
Garmin G1000 Pilot’s Guide for Cessna Nav III |
190-00498-00 Rev.A |