This determines which item is to be initially selected in the list box. The second difference is in the size of the control. For the lboxSex control, the size was set to 100×20 (in Line 54). For the lboxAge, the size was set to 100×60 (in Line 67). You can see the results of this on the displayed form (refer to Figure 17.3). The lboxSex control can display only one option at a time because of its smaller vertical size. Because the items don’t fit in the size of the control, vertical scroll arrows are automatically added to the control. For the lboxAge box, the control is big enough, so no vertical scrollbar is needed.
Everything else about a list box is similar to the other controls. You can create events to determine when a selection has changed or when the user has left the control. You can add logic to your form to make sure that a selection was made. Or, you can do a lot more.
Adding Menus to Your Forms
17
Controls are one way to make your forms functional. Another way is to add menus. Most
windowed applications include a menu of some sort. At a minimum, there is generally a
File or a Help menu item. When selected, these usually list a set of submenu items for
selection. You also can add menus to your forms.
Creating a Basic Menu
Listing 17.4 is the form you saw yesterday that displays the current date and time (see
Figure 17.4). Instead of using a button to update the current date and time, this form uses
a menu item. Although this is not a great use of a menu item, it illustrates a number of
key points. First, you add a menu to your form. Second, you explore how the menu items
are associated to an event item. Finally, you see how to code a menu item’s event.
55:protected void FileExit_Selection( object sender, System.EventArgs e )
56:{
57:this.Close();
58:}
59:
60:public static void Main( string[] args )
61:{
62:Application.Run( new Menu() );
63:}
64:}
Creating Windows Applications
593
OUTPUT
FIGURE 17.4
The basic menu selected on the form.
In Figure 17.4, the listing creates a simple File menu that contains two items,
ANALYSIS Update Date and Exit. Selecting Update Date updates the date and time on the
screen. Selecting Exit ends the program by calling closing the current form using
17
this.Close().
The primary menu on a form is called the main menu, which contains File as well as any other options that appear across the top of the application. In Line 11 of Listing 17.4, a MainMenu type named myMainMenu is declared for the Menu form.
In Line 39, the myMainMenu data member is instantiated. In Lines 41–44, it is set up; in Line 46, it is added to the form.
Looking closer, you can see that a lot of work is done in Lines 41–46. In fact, a lot of work is done in Line 41 alone. In Line 41, a new data member is declared named menuitemFile. Additionally, the following statement adds a new item—the first item—to
the myMainMenu menu:
MyMainMenu.MenuItems.Add(“File”);
This item is called File, and it is then assigned to the menuitemFile data member.
In general terms, to add a menu item, you can call the MenuItems.Add method on either a menu data member or another menu item data member. If you call this on the main menu, you get the primary items in the main menu. If you call MenuItems.Add on a menu item, you get a submenu menu item.
In Line 42, the menu item containing File, menuitemFile, has its MenuItems.Add method called. This means that a submenu item is being added to File. In the case of Line 42, this is the item Update Date. In Line 44, the submenu item Exit is added.
Wait a minute: If you look closely, you will see that the call in Line 41 to the MenuItems.Add method is different from the ones in Lines 42 and 44. It should be obvious to you that this method has been overloaded. If only one parameter string is passed, it is
594
Day 17
assumed to be the text item that will be displayed. In the calls in Lines 42 and 44, two parameters are passed. The first is a new MenuItem that is assigned directly to the menu rather than an intermediary variable.
The second is a new event handler. This is the event handler that will be called if and when the menu item is selected. Event-handler methods have been created (starting in Lines 49 and 54) for the two event handlers passed in Lines 43 and 45.
Line 49 contains the event handler for the Update Date menu option. This method call has the same name passed to the MenuItems.Add method in Line 42. Don’t forget that when you set up the actual event-handler methods, you will have two parameters, the sender and EventArgs. When the Update Date menu option is selected, the event handler in Lines 49–54 is called. This method updates the date and time on the form. This could just as easily have done something else.
The event handler in Lines 55–58 is called when Exit is selected. This handler exits the application by closing the form.
Creating Multiple Menus
In this section, you add a second menu item to the main menu and control key access to your menu items. Listing 17.5 presents a program that contains both a File and a Help menu option on the main menu (see Figure 17.5). Each of these options contains its own submenu selections.
LISTING 17.5 Menus.cs—Multiple Items on the Main Menu
This listing is similar to Listing 17.4. One major difference is that the menu creation has been pulled into its own method to help organize the code better. This
method, CreateMyMenu, is in Lines 59–76. The InitializeComponent method calls CreateMyMenu in Line 39 as a part of its initial form setup.
Lines 42–57 contain the events that might be activated by different menu selections. The first two, MenuUpdate_Selection and FileExit_Selection, are like the ones in Listing 17.4. The third, FileAbout_Selection, is associated with the About menu item on the Help menu. Line 56 does not contain any code; however, any code could be placed here. In the case of an About menu selection, that would most likely be the display of an informative dialog box. Later today, you’ll see an example of such a dialog box.
The focus of this listing related to menus is in Lines 59–76, and it takes the same approach as in the previous listing. In Line 61, the main menu is instantiated. In Line 63, the File item is added to myMainMenu. There is one difference in this call: An ampersand
Creating Windows Applications
597
(&) has been added to File. This indicates that a letter—the letter following the amper- sand—should be underlined on the display. For a MainMenu item, it also indicates that the given item should be selectable by using the Alt key with the letter following the ampersand. In this case, pressing Alt+F automatically selects the File menu option.
In Lines 64 and 67, you see the addition of menu items to the File menu similar to the ones in the previous listing; however, yet another version of the MenuItems.Add method is called. This time a third parameter is included, which specifies that the menu item should indicate that a keyboard shortcut can be used to select the given menu item. If you look at the two submenu items on the File menu, you will see that they have additional text indicating that a shortcut key is available (see Figure 17.6).
FIGURE 17.6
Shortcut key indicators
17
on a menu item.
Note
Fortunately, there are shortcut keys already defined in the Shortcut data type. In general, you can use Shortcut.Ctrl*, where * is any letter.
Adding the second menu item to the main menu is done the same way the first item was added. The About menu item was added in Line 71. Because this menu item will have submenu items, you need to assign it to a MenuItem variable. In this case, it is
menuitemHelp. menuitemHelp then has its items added using its MenuItems.Add method.
Using Checked Menus
One other common feature of using menus is the capability to check or uncheck a menu item. When checked, it is active; when unchecked, it is not active. Listing 17.6 illustrates how to add checking to a menu item and also provides an alternate way of declaring and defining menus (see Figure 17.7). This method requires more code; however, some people consider it easier to read and follow.
109:menuitemActive.Click += new EventHandler(this.ActiveMenu_Selection);
110:menuitemActive.Checked = true;
111:menuitemHelp.MenuItems.Add( menuitemActive );
112:
113:menuitemAbout = new MenuItem();
114:menuitemAbout.Text = “&About”;
115:menuitemAbout.Shortcut = Shortcut.CtrlA;
116:menuitemAbout.ShowShortcut = false;
117:menuitemAbout.Click += new EventHandler(this.FileAbout_Selection);
118:menuitemHelp.MenuItems.Add( menuitemAbout );
119:
120:this.Menu = myMainMenu;
121:}
122:
123:public static void Main( string[] args )
124:{
125:Application.Run( new CheckedMenu() );
126:}
127:}
OUTPUT
FIGURE 17.7
Checked menus.
ANALYSIS
This listing is a little longer than the previous two, partly because of the alternate way of creating the menu.
Creating Windows Applications
601
Instead of declaring a MainMenu data item and only the top-level menu items, this listing declares a MainMenu item in Line 11 and then MenuItem variables for each menu item that will exist. Lines 13–18 declare a MenuItem variable to hold each of the individual menu items.
As in the previous listing, the functionality to create the menu is placed in its own method, starting in Line 84. In Line 86, the MainMenu item, myMainMenu, is declared.
In Line 89, the first menu item, File, is declared in the same way as you’ve seen. The declaration of the submenu items is different this time. The Update Date menu item is created in Lines 91–95. First, a menu item variable, menuitemUD, is instantiated as a menu item. This is followed by setting individual property values on this menu item (Lines 92–93). In Line 94, an event handler is associated with the Click event of this
menu item. This event handler will be called whenever the menu item is selected. Finally,
in Line 95, the menu item is attached to its parent menu item. In this case, the menuitemUD 17 is added to the File menu, menuitemFile.
All the other menu items are added in the same manner. In some cases, different properties are set.
This listing also incorporates a new feature that you’ve not used. The Active menu item on the Help menu can be checked on and off. If checked on, the date and time are updated when the Date Update menu item is selected. If checked off, the date and time are enclosed in asterisks when displayed. This is done by setting the Checked property on the menu item, as in Line 110, and by adding a little code to the menu item’s event
handler, ActiveMenu_Selection.
The ActiveMenu_Selection event handler is in Lines 73–83. There is nothing new in this routine, but a few lines are worth reviewing. As with other event handlers, this method receives an object as its first argument. Because this event was caused by a menu selection, you know that this object actually contains a MenuItem. In Lines 75–76, a temporary MenuItem variable is created and the argument is cast to this temporary variable. This temporary variable, tmp, can then be used to access all MenuItem properties and methods.
You also know that this event was activated by the Active menu selection. In Line 78, you check to see whether the Checked property of the Active menu item is true and thus checked. If it is, you uncheck it in Line 79 by setting the Checked property to false. If it wasn’t checked, you set the Checked property to true. The result of this method is that it toggles the Active menu’s check on and off.
The MenuUpdate event handler has also been modified in this listing. This event handler displays the current date if the active menu item is checked. If it isn’t checked, the current date and time value is enclosed in asterisks and is redisplayed. The main point of
602
Day 17
this event handler is not what is being displayed. Rather, it is that the checked menu item can be used to determine what should occur.
Creating a Pop-Up Menu
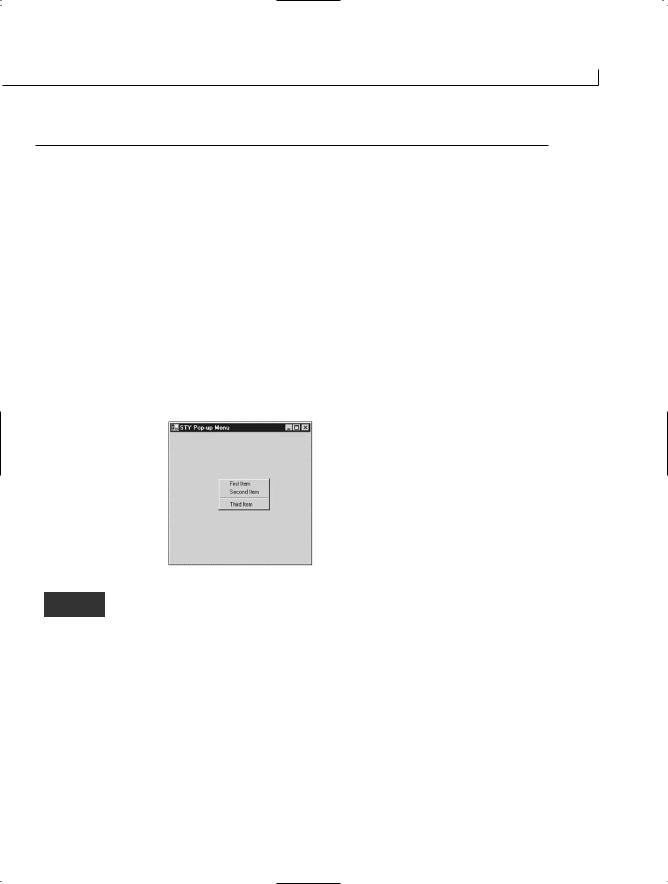
In addition to the standard menus you have seen up to this point, you can create pop-up menus. A pop-up menu is a menu that can appear at any location on the screen. Listing 17.7 presents a pop-up menu that is displayed by pressing the right mouse button (see Figure 17.8).
Instead of creating a MainMenu object, to create a pop-up menu, you create a ContextMenu item. This is done in Listing 17.7 in Line 33, where myPopUp is
instantiated as a ContextMenu. myPopUp was declared as a variable in Line 10.
You can add items to a ContextMenu the same way that you add them to a MainMenu—by using the MenuItems.Add method. In this listing, four items are added to this menu. The first, second, and fourth items are added the way you’ve seen before. The third item in Line 41 is the unique one. In Line 41, it appears that a single dash is being added to the menu. However, adding a single dash actually creates a line across the menu. You can see this in the output in Figure 17.8. When the items are all added to the ContextMenu item myPopUp, the menu is added as a ContextMenu to the current form.
604
Day 17
You should also notice that all three of the actual menu items use the same event handler, PopUp_Selection. This event handler is defined in Lines 25–29, with the actual functionality contained on Line 28. Line 28 assigns a new value to the Text property of the current form. Remember, the Text property is the title on the form. The value assigned is the text of the object that called the event handler. This is the text of the menu item that was selected. The code in Line 28 casts the sender object to a MenuItem and then uses the text value of this MenuItem. This is a shortcut way of doing the same thing that was done in Lines 75–76 of the previous listing.
Displaying Pop-Up Dialog Boxes and Forms
You now know how to display controls and menus on your forms. You have also learned to create event handlers to react to events that occur on your forms. The one procedure that has been missing from the examples shown so far is how to display another dialog box or form.
The following sections cover three topics related to displaying a new form or dialog box. First, you use the basic functionality of the MessageBox class. Then you explore a few dialog boxes that exist in Microsoft Windows. Finally, you learn about creating your own dialog box form, which is not nearly the same as using the custom dialog boxes.
Working with the MessageBox Class
A class that is often used when doing Windows programming is a message box class. A message box class is defined in the Base Class Libraries (BCL) as well. This class enables you to display a message in a pop-up box. Listing 17.8 uses the MessageBox class to pop up messages. You can see this by the output in Figures 17.9–17.12.
50:MessageBox.Show( “You are done with the application”, “Status”);
52:}
53:}
606
Day 17
OUTPUT
FIGURE 17.9
A message box displayed at the start of this program.
FIGURE 17.10
A message box displayed when the form has completed its initialization.
FIGURE 17.11
A message box displayed by selecting an item from the context menu.
FIGURE 17.12
A message box displayed at the end of the program.
This listing uses a MessageBox object to display a message at a number of differ- ANALYSIS ent times throughout the program’s execution.
The basic usage of the MessageBox class enables you to display a text string within a dialog box containing an OK button. You can also specify the title that will appear in the dialog box. Listing 17.8 uses a number of message boxes. The first is called in the constructor at Line 14. Two parameters are used with this basic call to the Show method of MessageBox. The first is the message that will be displayed in the dialog box. The second argument is the title of the dialog box. You can see that this is true by comparing the code in Line 14 to the dialog box presented in Figure 17.9. The dialog box in Line 14 is displayed immediately.
Creating Windows Applications
607
Lines 15–16 initialize the application’s main form and set up a pop-up menu. This is followed by another message box, which indicates that the initialization has been completed. This message box is the second that displayed.
When the OK button is clicked in the second message box, the constructor code, MsgBox(), concludes and the application’s main form is displayed. This form is an empty form that contains a menu that pops up with a right click of the mouse. When you select an item from this menu, the PopUp_Selection event handler in Lines 26–30 is called. This event handler calls the message box class regardless of which item was selected.
Figure 17.12 shows the final message box that is displayed when you exit this program. This dialog box results from the MessageBox.Show call in Line 50, and it doesn’t display until after the main form has exited.
Using Pre-existing Microsoft Windows Dialog Boxes
17
In addition to the MessageBox class, a number of more complex dialog boxes have been
defined. The following are useful dialog boxes:
•
Color Selection dialog box (ColorDialog)
•
Print Preview dialog box (PrintPreviewDialog)
•
Fonts dialog box (FontDialog)
•
File Open dialog box (OpenFileDialog)
•
File Save dialog box (SaveFileDialog)
Note
When this book was written, only Microsoft Windows supported these dialog boxes. Other platforms such as Linux may support these in the future.
These dialog boxes are within the BCL. Listing 17.9 shows how easy it is to incorporate the basic features of these dialog boxes into your list, as shown in Figures 17.13–17.15.
LISTING 17.9 Canned.cs—Using Some of the Canned Dialog Boxes
39:protected void Menu_Selection( object sender, System.EventArgs e )
40:{
41:switch (((MenuItem) sender).Text )
42:{
43:case “Exit”:
44:Application.Exit();
45:break;
46:
47:case “Colors Dialog”:
48:ColorDialog myColorDialog = new ColorDialog();
49:myColorDialog.ShowDialog();
50:break;
51:
52:case “Fonts Dialog”:
53:FontDialog myFontDialog = new FontDialog();
54:myFontDialog.ShowDialog();
Creating Windows Applications
609
LISTING 17.9
continued
55:
break;
56:
57:case “Print Preview Dialog”:
58:PrintPreviewDialog myPrintDialog =
59:
new PrintPreviewDialog();
60:myPrintDialog.ShowDialog();
61:break;
62:
63:default:
64:MessageBox.Show(“DEFAULT”, “PopUp”);
65:break;
66:}
67:}
68:
69:
public static void Main( string[] args )
17
70:
{
71:
Application.Run( new Canned() );
72:
}
73:
}
OUTPUT
FIGURE 17.13
Displaying the basic
Color dialog box.
FIGURE 17.14
Displaying the basic
Font dialog box.
ANALYSIS
610
Day 17
FIGURE 17.15
Displaying the Print
Preview dialog box.
This listing uses functionality that has been presented in earlier listings to display the dialog boxes. A File menu has been added to the form. This menu contains
items for displaying three dialog boxes, each displayed in the same manner. A new object of the dialog box’s type is instantiated. The object is then displayed by calling the ShowDialog method, which presents the dialog box. Selecting each of the menu options provides you with the associated precreated dialog box.
Note
To learn more about customizing and using the features of these dialog boxes, check the online help documents.
Popping Up Your Own Dialog Box
You also can create your own dialog boxes. You do this in the same way you create your base form: define a form object, add controls, and then display it.
You can display a form two ways. You can display a form so that it must be responded to before the application will continue. This is done using the ShowDialog method. Alternatively, you can display a form and let the application continue or let other forms continue to be displayed. This is done with the Show method. Listing 17.10 illustrates the difference between using Show and using ShowDialog (see Figure 17.16).
LISTING 17.10 MyForm.cs—Using Show Versus Using ShowDialog
95:protected void CloseMenu_Selection( object sender, System.EventArgs e )
96:{
97:this.Close();
98:}
99:}
Creating Windows Applications
613
OUTPUT
FIGURE 17.16
Only one ShowDialog form can be displayed at a time, but multiple Show forms can be displayed.
When you run this program, you will find that you can create multiple ShowDialog
17
ANALYSIS
forms. You can even change focus between them and the main application form.
When you create a ShowDialog form, you cannot do anything else in this program until you close it.
Note
A form that must be responded to before giving up focus is modal.
Summary
Today’s lesson ended up being among the longest in the book; however, you saw a lot of code. Today you expanded on what you learned yesterday regarding the creation of win- dows-based development. Although the information covered today is not a part of the ECMA standard C# language, it is applicable to programming on Microsoft Windows. Other platforms supporting .NET will most likely have similar—if not the same—func- tionality. For example, the mono C# and .NET project is planning to support the windows forms classes.
Today’s lesson started with coverage of two more controls, radio buttons and list boxes. You learned how to group controls with the group box. Additionally, you learned how to add both main menus and context (pop-up) menus to your applications. Creating an application with multiple forms and dialog boxes was also demonstrated. Not only did you learn to use the message box dialog box, but you also learned how to create your own dialog boxes and how to use pre-existing dialog boxes.
614
Day 17
The two days of windows coverage were not intended to be complete coverage. However, you now have a foundation for beginning to develop windows-based applications.
Q&A
QHow important was the information learned today and yesterday if I use a tool such as Microsoft Visual Studio .NET, Microsoft Visual C# .NET, or SharpDevelop?
AThe graphical IDEs will do a lot of the coding for you. For example, using Visual Studio, you can drag and drop controls onto a form and set properties by using a dialog box within the tool. This makes it very easy to create dialog boxes.
Yesterday’s lesson and today’s lesson help you understand the code that these tools are creating for you. By understanding generated code, you can better understand your programs and how they operate.
Q Isn’t there a lot more to learn about windows programming?
A Yesterday and today barely scratched the surface of windows-based programming, but they do give you a solid foundation from which to start such programming.
Q Is what I learned yesterday and today portable to other platforms?
ABecause all of the routines presented are a part of the Base Class Libraries, it is hoped that they will be ported to new platforms. In reality, these classes were not all part of the ECMA standard created for C#, so there is no guarantee that these window classes or control classes will be converted to other platforms. I believe there is a good chance that they will be ported.
Workshop
The Workshop provides quiz questions to help you solidify your understanding of the material covered and exercises to provide you with experience in using what you’ve learned. Try to understand the quiz and exercise answers before continuing to the next day’s lesson. Answers are provided on the CD.
Quiz
1.What class can be used to create a radio button control?
2.What namespace contains controls such as radio buttons and list boxes?
3.How do you set the tab order for a form’s controls?
Creating Windows Applications
615
4.What steps are involved in adding items to a list box?
5.What is the difference between a MainMenu and a ContextMenu item?
6.What is an easy way to display a dialog box with a simple message in a simple dialog box?
7.What are some of the pre-existing dialog boxes that you can use from the Base Class Library?
8.If you want to display a form and not allow any other forms to be displayed or activated in the same application, what method should you use?
9.How many forms can be displayed with the Show method at the same time?
Exercises
1. Write the code to add two radio buttons named butn1 and butn2 to a group box
17
named grpbox.
2.What code would you use to add a line to the MYMENU menu?
3.Create an application that uses the ColorDialog form. Set the background of your main form to the color returned from the ColorDialog form that you display. The color returned is stored in the Color property. Hint: Create a variable of type ColorDialog. When you return from calling the dialog box, the selected color
should be in the Color property.
4.Bug Buster: Does the following code have a problem? If so, what is it?
5.On Your Own: Create an application that contains a menu. The menu should display a dialog box that contains a number of controls, including an OK button.
6.Modify Listing 17.6 to include an About dialog box.
TYPE & RUN 4
Tic Tac Toe
This Type & Run is a simple game of Tic Tac Toe. This is done as a windows forms application using standard controls. For the most part, buttons are used. Although this code is very long, you will find that most of it sets up the controls on the form. Because this listing is so long, I suggest that you copy it from the CD.
If you are using an Integrated Development Environment that has a windows forms designer, I suggest that you try to re-create this application from scratch.
Unlike most of the Type & Runs, you have actually covered nearly everything that is in this listing. You should be able to work through this listing and follow what is happening. A few .NET Framework classes are being used that you have not seen before; however, you should find their functionality obvious.
Remember, the purpose of Type & Runs is to provide you with a longer, more complete listing than what is in the individual lessons. More important, they are to provide you with code to modify and play with.
The listing provides the code for a simple Tic Tac Toe game; however, a lot of functionality can be added. You could keep a tally for scoring. You could add
618
Type & Run 4
menus that have options for starting a game, switching who goes first (X or O), exiting the program, and using Help. The listing is functional; however, there are lots of ways you can enhance it.
The Tic Tac Toe Code
Enter and compile the following program. If you get any errors, make sure you entered the program correctly. You can also copy the code from the CD or pull it from
www.TeachYourselfCSharp.com.
LISTING T&R 4.1 TicTac.cs—A Tic Tac Toe Game
1:// TicTac.cs - Simple Windows Tic Tac Toe program
This is a Windows application, so you will want to target the compiling as a winexe. With the Microsoft C# command-line compiler, this is done by using the /target: or /t: flags. Additionally, you may need to reference the windows forms classes in the command line:
Depending on your compiler, you may not need to include the reference to
System.Windows.Forms.dll in the command line.
After it is compiled, running the program presents the form presented in Figure TR4.1.
FIGURE TR4.1
The Tic Tac Toe application.
628
Type & Run 4
Note
The source code for this listing is available on the included CD. Any updates to the code will be available at www.TeachYourselfCSharp.com.
WEEK 3
DAY 18
Working with Databases: ADO.NET
You’ve learned about working with classes within the .NET Framework. You’ve even learned about working with the windows forms classes. Today you continue your learning with a different set of classes within the .NET Framework. These classes are focused on accessing and manipulating data. Today you…
•Review key database terminology.
•Learn about ADO.NET.
•Use ADO.NET to retrieve data from a database.
•Discover how to use a DataReader.
•Add data to a database.
630
Day 18
Note
Be aware that entire books have been written on the topic of data programming with C# and .NET. In today’s lesson, you will learn quite a bit; however, this just scratches the surface of everything there is to learn about database programming with C#.
Understanding Key Database Concepts
On Day 15, “Using Existing Routines from the .NET Base Classes,” you learned how to read and write simple text files using streams. Using classes such as StreamWriter, StreamReader, BinaryWriter, and FileStream, you were able to both read information from different files and write information.
In real-world applications, you will often need a more robust set of classes and routines to work with data and information. Instead of storing everything as pure text or pure binary information, you will want to store items as different data types with different characteristics. You won’t want to store integers and strings; instead, you will want to store information such as prices and titles. Information such as this is best stored in a database.
Data becomes more useful when it is stored in a grouping. For example, if you create an application to track videos that are available for a rental, you might have a group of information that describes the videos and a group of information that describes the customers. For customers, this information may include their name, address, phone number, and membership number, along with the date they obtained rental privileges. You may also keep information on the media in the store. For example, you may keep track of title, rating, length, format, release date, and price to buy. A third set of information that you might want to track is the videos that a customer rented and when he or she rented them. Obviously, a lot more information can be tracked; however, most of this information can be grouped.
If you started to write programs using the file classes you learned on Day 15, you would find that it would take a lot of work to simply read in a date or a dollar number. Additionally, storing the information in a straight text or binary file would not be very efficient. Instead, information can be stored in databases such as Oracle, Microsoft SQL Server, mySQL, and Microsoft Access. A database system such as these helps organize, store, and access the information.
Understanding the Terminology
A single piece of information, such as a name or an address, is called a field.
NEW TERM
Another name for a field is a column; you’ll understand why in a second. A
Working with Databases: ADO.NET
631
group of related fields is called a record. Another name for a record is a column. An example of a record or column is the information traced on a video—this may be the title, media, price, and other information. A set of records, or information on a number of titles, is kept as a fil. A file is also known as a table. A group of one or more related files is considered a database.
You’ve just learned a lot of terms. In general, the terms row, column, and table are used within the context of .NET. These terms come from the fact that you can present data in a table format, as shown in Figure 18.1.
Note
FIGURE 18.1
Tables, rows, and columns.
One other term worth mentioning here is dataset. A dataset is one or more tables that have been copied from a database into memory.
Table: Videos
Columns/Fields
18
Rows/Records
Introducing ADO.NET
Because most real-world applications use data stored in a database, it shouldn’t be a surprise that strong database support is a part of the .NET Framework. Regardless of whether your data is stored on your local machine, on a network, or somewhere across the Internet, routines exist to help you access that information.
NEW TERM
632
Day 18
The primary data access technology for tapping into a database from .NET is ADO.NET. ADO.NET provides a way to connect to a database and to manipulate the data within it.
Accessing databases is a slow process in terms of how fast your application will execute. Keeping a database open and working with specific data while the database is being accessed is a resource-intensive process. In general, you will want to access and connect to a database for the shortest periods of time possible.
In the past, people opened a database at the beginning of their application. They viewed, added, updated, and deleted information in the application. Finally, when the application was ready to end, they closed the database. This mode of operation is fine if you are the only one using the database and if the database is on your local machine; however, if you are working with a database across the Internet, or if you are sharing the database with others, this method of operation is very inefficient.
One of the key features of ADO.NET is that it provides classes and methods for accessing a database in a disconnected sort of way. Instead of accessing the database the entire time your application is running, you access it only when you really need to. The way this works is that, using ADO.NET classes, information is copied from the database into the memory of your own computer. You can then disconnect from the database. After manipulating the data in memory, you can again connect to the database and have the changes made.
Connecting to and Working with a Database
Connecting to the database, retrieving data from the database, updating or deleting the data in the database, and performing other functions directly related to
the database are all done with a data provider. The data provider is used to interact between the database and your program.
A data provider is a set of classes that you use. More specifically, four key classes are used as a part of the data provider:
xxxConnection
xxxCommand
xxxDataReader
xxxDataAdapter
Used to connect to the database.
Used to execute a command against the database.
A special class used to get a set of data from the database that you can view. This can be viewed only sequentially, and the data can’t be changed.
Used to get a set of data from the database that you can then manipulate. You use this to make the changes to the database as well.
Working with Databases: ADO.NET
633
The actual names for the key data provider classes are dependent upon the data provider you use. Microsoft’s .NET Framework contains two different data providers. The Microsoft SQL Server .NET Data Provider is specifically tailored for Microsoft SQL Server 7.0 or later. The other, OleDb .NET Data Provider, is a more generic provider that connects to a number of different databases, including Microsoft Access and Oracle.
The different data provider classes are accessed from different namespaces. The SQL Server data provider classes can be found in System.IO.Data.Sql. The names of the classes within this provider start with the prefix Sql. For example, the connection class mentioned previously (xxxConnection) would be SqlConnection if the SQL Server provider were used.
The OleDb classes can be found in System.IO.Data.OleDB. The prefix for these classes is OleDb. The connection class for this data provider would be OleDbConnection.
Note
In today’s lessons, the OleDb data provider is used. If you are using a SQL
Server database, you should switch to the SQL Server data provider. It is
optimized for Microsoft SQL Server, so it can provide for better perfor-
mance. If you use the SQL Server provider, you should change the OleDb pre-
18
fix used in the examples to an Sql prefix.
Making the Connection to the Database
When using a database, the first thing you must do is open it. To open a database, you must first connect to it.
You create a connection by using the xxxConnection class mentioned earlier. Using this class, you instantiate a connection object:
OleDbConnection myConnection = new OleDbConnection(myConnectionString);
As you can see, myConnection is created in the same way that other objects are created.
The one unique thing is the myConnectionString value that is passed to the constructor. This string contains information about connecting to a database. The exact values placed in this string vary depending on the database, access rights, and other information specific to the database you are opening. For example, if you want to open a Microsoft Access database that does not have any security included, you could set
You can see that the string is composed of four different areas that are separated by semicolons:
Provider
This defines the data provider that will be used. In this case, it is Microsoft Jet, which is the provider for Microsoft Access. If you were using a Microsoft Access database, you would most likely use this same provider.
User ID
This is the ID of the account to use to access the database. In the case of the database used here, no ID is needed.
Password This is the password associated with the User ID. Again, because there is no security being used on the example database, no value is set equal to the Password.
Data Source This is the database name and location. In the example provided here, the data source is the Videos.mdb database that is in the current directory.
If you were accessing a different database, your values would be different. You may also need to include additional values. The values that you will provide are the ones needed by your database. If you are unsure of what is needed, check with your database administrator. Examples of other connection strings are shown here:
“Provider=MSDAORA; Data Source=ORACLE8i7;Persist Security Info=False;I
ntegrated Security=yes”
“Provider=Microsoft.Jet.OLEDB.4.0; Data Source=c:\databases\Contacts.mdb”
After you have created your connection object, you can use it to open the database. You open the database by calling the Open method of the connection object:
MyConnection.Open();
After Open is called, a connection to the database should be opened and ready to use. Of course, if the database doesn’t exist or if there is something wrong with the database, an exception will be thrown.
Note
You should always use exception handling when using database routines. You want to control your application’s reaction to problems such as a missing database. In today’s examples, exception handling is left out to save space. In the exercises, you will see an example of using exception handling with database access.
Working with Databases: ADO.NET
635
Executing a Command
With a database opened, the next step is to issue one or more commands to the database. Commands are issued to the database by using a command object that is associated to your connection object. You will want to first create the command object. You will then apply a command to the command object. Finally, you will execute the command.
To create the command object, you use the xxxCommand class. Because you are using the OleDb provider in this chapter, you would use the following statement to create a command object named myCommand:
OleDbCommand myCommand = new OleDbCommand();
You can then associate the command object with the connection object by setting the command’s Connection property:
myCommand.Connection = myConnection;
You now have a command object that you can use. When the command object is executed, it will use the database associated with myConnection.
Before you can execute the command, you need to associate a SQL query or a stored
procedure with the command. To make this association, you assign the SQL query or 18 stored procedure to the CommandText property:
myCommand.CommandText = “SELECT * FROM Titles ORDER BY Title”;
As you can see, this assigns a SQL query to the CommandText of the myCommand object. With this assignment, the command can now be executed.
How you execute a command depends on the result you expect from the command. You will consider executing a command generally in three ways:
•
•
•
ExecuteReader
ExecuteNonQuery
ExecuteScalar
You use ExecuteReader if you plan to retrieve data from the database. If you plan to make changes to the database but don’t expect values to be returned, you can use ExecuteNonQuery. Finally, if you want to get just a single value from the database, you can
use ExecuteScalar.
Retrieving Data with a DataReader
Most likely, your first foray into a database will be to read information from the database to display. A special class has been created to enable you to easily and efficiently read
636
Day 18
data from a database. This is the DataReader. The downsides to the DataReader are that it can only read data (it can’t write) and that it does only a forward read. This means you can go through the data only once. With these downsides, it is worth saying again—the benefit of the DataReader is that it is easy and efficient.
When you initially create a DataReader, you don’t need to instantiate it. Instead, when you execute a command against the database, it returns a DataReader object to you. The following creates a DataReader named myDataReader and sets it to null:
OleDbDataReader myDataReader = null;
You can then execute your Command object, using the ExecuteReader method:
myDataReader = myCommand.ExecuteReader();
Remember, myCommand is associated with your connection, plus it contains the SQL statement or stored procedure that you assigned earlier. After it is executed, myDataReader will contain the results of the command that you assigned.
This result will most likely be a set of records from the database. You can now loop through these records by calling the Read method of the DataReader. Each time you call the Read method, the next record is read.
You can access the values in each record by getting their values with a Getxxx method. To use most of these methods, you must know the data type of the information you are retrieving. If you don’t know the type, you will want to use the GetValue method.
Table 18.1 presents a list of the Getxxx methods that you can use.
TABLE 18.1 The Getxxx Methods of the DataReader
Method
Returns
GetBoolean
A Boolean value (bool)
GetByte
A byte value
GetBytes
An array of bytes
GetChar
A character value (char)
GetChars
An array of characters
GetDataTypeName
The name of the source’s data type
GetDateTime
A DateTime object
GetDecimal
A decimal value
GetDouble
A double value
GetFieldType
A Type value
GetFloat
A float value
Working with Databases: ADO.NET
637
TABLE 18.1 continued
Method
Returns
GetGuid
A Guid object
GetInt16
A short value
GetInt32
An integer value (int)
Get64
A long value
GetName
The column’s name
GetOrdinal
The ordinal, when passed the column title
GetSchemaTable
A DataTable object
GetString
A string value
GetTimeSpan
A TimeSpan object
GetValue
The value
GetValues
Gets all the attribute values in the current row
With the DataReader executed, you can easily set up a command to loop through the
retrieved information. For example, to print the value of the first item in each row or
18
record retrieved, you could use the following simple loop:
while ( myDataReader.Read() )
{
WriteLine(myDataReader.GetValue(0).ToString());
}
When you are done using the DataReader, you should close it using the Close method:
myDataReader.Close();
Closing the Database
Just as you should close the DataReader when you are finished with it, you should close the database connection. You close the connection by calling its Close method:
myConnection.Close();
Pulling It All Together
You’ve covered a lot up to this point. When you pull together all of the snippets, you can create a simple application that can read through a set of records within a database. Listing 18.1 presents an application that uses the code snippets you’ve seen up to this point. This listing uses a Microsoft Access database named Videos. This database can be found on the CD included with this book.
638
Day 18
Note
Listing 18.1 does not include exception handling, to keep the listing short. It is highly recommended that you never create a database application without including exception handling because too many things can go wrong. For example, the database could be missing.
Exercise 1 at the end of this chapter instructs you to add exception handling to this listing. The answer to that exercise is provided on the CD-ROM, “Answers.”
LISTING 18.1 ReadVids.cs—Using the DataReader
1:// ReadVids.cs
2:// ------
3:// ------ Note - Exception handling will be added in exercise 1
DVD - AI - Artificial Intelligence (PG-13) - $22.99
XBx - amped (Everyone) - $49.99
VHS - Anywhere But Here (PG-13) - $7.99
DVD - Atlantis (PG) - $20.99
XBx - Azurk Rise of Perathia (Teen) - $49.99
VHS - Billy Elliot (R) - $14.99
XBx - Blood Wake (Teen) - $49.99
DVD - Boys Don’t Cry (R) - $9.99
DVD - BraveHeart (R) - $24.99
DVD - Cast Away (PG-13) - $19.99
DVD - Charlie’s Angels (PG-13) - $14.99
DVD - Cider House Rules, The (PG-13) - $9. 99
DVD - Contender, The (R) - $9.99
VHS - Contender, The (R) - $9.99
DVD - Crouching Tiger Hidden dragon (PG-13) - $16.99
DVD - Dinotopia (NR) - $14.99
VHS - Double Jeopardy (R) - $12.99
DVD - Enemy of the State (R) - $1.50
DVD - Erin Brockovich (R) - $9.99
DVD - Excallibur (R) - $9.99
DVD - Family Man, The (PG-13) - $12.99
DVD - For Love of the Game (PG-13) - $9.99
XBx - Fuzion Frenzy (Everyone) - $49.99
ANALYSIS
640
Day 18
DVD -
GalaxyQuest (PG)
- $16.99
DVD -
Gladiator (R) -
$19.99
XBx -
Halo Combat Evolved (Mature) - $49.99
DVD -
Harry Potter and
the Sorcerer’s Stone (PG) - $12.99
VHS -
Hollow Man (R) -
$9.99
DVD -
Independence Day
Collector’s Edition (PG-13) - $19.99
...
DVD -
X-Men (PG-13) -
$14.99
VHS -
You Can Count On
Me (R) - $9.99
DVD -
You’ve Got Mail
(PG) - $14.99
TOTAL:
$1,727.36 AVG
PRICE: $16.77
Before running this listing, you need to make sure that the Videos.mdb file is located at C:\. If you want this file to be somewhere else, change the path used in
the data source shown in Line 19.
This listing uses everything you’ve read about in today’s lesson up to this point. In
Line 16, a connection string named myConnectionString is created. This includes information to use Microsoft Access database (see Line 17) as well as the previously mentioned link to the data source.
Note
Notice the use of @ in Line 19. This allows the string following to be taken literally. If you leave off the @, you will need to use double forward slashes in the path. You should also note that although this is a single string variable, it looks like three strings are assigned. This is not the case. The plus sign adds the three strings (concatenates them) into a single string.
In Lines 20–21, two variables are set up to track totals. These totals will be filled in as the records are read. In Line 22 a SQL query is created and also assigned to a string variable, mySelectQuery. This query selects all the information from each row in the videos table. It then orders (sorts) them by their titles.
In Line 24, the connection object, myConnection, is created using the connection string that was created in Line 16. In Line 27, an OleDbCommand object is created. This is done slightly differently than what you saw earlier. As you can see, the query (mySelectQuery) is passed as the first item along with the connection object.
Line 30 uses the connection object that you created for the video database to actually open the database using the Open method. After this line is executed, you will have an opened, usable connection to the data.
Working with Databases: ADO.NET
641
Line 32 creates the DataReader that will be used to read the data. Line 33 calls the ExecuteReader method using your command object. This returns the data to your reader object, myDataReader. With the reader full of data, you are ready to loop through it. This is accomplished with the while loop in Lines 35–47. Each time through, you call the Read method to get the next record.
With each loop, Lines 37–43 contain a call to WriteLine. Although this looks complicated, it isn’t. Getxxx methods are used to get data from the records. In this case, the 10 element is the medium type. Because the medium type is a string, myDataReader uses the GetString method and passes the value 9, which gives the tenth element because of the zero offset. The PadLeft is a standard string function that enables you to pad a value with a character—in this case, a string. Line 40 works in the same way, getting the second element, which is the title. Line 43 uses the GetDecimal method to get the fourth value, which is a currency value. This is retrieved as a decimal value and then is displayed using the currency formatter ({0:C}).
In Line 45, the fourth value is used a second time. In this line, the value is added to a
total accumulator. In Line 46, a counter is being used to count the number of records that
are being counted.
18
After the loop completes, Line 50 closes the DataReader that you were using. You should
always close your DataReaders. Line 53 closes the connection to the database. Again, this
is something you should always do.
This listing ends with the values of the counter variables being printed in Line 55. This
prints the total value of the videos along with the average value.
I may sound like a broken record (or a CD with a skip), but this listing is missing excep-
tion handling. In an exercise at the end of today, exception handling will be added. You
should always include exception handling in your applications.
Adding, Updating, and Deleting Data
Earlier, the Command class was mentioned. In Listing 18.1, you used the ExecuteReader method to read data from a database. You can also use the command object to execute other commands against the database. This includes using it to do inserts, updates, and deletes.
Instead of using ExecuteReader, you use the ExecuteNonQuery method. This method enables you to execute a SQL query or a stored procedure against the database. This method returns the number of records impacted by the query. Because it doesn’t return data, you can’t use it for retrieving information. However, this is perfect for inserts, updates, and deletes.
642
Day 18
The ExecuteNonQuery command is used similarly to the ExecuteReader command. You connect to and open the database, create a command object, and associate both the connection and the query you want to execute with the Command object. You then call ExecuteNonQuery. You should close the connection before exiting.
The queries that you can assign are any valid SQL query or stored procedure. This query needs to be valid for the specific database that you are using. SQL is not exactly the same across databases.
In Listing 18.2, a simple insert query is created for Microsoft Access. To make this listing simpler, a different table from within the Videos database is used. When this listing is executed, two additional rows are added to the Names table.
LISTING 18.2 Customers.cs—Updating with a SQL query