


TYPE & RUN 1
Numbering Your Listings
Throughout this book, you will find a number of Type & Run sections. These sections present a listing that is a little longer than the listings within the daily lessons. The purpose of these listings is to give you a program to type in and run. The listings might contain elements not yet explained in the book.
These programs generally do something either fun or practical. For instance, the program included here, named NumberIT, adds line numbers similar to those included on the listings in this book. You can use this program to number your listings as you work through the rest of this book.
I suggest that after you type in and run these programs, you take the time to experiment with the code. Make changes, recompile, and then rerun the programs. See what happens. There won’t be explanations on how the code works—only on what it does. Don’t fret, though. By the time you complete this book, you should understand everything within these earlier listings. In the meantime, you will have had the chance to enter and run some listings that are a little more fun or practical.

38 |
Type & Run 1 |
The First Type & Run
Enter and compile the following program. If you get any errors, make sure you entered the program correctly.
The usage for this program is NumberIT filename.ext, where filename.ext is the source filename along with the extension. Note that this program adds line numbers to the listing. (Don’t let this program’s length worry you; you’re not expected to understand it yet. It’s included here to help you compare printouts of your programs with the ones given in the book.)
LISTING T&R 1.1 NumberIT.cs
1:using System;
2:using System.IO;
4:/// <summary>
5:/// Class to number a listing. Assumes fewer than 1000 lines.
6:/// </summary>
8:class NumberIT
9:{
10:
11:/// <summary>
12:/// The main entry point for the application.
13:/// </summary>
14:
15:public static void Main( string[] args)
16:{
17:
18:// check to see if a file name was included on the
19:// command line.
20:
21:if ( args.Length <= 0 )
22:{
23:Console.WriteLine(“\nYou need to include a filename.”);
24:}
25:else
26:{
27:// declare objects for connecting to files...
28:StreamReader InFile = null;
29:StreamWriter OutFile = null;
30:
31:try
32:{
33:// Open file name included on command line...
34:InFile = File.OpenText(args[0]);
35:// Create the output file...

Numbering Your Listings |
39 |
LISTING T&R1.1 continued
36: OutFile = File.CreateText(“outfile.txt”); 37:
38: Console.Write(“\nNumbering...”); 39:
40:// Read first line of the file...
41:string line = InFile.ReadLine();
42:int ctr = 1;
43:
44:// loop through the file as long as not at the end...
45:while ( line != null)
46:{
47:OutFile.WriteLine(“{0}: {1}”,
48: ctr.ToString().PadLeft(3,’0’), line);
49:Console.Write(“..{0}..”, ctr.ToString());
50:ctr++;
51:line = InFile.ReadLine();
52:}
53:}
54:catch (System.IO.FileNotFoundException)
55:{
56:Console.WriteLine (“Could not find the file {0}”, args[0]);
57:}
58:catch (Exception e)
59:{
60:Console.WriteLine(“Error: {0}”, e.Message);
61:}
62:finally
63:{
64:if(InFile != null)
65:{
66:// Close the files
67:InFile.Close();
68:OutFile.Close();
69:Console.WriteLine(“...Done.”);
70:}
71:}
72:}
73:}
74:}
You will also find that the Type & Runs don’t contain line-by-line analysis like many of the listings within the books. Instead, a few key concepts are highlighted.
Enter the previous listing and compile it. If you need to, refer to Day 1, “Getting Started with C#,” for the steps to enter, compile, and run a listing. When you run this listing on the command line as follows:

40 |
Type & Run 1 |
NumberIT
you will get this message:
You need to include a filename.
OUTPUT
This listing takes a command-line parameter that is the name of the file that you want numbered. For example, to number the NumberIT.cs listing, you would enter this:
NumberIT NumberIT.cs
When this program executes, it displays the following to the screen:
OUTPUT |
Numbering |
..... 1 |
....2 |
.... ....3 |
....4 |
5 |
....6 |
.... 7 |
....8 |
.... ....9 |
....10 |
....11 |
1 |
|
2.... |
13.... |
14 .... |
15.... |
16.... |
17.... |
|
18.... |
19 .... |
20.... |
21.... |
22.... |
23.... |
2 |
|
|
....4 |
.... ....25 |
26 |
....27 |
....28 |
....29 |
|
.... ....30 |
31 |
....32 |
....33 |
....34 |
....35 |
3 |
|
6.... |
37.... .... |
38 |
39.... |
40.... |
41.... |
|
42.... .... |
43 |
44.... |
45.... |
46.... |
47.... |
4 |
|
8.... |
49.... .... |
50 |
51.... |
52.... |
53.... |
|
54.... .... |
55 |
56..... |
Done. |
|
|
|
In addition to displaying this output, the listing creates an additional file named outfile.txt. This file contains the numbered version of the listing that you passed as a command-line parameter. If you want the output to be a different name, you can change the name in Line 36.
Note
The source code for this listing is available on the included CD. Any updates to the code will be available at www.TeachYourselfCSharp.com.

WEEK 1
DAY 2
Understanding C#
Programs
In addition to understanding the basic composition of a program, you need to understand the structure of creating a C# program. Today you…
•Learn about the parts of a C# application.
•Understand C# statements and expressions.
•Explore the basic storage types for C# programs.
•Learn what a variable is.
•Discover how to create variable names in C#.
•Use different types of numeric variables.
•Evaluate the differences and similarities between character and numeric values.
•See how to declare and initialize variables.

42 |
Day 2 |
Dissecting a C# Application
The first part of today’s lesson focuses on a simple C# application. Using Listing 2.1, you will gain an understanding of some of the key parts of a C# application.
LISTING 2.1 App.cs—Example C# Application
1:// App.cs - A sample C# application
2:// Don’t worry about understanding everything in
3:// this listing. You’ll learn all about it later!
4://-----------------------------------------------
6: using System; 7:
8:class App
9:{
10:public static void Main()
11:{
12://Declare variables
14:int radius = 4;
15:const double PI = 3.14159;
16:double area;
17:
18: //Do calculation 19:
20: area = PI * radius * radius; 21:
22: //Print the results 23:
24:Console.WriteLine(“Radius = {0}, PI = {1}”, radius, PI );
25:Console.WriteLine(“The area is {0}”, area);
26:}
27:}
You should enter this listing into your editor and then use your compiler to create the program. You can save the program as App.cs. When compiling the program, you enter the following at the command prompt:
csc App.cs
Alternatively, if you are using a visual editor, you should be able to select a compiler from the menu options.

Understanding C# Programs |
43 |
Caution |
Remember, you don’t enter the line numbers or the colons when you are |
|
entering the listing. The line numbers help in discussing the listing in the |
||
|
||
|
lessons. |
|
|
|
When you run the program, you get the following output:
Radius = |
4, |
PI = 3.14159 |
2 |
OUTPUT The area |
is |
50.26544 |
|
As you can see, the output from this listing is pretty straightforward. The value of a radius and the value of PI are displayed. The area of a circle based on these two values is then displayed.
In the following sections, you learn about some of the different parts of this program. Don’t worry about understanding everything. In the lessons presented on later days, you will be revisiting this information in much greater detail. The purpose of the following sections is to give you a first look.
Starting with Comments
The first four lines of Listing 2.1 are comments. Comments are used to enter information in your program that can be ignored by the compiler. Why would you want to enter information that the compiler will ignore? There are a number of reasons.
Comments are often used to provide descriptive information about your listing—for example, identification information. Additionally, by entering comments, you can document what a listing is expected to do. Even though you might be the only one who uses a listing, it is still a good idea to put in information about what the program does and how it does it. Although you know what the listing does now—because you just wrote it— you might not be able to remember later what you were thinking. If you give your listing to others, the comments will help them understand what the code was intended to do. Comments can also be used to provide revision history of a listing.
The main thing to understand about comments is that they are for programmers using the listing. The compiler actually ignores them. In C#, you can use three types of comments:
•One-line comments
•Multiline comments
•Documentation comments
44 |
Day 2 |
Tip
The compiler removes comments, so there is no penalty for having them in your program listings. If in doubt, you should include a comment.
One-Line Comments
Listing 2.1 uses one-line—also called single-line—comments in Lines 1–4 and Lines 12, 18, and 22. One-line comments have the following format:
// comment text
The two slashes indicate that a comment is beginning. From that point to the end of the current line, everything is treated as a comment.
A one-line comment does not have to start at the beginning of the line. You can actually have C# code on the line before the comments; however, after the two forward slashes, the rest of the line is a comment.
Multiline Comments
Listing 2.1 does not contain any multiline comments, but sometimes you want a comment to go across multiple lines. In this case, you can either start each line with the double forward slash (as in Lines 1–4 of the listing), or you can use multiline comments.
Multiline comments are created with a starting and ending token. To start a multiline comment, you enter a forward slash followed by an asterisk:
/*
Everything after that token is a comment until you enter the ending token. The ending token is an asterisk followed by a forward slash:
*/
The following is a comment:
/* this is a comment */
The following is also a comment:
/* this is
a comment that is on
a number of lines */

Understanding C# Programs |
45 |
You can also enter this comment as the following:
//this is
//a comment that
//is on
//a number of
//lines
The advantage of using multiline comments is that you can “comment out” a section of a
code listing by simply adding /* and */. The compiler ignores anything that appears 2 between the /* and the */ as a comment.
Caution |
You cannot nest multiline comments. This means that you cannot place one |
|
multiline comment inside of another. For example, the following is an error: |
||
|
||
|
/* Beginning of a comment... |
|
|
/* with another comment nested */ |
|
|
*/ |
|
|
|
Documentation Comments
C# has a special type of comment that enables you to create external documentation automatically.
These comments are identified with three slashes instead of the two used for single-line comments. These comments also use Extensible Markup Language (XML)–style tags. XML is a standard used to mark up data. Although any valid XML tag can be used, com-
mon tags used for C# include <c>, <code>, <example>, <exception>, <list>, <para>, <param>,
<paramref>, <permission>, <remarks>, <returns>, <see>, <seealso>, <summary>, and <value>.
These comments are placed in your code listings. Listing 2.2 shows an example of these comments being used. You can compile this listing as you have earlier listings. See Day 1, “Getting Started with C#,” if you need a refresher.
LISTING 2.2 Xmlapp.cs—Using XML Comments
1:// Xmlapp.cs - A sample C# application using XML
2: |
// |
documentation |
3: |
// |
----------------------------------------------- |
4: |
|
|
5:/// <summary>
6:/// This is a summary describing the class.</summary>
7:/// <remarks>
8:/// This is a longer comment that can be used to describe

46 |
Day 2 |
LISTING 2.2 continued
9:/// the class. </remarks>
10:class Xmlapp
11:{
12:/// <summary>
13:/// The entry point for the application.
14:/// </summary>
15:/// <param name=”args”> A list of command line arguments</param>
16:public static void Main(string[] args)
17:{
18:System.Console.WriteLine(“An XML Documented Program”);
19:}
20:}
When you compile and execute this listing, you get the following output:
An XML Documented Program
OUTPUT
To get the XML documentation, you must compile this listing differently from what you have seen before. To get the XML documentation, add the /doc parameter when you compile at the command line. If you are compiling at the command line, you enter this:
csc /doc:xmlfile Xmlapp.cs
When you compile, you get the same output as before when you run the program. The difference is that you also get a file called xmlfile that contains documentation in XML. You can replace xmlfile with any name that you want to give your XML file. For Listing 2.2, the XML file is this:
<?xml version=”1.0”?> <doc>
<assembly>
<name>Xmlapp</name>
</assembly>
<members>
<member name=”T:Xmlapp”> <summary>
This is a summary describing the class.</summary> <remarks>
This is a longer comment that can be used to describe the class. </remarks>
</member>
<member name=”M:Xmlapp.Main(System.String[])”> <summary>
The entry point for the application. </summary>

Understanding C# Programs |
47 |
<param name=”args”> A list of command line arguments</param> </member>
</members>
</doc>
Note
Note
XML and XML files are beyond the scope of this book.
2
If you are compiling from within an Integrated Development Environment, you need to check the documentation or help system to learn how to generate the XML documentation. Even if you are using such a tool, you can compile your programs from the command line, if you want. If you are using Microsoft Visual Studio .NET, you can set the project to generate the XML documentation by doing the following:
1.Go to the Solution Explorer. See the documentation if you are unsure of what the Solution Explorer is.
2.Right-click the project name and select the Properties page.
3.Click the Configuration Properties folder to select it.
4.Click the Build option to select it.
5.In the dialog box (shown in Figure 2.1), enter a filename for the XML Documentation File property. In the dialog box in Figure 2.1, the name MyXMLDocs was entered.
FIGURE 2.1
Setting the documentation comments switch in Visual Studio .NET.

48 |
Day 2 |
Basic Parts of a C# Application
A programming language is composed of a bunch of keywords that have special meanings. A computer program is the formatting and use of these words in an organized manner, along with a few additional words and symbols. The key parts of a C# language include the following:
•Whitespace
•C# keywords
•Literals
•Identifiers
Formatting with Whitespace
Listing 2.1 has been formatted so that the code lines up and is relatively easy to
NEW TERM
read. The blank spaces put into a listing are called whitespace. The basis of this term is that, on white paper, you can’t see the spaces. Whitespace can consist of spaces, tabs, linefeeds, and carriage returns.
The compiler almost always ignores whitespace. Because of this, you can add as many spaces, tabs, and linefeeds as you want. For example, consider Line 14 from Listing 2.1:
int radius = 4;
This is a well-formatted line with a single space between items. This line could have had additional spaces:
int |
radius |
= |
4 |
; |
This line with extra spaces executes the same way as the original. In fact, when the program is run through the C# compiler, the extra whitespace is removed. You could also format this code across multiple lines:
int radius
=
4
;
Although this is not very readable, it still works.
The exception to the compiler ignoring whitespace has to do with the use of text within quotation marks. When you use text within double quotes, whitespace is important because the text is to be used exactly as presented. Text has been used within quotation marks with the listings you have seen so far. In Listing 2.1, Lines 24–25 contain text

Understanding C# Programs |
49 |
within double quotes. This text is written exactly as it is presented between the quotation marks.
Tip
Because the compiler ignores whitespace, you should make liberal use of it to help format your code and make it readable.
2
The Heart of C#: Keywords
Keywords are the specific terms that have special meaning and, therefore, make up a language. The C# language has a number of keywords, listed in Table 2.1.
TABLE 2.1 The C# Keywords
abstract |
as |
base |
bool |
break |
byte |
case |
catch |
char |
checked |
class |
const |
continue |
decimal |
default |
delegate |
do |
double |
else |
enum |
event |
explicit |
extern |
false |
finally |
fixed |
float |
for |
foreach |
goto |
if |
implicit |
in |
int |
interface |
internal |
is |
lock |
long |
namespace |
new |
null |
object |
operator |
out |
override |
params |
private |
protected |
public |
readonly |
ref |
return |
sbyte |
sealed |
short |
sizeof |
stackalloc |
static |
string |
struct |
switch |
this |
throw |
true |
try |
typeof |
uint |
ulong |
unchecked |
unsafe |
ushort |
using |
virtual |
void |
while |
|
|
|
|
|
|
|
|
|
Note
A few other words are used in C# programs: get, set, and value. Although these reserved words are not keywords, they should be treated as though they are.
In future versions of C#, partial, yield, and where might also become keywords.

50 |
Day 2 |
These keywords have a specific meaning when you program in C#. You will learn the meaning of these as you work through this book. Because all these words have a special meaning, they are reserved; you should not use them for your own use. If you compare the words in Table 2.1 to Listing 2.1 or any of the other listings in this book, you will see that much of the listing is composed of keywords.
Note
Appendix A, “C# Keywords,” contains short definitions for each of the C# keywords.
Literals
Literals are straightforward hard-coded values. They are literally what they are! For example, the numbers 4 and 3.14159 are both literals. Additionally, the text
within double quotes is literal text. Later today, you will learn more details on literals and their use.
Identifiers
In addition to C# keywords and literals, other words are used within C# programs. These words are considered identifiers. Listing 2.1 contains a number of
identifiers, including System in Line 6; sample in Line 8; radius in Line 14; PI in line 15; area in Line 16; and PI, radius, and area in Line 22.
Exploring the Structure of a C# Application
Words and phrases are used to make sentences, and sentences are used to make paragraphs. In the same way, whitespace, keywords, literals, and identifiers are combined to make expressions and statements. These, in turn, are combined to make a program.
Understanding C# Expressions and Statements
Expressions are like phrases: They are snippets of code made up of keywords.
NEW TERM
For example, the following are simple expressions:
PI = 3.14159
PI * radius * radius
Statements are like sentences; they complete a single thought. A statement generally ends with a punctuation character—a semicolon (;). In Listing 2.1, Lines 14–16 are examples of statements.

Understanding C# Programs |
51 |
The Empty Statement
One general statement deserves special mention: the empty statement. As you learned previously, statements generally end with a semicolon. You can actually put a semicolon on a line by itself. This is a statement that does nothing. Because there are no expressions to execute, the statement is considered an empty statement. You’ll learn on Day 4, “Controlling Your Program’s Flow,” when you need to use an empty statement.
2
Analyzing Listing 2.1
It is worth taking a closer look at Listing 2.1 now that you’ve learned of some of ANALYSIS the many concepts. The following sections review each line of Listing 2.1.
Lines 1–4: Comments
As you already learned, Lines 1–4 contain comments that the compiler ignores. These are for you and anyone who reviews the source code.
Lines 5, 7, 13, 17, 21, and 23: Whitespace
Line 5 is blank. You learned that a blank line is simply whitespace that the compiler ignores. This line is included to make the listing easier to read. Lines 7, 13, 17, 21, and 23 are also blank. You can remove these lines from your source file, and there will be no difference in how your program runs.
Line 6—The using Statement
Line 6 is a statement that contains the keyword using and a literal System. As with most statements, this ends with a semicolon. The using keyword is used to condense the amount of typing you need to do in your listing. Generally, the using keyword is used with namespaces. Namespaces and details on the using keyword are covered in some detail on Day 5, “The Core of C# Programming: Classes.”
Line 8—Class Declaration
C# is an object-oriented programming (OOP) language. Object-oriented languages use classes to declare objects. This program defines a class called App. Although classes are used throughout this entire book, the coding details concerning classes start on Day 5.
Lines 9, 11, 26, and 27: Punctuation Characters
Line 9 contains an opening bracket that is paired with a closing bracket in Line 27. Line 11 has an opening bracket that is paired with the closing one in Line 26. These sets of

52 |
Day 2 |
brackets contain and organize blocks of code. As you learn about different commands over the next four days, you will see how these brackets are used.
Line 10: Main()
The computer needs to know where to start executing a program. C# programs start executing with the Main() function, as in Line 10. A function is a grouping
of code that can be executed by calling the function’s name. You’ll learn the details about functions on Day 6, “Packaging Functionality: Class Methods and Member Functions.” The Main() function is special because it is used as a starting point.
Lines 14–16: Declarations
Lines 14–16 contain statements used to create identifiers that will store information. These identifiers are used later to do calculations. Line 14 declares an identifier to store the value of a radius. The literal 4 is assigned to this identifier. Line 15 creates an identifier to store the value of PI. This identifier, PI, is filled with the literal value of 3.14159. Line 16 declares an identifier that is not given any value. You’ll learn more about creating and using these identifiers, called variables, later today.
Line 20: The Assignment Statement
Line 20 contains a simple statement that multiplies the identifier PI by the radius twice. The result of this expression is then assigned to the identifier area. You’ll learn more about creating expressions and doing operations in tomorrow’s lesson.
Lines 24–25: Calling Functions
Lines 24–25 are the most complex expressions in this listing. These two lines call a predefined routine that prints information to the console (screen). You learned about these routines yesterday, and you’ll see them used throughout this entire book.
Storing Information with Variables
When you start writing programs, you will quickly find that you need to keep track of different types of information. This might be tracking your clients’ names, the amounts of money in your bank accounts, or the ages of your favorite movie stars. To keep track of this information, your computer programs need a way to store the values.
Storing Information in Variables
A variable is a named data storage location in your computer’s memory. By using a variable’s name in your program, you are, in effect, referring to the information stored there.

Understanding C# Programs |
53 |
For example, you could create a variable called my_variable that holds a number. You would be able to store different numbers in the my_variable variable.
You could also create variables to store information other than a simple number. You |
|
could create a variable called BankAccount to store a bank account number, a variable |
|
called email to store an email address, or a variable called address to store a person’s |
|
mailing address. Regardless of what type of information will be stored, a variable is used |
|
to obtain its value. |
2 |
|
Naming Your Variables
To use variables in your C# programs, you must know how to create variable names. In C#, variable names must adhere to the following rules:
•The name can contain letters, digits, and the underscore character (_).
•The first character of the name must be a letter. The underscore is also a legal first character, but its use is not recommended at the beginning of a name. An underscore is often used with special commands. Additionally, it is sometimes hard to read.
•Case matters (that is, upperand lowercase letters). C# is case sensitive; thus, the names count and Count refer to two different variables.
•C# keywords can’t be used as variable names. Recall that a keyword is a word that is part of the C# language. (A complete list of the C# keywords can be found in Appendix A.)
The following list contains some examples of valid and invalid C# variable names:
Variable Name |
Legality |
|
Percent |
Legal |
|
y2x5__w7h3 |
Legal |
|
yearly_cost |
Legal |
|
_2010_tax |
Legal, but not advised |
|
checking#account |
Illegal; contains the illegal character # |
|
double |
Illegal; is a C keyword |
|
9byte |
Illegal; first character is a digit |
|
54 |
Day 2 |
Because C# is case-sensitive, the names percent, PERCENT, and Percent are considered three different variables. C# programmers commonly use only lowercase letters in variable names, although this isn’t required; often programmers use mixed case as well. Using all-uppercase letters is usually reserved for the names of constants (which are covered later today).
Variables can have any name that fits the rules listed previously. For example, a program that calculates the area of a circle could store the value of the radius in a variable named radius. The variable name helps make its usage clear. You could also have created a variable named x or even billy_gates; it doesn’t matter. Such a variable name, however, wouldn’t be nearly as clear to someone else looking at the source code. Although it might take a little more time to type descriptive variable names, the improvements in program clarity make it worthwhile.
Many naming conventions are used for variable names created from multiple words. Consider the variable name circle_radius. Using an underscore to separate words in a variable name makes it easy to interpret. Another style is called Pascal notation. Instead of using spaces, the first letter of each word is capitalized. Instead of circle_radius, the variable would be named CircleRadius. Yet another notation that is growing in popularity is camel notation. Camel notation is like Pascal notation, except that the first letter of the variable name is also lowercase. A special form of camel notation is called Hungarian notation. With Hungarian notation, you also include information in the name of the vari- able—such as whether it is numeric, has a decimal value, or is text—that helps to identify the type of information being stored. The underscore is used in this book because it’s easier for most people to read. You should decide which style you want to adopt.
DO |
DON’T |
Do use variable names that are descriptive.
Do adopt and stick with a style for naming your variables.
Don’t name your variables with all capital letters unnecessarily.
Note
C# supports a Unicode character set, which means that letters from any language can be stored and used. You can also use any Unicode character to name your variables.

Understanding C# Programs |
55 |
Using Your Variables
Before you can use a variable in a C# program, you must declare it. A variable declaration tells the compiler the name of the variable and the type of information that the variable will be used to store. If your program attempts to use a variable that hasn’t been declared, the compiler generates an error message.
Declaring a variable also enables the computer to set aside memory for the variable. By identifying the specific type of information that will be stored in a variable, you can gain 2 the best performance and avoid wasting memory.
Declaring a Variable
A variable declaration has the following form:
typename varname;
typename specifies the variable type. In the following sections, you will learn about the types of variables that are available in C#. varname is the name of the variable. To declare a variable that can hold a standard numeric integer, you use the following line of code:
int my_number;
The name of the variable declared is my_number. The data type of the variable is int. As you will learn in the following section, the type int is used to declare integer variables, which is perfect for this example.
You can also declare multiple variables of the same type on one line by separating the variable names with commas. This enables you to be more concise in your listings. Consider the following line:
int count, number, start;
This line declares three variables: count, number, and start. Each of these variables is type int, which is for integers.
Note
Although declaring multiple variables on the same line can be more concise, I don’t recommend that you always do this. Sometimes it is easier to read and follow your code by using multiple declarations. There will be no noticeable performance loss by doing separate declarations.

56 |
Day 2 |
Assigning Values to Your Variables
Now that you know how to declare a variable, it is important to learn how to store values. After all, the purpose of a variable is to store information.
The format for storing information in a variable is as follows:
varname = value;
You have already seen that varname is the name of the variable. value is the value that will be stored in the variable. For example, to store the number 5 in the variable, my_variable, you enter the following:
my_variable = 5;
You can assign a value to a variable any time after it has been declared. You can even do this at the same time you declare a variable:
int my_variable = 5;
A variable’s value can also be changed. To change the value, you simply reassign a new value:
my_variable = 1010;
Listing 2.3 illustrates assigning values to a couple of variables. It also shows that you can overwrite a value.
LISTING 2.3 var_values.cs—Assigning Values to a Variable
01: // var_values.cs - A listing to assign and print the value
02: // |
of variables |
03: //--------------------------------------------------------- |
|
04: |
|
05: using System; |
|
06: |
|
07: class var_values |
|
08: { |
|
09:public static void Main()
10:{
11:// declare first_var
12:int first_var;
13:
14:// declare and assign a value to second_var
15:int second_var = 200;
16:
17:// assign an initial value to first_var...
18:first_var = 5;
19:

Understanding C# Programs |
57 |
LISTING 2.3 continued
20:// print values of variables...
21:Console.WriteLine(“\nfirst_var contains the value {0}”, first_var);
22:Console.WriteLine(“second_var contains the value {0}”, second_var);
24:// assign a new value to the variables...
25:first_var = 1010;
26:second_var = 2020;
27: |
2 |
28:// print new values...
29:Console.WriteLine(“\nfirst_var contains the value {0}”, first_var);
30:Console.WriteLine(“second_var contains the value {0}”, second_var);
31:}
32:}
first_var contains the value 5 second_var contains the value 200
first_var contains the value 1010 second_var contains the value 2020
Enter this listing into your editor, compile it, and execute it. If you need a refresher on how to do this, refer to Day 1. The first three lines of this listing are
comments. Lines 11, 14, 17, 20, 24, and 28 also contain comments. Remember that comments provide information; the compiler ignores them. Line 5 includes the System namespace that you need to do things such as write information. Line 7 declares the class that will be your program (var_values). Line 9 declares the entry point for your program, the Main() function. Remember, Main() must be capitalized or you’ll get an error.
Line 12 declares the variable first_var of type integer (int). After this line has executed, the computer knows that a variable called first_var exists and enables you to use it. Note, however, that this variable does not yet contain a value. In Line 15, a second variable called second_var is declared and also assigned the value of 200. In Line 18, the value of 5 is assigned to first_var. Because first_var was declared earlier, you don’t need to include the int keyword again.
Lines 21–22 print the values of first_var and second_var. In Lines 25–26, new values are assigned to the two variables. Lines 29–30 then reprint the values stored in the variables. You can see when the new values print that the old values of 5 and 200 are gone.
Caution |
You must declare a variable before you can use it. |
|

58 |
Day 2 |
Issues with Uninitialized Variables
You will get an error if you don’t assign a value to a variable before it is used. You can see this by modifying Listing 2.3. Add the following line of code after Line 12:
Console.WriteLine(“\nfirst_var contains the value {0}”, first_var);
You can see that in Line 12, first_var is declared; however, it is not assigned any value. What value would you expect first_var to have when the preceding line tries to print it to the console? Because first_var hasn’t been assigned a value, you have no way of knowing what the value will be. In fact, when you try to recompile the listing, you get an error:
var_values2.cs(13,63): error CS0165: Use of unassigned local variable ‘first_var’
It is best to always assign a value to a variable when you declare it. You should do this even if the value is temporary.
Note
In other languages, such as C and C++, this listing would compile. The value printed for the uninitialized first_var in these other languages would be garbage. C# prevents this type of error from occurring.
Understanding Your Computer’s Memory
Variables are stored in your computer’s memory. If you already know how a computer’s memory operates, you can skip this section. If you’re not sure, read on. This information is helpful to understanding how programs store information.
What is your computer’s memory (RAM) used for? It has several uses, but only data storage need concern you as a programmer. Data is the information with which your C# program works. Whether your program is maintaining a contact list, monitoring the stock market, keeping a budget, or tracking the price of snickerdoodles, the information (names, stock prices, expense amounts, or prices) is kept within variables in your computer’s memory when it is being used by your running program.
A computer uses random access memory (RAM) to store information while it is operating. RAM is located in integrated circuits, or chips, inside your computer. RAM is volatile, which means that it is erased and replaced with new information as often as needed. Being volatile also means that RAM “remembers” only while the computer is turned on and loses its information when you turn the computer off.

Understanding C# Programs |
59 |
A byte is the fundamental unit of computer data storage. Each computer has a certain amount of RAM installed. The amount of RAM in a system is usually specified in megabytes (MB), such as 64MB, 128MB, 256MB, or more. 1MB of memory is 1,024 kilobytes (KB). 1KB of memory consists of 1,024 bytes. Thus, a system with 8MB of memory actually has 8 × 1,024KB, or 8,192KB of RAM. This is 8,192KB × 1,024 bytes, for a total of 8,388,608 bytes of RAM. Table 2.2 provides you with an idea of how many
bytes it takes to store certain kinds of data.
2
TABLE 2.2 Minimum Memory Space Generally Required to Store Data
Data |
Bytes Required |
The letter x |
2 |
The number 500 |
2 |
The number 241.105 |
4 |
The phrase “Teach Yourself C#” |
34 |
One typewritten page |
Approximately 4,000 |
|
|
The RAM in your computer is organized sequentially, with one byte following another. Each byte of memory has a unique address by which it is identified—an address that also distinguishes it from all other bytes in memory. Addresses are assigned to memory locations in order, starting at 0 and increasing to the system limit. For now, you don’t need to worry about addresses; it’s all handled automatically.
Now that you understand a little about the nuts and bolts of memory storage, you can get back to C# programming and how C# uses memory to store information efficiently.
Introducing the C# Data Types
You know how to declare, initialize, and change the values of variables; it is important that you know the data types that you can use. You learned earlier that you have to declare the data type when you declare a variable. You’ve seen that the int keyword declares variables that can hold integers. An integer is simply a whole number that does- n’t contain a fractional or decimal portion. The variables that you’ve declared to this point hold only integers. What if you want to store other types of data, such as decimals or characters?

60 |
Day 2 |
Numeric Variable Types
C# provides several different types of numeric variables. You need different types of variables because different numeric values have varying memory storage requirements and differ in the ease with which certain mathematical operations can be performed on them. Small integers (for example, 1, 199, and -8) require less memory to store, and your computer can perform mathematical operations (addition, multiplication, and so on) with such numbers very quickly. In contrast, large integers and values with decimal points require more storage space and more time for mathematical operations. By using the appropriate variable types, you ensure that your program runs as efficiently as possible.
The following sections break the different numeric data types into four categories:
•Integral
•Floating point
•Decimal
•Boolean
The amount of memory used to store a variable is based on its data type. Listing 2.4 is a program that contains code beyond what you know right now; however, it provides you with the amount of information needed to store some of the different C# data types.
You must include extra information for the compiler when you compile this listing. This extra information is referred to as a ”flag” to the compiler and can be included on the command line. Specifically, you need to add the /unsafe flag, as shown:
csc /unsafe sizes.cs
If you are using an Integrated Development Environment, you need to set the unsafe option as instructed by its documentation.
Note
If you are using Microsoft Visual Studio .NET, you can set the unsafe flag in the same dialog box where you set the XML documentation filename.
LISTING 2.4 Sizes.cs—Memory Requirements for Data Types
1:// Sizes.cs--Program to tell the size of the C# variable types
2://----------------------------------------------------------------
4: using System; 5:
6: class Sizes

Understanding C# Programs |
61 |
LISTING 2.4 continued
7:{
8:unsafe public static void Main()
9:{
10:Console.WriteLine( “\nA byte
11:Console.WriteLine( “A sbyte
12:Console.WriteLine( “A char
13:Console.WriteLine( “\nA short
14:Console.WriteLine( “An ushort
15:Console.WriteLine( “\nAn int
16:Console.WriteLine( “An uint
17:Console.WriteLine( “\nA long
18:Console.WriteLine( “An ulong
19:Console.WriteLine( “\nA float
20:Console.WriteLine( “A double
|
is |
{0} |
byte(s)”, |
sizeof( |
byte )); |
|
|||
is {0} byte(s)”, sizeof( sbyte )); |
|
||||||||
is |
{0} |
byte(s)”, |
sizeof( |
char )); |
|
||||
|
is |
{0} |
byte(s)”, |
sizeof( |
short )); |
2 |
|||
is |
{0} |
byte(s)”, |
sizeof( |
ushort )); |
|||||
is {0} byte(s)”, sizeof( int )); is {0} byte(s)”, sizeof( uint ));
is {0} byte(s)”, sizeof( long )); is {0} byte(s)”, sizeof( ulong ));
is {0} byte(s)”, sizeof( float )); is {0} byte(s)”, sizeof( double ));
21:Console.WriteLine( “\nA decimal is {0} byte(s)”, sizeof( decimal));
22:Console.WriteLine( “\nA boolean is {0} byte(s)”, sizeof( bool ));
23:}
24:}
Caution |
The C# keyword sizeof can be used, but you should generally avoid it. The |
|
sizeof keyword sometimes accesses memory directly to find out the size. |
||
|
||
|
Accessing memory directly should be avoided in pure C# programs. |
|
|
You might get an error when compiling this program, saying that unsafe |
|
|
code can appear only if you compile with /unsafe. If you get this error, you |
|
|
need to add the /unsafe flag to the command-line compile: |
|
|
csc /unsafe sizes.cs |
|
|
If you are using an IDE, you need to set the /unsafe flag in the IDE settings. |
|
|
|
OUTPUT |
A byte |
is 1 byte(s) |
|
A sbyte |
is 1 byte(s) |
||
|
A char |
is 2 byte(s) |
|
|
A short |
is 2 byte(s) |
|
|
An ushort |
is 2 byte(s) |
|
|
An int |
is 4 byte(s) |
|
|
An uint |
is 4 byte(s) |
|
|
A long |
is 8 |
byte(s) |
|
An ulong |
is 8 |
byte(s) |
|
A float |
is 4 |
byte(s) |
|
A double |
is 8 |
byte(s) |

62 |
Day 2 |
A |
decimal |
is |
16 byte(s) |
A |
boolean |
is |
1 byte (s) |
Although you haven’t learned all the data types yet, it is valuable to present this ANALYSIS listing here. As you go through the following sections, refer to this listing and its
output.
This listing uses a C# keyword called sizeof. The sizeof keyword tells you the size of a variable. In this listing, sizeof is used to show the size of the different data types. For example, to determine the size of an int, you can use this:
sizeof(int)
If you had declared a variable called x, you could determine its size—which would actually be the size of its data type—by using the following code:
sizeof(x)
Looking at the output of Listing 2.4, you see that you have been given the number of bytes that are required to store each of the C# data types. For an int, you need 4 bytes of storage. For a short, you need 2. The amount of memory used determines how big or small a number that is stored can be. You’ll learn more about this in the following sections.
The sizeof keyword is not one that you will use very often; however, it is useful for illustrating the points in today’s lesson. The sizeof keyword taps into memory to determine the size of the variable or data type. With C#, you avoid tapping directly into memory. In Line 8, the extra keyword unsafe is added. If you don’t include the unsafe keyword, you get an error when you compile this program. For now, understand that unsafe is added because the sizeof keyword has the potential to work directly with memory.
The Integral Data Types
Until this point, you have been using one of the integral data types, int. Integral data types store integers. Recall that an integer is basically any numeric value that does not include a decimal or a fractional value. The numbers 1, 1,000, 56,000,000,000,000, and -534 are integral values.
C# provides nine integral data types, including the following:
•Integers (int and uint)
•Shorts (short and ushort)
•Longs (long and ulong)

Understanding C# Programs |
63 |
•Bytes (byte and sbyte)
•Characters (char)
Integers
As you saw in Listing 2.4, an integer is stored in 4 bytes of memory. This includes both the int and uint data types. This data type cannot store just any number; it can store any signed whole number that can be represented in 4 bytes or 32 bits—any number between
-2,147,483,648 and 2,147,483,647. 2
A variable of type int is signed, which means that it can be positive or negative. Technically, 4 bytes can hold a number as big as 4,294,967,295; however, when you take away one of the 32 bits to keep track of positive or negative, you can go only to
2,147,483,647. You can, however, also go to -2,147,483,648.
Note
As you learned earlier, information is stored in units called bytes. A byte is actually composed of 8 bits. A bit is the most basic unit of storage in a computer. A bit can have one of two values—0 or 1. Using bits and the binary math system, you can store numbers in multiple bits. In Appendix C, “Understanding Number Systems,” you can learn the details of binary math.
If you want to use a type int to go higher, you can make it unsigned. An unsigned number can be only positive. The benefit should be obvious. The uint data type declares an unsigned integer. The result is that a uint can store a value from 0 to 4,294,967,295.
What happens if you try to store a number that is too big? What about storing a number with a decimal point into an int or a uint? What happens if you try to store a negative number into a uint? Listing 2.5 answers all three questions.
LISTING 2.5 int_conv.cs—Doing Bad Things
1:// int_conv.cs
2:// storing bad values. Program generates errors and won’t compile.
3://----------------------------------------------------------------
4:
5: using System; 6:
7:class int_conv
8:{
9:public static void Main()
10:{
11: |
int val1, val2; |
// declare two integers |
64 |
Day 2 |
LISTING 2.5 continued
12: |
uint pos_val; |
// declare an unsigned int |
13: |
|
|
14:val1 = 1.5;
15:val2 = 9876543210;
16:pos_val = -123;
18:Console.WriteLine( “val1 is {0}”, val1);
19:Console.WriteLine( “val2 is {0}”, val2);
20:Console.WriteLine( “pos_val is {0}”, pos_val);
21:}
22:}
int_conv.cs(14,15): error CS0029: Cannot implicitly convert type |
|
OUTPUT ‘double’ to ‘int’ |
|
int_conv.cs(15,15): error CS0029: Cannot implicitly convert type |
|
‘long’ to ‘int’ |
|
int_conv.cs(16,18): error CS0031: Constant value ‘-123’ cannot be |
|
converted to a ‘uint’ |
|
Caution |
This program gives compiler errors. |
This program will not compile. As you can see, the compiler catches all three problems that were questioned. Line 14 tries to put a number with a decimal
point into an integer. Line 15 tries to put a number that is too big into an integer. Remember, the highest number that can go into an int is 2,147,483,647. Finally, Line 16 tries to put a negative number into an unsigned integer (uint). As the output shows, the compiler catches each of these errors and prevents the program from being created.
Shorts
The int and uint data types used 4 bytes of memory for each variable declared. Sometimes you don’t need to store numbers that are that big. For example, you don’t need big numbers to keep track of the day of the week (numbers 1–7), to store a person’s age, or to track the temperature to bake a cake.
When you want to store a whole number and you want to save some memory, you can use short and ushort. A short, like an int, stores a whole number. Unlike an int, it is only 2 bytes instead of 4. In the output from Listing 2.4, you see that sizeof returned 2 bytes for both short and ushort. If you are storing both positive and negative numbers, you’ll want to use short. If you are storing only positive numbers and you want to use

|
Understanding C# Programs |
65 |
|
|
|
|
|||
|
|
|
|
|
the extra room, you’ll want to use ushort. The values that can be stored in a short are |
|
|
||
from -32,768 to 32,767. If you use a ushort, you can store whole numbers from 0 to |
|
|
||
65,535. |
|
|
|
|
Longs |
|
|
|
|
If int and uint are not big enough for what you want to store, you can use the long data |
|
|
||
type. As with short and int, there is also an unsigned version of the long data type called |
2 |
|
||
ulong. In the output from Listing 2.4, you can see that long and ulong each use 8 bytes of |
|
|||
memory. This gives them the capability of storing very large numbers. A long can store |
|
|
||
numbers from -9,223,372,036,854,775,808 to 9,223,372,036,854,775,807. A ulong can |
|
|
||
store a number from 0 to 18,446,744,073,709,551,615. |
|
|
||
Bytes |
|
|
|
|
|
|
|
|
|
As you have seen, you can store whole numbers in data types that take 2, 4, or 8 bytes of |
|
|
||
memory. When your needs are very small, you can also store a whole number in a single |
|
|
||
byte. To keep things simple, the data type that uses a single byte of memory for storage |
|
|
||
is called a byte. As with the previous integers, there is both a signed version, sbyte, and |
|
|
||
an unsigned version, byte. An sbyte can store a number from -128 to 127. An unsigned |
|
|
||
byte can store a number from 0 to 255. |
|
|
||
Caution |
|
|
|
|
Unlike the other data types, it is byte and sbyte instead of byte and ubyte; |
|
|
|
|
there is no such thing as a ubyte. |
|
|
|
|
|
|
|
|
|
|
|
|
|
|
Characters
In addition to numbers, you will often want to store characters. Characters are letters, such as A, B, or C, or even extended characters such as the smiley face. Additional characters that you might want to store are $, %, or *. You might even want to store foreign characters.
A computer does not recognize characters; it can recognize only numbers. To get around this, all characters are stored as numbers. To make sure that everyone uses the same values, a standard was created called Unicode. Within Unicode, each character and symbol is represented by a single whole number. This is why the character data type is considered an integral type.
To know that numbers should be used as characters, you use the data type char. A char is a number stored in 2 bytes of memory that is interpreted as a character. Listing 2.6 presents a program that uses char values.

66 |
Day 2 |
LISTING 2.6 Chars.cs—Working with Characters
1:// Chars.cs
2:// A listing to print out a number of characters and their numbers
3://----------------------------------------------------------------
5: using System; 6:
7:class Chars
8:{
9:public static void Main()
10:{
11:int ctr;
12:char ch;
13:
14: Console.WriteLine(“\nNumber Value\n”); 15:
16:for( ctr = 63; ctr <= 94; ctr = ctr + 1)
17:{
18:ch = (char) ctr;
19:Console.WriteLine( “{0} is {1}”, ctr, ch);
20:}
21:}
22:}
Number Value
OUTPUT
63 is ?
64 is @
65 is A
66 is B
67 is C
68 is D
69 is E
70 is F
71 is G
72 is H
73 is I
74 is J
75 is K
76 is L
77 is M
78 is N
79 is O
80 is P
81 is Q
82 is R
83 is S
84 is T

Understanding C# Programs |
67 |
85 |
is U |
|
86 |
is V |
|
87 |
is W |
|
88 |
is X |
|
89 |
is Y |
|
90 |
is Z |
|
91 |
is [ |
|
92 |
is \ |
|
93 |
is ] |
2 |
94 |
is ^ |
This listing displays a range of numeric values and their character equivalents. ANALYSIS Line 11 declares an integer called ctr. This variable is used to cycle through a
number of integers. Line 12 declares a character variable called ch. Line 14 prints headings for the information that will be displayed.
Line 16 contains something new. For now, don’t worry about fully understanding this line of code. On Day 4, you will learn all the glorious details. For now, know that this line sets the value of ctr to 63. It then runs Lines 18–19 before adding 1 to the value of ctr. It keeps doing this until ctr is no longer less than or equal to 94. The end result is that Lines 18–19 are run using the ctr with the value of 63, then 64, then 65, and on and on until ctr is 94.
Line 18 sets the value of ctr (first 63) and places it into the character variable ch. Because ctr is an integer, you have to tell the computer to convert the integer to a character, which the (char) statement does. You’ll learn more about this later.
Line 19 prints the values stored in ctr and ch. As you can see, the integer ctr prints as a number. The value of ch, however, does not print as a number; it prints as a character. As you can see from the output of this listing, the character A is represented by the value 65. The value of 66 is the same as the character B.
Character Literals
How can you assign a character to a char variable? You place the character between single quotes. For example, to assign the letter a to the variable my_char, you use the following:
my_char = ‘a’;
In addition to assigning regular characters, you will most likely want to use several extended characters. You have actually been using one extended character in a number of your listings. The \n that you’ve been using in your listings is an extended character that prints a newline character. Table 2.3 contains some of the most common characters you might want to use. Listing 2.7 shows some of these special characters in action.

68 |
Day 2 |
TABLE 2.3 Extended Characters
Characters |
Meaning |
\b |
Backspace |
\n |
Newline |
\t |
Horizontal tab |
\\ |
Backslash |
\’ |
Single quote |
\” |
Double quote |
|
|
Note
LISTING 2.7
The extended characters in Table 2.3 are often called escape characters because the slash “escapes” from the regular text and indicates that the following character is special (or extended).
chars_table.cs—The Special Characters
1:// chars_table.cs
2://----------------------------------------------------------------
4: using System; 5:
6:class chars_table
7:{
8:public static void Main()
9:{
10:char ch1 = ‘Z’;
11:char ch2 = ‘x’;
12:
13:Console.WriteLine(“This is the first line of text”);
14:Console.WriteLine(“\n\n\nSkipped three lines”);
15:Console.WriteLine(“one\ttwo\tthree <-tabbed”);
16:Console.WriteLine(“ A quote: \’ \ndouble quote: \””);
17: |
Console.WriteLine(“\n ch1 = {0} ch2 = {1}”, ch1, ch2); |
18:}
19:}
This is the first line of text
OUTPUT
Skipped three lines
one two three <-tabbed A quote: ‘

Understanding C# Programs |
69 |
double quote: “
ch1 = Z ch2 = x
This listing illustrates two concepts. First, in Lines 10–11, you see how a character can be assigned to a variable of type char. It is as simple as including the
character in single quotes. In Lines 13–17, you see how to use the extended characters. There is nothing special about Line 13. Line 14 prints three newlines followed by some
text. Line 15 prints one, two, and three, separated by tabs. Line 16 displays a single quote 2 and a double quote. Notice that there are two double quotes in a row at the end of this
line. Finally, line 17 prints the values of ch1 and ch2.
Working with Floating-Point Values
Not all numbers are whole numbers. When you need to use numbers that have decimals, you must use different data types. As with storing whole numbers, you can use different data types, depending on the size of the numbers you are using and the amount of memory you want to use. The two primary types are float and double.
float
A float is a data type for storing numbers with decimal places. For example, in calculating the circumference or area of a circle, you often end up with a result that is not a whole number. Any time you need to store a number such as 1.23 or 3.1459, you need a nonintegral data type.
The float data type stores numbers in 4 bytes of memory. As such, it can store a number from approximately 1.5 × 10-45 to 3.4 × 1038.
Note
Caution
1038 is equivalent to 10 × 10, 37 times. The result is 1 followed by 38 zeros, or 100,000,000,000,000,000,000,000,000,000,000,000,000. 10-45 is 10÷10, 44 times. The result is 44 zeros between a decimal point and a 1, or
.000000000000000000000000000000000000000000001.
A float can retain only about seven digits of precision, which means that it is not uncommon for a float to be off by a fraction. For example, subtracting 9.90 from 10.00 might result in a number different from .10; it might result in a number closer to .099999999. Generally, such rounding errors are not noticeable.

70 |
Day 2 |
double
Variables of type double are stored in 8 bytes of memory. This means that they can be much bigger than a float. A double can generally be from 5.0 × 10–324 to 1.7×10308. The
precision of a double is generally from 15 to 16 digits.
Note
C# supports the 4-byte precision (32 bits) and 8-byte precision (64 bits) of the IEEE 754 format, so certain mathematical functions return specific values. If you divide a number by 0, the result is infinity (either positive or negative). If you divide 0 by 0, you get a Not-a-Number value. Finally, 0 can be both positive and negative. For more on this, check your C# documentation.
Gaining Precision with Decimal
C# provides another data type that can be used to store special decimal numbers: the decimal data type. This data type was created for storing numbers with greater precision. When you store numbers in a float or a double, you can get rounding errors. For example, storing the result of subtracting 9.90 from 10.00 in a double could result in the string 0.099999999999999645 instead of .10. If this math is done with decimal values, the .10 is stored.
Tip
If you are calculating monetary values or doing financial calculations in which precision is important, you should use a decimal instead of a float or a double.
A decimal number uses 16 bytes to store numbers. Unlike the other data types, there is no unsigned version of decimal. A decimal variable can store a number from 1.0 × 10⁻²⁸ to approximately 7.9 × 1028. It can do this while maintaining precision to 28 places.
Storing Boolean Values
The last of the simple data types is the Boolean. Sometimes you need to know whether something is on or off, true or false, or yes or no. Boolean numbers are generally set to one of two values: 0 or 1.
C# has a Boolean data type called a bool. As you can see in Listing 2.4, a bool is stored in 1 byte of memory. The value of a bool is either true or false, which are C# keywords. This means that you can actually store true and false in a data type of bool.

Understanding C# Programs |
71 |
Caution |
Yes, no, on, and off are not keywords in C#. This means that you cannot set |
|
a Boolean variable to these values. Instead, you must use true or false. |
||
|
||
|
|
Working Checked Versus Unchecked Code
Earlier in today’s lesson, you learned that if you put a number that is too big into a vari-
able, an error is produced. Sometimes you do not want an error produced. In those cases, 2 you can have the compiler avoid checking the code. This is done with the unchecked key-
word, as illustrated in Listing 2.8.
LISTING 2.8 Unchecked.cs—Marking Code as Unchecked
1:// Unchecked.cs
2://----------------------------------------------------------------
4: using System; 5:
6:class Unchecked
7:{
8:public static void Main()
9:{
10:int val1 = 2147483647;
11:int val2;
12:
13:unchecked
14:{
15:val2 = val1 + 1;
16:}
17:
18:Console.WriteLine( “val1 is {0}”, val1);
19:Console.WriteLine( “val2 is {0}”, val2);
20:}
21:}
val1 is 2147483647 val2 is -2147483648
This listing uses unchecked in Line 13. The brackets in Line 14 and 16 enclose the area to be unchecked. When you compile this listing, you do not get any
errors. When you run the listing, you get what might seem like a weird result. The number 2,147,483,647 is the largest number that a signed int variable can hold. As you see in Line 10, this maximum value has been assigned to var1. In Line 15, the unchecked line, 1 is added to what is already the largest value var1 can hold. Because this line is

72 |
Day 2 |
unchecked, the program continues to operate. The result is that the value stored in var1 rolls to the most negative number.
This operation is similar to the way an odometer works in a car. When the mileage gets to the maximum, such as 999,999, adding 1 more mile (or kilometer) sets the odometer to 000,000. It isn’t a new car with no miles; it is simply a car that no longer has a valid value on its odometer. Rather than rolling to 0, a variable rolls to the lowest value it can store. In this listing, that value is –2,147,483,648.
Change Line 13 to the following, and recompile and run the listing:
13:checked
The program compiled, but will it run? Executing the program causes an error. If you are asked to run your debugger, you’ll want to say no. The error that you get will be similar to the following:
Exception occurred: System.OverflowException: An exception of type System.OverflowException was thrown.
at Unchecked.Main()
On later days, you’ll see how to deal with this error in your program. For now, you should keep in mind that if you believe there is a chance of putting an invalid value into a variable, you should force checking to occur. You should not use the unchecked keyword as a means of simply avoiding an error.
Data Types Simpler Than .NET
The C# data types covered so far are considered simple data types. The simple data types
are sbyte, byte, short, ushort, int, uint, long, ulong, char, float, double, bool, and decimal.
In yesterday’s lesson, you learned that C# programs execute on the Common Language Runtime (CLR). Each of these data types corresponds directly to a data type that the CLR uses. Each of these types is considered simple because there is a direct relationship with the types available in the CLR and, thus, in the .NET Framework. Table 2.4 presents the .NET equivalent of the C# data types.
TABLE 2.4 C# and .NET Data Types
C# Data Type |
.NET Data Type |
sbyte |
System.SByte |
byte |
System.Byte |
short |
System.Int16 |
ushort |
System.UInt16 |
int |
System.Int32 |

|
|
|
Understanding C# Programs |
73 |
|
|
|
|
|
|
|||
|
|
|
|
|
|
|
|
TABLE 2.4 continued |
|
|
|
|
|
|
|
|
|
|
|
|
|
|
C# Data Type |
.NET Data Type |
|
|
|
|
|
|
|
|
|
|
|
|
uint |
System.UInt32 |
|
|
|
|
|
long |
System.Int64 |
|
|
|
|
|
ulong |
System.UInt64 |
|
|
|
|
|
char |
System.Char |
|
|
|
|
|
2 |
|
|||
|
|
float |
System.Single |
|
||
|
|
double |
System.Double |
|
|
|
|
|
bool |
System.Boolean |
|
|
|
|
|
decimal |
System.Decimal |
|
|
|
|
|
|
|
|
|
|
If you want to declare an integer using the .NET equivalent declaration—even though there is no good reason to do so—you use the following:
System.Int32 my_variable = 5;
As you can see, System.Int32 is much more complicated than simply using int. Listing 2.9 shows the use of the .NET data types.
LISTING 2.9 net_vars.cs—Using the .NET Data Types
1:// net_vars
2:// Using a .NET data declaration
3://-----------------------------------------------
5: using System; 6:
7:class net_vars
8:{
9:public static void Main()
10:{
11:System.Int32 my_variable = 4;
12:System.Double PI = 3.1459;
14:Console.WriteLine(“\nmy_variable is {0}”, my_variable );
15:Console.WriteLine(“\nPI is {0}”, PI );
16:}
17:}
my_variable is 4
OUTPUT
PI is 3. 1459
74 |
Day 2 |
ANALYSIS Lines 11–12 declare an int and a double. Lines 14–15 print these values. This listing operates like those you’ve seen earlier, except that it uses the .NET data
types.
In your C# programs, you should use the simple data types rather than the .NET types. All the functionality of the .NET types is available to you in the simpler commands that C# provides. However, you should understand that the simple C# data types translate to
.NET equivalents. You’ll find that all other programming languages that work with the Microsoft .NET types also have data types that translate to these .NET types.
Note
The Common Type System (CTS) is a set of rules that data types within the CLR must adhere to. The simple data types within C# adhere to these rules, as do the .NET data types. If a language follows the CTS in creating its data types, the data created and stored should be compatible with other programming languages that also follow the CTS.
Literals Versus Variables
Often you will want to type a number or value into your source code. A literal value stands on its own within the source code. For example, in the following lines of code, the number 10 and the value “Bob is a fish” are literal values.
int x = 10;
myStringValue = “Bob is a fish”;
Working with Numeric Literals
In many of the examples, you have used numeric literals. By default, a numeric literal is either an integer or a double. It is an int if it is a whole number, and it is a double if it is a floating-point number. For example, consider the following:
nbr = 100;
By default, the numeric literal 100 is considered to be of type int, regardless of what data type the nbr variable is. Now consider the following:
nbr = 99.9;
In this example, 99.9 is also a numeric literal; however, it is of type double by default. Again, this is regardless of the data type that nbr is. This is true even though 99.9 could be stored in a type float. In the following line of code, is 100. an int or a double?
x = 100.;

Understanding C# Programs |
75 |
This is a tough one. If you guessed int, you are wrong. Because there is a decimal included with the 100, it is a double.
Understanding the Integer Literal Defaults
When you use an integer value, it is actually put into an int, uint, long, or ulong, depending on its size. If it will fit in an int or a uint, it will be. If not, it will be put into a long or a ulong. If you want to specify the data type of the literal, you can use a suffix on the
literal. For example, to use the number 10 as a literal long value (signed or unsigned), 2 you write it like the following:
10L;
You can make an unsigned value by using a u or a U. If you want an unsigned literal long value, you can combine the two suffixes: ul.
Note
The Microsoft C# compiler gives you a warning if you use a lowercase l to declare a long value literal. The compiler provides this warning to make you aware that it is easy to mistake a lowercase l with the number 1.
Understanding Floating-Point Literal Defaults
As stated earlier, by default, a decimal value literal is a double. To declare a literal that is of type float, you include f or F after the number. For example, to assign the number 4.4 to a float variable, my_float, you use the following:
my_float = 4.4f;
To declare a literal of type decimal, you use a suffix of m or M. For example, the following line declares my_decimal to be equal to the decimal number 1.32.
my_decimal = 1.32m;
Working with Boolean Literals (true and false)
We have already covered Boolean literals. The values true and false are literal. They also happen to be keywords.
Understanding String Literals
When you put characters together, they make words, phrases, and sentences. In programming parlance, a group of characters is called a string. A string can be identified because it is contained within a set of double quotes. For example, the Console.WriteLine routine

76 |
Day 2 |
uses a string. A string literal is any set of characters between double quotes. The following are examples of strings:
“Hello, World!”
“1234567890”
Because the numbers are between quotation marks, the last example is treated as a string literal rather than as a numeric literal.
Note
You can use any of the special characters from Table 2.3 inside a string.
Creating Constants
In addition to using literals, sometimes you want to put a value in a variable and freeze it. For example, if you declare a variable called PI and you set it to 3.14159, you want it to stay 3.14159. There is no reason to ever change it. Additionally, you want to prevent people from changing it.
To declare a variable to hold a constant value, you use the const keyword. For example, to declare PI as stated, you use the following:
const float PI = 3.1459;
You can use PI in a program; however, you will never be able to change its value. The const keyword freezes its contents. You can use the const keyword on any variable of any data type.
Tip
To help make it easy to identify constants, you can enter their names in all capital letters.
A Peek at Reference Types
To this point, you have seen a number of different data types. C# offers two primary ways of storing information: by value (byval) and by reference (byref). The basic data types that you have learned about store information by value.
When a variable stores information by value, the variable contains the actual information. For example, when you store 123 in an integer variable called x, the value of x is 123. The variable x actually contains the value 123.
Understanding C# Programs |
77 |
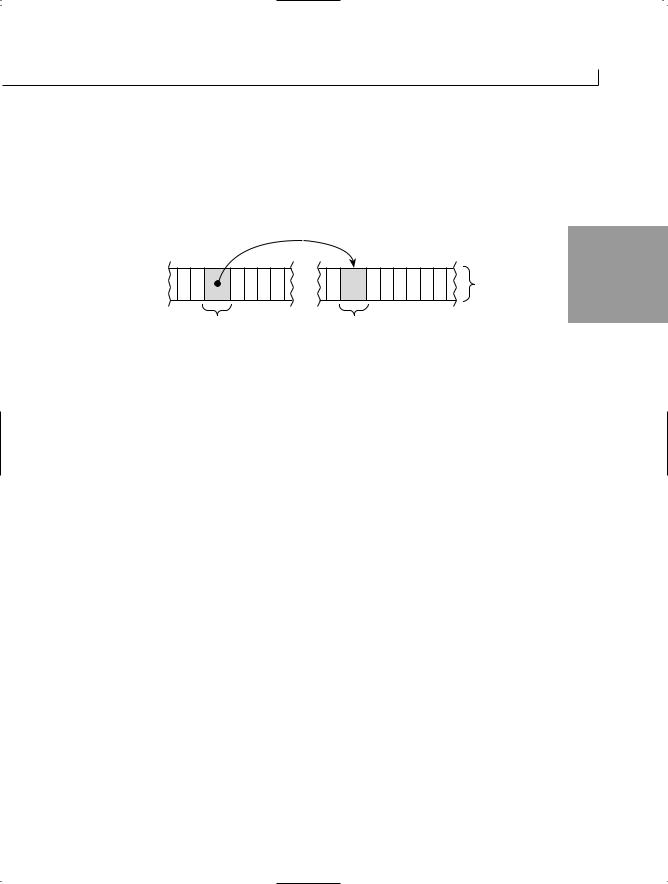
Storing information by reference is a little more complicated. If a variable stores by reference rather than storing the information in itself, it stores the location of the information. In other words, it stores a reference to the information. For example, if x is a “by reference” variable, it contains information on where the value 123 is located; it does not store the value 123. Figure 2.2 illustrates the difference.
FIGURE 2.2 |
|
2 |
By reference versus by |
|
|
|
|
|
value. |
1 2 3 |
Memory |
|
||
X_byref |
X_byval |
|
The data types used by C# that store by reference are listed here:
•Classes
•Strings
•Interfaces
•Arrays
•Delegates
Each of these data types is covered in detail throughout the rest of this book.
Summary
Today’s lesson was the longest in the book. It builds some of the foundation that will be used to teach you C#. Today you started by learning about some of the basic parts of a C# application. You learned that comments help make your programs easier to understand.
In addition, you learned about the basic parts of a C# application, including whitespace, C# keywords, literals, and identifiers. Looking at an application, you saw how these parts are combined to create a complete listing. This included seeing a special identifier used as a starting point in an application: Main().
After you examined a listing, you dug into storing basic information in a C# application using variables. You learned how the computer stores information. You focused on the data types that store data by value, including int, uint, long, ulong, bool, char, short, ushort, float, double, decimal, byte, and ubyte. In addition to learning about the data types, you learned how to name and create variables. You also learned the basics of

78 |
Day 2 |
setting values in these variables, including the use of literals. Table 2.5 lists the data types and information about them.
TABLE 2.5 C# Data Types
C# Data |
NET Data |
Size |
Low |
High |
Type |
Type |
in Bytes |
Value |
Value |
|
|
|
|
|
sbyte |
System.Sbyte |
1 |
-128 |
127 |
byte |
System.Byte |
1 |
0 |
255 |
short |
System.Int16 |
2 |
-32,768 |
32,767 |
ushort |
System.UInt16 |
2 |
0 |
65,535 |
int |
System.Int32 |
4 |
-2,147,483,648 |
2,147,483,647 |
uint |
System.UInt32 |
4 |
0 |
4,294,967,295 |
long |
System.Int64 |
8 |
-9,223,372,036, |
9,223,372,036,854,775,807 |
|
|
|
854,775,808 |
|
ulong |
System.UInt64 |
char |
System.Char |
float |
System.Single |
double |
System.Double |
bool |
System.Boolean |
decimal |
System.Decimal |
8 |
0 |
18,446,744,073,709,551,615 |
2 |
0 |
65,535 |
4 |
-45 |
38 |
1.5×10 |
3.4×10 |
|
8 |
-324 |
308 |
5.0×10 |
1.7×10¹⁰ |
|
1 |
false (0) |
true (1) |
16 |
-28 |
28 |
1.0×10 |
approx. 7.9×10 |
Q&A
QWhy shouldn’t all numbers be declared as the larger data types instead of the smaller data types?
AAlthough it might seem logical to use the larger data types, this would not be efficient. You should not use any more system resources (memory) than you need.
Q What happens if you assign a negative number to an unsigned variable?
AThe compiler returns an error saying that you can’t assign a negative number to an unsigned variable if you do this with a literal. If you do a calculation that causes an unsigned variable to go below 0, you get erroneous data. On later days, you will learn how to check for these erroneous values.
QA decimal value is more precise than a float or a double value. What happens with rounding when you convert from these different data types?

Understanding C# Programs |
79 |
AWhen converting from a float, double, or decimal to one of the whole-number variable types, the value is rounded. If a number is too big to fit into the variable, an error occurs.
When a double is converted to a float that is too big or too small, the value is represented as infinity or 0, respectively.
When a value is converted from a float or a double to a decimal, the value is
rounded. This rounding occurs after 28 decimal places and occurs only if neces- 2 sary. If the value being converted is too small to be represented as a decimal, the
new value is set to 0. If the value is too large to store in the decimal, an error occurs.
For conversions from decimal to float or double, the value is rounded to the nearest value that the float or double can hold. Remember, a decimal has better precision than a float or a double. This precision is lost in the conversion.
QWhat other languages adhere to the Common Type System (CTS) in the Common Language Runtime (CLR)?
AMicrosoft Visual Basic .NET (Version 7) and Microsoft Visual C++ .NET (Version 7) both support the CTS. Additionally, versions of a number of other languages are ported to the CTS. These include Python, COBOL, Perl, Java, and more. Check out the Microsoft Web site for additional languages.
Workshop
The Workshop provides quiz questions to help you solidify your understanding of the material covered and exercises to provide you with experience in using what you’ve learned. Try to understand the quiz and exercise answers before continuing to the next day’s lesson. Answers are provided on the CD.
Quiz
1.What three types of comments can you use in a C# program and how is each of the three types of comments entered into a C# program?
2.What impact does whitespace have on a C# program?
3.Which of the following are C# keywords?
field, cast, as, object, throw, baseball, catch, football, fumble, basketball
4.What is a literal?
5.What by value data types are available in C#?
6.What is the difference between a signed variable and an unsigned variable?

80 |
Day 2 |
7.What is the smallest data type that you can use to store the number 55?
8.What is the biggest number that a type short variable can hold?
9.What numeric value is the character B?
10.Name three of the reference data types.
11.Which floating-point data type has the best precision?
12.What .NET data type is equivalent to the C# int data type?
Exercises
1.Enter, compile, and run the following program. What does it do?
1:// Ex0201.cs - Exercise 1 for Day 2
2://-----------------------------------------------
3:
4:class Ex0201
5:{
6:public static void Main()
7:{
8:int ctr;
9:
10:for( ctr = 1; ctr <= 10; ctr++ )
11:{
12:System.Console.Write(“{0:D3} “, ctr);
13:}
14:}
15:}
2.Bug Buster: The following program has a problem. Enter it in your editor and compile it. Which lines generate error messages?
1:// Bugbust.cs
2://-----------------------------------------------
3:
4:class Bugbust
5:{
6:public static void Main()
7:{
8:System.Console.WriteLine(“\nA fun number is {1}”, 123 );
9:}
10:}
3.Change the range of values in Listing 2.6 to print the lowercase letters.
4.Write the line of code that declares a variable named xyz of type float, and assign the value of 123.456 to it.

Understanding C# Programs
5.Which of the following variable names are valid?
a.X
b.PI
c.12months
d.sizeof
e.nine
6.Bug Buster: The following program has a problem. Enter it in your editor and compile it. Which lines generate error messages?
1://BugBuster
2://--------------------------------------------------------------
3:using System;
81
2
4:
5:class BugBuster
6:{
7:public static void Main()
8:{
9:double my_double;
10:decimal my_decimal;
12:my_double = 3.14;
13:my_decimal = 3.14;
15:Console.WriteLine(“\nMy Double: {0}”, my_double);
16:Console.WriteLine(“\nMy Decimal: {0}”, my_decimal);
18:}
19:}
7.On Your Own: Write a program that declares two variables of each data type and assigns the values 10 and 1.879 to each variable.


WEEK 1
DAY 3
Manipulating Values in
Your Programs
Now that you know how to store information in variables, you’ll want to do something with that information. Most likely, you’ll want to manipulate it by making changes to it. For example, you might want to use the radius of a circle to find the area of the circle. Today you…
•Learn two ways of displaying basic information.
•Discover the types and categories of operators available in C#.
•Manipulate information using the different operators.
•Change program flow using the if command.
•Understand which operators have precedence over others.
•Investigate variable and value conversions.
•Explore bitwise operations—if you’re brave enough.
84 |
Day 3 |
Displaying Basic Information
Before you learn how to manipulate values stored in variables, it is worth taking a few minutes to learn how to display basic information. You can use two routines to display information. When you understand these routines, you will be able to display basic information to the console.
The two routines that you will use throughout this book to display basic information are as follows:
•
•
System.Console.WriteLine()
System.Console.Write()
Both print information to the screen in the same manner, with only one small difference. The WriteLine() routine writes information and then goes to a new line. The Write()routine does not go to a new line when information is written.
The information that you will display on the screen is written between the parentheses. If you are printing text, you include the text between the parentheses and within double quotes. For example, the following prints the text Hello World:
System.Console.WriteLine(“Hello World”);
This prints Hello World on the screen. The following examples illustrate other text being printed:
System.Console.WriteLine(“This is a line of text”);
System.Console.WriteLine(“This is a second line of text”);
If you execute these consecutively, you see the following displayed:
This is a line of text
This is a second line of text
Now consider the following two lines. If these execute consecutively, what do you see printed?
System.Console.WriteLine(“Hello “);
System.Console.WriteLine(“World!”);
If you guessed that these would print
Hello World!
you are not correct! Instead, the following is printed:
Hello
World!

Manipulating Values in Your Programs |
85 |
Notice that each word is on a separate line. If you execute the two lines using the Write() routine instead, you get the results you want:
Hello World!
As you can see, the difference between the two routines is that WriteLine() automatically goes to a new line after the text is displayed, whereas Write() does not.
Displaying Additional Information
In addition to printing text between quotation marks, you can pass values to be printed within the text. Consider the following example:
int nbr = 456; |
|
System.Console.WriteLine(“The following is a number: {0}”, nbr); |
|
This prints the following line: |
3 |
The following is a number: 456
As you can see, the {0} gets replaced with the value that follows the quoted text. In this case, the value is that of a variable, nbr, which equals 456. The format is as shown here:
System.Console.WriteLine(“Text”, value);
Text is almost any text that you want to display. The {0} is a placeholder for a value. The brackets indicate that this is a placeholder. The 0 is an indicator for using the first item following the quotation marks. A comma separates the text from the value to be placed in the placeholder.
You can have more than one placeholder in a printout. Each placeholder is given the next sequential number:
System.Console.Write(“Value 1 is {0} and value 2 is {1}”, 123, “Brad”);
This prints the following line:
Value 1 is 123 and value 2 is Brad
Listing 3.1 presents System.Console.Write and System.Console.WriteLine in action.
LISTING 3.1 Display.cs—Using WriteLine() and Write()
1:// Display.cs - printing with WriteLine and Write
2://-----------------------------------------------
4:class Display
5:{
6:

86 |
Day 3 |
LISTING 3.1 continued
7: { 8:
9:int iNbr = 321;
10:double dNbr = 123.45;
12:System.Console.WriteLine(“First WriteLine Line”);
13:System.Console.WriteLine(“Second WriteLine Line”);
15:System.Console.Write(“First Write Line”);
16:System.Console.Write(“Second Write Line”);
18:// Passing literal parameters
19:System.Console.WriteLine(“\nWriteLine: Parameter = {0}”, 123 );
20:System.Console.Write(“Write: Parameter = {0}”, 456);
21:
22:// Passing variables
23:System.Console.WriteLine(“\nWriteLine: val1 = {0} val2 = {1}”,
24: |
iNbr, dNbr ); |
25:System.Console.Write(“Write: val1 = {0} val2 = {1}”, iNbr, dNbr);
26:}
27:}
Remember that to compile this listing from the command line, you enter the following:
csc Display.cs
If you are using an integrated development tool, you can select the Compile option.
First WriteLine Line
Second WriteLine Line
First Write LineSecond Write Line
WriteLine: Parameter = 123
Write: Parameter = 456
WriteLine: val1 = 321 val2 = 123.45
Write: val1 = 321 val2 = 123.45
This listing defines two variables that will be printed later in the listing. Line 9 declares an integer and assigns the value 321 to it. Line 10 defines a double and
assigns the value 123.45.
Lines 12–13 print two pieces of text using System.Console.WriteLine(). You can see from the output that each of these prints on a separate line. Lines 15–16 show the System.Console.Write() routine. These two lines print on the same line. There is no return linefeed after printing. Lines 19–20 show each of these routines with the use of a parameter. Lines 23 and 25 also show these routines printing multiple values from variables.
You will learn more about using these routines throughout this book.

Manipulating Values in Your Programs |
87 |
Caution |
The first placeholder is numbered 0, not 1. |
|
|
Manipulating Variable Values with Operators |
|
Now that you understand how to display the values of variables, it is time to focus on |
|
manipulating the values in the variables. Operators are used to manipulate information. |
|
You have used a number of operators in the programming examples up to this point. |
|
Operators are used for addition, multiplication, comparison, and more. |
|
Operators can be broken into a number of categories: |
|
• The basic assignment operator |
3 |
•Mathematical/arithmetic operators
•Relational operators
•The conditional operator
•Other operators (type, size)
Each of these categories and the operators within them are covered in detail in the following sections. In addition to these categories, it is important to understand the structure of operator statements. Three types of operator structures exist:
•Unary
•Binary
•Ternary
Unary Operator Types
Unary operators are operators that impact a single variable. For example, to have a negative 1, you type this:
-1
If you have a variable called x, you change the value to a negative by using this line:
-x
The negative requires only one variable, so it is unary. The format of a unary variable is one of the following, depending on the specific operator:
[operator][variable]

88 |
Day 3 |
or
[variable][operator]
Binary Operator Types
Whereas unary operator types use only one variable, binary operator types work with two variables. For example, the addition operator is used to add two values. The format of the binary operator types is as follows:
[variable1][operator][variable2]
Examples of binary operations in action are shown here:
5 + 4
3 – 2
100.4 – 92348.67
You will find that most of the operators fall into the binary operator type.
Ternary Operator Types
Ternary operators are the most complex operator type to work with. As the name implies, this type of operator works on three variables. C# has only one true ternary operator, the conditional operator. You will learn about it later today. For now, know that ternary operators work with three variables.
Understanding Punctuators
Before jumping into the different categories and specific operators within C#, it is important to understand about punctuators. Punctuators are a special form of operator that helps you format your code, do multiple operations at once, and simply signal information to the compiler. The punctuators that you need to know about are listed here:
•Semicolon—The primary use of the semicolon is to end each C# statement. A semicolon is also used with a couple of the C# statements that control program flow. You will learn about the use of the semicolon with the control statements on Day 4, “Controlling Your Program’s Flow.”
•Comma—The comma is used to stack multiple commands on the same line. You saw the comma in use on Day 2, “Understanding C# Programs,” in a number of the examples. The most common time to use the comma is when declaring multiple variables of the same type:
int var1, var2, var3;

Manipulating Values in Your Programs |
89 |
•Parentheses, ()—Parentheses are used in multiple places. You will see later in today’s lesson that you can use parentheses to force the order in which your code will execute. Additionally, parentheses are used with functions.
•Braces, {}—Braces are used to group pieces of code. You have seen braces used to encompass classes in many of the examples. You also should have noticed that braces are always used in pairs.
Punctuators work the same way punctuation within a sentence works. For example, you end a sentence with a period or another form of punctuation. In C#, you end a “line” of code with a semicolon or other punctuator. The word line is in quotation marks because a line of code might actually take up multiple lines in a source listing. As you learned on Day 2, whitespace and new lines are ignored.
3
Note |
You can also use braces within the routines that you create to block off |
|
code. The code put between two braces, along with the braces, is called a |
||
|
||
|
block. |
Moving Values with the Assignment
Operator
It is now time to learn about the specific operators available in C#. The first operator that you need to know about is the basic assignment operator, which is an equals sign (=). You’ve seen this operator already in a number of the examples in earlier lessons.
The basic assignment operator is used to assign values. For example, to assign the value 142 to the variable x, you type this:
x = 142;
This compiler places the value that is on the right side of the assignment operator in the variable on the left side. Consider the following:
x = y = 123;
This might look a little weird; however, it is legal C# code. The value on the right of the equals sign is evaluated. In this case, the far right is 123, which is placed in the variable y. Then the value of y is placed in the variable x. The end result is that both x and y equal 123.

90 |
Day 3 |
Caution |
You cannot do operations on the left side of an assignment operator. For |
|
example, you can’t do this: |
||
|
||
|
1 + x = y; |
|
|
Nor can you put literals or constants on the left side of an assignment |
|
|
operator. |
|
|
|
Working with Mathematical/Arithmetic Operators
Among the most commonly used operators are the mathematical operators. All the basic math functions are available within C#, including addition, subtraction, multiplication, division, and modulus (remaindering). Additionally, compound operators make doing some of these operations more concise.
Adding and Subtracting
For addition and subtraction, you use the additive operators. As you should expect, for addition, the plus operator (+) is used. For subtraction, the minus (-) operator is used. The general format of using these variables is as follows:
NewVal = Value1 + Value2;
NewVal2 = Value1 – Value2;
In the first statement, Value2 is being added to Value1 and the result is placed in NewVal. When this command is done, Value1 and Value2 remain unchanged. Any pre-existing values in NewVal are overwritten with the result.
For the subtraction statement, Value2 is subtracted from Value1 and the result is placed in NewVal2. Again, Value1 and Value2 remain unchanged, and the value in NewVal2 is overwritten with the result.
Value1 and Value2 can be any of the value data types, constants, or literals. You should note that NewVal must be a variable; however, it can be the same variable as Value1 or Value2. For example, the following is legal as long as Variable1 is a variable:
Variable1 = Variable1 – Variable2;
In this example, the value in Variable2 is subtracted from the value in Variable1. The result is placed into Variable1, thus overwriting the previous value that Variable1 held. The following example is also valid:

Manipulating Values in Your Programs |
91 |
Variable1 = Variable1 – Variable1;
In this example, the value of Variable1 is subtracted from the value of Variable1. Because these values are the same, the result is 0. This 0 value is then placed into Variable1, overwriting any previous value.
If you want to double a value, you enter the following:
Variable1 = Variable1 + Variable1;
Variable1 is added to itself, and the result is placed back into Variable1. The end result is that you double the value in Variable1.
Doing Multiplicative Operations
An easier way to double the value of a variable is to multiply it by two. Three multiplica- |
3 |
tive operators commonly are used in C#: |
•For multiplication, the multiplier (or times) operator, which is an asterisk (*)
•For division, the divisor operator, which is a forward slash (/)
•For obtaining remainders, the remaindering (also called modulus) operator, which is the percentage sign (%)
Multiplication and division are done in the same manner as addition and subtraction. To multiply two values, you use the following format:
NewVal = Value1 * Value2;
For example, to double the value in Val1 and place it back into itself (as seen with the last addition example), you can enter the following:
Val1 = Val1 * 2;
This is the same as this line:
Val1 = 2 * Val1;
Again, division is done the same way:
NewVal = Value1 / Value2;
This example divides Value1 by Value2 and places the result in NewVal. To divide 2 by 3, you write the following:
answer = 2 / 3;
Sometimes when doing division, you want only the remainder. For example, I know that 3 will go into 4 one time; however, I also would like to know that I have 1 remaining.

92 |
Day 3 |
You can get this remainder using the remaindering (also called modulus) operator, which is the percentage sign (%). For example, to get the remainder of 4 divided by 3, you enter this:
Val = 4 % 3;
The result is that Val is 1.
Consider another example that is near and dear to my heart. You have three pies that can be cut into six pieces. If 13 people each want a piece of pie, how many pieces of pie are left over for you?
To solve this, take a look at Listing 3.2.
LISTING 3.2 Pie.cs—Number of Pieces of Pie for Me
1:// Pie.cs - Using the modulus operators
2://------------------------------------------------
3:class Pie
4:{
5:public static void Main()
6:{
7:int PiecesForMe = 0;
8:int PiecesOfPie = 0;
9:
10: PiecesOfPie = 3 * 6; 11:
12: PiecesForMe = PiecesOfPie % 13; 13:
14:System.Console.WriteLine(“Pieces Of Pie = {0}”, PiecesOfPie);
15:System.Console.WriteLine(“Pieces For Me = {0}”, PiecesForMe);
16:}
17:}
Pieces Of Pie = 18
Pieces For Me = 5
Listing 3.2 presents the use of the multiplication and modulus operators. Line 10 illustrates the multiplication operator, which is used to determine how many
pieces of pie there are. In this case, there are six pieces in three pies (so, 6 × 3). Line 12 then uses the modulus operator to determine how many pieces are left for you. As you can see from the information printed in Lines 14–15, there are 18 pieces of pie, and 5 will be left for you.

Manipulating Values in Your Programs |
93 |
Working with the Compound Arithmetic Assignment Operators
You’ve learned about the basic assignment operator; however, there are also other assignment operators—the compound assignment operators (see Table 3.1).
TABLE 3.1 Compound Arithmetic Assignment Operators
Operator |
Description |
Noncompound Equivalent |
+= |
x += 4 |
||
-= |
x -= 4 |
||
*= |
x *= 4 |
||
/= |
x |
/= |
4 |
%= |
x |
%= |
4 |
x = x + 4 |
|
||||
x = x – 4 |
|
||||
x = x * 4 |
|
||||
x |
= |
x |
/ |
4 |
3 |
x |
= |
x |
% |
4 |
|
The compound operators provide a concise method for performing a math operation and assigning it to a value. For example, if you want to increase a value by 5, you use the following:
x = x + 5;
Or, you can use the compound operator:
x += 5;
As you can see, the compound operator is much more concise.
Tip
Although the compound operators are more concise, they are not always the easiest to understand in code. If you use the compound operators, make sure that what you are doing is clear, or remember to comment your code.
Doing Unary Math
All the arithmetic operators that you have seen so far have been binary. Each has required two values to operate. A number of unary operators also work with just one value or variable. The unary arithmetic operators include the increment operator (++) and the decrement operator (--).
These operators add 1 to the value or subtract 1 from the value of a variable. The following example adds 1 to x:
++x;
94 |
Day 3 |
It is the same as saying this:
x = x + 1;
Additionally, the following subtracts 1 from x:
--x;
It is the same as saying this:
x = x – 1;
Tip
The increment and decrement operators are handy when you need to step through a lot of values one by one.
The increment and decrement operators have a unique feature that causes problems for a lot of newer programmers. Assume that the value of myNbr is 10. Look at the following line of code:
NewNbr = ++myNbr;
After this statement executes, what will the values of myNbr and newNbr be? You should be able to guess that the value of myNbr will be 11 after it executes. The value of newNbr will also be 11. Now consider the following line of code; again consider the value of myNbr to start at 10.
newNbr = myNbr++;
After this statement executes, what will the values of myNbr and newNbr be? If you said that they would both be 11 again, you are wrong! After this line of code executes, myNbr will be 11; however, newNbr will be 10. Confused?
It is simple: The increment operator can operate as a pre-increment operator or a post- increment operator. If it operates as a pre-increment operator, the value is incremented before everything else. If it operates as a post-increment operator, it happens after everything else. How do you know whether it is preor post-? Easy. If it is before the variable, ++myNbr, it is pre-. If it is after the variable, myNbr++, it is post-. The same is true of the decrement operator. Listing 3.3 illustrates the preand postoperations of the increment and decrement operators.

Manipulating Values in Your Programs |
95 |
LISTING 3.3 Prepost.cs—Using the Increment and Decrement Unary Operators
1:// Prepost.cs - Using preversus post-increment operators
2://----------------------------------------------------
3:
4:class Prepost
5:{
6:public static void Main()
7:{
8:int Val1 = 0;
9:int Val2 = 0;
10:
11: System.Console.WriteLine(“Val1 = {0} Val2 = {1}”, Val1, Val2); 12:
13:System.Console.WriteLine(“Val1 (Pre) = {0} Val2 = (Post) {1}”,
14:++Val1, Val2++);
15: |
3 |
|
16:System.Console.WriteLine(“Val1 (Pre) = {0} Val2 = (Post) {1}”,
17:++Val1, Val2++);
18:
19:System.Console.WriteLine(“Val1 (Pre) = {0} Val2 = (Post) {1}”,
20:++Val1, Val2++);
21:}
22:}
Val1 = 0 Val2 = 0
Val1 (Pre) = 1 Val2 = (Post) 0
Val1 (Pre) = 2 Val2 = (Post) 1
Val1 (Pre) = 3 Val2 = (Post) 2
It is important to understand what is happening in Listing 3.3. In Lines 8–9, two variables are again being initialized to 0. These values are printed in Line 11. As you can see from the output, the result is that Val1 and Val2 equal 0. Line 13, which con-
tinues to Line 14, prints the values of these two variables again. The values printed, though, are ++Val1 and Val2++. As you can see, the pre-increment operator is being used on Val1, and the post-increment operator is being used on Val2. The results can be seen in the output. Val1 is incremented by 1 and then printed. Val2 is printed and then incremented by 1. Lines 16 and 19 repeat these same operations two more times.
DO |
DON’T |
Do use the compound operators to make your math routines concise.
Don’t confuse the post-increment and pre-increment operators. Remember that the pre-increment adds before the variable, and the post-increment adds after it.

96 |
Day 3 |
Making Comparisons with Relational Operators
Questions are a part of life. In addition to asking questions, it is often important to compare things. In programming, you compare values and then execute code based on the answer. The relational operators are used to compare two values. The relational operators are listed in Table 3.2.
TABLE 3.2 Relational Operators
Operator |
Description |
> |
Greater than |
< |
Less than |
== |
Equal to |
!= |
Not equal to |
>= |
Greater than or equal to |
<= |
Less than or equal to |
|
|
When making comparisons with relational operators, you get one of two results: true or false. Consider the following comparisons made with the relational operators:
5 |
< |
10 |
5 is less than 10, so this is true. |
|
5 |
> |
10 |
5 is not greater than 10, so this is false. |
|
5 |
== |
10 |
5 does not equal 10, so this is false. |
|
5 |
!= |
10 |
5 does not equal 10, so this is true. |
|
As you can see, each of these results is either true or false. Knowing that you can check the relationship of values should be great for programming. The question is, how do you use these relations?
Using the if Statement
The value of relational operators is that they can be used to make decisions to change the flow of the execution of your program. The if keyword can be used with the relational operators to change the program flow.
The if keyword is used to compare two values. The standard format of the if command is as follows:
if( val1 [operator] val2) statement(s);

Manipulating Values in Your Programs |
97 |
operator is one of the relational operators; val1 and val2 are variables, constants, or literals; and statement(s) is a single statement or a block containing multiple statements. Remember that a block is one or more statements between brackets.
If the comparison of val1 to val2 is true, the statements are executed. If the comparison of val1 to val2 is false, the statements are skipped. Figure 3.1 illustrates how the if command works.
FIGURE 3.1
The if command.
true
Condition Statement(s)
3
false
Applying this to an example helps make this clear. Listing 3.4 presents simple usage of the if command.
LISTING 3.4 iftest.cs—Using the if Command
1:// iftest.csThe if statement
2://----------------------------------------------------
4:class iftest
5:{
6:public static void Main()
7:{
8:int Val1 = 1;
9:int Val2 = 0;
10:
11: System.Console.WriteLine(“Getting ready to do the if...”); 12:
13:if (Val1 == Val2)
14:{
15:System.Console.WriteLine(“If condition was true”);
16:}
17:System.Console.WriteLine(“Done with the if statement”);
18:}
19:}
Getting ready to do the if...
OUTPUT Done with the if statement

98 |
Day 3 |
This listing uses the if statement in Line 13 to compare two values to see whether they are equal. If they are, it prints Line 15. If not, it skips Line 15.
Because the values assigned to Val1 and Val2 in Lines 8–9 are not equal, the if condition fails and Line 15 is not printed.
Change Line 13 to this:
if (Val1 != Val2)
Rerun the listing. This time, because Val1 does not equal Val2, the if condition evaluates to true. The following is the output:
Getting ready to do the if...
If condition was true
Done with the if statement
Caution |
There is no semicolon at the end of the first line of the if command. For |
|
example, the following is incorrect: |
||
|
if( val != val );
{
//Statements to do when the if evaluates to true (which will
//never happen)
}
val should always equal val, so val != val will be false and the line // Statements to do when the if evaluates to true... should never execute. Because there is a semicolon at the end of the first line, the if statement is ended. This means that the next statement after the if statement is executed—the line //Statements to do when the if evaluates to true.... This line always executes, regardless of whether the if evaluates to true or, as in this case, to false. Don’t make the mistake of including a semicolon at the end of the first line of an if statement.
Conditional Logical Operators
The world is rarely a simple place. In many cases, you will want to do more than one comparison to determine whether a block of code should be executed. For example, you might want to execute some code if a person is a female and at least 21 years old. To do this, you execute an if statement within another if statement. The following pseudocode illustrates this:
if( sex == female )
{
if( age >= 21 )
{

Manipulating Values in Your Programs |
99 |
// The person is a female that is 21 years old or older.
}
}
There is an easier way to accomplish this—by using a conditional logical operator.
The conditional logical operators enable you to do multiple comparisons with relational operators. The two conditional logical operators that you will use are the AND operator (&&) and the OR operator (||).
The Conditional AND Operator
Sometimes you want to verify that a number of conditions are all met. The previous example was one such case. The logical AND operator (&&) enables you to verify that all conditions are met. You can rewrite the previous example as follows:
If( sex == female && age >= 21 |
) |
3 |
{ |
|
|
// This person is a female |
that is 21 years old or older. |
|
} |
|
|
You can actually place more than two relationships within a single if statement. Regardless of the number of comparisons, the comparisons on each side of the AND (&&) must be true. For example:
if( x < 5 && y < 10 && z > 10)
{
// statements
}
The statements line is reached only if all three conditions are met. If any of the three conditions in the if statements is false, the statements are skipped.
The Conditional OR Operator
Also sometimes, you do not want all the conditions to be true: Instead, you need only one of a number of conditions to be true. For example, you want might want to execute some code if the day of week is Saturday or Sunday. In these cases, you use the logical OR operator (||). The following illustrates this with pseudocode:
if( day equals sunday OR day equals saturday )
{
// do statements
}
In this example, the statements are executed if the day equals either sunday or saturday. Only one of these conditions needs to be true for the statements to be executed. Listing 3.5 presents both the logical AND and OR in action.

100 |
Day 3 |
LISTING 3.5 and.cs—Using the Logical AND and OR
1:// and.csUsing the conditional AND and OR
2://----------------------------------------------------
4:class andclass
5:{
6:public static void Main()
7:{
8:int day = 1;
9:char sex = ‘f’;
10:
11:System.Console.WriteLine(“Starting tests... (day:{0}, sex:{1})”,
12: |
|
day, sex ); |
|
13: |
|
|
|
14: |
if ( day >= 1 && day <=7 ) |
//day |
from 1 to 7? |
15:{
16:System.Console.WriteLine(“Day is from 1 to 7”);
17:}
18:if (sex == ‘m’ || sex == ‘f’ ) // Male or female?
19:{
20:System.Console.WriteLine(“Sex is male or female.”);
21:}
22:
23:System.Console.WriteLine(“Done with the checks.”);
24:}
25:}
Starting tests... (day:1, sex:f)
Day is from 1 to 7
Sex is male or female.
Done with the checks.
This listing illustrates both the && and || operators. In Line 14, you can see the ANALYSIS AND operator (&&) in action. For this if statement to evaluate to true, the day
must be greater than or equal to 1 as well as less than or equal to 7. If the day is 1, 2, 3, 4, 5, 6, or 7, the if condition evaluates to true and Line 16 prints. Any other number results in the if statement evaluating to false, and thus Line 16 will be skipped.
Line 18 shows the OR (||) operator in action. Here, if the value in sex is equal to the character ‘m’ or the character ‘f’, line 20 is printed; otherwise, Line 20 is skipped.
Caution |
Be careful with the if condition in Line 18. This checks for the characters |
|
‘m’ and ‘f’. Notice these are lowercase values, which are not the same as |
||
|
||
|
the uppercase values. If you set sex equal to ‘F’ or ‘M’ in Line 9, the if |
|
|
statement in line 18 would still fail. |
|
|
|

Manipulating Values in Your Programs |
101 |
Change the values in Lines 8–9, and rerun the listing. You’ll see that you get different output results based on the values you select. For example, change Lines 8–9 to the following:
8:int day = 9;
9:char sex = ‘x’;
Here are the results of rerunning the program:
Starting tests... (day:9, sex:x)
OUTPUT Done with the checks.
Other times you will want to use the AND (&&) and OR (||) commands together. For example, you might want to execute code if a person is 21 and is either a male or a female. This can be accomplished by using the AND and OR statements together. You must be careful when doing this, though. An AND operator expects the values on both
sides of it to be true. An OR statement expects one of the values to be true. For the previ- 3 ous example, you might be tempted to enter the following (note that this is pseudocode):
if( age >= 21 AND gender == male OR gender == FEMALE) // statement
This will not accomplish what you want. If the person is 21 or older and is a female, the statement will not execute. The AND portion will result in being false. To overcome this problem, you can force how the statements are evaluated using the parenthesis punctuator. To accomplish the desired results, you would change the previous example to this:
if( age >= 21 AND (gender == male OR gender == female)) // statement
The execution always starts with the innermost parenthesis. In this case, the statement (gender == male OR gender == female) is evaluated first. Because this uses OR, this portion of the statement will evaluate to true if either side is true. If this is true, the AND will compare the age value to see whether the age is greater than or equal to 21. If this proves to be true as well, the statement will execute.
Tip
Use parentheses to make sure that you get code to execute in the order you want.
DO |
DON’T |
Do use parentheses to make complex math and relational operations easier to understand.
Don’t confuse the assignment operator (=) with the relational equals operator (==).

102 |
Day 3 |
Understanding Logical Bitwise Operators
You might want to use three other logical operators: the logical bitwise operators. Although the use of bitwise operations is beyond the scope of this book, I’ve included a section near the end of today’s lesson called “For Those Brave Enough.” This section explains bitwise operations, the three logical bitwise operators, and the bitwise shift operators.
The bitwise operators obtain their name from the fact that they operate on bits. A bit is a single storage location that stores either an on or an off value (equated to 0 or 1). In the section at the end of today’s lesson, you will learn how the bitwise operators can be used to manipulate these bits.
Understanding the Type Operators
As you begin working with classes and interfaces later in this book, you will need the type operators. Without understanding interfaces and classes, it is hard to fully understand these operators. For now, be aware that you will need a number of operators later:
•
•
•
typeof
is
as
Using the sizeof Operator
You saw the sizeof operator in action on Day 2. This operator is used to determine the size of a value in memory.
Caution |
Because the sizeof operator manipulates memory directly, avoid its use, if |
|
possible. |
||
|
Shortcutting with the Conditional Operator
C# has one ternary operator: the conditional operator. The conditional operator has the following format:
Condition ? if_true_statement : if_false_statement;
As you can see, there are three parts to this operation, with two symbols used to separate them. The first part of the command is a condition. This is just like the conditions that

Manipulating Values in Your Programs |
103 |
you created earlier for the if statement. This can be any condition that results in either
true or false.
After the condition is a question mark, which separates the condition from the first of two statements. The first of the two statements executes if the condition is true. The second statement is separated from the first with a colon and is executed if the condition is false. Listing 3.6 presents the conditional operator in action.
The conditional operator is used to create concise code. If you have a simple if state- |
|
ment that evaluates to doing a simple true and simple false statement, then the condi- |
|
tional operator can be used. In my opinion, you should avoid the use of the conditional |
|
operator. Because it is just a shortcut version of an if statement, just stick with using the |
|
if statement. Most people reviewing your code will find the if statement easier to read |
|
and understand. |
3 |
|
LISTING 3.6 cond.cs—The Conditional Operator in Action
1:// cond.cs - The conditional operator
2://----------------------------------------------------
4:class cond
5:{
6:public static void Main()
7:{
8:int Val1 = 1;
9:int Val2 = 0;
10:int result;
11:
12: result = (Val1 == Val2) ? 1 : 0; 13:
14:System.Console.WriteLine(“The result is {0}”, result);
15:}
16:}
The result is 0
This listing is very simple. In Line 12, the conditional operator is executed and the result is placed in the variable result. Line 14 then prints this value. In this
case, the conditional operator checks to see whether the value in Val1 is equal to the value in Val2. Because 1 is not equal to 0, the false result of the conditional is set. Modify Line 8 so that Val2 is set equal to 1, and then rerun this listing. You will see that because 1 is equal to 1, the result will be 1 instead of 0.
104 |
Day 3 |
Caution |
The conditional operator provides a shortcut for implementing an if state- |
|
ment. Although it is more concise, it is not always the easiest to understand. |
||
|
||
|
When using the conditional operator, you should verify that you are not |
|
|
making your code harder to understand. |
|
|
|
Understanding Operator Precedence
Rarely are these operators used one at a time. Often multiple operators are used in a single statement. When this happens, a lot of issues seem to arise. Consider the following:
Answer = 4 * 5 + 6 / 2 – 1;
What is the value of Answer? If you said 12, you are wrong. If you said 44, you are also wrong. The answer is 22.
Different types of operators are executed in a set order, called operator precedence. The word precedence is used because some operators have a higher level
of precedence than others. In the example, multiplication and division have a higher level of precedence than addition and subtraction. This means that 4 is multiplied by 5, and 6 is divided by 2 before any addition occurs.
Table 3.3 lists all the operators. The operators at each level of the table are at the same level of precedence. In almost all cases, there is no impact on the results. For example, 5 × 4 / 10 is the same whether 5 is multiplied by 4 first or 4 is divided by 10.
TABLE 3.3 Operator Precedence
Level |
Operator Types |
Operators |
|
|
||
1 |
Primary operators |
() |
. |
[] |
x++ |
x-- new typeof sizeof |
|
|
checked unchecked |
|
|||
2 |
Unary |
+ |
- |
! ~ |
++x |
--x |
3 |
Multiplicative |
* |
/ |
% |
|
|
4 |
Additive |
+ |
- |
|
|
|
5 |
Shift |
<< |
>> |
|
|
|
6 |
Relational |
< |
> |
<= |
>= is |
|
7 |
Equality |
== |
!= |
|
|
|
8 |
Logical AND |
& |
|
|
|
|
9 |
Logical XOR |
^ |
|
|
|
|
10 |
Logical OR |
| |
|
|
|
|

Manipulating Values in Your Programs |
105 |
TABLE 3.3 continued
Level |
Operator Types |
Operators |
11Conditional AND
12Conditional OR
13Conditional
14Assignment
&&
||
?:
= *= /= %= += -= <<= >>= &= ^= |=
Changing Precedence Order
You learned how to change the order of precedence by using parentheses punctuators earlier in today’s lessons. Because parentheses have a higher level of precedence than the
operators, what is enclosed in them is evaluated before operators outside of them. Using 3 the earlier example, you can force the addition and subtraction to occur first by using parentheses:
Answer = 4 * ( 5 + 6 ) / ( 2 – 1 );
Now what will Answer be? Because the parentheses are evaluated first, the compiler first resolves the code to this:
Answer = 4 * 11 / 1;
The final result is 44. You can also have parentheses within parentheses. For example, the code could be written as follows:
Answer = 4 * ( ( 5 + 6 ) / ( 2 – 1 ) );
The compiler would resolve this as follows:
Answer = 4 * ( 11 / 1 );
Then it would resolve it as this:
Answer = 4 * 11;
Finally, it would resolve it as the Answer of 44. In this case, the parentheses didn’t cause a difference in the final answer; however, sometimes they do.
Converting Data Types
When you move a value from one variable type to another, a conversion must occur. Additionally, if you want to perform an operation on two different data types, a conversion might also need to occur. Two types of conversions can occur: implicit and explicit.

106 |
Day 3 |
Implicit conversions happen automatically without error. You’ve read about many of these within today’s lesson. What happens when an implicit conversion is not
available? For example, what if you want to put the value stored in a variable of type long into a variable of type int?
Explicit conversions are conversions of data that are forced. For the value data types that you learned about today, the easiest way to do an explicit conversion is
with a cast. A cast is the forcing of a data value to another data type. The format of a cast is shown here:
ToVariable = (datatype) FromVariable;
datatype is the data type that you want the FromVariable converted to. Using the example of converting a long variable to an int, you enter the following statement:
int IntVariable = 0;
long LongVariable = 1234; IntVariable = (int) LongVariable;
In doing casts, you take responsibility for making sure that the variable can hold the value being converted. If the receiving variable cannot store the received value, truncation or other changes can occur. A number of times, you will need to do explicit conversions. Table 3.4 contains a list of those times.
Note
Explicit conversions as a group also encompass all the implicit conversions. It is possible to use a cast even if an implicit conversion is available.
TABLE 3.4 Required Explicit Conversions
From Type |
To Type(s) |
sbyte |
byte, ushort, uint, ulong, or char |
byte |
sbyte or char |
short |
sbyte, byte, ushort, uint, ulong, or char |
ushort |
sbyte, byte, short, or char |
int |
sbyte, byte, short, ushort, uint, ulong, or char |
uint |
sbyte, byte, short, ushort, int, or char |
long |
sbyte, byte, short, ushort, int, uint, ulong, or char |
ulong |
sbyte, byte, short, ushort, int, uint, long, or char |
char |
sbyte, byte, or short |
float |
sbyte, byte, short, ushort, int, uint, long, ulong, char, or decimal |

|
|
|
Manipulating Values in Your Programs |
107 |
|
|
|
|
|
||
|
|
|
|
|
|
|
TABLE 3.4 continued |
|
|
|
|
|
|
|
|
|
|
|
|
From Type |
To Type(s) |
|
|
|
|
|
|
|
|
|
|
double |
sbyte, byte, short, ushort, int, uint, long, ulong, char, float, or decimal |
|
|
|
|
decimal |
sbyte, byte, short, ushort, int, uint, long, ulong, char, float, or double |
|
|
|
|
|
|
|
|
Understanding Operator Promotion
|
|
Implicit conversions are also associated with operator promotion, which is the |
|
||
NEW TERM |
|
|
|||
|
automatic conversion of an operator from one type to another. When you do |
|
|||
|
|
|
|||
|
|
|
|||
basic arithmetic operations on two variables, they are converted to the same type before |
|
||||
doing the math. For example, if you add a byte variable to an int variable, the byte vari- |
3 |
||||
able is promoted to an integer before it is added. |
|||||
A numeric variable smaller than an int is promoted to an int. The order of promotion |
|
||||
after an int is as follows: |
|
||||
int |
|
|
|
|
|
|
|
|
|
||
uint |
|
|
|
|
|
long |
|
|
|
|
|
ulong |
|
|
|
|
|
float |
|
|
|
|
|
double |
|
|
|
||
decimal |
|
|
|
||
Note |
|
|
|
|
|
|
The following section contains advanced material that is not critical to know |
|
|
||
|
at this time. You can cover this material now, or you can to skip to the end |
|
|
||
|
|
|
|
|
|
|
|
|
of today’s lesson and come back to this material later. |
|
|
|
|
|
|
|
|
Bonus Material: For Those Brave Enough
For those brave enough, the following sections explain using the bitwise operators. This includes using the shift operators and the logical bitwise operators. Bitwise operators are a more advanced topic, so most beginning-level books skip over them. One reason they are advanced is that before understanding how these operators work, you need to understand how variables are truly stored.

108 |
Day 3 |
Tip
It is valuable to understand the bitwise operators and how memory works; however, it is not critical to your understanding C#. If you feel brave, continue forward. If not, feel free to jump to the Summary and Workshop at the end of today’s lessons. You can always come back and read this later.
Storing Variables in Memory
To understand the bitwise operators, you must first understand bits. In yesterday’s lesson on data types, you learned that the different data types take different numbers of bits to store. For example, a char data type takes 2 bytes. An integer takes 4 bytes. You also learned that maximum and minimum values can be stored in these different data types.
Recall that a byte is 8 bits of memory; 2 bytes is 16 bits of memory—2 × 8. Therefore, 4 bytes is 32 bits of memory. The key to all of this is to understand what a bit is.
A bit is simply a single storage unit of memory that can be either turned on or turned off just like a light bulb. If you are storing information on a magnetic medium, a bit can be stored as either a positive charge or a negative charge. If you are working with something such as a CD-ROM, the bit can be stored as a bump or as an indent. In all these cases, one value is equated to 0 and the other is equated to 1.
If a bit can store only a 0 or a 1, you are obviously very limited in what can be stored. To be able to store larger values, you use bits in groups. For example, if you use 2 bits, you can actually store four numbers, 00, 01, 10, and 11. If you use 3 bits, you can store eight numbers, 000, 001, 010, 011, 100, 101, 110, and 111. If you use 4 bits, you can store 16 numbers. In fact x bits can store 2x numbers, so a byte (8 bits), can store 28, or 256 numbers. Two bytes can store 216, or 65536 values.
Translating from these 1s and 0s is simply a matter of using the binary number system. Appendix C, “Understanding Number Systems,” explains how you can work with the binary number system in detail. For now, understand that the binary system is simply a number system.
You use the decimal number system to count. Whereas the decimal system uses 10 numbers (0 to 9), the binary system uses 2 numbers. When counting in the decimal system, you use 1s, 10s, 100s, 1,000s, and so forth. For example, the number 13 is one 10 and three 1s. The number 25 is two 10s and five 1s.
The binary system works the same way, except that there are only two numbers, 0 and 1. Instead of 10s and 100s, you have 1s, 2s, 4s, 8s, and so on. In fact, each group is based on

Manipulating Values in Your Programs |
109 |
taking 2 to the power of a number. The first group is 2 to the power of 0, the second is 2 to the power of 1, the third is 2 to the power of 3, and so on. Figure 3.2 illustrates this.
FIGURE 3.2 |
|
103 |
102 |
|
101 |
100 |
Decimal |
|
Binary versus decimal. |
… Thousands |
Hundreds |
Tens |
Ones |
||||
|
||||||||
|
|
|
|
|
|
|
||
|
|
24 |
23 |
22 |
21 |
20 |
Binary |
|
|
… |
Sixteens |
Eights |
Fours |
Twos |
Ones |
||
|
|
|||||||
Presenting numbers in the binary system works the same way it does in the decimal system. The first position on the right is 1s, the second position from the right is 2s, the third is 4s, and so on. Consider the following number:
1101 |
3 |
|
To convert this binary number to decimal, you can multiply each value in the number times by positional value. For example, the value in the right column (1s) is 1. The 2s column contains a 0, the 4s column contains a 1, and the 8s column contains a 1. The result is this:
1 + (0 × 2) + (1 × 4) + (1 × 8)
The final decimal result is this:
1 + 0 + 4 + 8
This is 13. So, 1101 in binary is equivalent to 13 in decimal. This same process can be applied to convert any binary number to decimal. As numbers get larger, you need more bit positions. To keep things simpler, memory is actually separated into 8-bit units— bytes.
Understanding the Shift Operators
C# has two shift operators that can be used to manipulate bits. These operators do exactly what their names imply—they shift the bits. The shift operators can shift the bits to the right using the >> operator or to the left using the << operator. These operators shift the bits within a variable by a specified number of positions. The format is as follows:
New_value = Value [shift-operator] number-of-positions;
Value is a literal or a variable, shift-operator is either the right (>>) or the left (<<) shift operator, and number-of-positions is how many positions you want to shift the bits. For

110 |
Day 3 |
example, if you have the number 13 stored in a byte, you know that its binary representation is as follows:
00001101
If you use the shift operator on this, you change the value. Consider the following:
00001101 >> 2
This shifts the bits in this number to the right two positions. The result is this:
00000011
This binary value is equivalent to the value of 3. In summary, 13 >> 2 equals 3. Consider another example:
00001101 << 8
This example shifts the bit values to the left eight positions. Because this is a single-byte value, the resulting number is 0.
Manipulating Bits with Logical Operators
In addition to being able to shift bits, you can combine the bits of two numbers. Three bitwise logical operators can be used, as shown in Table 3.5.
TABLE 3.5 Logical Bitwise Operators
Operator |
Description |
| |
Logical OR bitwise operator |
& |
Logical AND bitwise operator |
^ |
Logical XOR bitwise operator |
|
|
Each of these operators is used to combine the bits of two binary values. Each has a different result.
The Logical OR Bitwise Operator
When combining two values with the logical OR bitwise operator (|), you get the following results:
•If both bits are 0, the result is 0.
•If either or both bits are 1, the result is 1.

Manipulating Values in Your Programs |
111 |
Combining 2 byte values results in the following:
Value 1: |
00001111 |
Value 2: |
11001100 |
|
-------- |
Result: |
11001111 |
The Logical AND Bitwise Operator
When combining two values with the logical AND bitwise operator (&), you get the following result:
• |
If both bits are 1, the result is 1. |
|
• |
If either bit is 0, the result is 0. |
3 |
|
|
Combining 2 byte values results in the following:
Value 1: |
00001111 |
Value 2: |
11001100 |
|
-------- |
Result: |
00001100 |
The Logical XOR Operator
When combining two values with the logical XOR bitwise operator (^), you get the following result:
•If both bits are the same, the result is 0.
•If 1 bit is 0 and the other is 1, the result is 1.
Combining 2 byte values results in the following:
Value 1: |
00001111 |
Value 2: |
11001100 |
|
-------- |
Result: |
11000011 |
Listing 3.7 illustrates some of the bitwise operators.

112 |
Day 3 |
LISTING 3.7 bitwise.cs—The Bitwise Operators
1:// bitwise.cs - Using the bitwise operators
2://----------------------------------------------------
4:class bitwise
5:{
6:public static void Main()
7:{
8:int ValOne = 1;
9:int ValZero = 0;
10:int NewVal;
11:
12: // Bitwise XOR Operator 13:
14:NewVal = ValZero ^ ValZero;
15:System.Console.WriteLine(“\nThe XOR Operator: \n 0 ^ 0 = {0}”,
16: |
NewVal); |
17:NewVal = ValZero ^ ValOne;
18:System.Console.WriteLine(“ 0 ^ 1 = {0}”, NewVal);
20:NewVal = ValOne ^ ValZero;
21:System.Console.WriteLine(“ 1 ^ 0 = {0}”, NewVal);
23:NewVal = ValOne ^ ValOne;
24:System.Console.WriteLine(“ 1 ^ 1 = {0}”, NewVal);
26: // Bitwise AND Operator 27:
28:NewVal = ValZero & ValZero;
29:System.Console.WriteLine(“\nThe AND Operator: \n 0 & 0 = {0}”,NewVal);
30:
31:NewVal = ValZero & ValOne;
32:System.Console.WriteLine(“ 0 & 1 = {0}”, NewVal);
34:NewVal = ValOne & ValZero;
35:System.Console.WriteLine(“ 1 & 0 = {0}”, NewVal);
37:NewVal = ValOne & ValOne;
38:System.Console.WriteLine(“ 1 & 1 = {0}”, NewVal);
40: // Bitwise OR Operator 41:
42:NewVal = ValZero | ValZero;
43:System.Console.WriteLine(“\nThe OR Operator: \n 0 | 0 = {0}”,
44: |
NewVal); |
45:NewVal = ValZero | ValOne;
46:System.Console.WriteLine(“ 0 | 1 = {0}”, NewVal);
47:

Manipulating Values in Your Programs |
113 |
LISTING 3.7 continued
48:NewVal = ValOne | ValZero;
49:System.Console.WriteLine(“ 1 | 0 = {0}”, NewVal);
51:NewVal = ValOne | ValOne;
52:System.Console.WriteLine(“ 1 | 1 = {0}”, NewVal);
53:}
54:}
OUTPUT |
The |
XOR Operator: |
|
|
0 |
^ 0 = 0 |
|
||
|
0 |
^ 1 = 1 |
|
|
|
1 |
^ 0 = 1 |
|
|
|
1 |
^ 1 = 0 |
3 |
|
|
The |
AND Operator: |
||
|
0 |
& 0 = 0 |
|
|
|
0 |
& 1 = 0 |
|
|
|
1 |
& 0 = 0 |
|
|
|
1 |
& 1 = 1 |
|
|
|
The |
OR Operator: |
|
|
|
0 |
| 0 |
= 0 |
|
|
0 |
| 1 |
= 1 |
|
|
1 |
| 0 |
= 1 |
|
|
1 |
| 1 |
= 1 |
|
Listing 3.7 summarizes the logical bitwise operators. Lines 8–9 define two variables and assign the values 1 and 0 to them. These two variables are then used
repeatedly with the bitwise operators. A bitwise operation is done, and the result is written to the console. You should review the output and see that the results are exactly as described in the earlier sections.
Flipping Bits with the Logical NOT Operator
One other bitwise operator is often used. The logical NOT operator (~) is used to flip the bits of a value. Unlike the logical bitwise operator mentioned in the previous sections, the NOT operator is unary—it works with only one value. The results are as follows:
•If the bit’s value is 1, the result is 0.
•If the bit’s value is 0, the result is 1.
Using this on an unsigned byte that contains the value of 1 (00000001) would result in the
number 254 (11111110).
114 |
Day 3 |
Summary
Today’s lesson presents a lot of information regarding operators and their use. You learned about the types of operators, including arithmetic, multiplicative, relational, logical, and conditional. You also learned the order in which operators are evaluated (operator precedence). When working with values, you learned that there are both implicit and explicit conversions. Explicit conversions are ones that you make happen. Implicit conversions occur automatically. Finally, today’s lesson ended with a section on bitwise operations and the bitwise operators, for those who were brave enough.
Q&A
Q How important is it to understand operators and operator precedence?
AYou will use the operators in almost every application you create. Operator precedence is critical to understand. As you saw in today’s lesson, if you don’t understand operator precedence, you might end up with results that are different from what you expect.
QToday’s lesson covered the binary number system briefly. Is it important to understand this number system? Also, what other number systems are important?
AAlthough it is not critical to understand binary, it is important. With computers today, information is stored in a binary format. Whether it is a positive versus negative charge, a bump versus an impression, or some other representation, all data is ultimately stored in binary. Knowing how the binary system works will make it easier for you to understand these actual storage values.
In addition to binary, many computer programmers work with octal and hexadecimal. Octal is a base-8 number system, and hexadecimal is a base-16 number system. Appendix C, “Understanding Number Systems,” covers these systems in more detail.
Workshop
The Workshop provides quiz questions to help you solidify your understanding of the material covered and exercises to provide you with experience in using what you’ve learned. Try to understand the quiz and exercise answers before continuing to the next day’s lesson. Answers are provided on the CD.

Manipulating Values in Your Programs |
115 |
Quiz
The following quiz questions will help verify your understanding of today’s lessons.
1.What character is used for multiplication?
2.What is the result of 10 % 3?
3.What is the result of 10 + 3 * 2?
4.What are the conditional operators?
5.What C# keyword can be used to change the flow of a program?
6.What is the difference between a unary operator and a binary operator?
7.What is the difference between an explicit data type conversion and an implicit conversion?
8. Is it possible to convert from a long to an integer? |
3 |
9.What are the possible results of a conditional operation?
10.What do the shift operators do?
Exercises
Please note that answers will not be provided for all exercises. The exercises will help you apply what you have learned in today’s lessons.
1. What is the result of the following operation?
2 + 6 * 3 + 5 – 2 * 4
2. What is the result of the following operation?
4 * (8 – 3 * 2) * (0 + 1) / 2
3.Write a program that checks to see whether a variable is greater than 65. If the value is greater than 65, print the statement “The value is greater than 65!”.
4.Write a program that checks to see whether a character contains the value of t or T.
5.Write the line of code to convert a long called MyLong to a short called MyShort.
6.Bug Buster: The following program has a problem. Enter it in your editor and compile it. Which lines generate error messages? What is the error?
1:class exercise
2:{
3:public static void Main()
4:{
5:int value = 1;
6:
7:if ( value > 100 );
8:{

116 |
Day 3 |
9:System.Console.WriteLine(“Number is greater than 100”);
10:}
11:}
12:}
7.Write the line of code to convert an integer, IntVal, to a short, ShortVal.
8.Write the line of code to convert a decimal, DecVal, to a long, LongVal.
9.Write the line of code to convert an integer, ch, to a character, charVal.

WEEK 1
DAY 4
Controlling Your
Program’s Flow
You’ve learned a lot in the previous three days. This includes knowing how to store information, knowing how to do operations, and even knowing how to avoid executing certain commands by using the if statement. You have even learned a little about controlling the flow of a program using the if statement; however, often you need to be able to control the flow of a program even more. Today you…
•See the other commands to use for program flow control.
•Explore how to do even more with the if command.
•Learn to switch among multiple options.
•Investigate how to repeat a block of statements multiple times.
•Discover how to abruptly stop the repeating of code.

118 |
Day 4 |
Controlling Program Flow
By controlling the flow of a program, you can create functionality that results in something useful. As you continue to program, you will want to change the flow of your programs in a number of additional ways. You will want to repeat a piece of code, skip a piece of code altogether, or switch among different pieces of code. Regardless of how you want to change the flow of a program, C# has an option for doing it. Most of the changes of flow can be categorized into two types:
•Selection statements
•Iterative statements
Using Selection Statements
Selection statements enable you to execute specific blocks of code based on the results of a condition. The if statement that you learned about previously is a selection statement, as is the switch statement.
Revisiting if
You’ve learned about the if statement; however, it is worth revisiting. Consider the following example:
if( gender == ‘m’ || gender == ‘f’ )
{
System.Console.WriteLine(“The gender is valid”);
}
if( gender != ‘m’ && gender != ‘f’ )
{
System.Console.WriteLine(“The gender value, {0} is not valid”, gender);
}
This example uses a character variable called gender. The first if statement checks to see whether gender is equal to an ‘m’ or an ‘f’. This uses the OR operator (||) that you learned about in yesterday’s lesson. A second if statement prints an error message when the gender is not equal to ‘m’ or ‘f’. This second if statement is an example of making sure that the variable has a valid value. If there is a value other than ‘m’ and ‘f’, an error message is displayed.
If you are looking at these two statements and think that something is just not quite optimal, you are correct. Like many other languages, C# offers another keyword that can be used with the if statement: the else statement. The else statement is used specifically with the if statement. The format of the if...else statement is shown here:

Controlling Your Program’s Flow |
119 |
if ( condition )
{
// If condition is true, do these lines
}
else
{
// If condition is false, do these lines
}
// code after if... statement
The else statement gives you the capability to have code that executes when the if statement’s condition fails. You should also note that either the block of code after the if or the block of code after the else executes—but not both. After either of these blocks of code is done executing, the program jumps to the first line after the if...else condition.
Listing 4.1 presents the gender code from earlier. This time, the code has been modified to use the if...else command. As you can see in the listing, this version is much more efficient and easier to follow than the one presented earlier.
LISTING 4.1 |
ifelse.cs—Using the if...else Command |
|
|
1: |
// |
ifelse.cs - Using the if...else statement |
4 |
2: |
// |
-------------------------------------------------------------------- |
|
3: |
|
|
|
4:class ifelse
5:{
6:public static void Main()
7:{
8:char gender = ‘x’;
9:
10:if( gender == ‘m’ || gender == ‘f’ )
11:{
12:System.Console.WriteLine(“The gender is valid”);
13:}
14:else
15:{
16:System.Console.WriteLine(“The gender value, {0}, is not valid”,
17:gender);
18:}
19:System.Console.WriteLine(“The if statement is now over!”);
20:}
21:}
The gender value, x, is not valid OUTPUT The if statement is now over!

120 |
Day 4 |
This listing declares a simple variable called gender of type char in Line 8. This variable is set to a value of ‘x’ when it is declared. The if statement starts in
Line 10, which checks to see whether gender is either ‘m’ or ‘f’. If it is, a message is printed in Line 12 saying that gender is valid. If gender is not ‘m’ or ‘f’, the if condition fails and control is passed to the else statement in Line 14. In this case, gender is equal to ‘x’, so the else command is executed. A message is printed stating that the gender value is invalid. Control is then passed to the first line after the if...else statement— Line 19.
Modify Line 8 to set the value of gender to either ‘m’ or ‘f’. Recompile and rerun the program. This time the output will be as follows:
OUTPUT |
The gender is valid |
||
The if statement is now over! |
|||
Caution |
|
||
What would you expect to happen if you set the value of gender to a capi- |
|||
tal M or F? Remember, C# is case sensitive. |
|||
|
|
||
|
|
|
|
Nesting and Stacking if Statements
Nesting is simply the inclusion of one statement within another. Almost all C#
NEW TERM
flow commands can be nested within each other.
To nest an if statement, you place a second if statement within the first. You can nest within the if section or the else section. Using the gender example, you could do the following to make the statement a little more effective (the nested statement appears in bold):
if( gender == ‘m’ )
{
// it is a male
}
else
{
if ( gender == ‘f’ )
{
// it is a female
}
else
{
//neither a male or a female
}
}

Controlling Your Program’s Flow |
121 |
A complete if...else statement is nested within the else section of the original if statement. This code operates just as you expect. If gender is not equal to ‘m’, the flow goes to the first else statement. Within this else statement is another if statement that starts from its beginning. This second if statement checks to see whether the gender is equal to ‘f’. If not, the flow goes to the else statement of the nested if . At that point, you know that gender is neither ‘m’ nor ‘f’, and you can add appropriate coding logic.
Although nesting makes some functionality easier, you can also stack if statements. In the example of checking gender, stacking is actually a much better solution.
Stacking if Statements
Stacking if statements combines the else with another if. The easiest way to understand stacking is to see the gender example one more time, stacked (see Listing 4.2).
LISTING 4.2 Stacked.cs—Stacking an if Statement
1:// Stacked.cs - Using the if...else statement
2://--------------------------------------------------------------------
4: |
class Stacked |
4 |
5: |
{ |
6:static void Main()
7:{
8:char gender = ‘x’;
10:if( gender == ‘m’ )
11:{
12:System.Console.WriteLine(“The gender is male”);
13:}
14:else if ( gender == ‘f’ )
15:{
16:System.Console.WriteLine(“The gender is female”);
17:}
18:else
19:{
20:System.Console.WriteLine(“The gender value, {0}, is not valid”,
21: |
gender); |
22:}
23:System.Console.WriteLine(“The if statement is now over!”);
24:}
25:}
The gender value, x, is not valid
OUTPUT The if statement is now over!

122 |
Day 4 |
The code presented in this example is very close to the code presented in the previous example. The primary difference is in Line 14. The else statement is
immediately followed by an if. There are no braces or a block. The format for stacking is as follows:
if ( condition 1 )
{
// do something about condition 1
}
else if ( condition 2 )
{
// do something about condition 2
}
else if ( condition 3 )
{
// do something about condition 3
}
else if ( condition x )
{
// do something about condition x
else
{
// All previous conditions failed
}
This is relatively easy to follow. With the gender example, you had only two conditions. There are times when you might have more than two. For example, you could create a computer program that checks the roll of a die. You could then do something different depending on what the roll is. Each stacked condition could check for a different number (from 1 to 6), with the final else statement presenting an error because there can be only six numbers. The code for this would be as follows:
if ( roll == 1 )
//roll is 1 else if (roll == 2)
//roll is 2 else if (roll == 3)
//roll is 3 else if (roll == 4)
//roll is 4 else if (roll == 5)
//roll is 5 else if (roll == 6)
//roll is 6
else
//it isn’t a number from 1 to 6

Controlling Your Program’s Flow |
123 |
This code is relatively easy to follow because it’s easy to see that each of the six possible numbers is checked against the roll. If the roll is not one of the six, the final else statement can take care of any error logic or reset logic.
Note
As you can see in the die code, no braces are used around the if statements. If you are using only a single statement within the if or the else, you don’t need the braces. You include them only when you have more than one statement.
Discovering the switch Statement
C# provides a much easier way to modify program flow based on multiple values stored in a variable: the switch statement. The format of the switch statement is as follows:
switch ( value )
{
case result_1 :
// do stuff for result_1 break;
case result_2 : |
4 |
|
|
// do stuff for result_2 |
|
break; |
|
... |
|
case result_n : |
|
// do stuff for result_x |
|
break; |
|
default: |
|
// do stuff for default case |
|
break; |
|
} |
|
You can see by the format of the switch statement that there is no condition. Instead, a |
|
value is used. This value can be the result of an expression, or it can be a variable. This |
|
value is then compared to each of the values in each of the case statements until a match |
|
is found. If a match is not found, the flow goes to the default case. If there is not a |
|
default case, flow goes to the first statement following the switch statement. |
|
When a match is found, the code within the matching case statement is executed. When |
|
the flow reaches another case statement, the switch statement ends. Only one case state- |
|
ment is executed at most. Flow then continues, with the first command following the |
|
switch statement. Listing 4.3 shows the switch statement in action, using the earlier |
|
example of a roll of a six-sided die. |
|
124 |
Day 4 |
LISTING 4.3 roll.cs—Using the switch Statement with the Roll of a Die
1:// roll.csUsing the switch statement.
2://--------------------------------------------------------------------
4:class roll
5:{
6:public static void Main()
7:{
8:int roll = 0;
9:
10:// The next two lines set the roll to a random number from 1 to 6
11:System.Random rnd = new System.Random();
12:roll = (int) rnd.Next(1,7);
13:
14: System.Console.WriteLine(“Starting the switch... “); 15:
16:switch (roll)
17:{
18:case 1:
19: |
System.Console.WriteLine(“Roll is 1”); |
20: |
break; |
21:case 2:
22: |
System.Console.WriteLine(“Roll is 2”); |
23: |
break; |
24:case 3:
25: |
System.Console.WriteLine(“Roll is 3”); |
26: |
break; |
27:case 4:
28: |
System.Console.WriteLine(“Roll is 4”); |
29: |
break; |
30:case 5:
31: |
System.Console.WriteLine(“Roll is 5”); |
32: |
break; |
33:case 6:
34: |
System.Console.WriteLine(“Roll is 6”); |
35: |
break; |
36:default:
37: |
System.Console.WriteLine(“Roll is not 1 through 6”); |
38: |
break; |
39:}
40:System.Console.WriteLine(“The switch statement is now over!”);
41:}
42:}
OUTPUT |
Starting the switch... |
Roll is 1 |
|
|
The switch statement is now over! |

Controlling Your Program’s Flow |
125 |
Your answer for the roll in the output might be a number other than 1.
This listing is a little longer than a lot of the previous listings; however, it is also more functional. The first thing to focus on is Lines 16–39. These lines contain
the switch statement that is the center of this discussion. The switch statement uses the value stored in the roll. Depending on the value, one of the cases is selected. If the number is something other than 1–6, the default statement starting in Line 39 is executed. If any of the numbers is rolled (1–6), the appropriate case statement is executed.
You should note that at the end of each section of code for each case statement, there is a break command, which is required at the end of each set of code. This signals the end of the statements within a case. If you don’t include the break command, you get a compiler error.
To make this listing more interesting, Lines 11–12 were added. Line 11 might look unfamiliar; it creates a variable called rnd, which is an object that holds a random number. In
tomorrow’s lesson, you revisit this line of code and learn the details of what it is doing. 4 For now, simply know that it is setting up a variable for a random number.
Line 12 is also a line that will become more familiar over the next few days. The command (int) rnd.Next(1,7) provides a random number from 1 to 6.
Tip
You can use Lines 11–12 to generate random numbers for any range by simply changing the values from 1 and 7 to the range you want numbers between. The first number is the lowest number that will be returned. The second number is one higher than the highest number that will be returned. For example, if you wanted a random number from 90 to 100, you could change Line 12 to this:
Roll = (int) rnd.Next(90, 101);
Executing a Single Solution for Multiple Cases
Sometimes you want to execute the same piece of code for multiple values. For example, if you want to switch based on the roll of a six-sided die, but you want to do something based only on odd or even numbers, you could group multiple case statements. The switch statement is this:

126 |
Day 4 |
switch (roll)
{
case 1: case 3: case 5:
System.Console.WriteLine(“Roll is odd”); break;
case 2: case 4: case 6:
System.Console.WriteLine(“Roll is even”); break;
default:
System.Console.WriteLine(“Roll is not 1 through 6”); break;
}
The same code is executed if the roll is 1, 3, or 5. Additionally, the same code is executed if the roll is 2, 4, or 6.
Caution |
In other languages, such as C++, you can have code execute from multiple |
|
case statements by leaving out the break command. This causes the code to |
||
|
||
|
drop through to the next case statement. In C#, this is not valid. Code can- |
|
|
not drop through from one case to another. This means that if you are |
|
|
going to group case statements, you cannot place any code between them. |
|
|
You can place one only after the last case statement in each group. |
|
|
|
Executing More Than One case Statement
You might want to execute more than one case statement within a switch statement. To do this in C#, you can use the goto command. The goto command can be used within the switch statement to go to either a case statement or the default command. The following code snippet shows the switch statement from the previous section executed with goto statements instead of simply dropping through:
switch (roll)
{
case 1:
goto case 5; break;
case 2:
goto case 6; break;
case 3:
goto case 5; break;

Controlling Your Program’s Flow |
127 |
case 4:
goto case 6; break;
case 5:
System.Console.WriteLine(“Roll is odd”); break;
case 6:
System.Console.WriteLine(“Roll is even”); break;
default:
System.Console.WriteLine(“Roll is not 1 through 6”); break;
}
Although this example illustrates using the goto, it is much easier to use the previous example of grouping multiple case statements. You will find times, however, when the goto provides the solution you need.
Understanding the Governing Types for switch Statements
A switch statement has only certain types that can be used. The data type—or the “governing type” for a switch statement—is the type that the switch statement’s expression resolves to. If this governing type is sbyte, byte, short, ushort, int, uint, long, ulong, char,
or a text string, this type is the governing type. Another type, called an enum, is also valid 4 as a governing type. You will learn about enum types on Day 7, “Storing More Complex
Stuff: Structures, Enumerators, and Arrays.”
If the data type of the expression is something other than these types, the type must have a single implicit conversion that converts it to a type of sbyte, byte, short, ushort, int, uint, long, ulong, or a string. If no conversion is available, or if there is more than one, you get an error when you compile your program.
Note
If you don’t remember what implicit conversions are, review Day 3, “Manipulating Values in Your Programs.”
DO
Do use a switch statement when you are checking for multiple different values in the same variable.
DON’T
Don’t accidentally put a semicolon after the condition of a switch or if statement:
if ( condition );

128 |
Day 4 |
Using Iteration Statements
In addition to changing the flow through selection statements, you might want to repeat a piece of code multiple times. When you want to repeat code, C# provides a number of iteration statements. Iteration statements can execute a block of code zero or more times. Each execution of the code is a single iteration.
The iteration statements in C# are listed here:
•
•
•
•
while
do
for
foreach
Executing Code with the while Statement
The while command is used to repeat a block of code as long as a condition is true. The format of the while statement is as follows
while ( condition )
{
Statement(s)
}
This format is also presented in Figure 4.1.
FIGURE 4.1
The while command.
While |
Condition |
true |
Statement(s) |
||
|
? |
|
|
false |
|
As you can see from the figure, a while statement uses a conditional statement. If this conditional statement evaluates to true, the statement(s) are executed. If the condition evaluates to false, the statements are not executed and program flow goes to the next command following the while statement. Listing 4.4 presents a while statement that enables you to print the average of 10 random numbers from 1 to 10.

Controlling Your Program’s Flow |
129 |
LISTING 4.4 average.cs—Using the while Command
1:// average.cs Using the while statement.
2:// print the average of 10 random numbers that are from 1 to 10.
3://---------------------------------------------------------------
5:class average
6:{
7:public static void Main()
8:{
9:int ttl = 0; // variable to store the running total
10:int nbr = 0; // variable for individual numbers
11:int ctr = 0; // counter
12:
13: System.Random rnd = new System.Random(); // random number 14:
15:while ( ctr < 10 )
16:{
17://Get random number
18:nbr = (int) rnd.Next(1,11);
20: |
System.Console.WriteLine(“Number {0} is {1}”, (ctr + 1), nbr); |
|
|
21: |
|
|
4 |
22: |
ttl += nbr; |
//add nbr to total |
|
23: |
ctr++; |
//increment counter |
|
24: |
} |
|
|
25: |
|
|
|
26:System.Console.WriteLine(“\nThe total of the {0} numbers is {1}”,
27: |
ctr, ttl); |
28:System.Console.WriteLine(“\nThe average of the numbers is {0}”,
29: |
ttl/ctr ); |
30:}
31:}
Note
OUTPUT
The numbers in your output will differ from those shown here. Because random numbers are assigned, each time you run the program, the numbers will be different.
Number 1 is 2
Number 2 is 5
Number 3 is 4
Number 4 is 1
Number 5 is 1
Number 6 is 5
Number 7 is 2
Number 8 is 5

130 |
Day 4 |
Number 9 is 10
Number 10 is 2
The total of the 10 numbers is 37
The average of the numbers is 3
This listing uses the code for random numbers that you saw earlier in today’s lesson. Instead of a random number from 1 to 6, this code picks numbers from 1 to
10. You see this in Line 18, where the value of 10 is multiplied against the next random number. Line 13 initialized the random variable before it was used in this manner.
The while statement starts in Line 15. The condition for this while statement is a simple check to see whether a counter is less than 10. Because the counter was initialized to 0 in Line 11, this condition evaluates to true, so the statements within the while are executed. This while statement simply gets a random number from 1 to 10 in Line 18 and adds it to the total counter, ttl in Line 22. Line 23 then increments the counter variable, ctr. After this increment, the end of the while is reached in Line 24. The flow of the program is automatically put back to the while condition in Line 15. This condition is re-evaluated to see whether it is still true. If it is true, the statements are executed again. This continues to happen until the while condition fails. For this program, the failure occurs when ctr becomes 10. At that point, the flow goes to Line 25, which immediately follows the while statement.
The code after the while statement prints the total and the average of the 10 random numbers that were found. The program then ends.
Caution |
For a while statement to eventually end, you must make sure that you |
|
change something in the statement(s) that will impact the condition. If your |
||
|
||
|
condition can never be false, your while statement could end up in an infi- |
|
|
nite loop. There is one alternative to creating a false condition: the break |
|
|
statement. This is covered in the next section. |
|
|
|
Breaking Out of or Continuing a while Statement
It is possible to end a while statement before the condition is set to false. It is also possible to end an iteration of a while statement before getting to the end of the statements.
To break out of a while and thus end it early, you use the break command. A break immediately takes control of the first command after the while.

Controlling Your Program’s Flow |
131 |
You can also cause a while statement to jump immediately to the next iteration. This is done by using the continue statement. The continue statement causes the program’s flow to go to the condition statement of the while. Listing 4.5 illustrates both the continue and the break statements within a while.
LISTING 4.5 even.cs—Using break and continue
1:// even.csUsing the while with the break and continue commands.
2://----------------------------------------------------------------
4:class even
5:{
6:public static void Main()
7:{
8:int ctr = 0;
9:
10:while (true)
11:{
12:ctr++;
14: |
if (ctr > 10 ) |
|
15: |
{ |
4 |
16: |
break; |
17:}
18:else if ( (ctr % 2) == 1 )
19:{
20:continue;
21:}
22:else
23:{
24:System.Console.WriteLine(“...{0}...”, ctr);
25:}
26:}
27:System.Console.WriteLine(“Done!”);
28:}
29:}
...2...
OUTPUT ...4...
...6...
...8...
...10...
Done!
ANALYSIS This listing prints even numbers and skips odd numbers. When the value of the counter is greater than 10, the while statement ends with a break statement.

132 |
Day 4 |
This listing declares and sets a counter variable, ctr, to 0 in Line 8. A while statement is then started in Line 10. Because a break is used to end the loop, the condition in Line 10 is simply set to true. This, in effect, creates an infinite loop. Because this is an infinite loop, a break statement is needed to end the while statement’s iterations. The first thing done in the while statement is that ctr is incremented in Line 12. Line 14 then checks to see whether ctr is greater than 10. If ctr is greater than 10, Line 16 executes a break statement, which ends the while and sends the program flow to Line 27.
If ctr is less than 10, the else statement in Line 18 is executed. This else statement is stacked with an if statement that checks to see whether the current number is odd. This is done using the modulus operator. If the counter is even, by using the modulus operator with 2, you get a result of 0. If it is odd, you get a result of 1. When an odd number is found, the continue statement is called in Line 20. This sends control back to the top of the while statement, where the condition is checked again. Because the condition is always true (literally), the while statement’s statements are executed again. This starts with the increment of the counter in Line 12 again, followed by the checks.
If the number is not odd, the else statement in Line 22 will execute. This final else statement contains a single call to WriteLine, which prints the counter’s value.
Working with the do Statement
If a while statement’s condition is false on the initial check, the while statement will never execute. Sometimes, however, you want statements to execute at least once. For these times, the do statement might be a better solution.
The format of the do statement is shown here:
Do
{
Statement(s)
} while ( condition );
This format is also presented in Figure 4.2.
As you can see from the figure, a do statement first executes its statements. Then a while statement is presented with a condition. This while statement and condition operate the same as the while that you explored earlier in Listing 4.4. If the condition evaluates to true, program flow returns to the statements. If the condition evaluates to false, the flow goes to the next line after the do...while. Listing 4.6 presents a do command in action.
Note
Because of the use of the while with the do statement, a do statement is often referred to as a do...while statement.

Controlling Your Program’s Flow |
133 |
FIGURE 4.2
The do command.
|
Statement(s) |
Do… While |
true |
Condition |
|
|
? |
|
false |
LISTING 4.6 do_it.cs—The do Command in Action
1:// do_it.cs Using the do statement.
2:// Get random numbers (from 1 to 10) until a 5 is reached.
3://------------------------------------------------------------
5: |
class do_it |
4 |
6: |
{ |
7:public static void Main()
8:{
9:int ttl = 0; // variable to store the running total
10:int nbr = 0; // variable for individual numbers
11:int ctr = 0; // counter
12:
13: System.Random rnd = new System.Random(); // random number 14:
15:do
16:{
17://Get random number
18:nbr = (int) rnd.Next(1, 11);
20: |
ctr++; |
//number of numbers counted |
21: |
ttl += nbr; |
//add nbr to total of numbers |
22: |
|
|
23: |
System.Console.WriteLine(“Number {0} is {1}”, ctr, nbr); |
|
24: |
|
|
25: |
} while ( nbr != 5 ); |
|
26: |
|
|
27:System.Console.WriteLine(“\n{0} numbers were read”, ctr);
28:System.Console.WriteLine(“The total of the numbers is {0}”, ttl);
29:System.Console.WriteLine(“The average of the numbers is {0}”,
30: |
ttl/ctr ); |
31:}
32:}
134 |
Day 4 |
Number 1 is 1
Number 2 is 6
Number 3 is 5
3 numbers were read
The total of the numbers is 12 The average of the numbers is 4
As with the previous listings that used random numbers, your output will most likely be different from what is displayed. You will have a list of numbers, end-
ing with 5.
For this program, you want to do something at least once—get a random number. You want to then keep doing this until you have a condition met—you get a 5. This is a great scenario for the do statement. This listing is very similar to an earlier listing. In Lines 9–11, you set up a number of variables to keep track of totals and counts. In Line 13, you again set up a variable to get random numbers.
Line 15 is the start of your do statement. The body of the do (Lines 16–24) is executed. First, the next random number is obtained. Again, this is a number from 1 to 10 that is assigned to the variable nbr. Line 20 keeps track of how many numbers have been obtained by adding 1 to ctr each time a number is read. Line 21 then adds the value of the number read to the total. Remember, the code
ttl += nbr
is the same as this code:
ttl = ttl + nbr
Line 23 prints the obtained number to the screen with the count of which number it is.
Line 25 is the conditional portion of the do statement. In this case, the condition is that nbr is not equal to 5. As long as the number obtained, nbr, is not equal to 5, the body of the do statement continues to execute. When a 5 is received, the loop ends. In the output of your program, you will find that there is always only one 5, and it is always the last number.
Lines 27–29 print statistical information regarding the numbers you found.
Counting and More with the for Statement
Although the do...while and while statements give you all the functionality you really need to control iterations of code, they are not the only commands available. Before looking at the for statement, check out the code in the following snippet:

Controlling Your Program’s Flow |
135 |
ctr = 1;
while ( ctr < 10 )
{
//do some stuff ctr++;
}
In this snippet of code, you can see that a counter is used to loop through a while statement. The flow of this code is this:
1. Set a counter to the value of 1.
Check to see whether the counter is less than 10.
If the counter is not less than 10 (the condition fails), go to the end.
3.Do some stuff.
4.Add 1 to the counter.
5.Go to Step 2.
These steps are a very common use of iteration. Because this is a common use, you are provided with the for statement, which consolidates the steps into a much simpler format:
for ( initializer; condition; incrementor )
4
{
Statement(s);
}
You should review the format presented here for the for statement, which contains three parts within parentheses: the initializer, the condition, and the incrementor. Each of these three parts is separated by a semicolon. If one of these expressions is to be left out, you still need to include the semicolon separators.
The initializer is executed when the for statement begins. It is executed only once at the beginning and then never again.
After executing the initializer, the condition statement is evaluated. Just like the condition in the while statement, this must evaluate to either true or false. If this evaluates to true, the statement(s) is executed.
After the statement or statement block executes, program flow is returned to the for statement where the incrementor is evaluated. This incrementor can actually be any valid C# expression; however, it is generally used to increment a counter.
After the incrementor is executed, the condition is again evaluated. As long as the condition remains true, the statements will be executed, followed by the incrementor. This continues until the condition evaluates to false. Figure 4.3 illustrates the flow of the for statement.

136 |
Day 4 |
FIGURE 4.3
The for statement.
Initializer
|
|
Incrementor |
For |
Condition |
true |
Statement(s) |
||
|
? |
|
|
false |
|
Before jumping into a listing, consider the while statement that was presented at the beginning of this section:
for ( ctr = 1; ctr < 10; ctr++ )
{
//do some stuff
}
This for statement is much simpler than the code used earlier with the while statement. The steps that this for statement executes are as follows:
1.Set a counter to the value of 1.
2.Check to see whether the counter is less than 10.
If the counter is not less than 10 (condition fails), go to the end of the for statement.
3.Do some stuff.
4.Add 1 to the counter.
5.Go to Step 2.
These are the same steps that were followed with the while statement snippet earlier. The difference is that the for statement is much more concise and easier to follow. Listing 4.7 presents a more robust use of the for statement. In fact, this is the same program that you saw in sample code earlier, only now it is much more concise.

Controlling Your Program’s Flow
LISTING 4.7 foravg.cs—Using the for Statement
1:// foravg.cs Using the for statement.
2:// print the average of 10 random numbers that are from 1 to 10.
3://----------------------------------------------------------------
5:class average
6:{
7:public static void Main()
8:{
9:int ttl = 0; // variable to store the running total
10:int nbr = 0; // variable for individual numbers
11:int ctr = 0; // counter
12:
13: System.Random rnd = new System.Random(); // random number 14:
15:for ( ctr = 1; ctr <= 10; ctr++ )
16:{
17://Get random number
18:nbr = (int) rnd.Next(1, 11);
20: |
System.Console.WriteLine(“Number {0} is {1}”, (ctr), nbr); |
|
21: |
|
|
22: |
ttl += nbr; |
//add nbr to total |
23: |
} |
|
24: |
|
|
25:System.Console.WriteLine(“\nThe total of the 10 numbers is {0}”,
26: |
ttl); |
27:System.Console.WriteLine(“\nThe average of the numbers is {0}”,
28: |
ttl/10 ); |
29:}
30:}
Number 1 is 10
OUTPUT Number 2 is 3
Number 3 is 6
Number 4 is 5
Number 5 is 7
Number 6 is 8
Number 7 is 7
Number 8 is 1
Number 9 is 4
Number 10 is 3
The total of the 10 numbers is 54
137
4
The average of the numbers is 5

138 |
Day 4 |
Much of this listing is identical to what you saw earlier in today’s lessons. You should note the difference, however. In Line 15, you see the use of the for state-
ment. The counter is initialized to 1, which makes it easier to display the value in the WriteLine routine in Line 20. The condition statement in the for statement is adjusted appropriately as well.
What happens when the program flow reaches the for statement? Simply put, the counter is set to 1. It is then verified against the condition. In this case, the counter is less than or equal to 10, so the body of the for statement is executed. When the body in Lines 16–23 is done executing, control goes back to the incrementor of the for statement in Line 15. In this for statement’s incrementor, the counter is incremented by 1. The condition is then checked again and, if true, the body of the for statement executes again. This continues until the condition fails. For this program, this happens when the counter is set
to 11.
Understanding the for Statement Expressions
You can do a lot with the initializer, condition, and incrementor. You can actually put any expressions within these areas. You can even put in more than one expression.
If you use more than one expression within one of the segments of the for statement, you need to separate them. The separator control is used to do this. The separator control is the comma. As an example, the following for statement initializes two variables and increments both:
for ( x = 1, y = 1; x + y < 100; x++, y++ )
// Do something...
In addition to being able to do multiple expressions, you also are not restricted to using each of the parts of a for statement as described. The following example actually does all of the work in the for statement’s control structure. The body of the for statement is an empty statement—a semicolon:
for ( x = 0; ++x <= 10; System.Console.WriteLine(“{0}”, x) )
;
This simple line of code actually does quite a lot. If you enter this into a program, it prints the numbers 1 to 10. You’re asked to turn this into a complete listing in one of today’s exercises at the end of the lesson.
Caution |
You should be careful about how much you do within the for statement’s |
|
control structures. You want to make sure that you don’t make your code |
||
|
||
|
too complicated to follow. |
|
|
|

Controlling Your Program’s Flow |
139 |
The foreach Statement
The foreach statement iterates in a way similar to the for statement. However, the foreach statement has a special purpose: It can loop through collections such as arrays. The foreach statement, collections, and arrays are covered on Day 7.
Revisiting break and continue
The break and continue commands were presented earlier with the while statement. Additionally, you saw the use of the break command with the switch statement. These two commands can also be used with the other program-flow statements.
In the do...while statement, break and continue operate exactly like the while statement. The continue command loops to the conditional statement. The break command sends the program flow to the statement following the do...while.
With the for statement, the continue statement sends control to the incrementor statement. The condition is then checked and, if true, the for statement continues to loop. The break statement sends the program flow to the statement following the for statement.
The break command exits the current routine. The continue command starts the next iter-
ation. |
4 |
Reviewing goto
The goto statement is fraught with controversy, regardless of the programming language you use. Because the goto statement can unconditionally change program flow, it is very powerful. With power comes responsibility. Many developers avoid the goto statement because it is easy to create code that is hard to follow.
The goto statement can be used in three ways. As you saw earlier, the switch statement is home to two of the uses of goto: goto case and goto default. You saw these in action earlier in the discussion on the switch statement.
The third goto statement takes the following format:
goto label;
With this form of the goto statement, you are sending the control of the program to a label statement.

140 |
Day 4 |
Exploring Labeled Statements
A label statement is simply a command that marks a location. The format of a label is as follows:
label_name:
Notice that this is followed by a colon, not a semicolon. Listing 4.8 presents the goto statement being used with labels.
LISTING 4.8 score.cs—Using the goto Statement with a Label
1: // score.cs |
Using the goto and label statements. |
2:// Disclaimer: This program shows the use of goto and label
3: |
// |
This is not a good use; however, it illustrates |
4: |
// |
the functionality of these keywords. |
5: |
// |
-------------------------------------------------------------------- |
6: |
|
|
7:class score
8:{
9:public static void Main()
10:{
11:int score = 0;
12:int ctr = 0;
13: |
|
14: |
System.Random rnd = new System.Random(); |
15: |
|
16: |
Start: |
17: |
|
18: |
ctr++; |
19: |
|
20:if (ctr > 10)
21:goto EndThis;
22:else
23:score = (int) rnd.Next(60, 101);
25:System.Console.WriteLine(“{0} - You received a score of {1}”,
26: |
ctr, score); |
27: |
|
28: |
goto Start; |
29: |
|
30: |
EndThis: |
31: |
|
32:System.Console.WriteLine(“Done with scores!”);
33:}
34:}

Controlling Your Program’s Flow |
141 |
1 - You received a score of 83
2 - You received a score of 99
3 - You received a score of 72
4 - You received a score of 67
5 - You received a score of 80
6 - You received a score of 98
7 - You received a score of 64
8 - You received a score of 91
9 - You received a score of 79
10 - You received a score of 76 Done with scores!
The purpose of this listing is relatively simple; it prints 10 scores that are obtained by getting 10 random numbers from 60 to 100. This use of random num-
bers is similar to what you’ve seen before, except for one small change. In Line 23, instead of starting at 1 for the number to be obtained, you start at 60. Additionally, because the numbers that you want are from 60 to 100, the upper limit is set to 101. By using 101 as the second number, you get a number less than 101.
The focus of this listing is Lines 16, 21, 28, and 30. In Line 16, you see a label called Start. Because this is a label, the program flow skips past this line and goes to Line 18,
where a counter is incremented. In Line 20, the condition within an if statement is 4 checked. If the counter is greater than 10, a goto statement in Line 21 is executed, which
sends program flow to the EndThis label in Line 30. Because the counter is not greater than 10, program flow goes to the else statement in Line 22. The else statement gets the random score in Line 23 that was already covered. Line 25 prints the score obtained. Program flow then hits Line 28, which sends the flow unconditionally to the Start label. Because the Start label is in Line 16, program flow goes back to Line 16.
This listing does a similar iteration to what can be done with the while, do, or for statements. In many cases, you will find that there are programming alternatives to using goto. If there is a different option, use it first.
Tip
Avoid using goto whenever possible. It can lead to what is referred to as spaghetti code, which is code that winds all over the place and is, therefore, hard to follow from one end to the next.
Nesting Flow
All of the program-flow commands from today can be nested. When nesting programflow commands, make sure that the commands are ended appropriately. You can create a logic error and sometimes a syntax error if you don’t nest properly.

142 |
Day 4 |
DO |
DON’T |
|
|
|
|
Do comment your code to make clearer |
|
Don’t use a goto statement unless it is |
|
||
what the program and program flow are |
|
absolutely necessary. |
doing. |
|
|
|
|
|
Summary
You learned a lot in today’s lesson, and you’ll use this knowledge in virtually every C# application you create.
In today’s lesson, you once again covered some of the constructs that are part of the basic C# language. You first expanded on your knowledge of the if statement by learning about the else statement. You then learned about another selection statement, the switch statement. Selection statements were followed by a discussion of iterative program flowcontrol statements. This included use of the while, do, and for statements. You learned that there is another command, foreach, that you will learn about on Day 7. In addition to learning how to use these commands, you discovered that they can be nested within each other. Finally, you learned about the goto statement and how it can be used with case, default, or labels.
Q&A
Q Are there other types of control statements?
A Yes—throw, try, catch, and finally. You will learn about these in future lessons.
Q Can you use a text string with a switch statement?
A Yes. A string is a “governing type” for switch statements. This means that you can use a variable that holds a string in the switch and then use string values in the case statements. Remember, a string is simply text in quotation marks. In one of the exercises, you create a switch statement that works with strings.
Q Why is goto considered so bad?
AThe goto statement has gotten a bad rap. If used cautiously and in a structured, organized manner, the goto statement can help solve a number of programming problems. goto case and goto default are prime examples of good uses of goto. goto has a bad rap because the goto statement is often not used cleanly; program-
mers use it to get from one piece of code to another quickly and in an unstructured manner. In an object-oriented programming language, the more structure you can keep in your programs, the better—and more maintainable—they will be.

Controlling Your Program’s Flow |
143 |
Workshop
The Workshop provides quiz questions to help you solidify your understanding of the material covered and exercises to provide you with experience in using what you’ve learned. Try to understand the quiz and exercise answers before continuing to the next day’s lesson. Answers are provided on the CD.
Quiz
1.What commands are provided by C# for repeating lines of code multiple times?
2.What is the fewest number of times that the statements in a while will execute?
3.What is the fewest number of times that the statements in a do will execute?
4.Consider the following for statement:
for ( x = 1; x == 1; x++ )
What is the conditional statement?
5.In the for statement in Question 4, what is the incrementor statement?
6.What statement is used to end a case expression in a select statement?
7. What punctuation character is used with a label? |
4 |
|
8.What punctuation is used to separate multiple expressions in a for statement?
9.What is nesting?
10.What command is used to jump to the next iteration of a loop?
Exercises
1.Write an if statement that checks to see whether a variable called file-type is s, m, or j. Print the following message based on the file-type:
sThe filer is single
mThe filer is married filing at the single rate
j The filer is married filing at the joint rate
2.Is the following if statement valid? If so, what is the value of x after this code executes?
int x = 2; int y = 3;
if (x==2) if (y>3) x=5; else x=9;
3.Write a while loop that counts from 99 to 1.
4.Rewrite the while loop in Exercise 3 as a for loop.
144 |
Day 4 |
5.Bug Buster: Is the following listing correct? If so, what does it do? If not, what is wrong with the listing (Ex04-05.cs)?
// Ex0405.cs. Exercise 5 for Day 4 //--------------------------------------------------------------------
class score
{
public static void Main()
{
int score = 99;
if ( score == 100 );
{
System.Console.WriteLine(“You got a perfect score!”);
}
else
System.Console.WriteLine(“Bummer, you were not perfect!”);
}
}
6.Create a for loop that prints the numbers 1 to 10 all within the initializer, condition, and incrementor sections of the for. The body of the for should be an empty statement.
7.Write the code for a switch statement that switches on the variable name. If the name is Robert, print a message that says Hi Bob. If the name is Richard, print a message that says Hi Rich. If the name is Barbara, print a message that says Hi Barb. If the name is Kalee, print a message that says You Go Girl!. On any other
name, print a message that says Hi x, where x is the person’s name.
8.Write a program to roll a six-sided die 100 times. Print the number of times each of the sides of the die was rolled.