Note that this listing also writes two additional rows into the Names table in the
Videos.mdb Microsoft Access Database located at C:\.
The first thing you should notice is that a little bit of exception handling was added to this listing. The code for connecting and accessing the database is con-
tained within a try statement starting in Line 33. If an error occurs with the database, instead of having the application crash with an error, the exception is caught. In Line 44, a check is done to catch an OleDbException. This is a general exception class for database errors that may have occurred. You can actually catch more specific errors if you want. If a database error is caught, it is simply printed to the console.
Stepping back, you can see that much of the logic for connecting and opening the database is the same as in the previous listing. Where things start to truly differ is in Line 42. Instead of calling the ExecuteReader method, this line calls the ExecuteNonQuery method. This executes the myAddQuery that was associated to myCommand in Lines 37–38. The call to ExecuteNonQuery results in the query being executed and a number being returned that is equal to the number of rows affected. In this case, a single line was added, so the value 1 should be returned.
NEW TERM
644
Day 18
After Line 42 completes, the exception-handling logic directs the program’s flow to the finally clause in Line 48. In Line 50, a check is made to see whether the connection to the database was actually made. If it was, it is closed in Line 51. If an exception had been thrown before the connection had been made or opened, you wouldn’t have wanted to close it because it wouldn’t have been opened.
With the record updated and everything closed, the listing ends with Line 54. This simply prints the return value from having called ExecuteNonQuery. This was done to show you that the returned value did equal the number of records impacted: one.
This same logic can be used to do updates and deletes. All you need to do is prepare the information that you want to update or delete and then associate it with the command object that you create.
Caution
The SQL commands that you use must be appropriate for your database.
Although SQL for different databases looks similar, it often is not.
Other Database Concepts
As mentioned at the beginning of today’s lesson, covering database topics and ADO could fill several books. I’ve provided you with a means of accessing and manipulating data in a database. However, this is not the only means. There are other ways, including a more robust way to work with data from databases. This includes the use of DataSets and DataAdapters. There is also the capability to do data binding to controls. Finally, you can work with data in other formats, including XML. This can be done in the same manner as working with databases.
A DataSet is a copy of data from a database that is stored in the memory of your computer. Data is often manipulated by retrieving data and placing it into a
DataSet. This set may include multiple data tables as well as relationships between them. Unlike the DataReader, you are not locked into just reading data, nor are you forced to read the data only from beginning to end.
Although DataSets are on your local machine, they are not directly connected to a database. Again, they are a copy of the data. To pull this data from the database (and to put changes back into the database), you use a DataAdapter.
When working with DataSets, you often use a DataAdapter. A DataAdapter is an object that contains a set of commands and a database connection. You use a DataAdapter as an intermediary for working with the data and a database.
Working with Databases: ADO.NET
645
Data binding is the process of associating a data to a control. This is usually a control on a form such as a DataGrid. The binding of data makes it easy to present the data on the control. However, it doesn’t remove the need to do the adding, updating, and deleting logic.
Summary
In today’s lesson, you learned a little about working with ADO.NET and databases. You learned to use a number of key classes for manipulating data. You learned an efficient way to retrieve data using the DataReader. You also learned a method for adding, updating, and deleting information from a database. The lesson ended by exposing you to a few of the terms that were not covered in regard to database programming.
Q&A
Q
What does ADO stand for?
A ADO stands for Active Data Objects.
Q
Isn’t ADO.NET a Microsoft standard? If so, will it be portable?
18
AADO is a Microsoft standard; however, it is still being ported to other platforms. For example, the mono project (www.go-mono.com) is including a port of ADO.NET within its scope. This should result in ADO.NET being supported on platforms such as Red Hat Linux, FreeBSD, and the Mac.
Q Is ADO.NET just a newer version of ADO?
A Yes and no. ADO.NET continued what ADO started. ADO.NET, however, is based on the premise that the database may be disconnected from the application. To accomplish this, ADO.NET was written from the ground up.
Q How comprehensive was today’s lessons in regard to databases and
ADO.NET?
AToday’s lessons barely scratched the surface of ADO.NET and database development with .NET. Entire books focus on just ADO.NET.
Workshop
The Workshop provides quiz questions to help you solidify your understanding of the material covered and exercises to provide you with experience in using what you’ve learned. Try to understand the quiz and exercise answers before continuing to the next day’s lesson. Answers are provided on the CD.
646
Day 18
Quiz
1.What is the difference between a column and a field?
2.Put the following in order from largest to smallest:
a.Table
b.Row/record
c.Database
d.Column/field
3.What four key classes are generally used by a data provider?
4.What is the difference between OleDbConnection and SqlConnection?
5.In the following, what is the name of the database being used?
6.What would the connection string be for accessing a Microsoft Access database named Customers using the password secret and the user ID BradJ?
7.What method of OleDbCommand would you use with a DataReader?
8.What method of OleDbCommand would you use to delete a record from a table?
9.What method of the DataReader would you use to get an double value from a record?
10.Why is exception handling important when working with databases?
Exercises
1.Add exception handling to Listing 18.1.
2.Modify the listing in Exercise 1 so that the class contains a method that will accept any valid connection string and still work. Hint: From the Main method, pass a connection string value to a new method.
3.On Your Own: Using a database, create the tables for tracking data for a video store. Write the code for reading the information in the different tables.
4.On Your Own: Create a windows form application that displays the information
from the DataReader.
5.On Your Own: Create a windows form that allows the user to enter a first name and a last name as well as a date. Add the values to the Names table in the Videos.mdb database when the user clicks a button. Make sure that the three values have been entered before actually adding the information.
WEEK 3
DAY 19
Creating Remote
Procedures: Web Services
Over the last couple of days, you have learned about creating applications that use windows forms. If you are building applications for the Internet—or, more specifically, the Web—you might not be able to use windows-based forms that use the System.Windows.Forms namespace. Instead, you might want to take advantage of the Web’s capability of working with numerous different systems by using general standards, such as HTML and XML. Today you begin the first of two days that dig into developing applications focused at the Web. Today you…
•Learn the basics about Web services.
•Create a simple Web service using C#.
•Understand how to generate a proxy file for using a Web service.
•Use your Web service from a client program.
NEW TERM
NEW TERM
648
Day 19
Caution
The topic of today’s lesson and tomorrow’s lesson—Web development—
could fill entire books on its own. To avoid adding a large number of pages
to these lessons, I make some assumptions. If you don’t fit all these assump-
tions, don’t fret—you will still find lots of value in the concepts and code
presented in today’s lessons.
My assumptions are as follows:
• You have access to a Web server or a Web service provider that can
host Web services written to the .NET runtime.
• You are familiar with basic Web development concepts, including the
use of HTML and basic client-side scripting.
• You are using a computer that has a Web server running that sup-
ports Active Server Pages and ASP.NET (such as Microsoft Internet
Information Server [IIS]).
• Your Web server is set up with the standard Inetpub/wwwroot direc-
tory. Today’s lesson references this directory as the base directory or
root directory of your Web server. If you know how to set up virtual
directories, you can use those as well.
Creating Web Applications
Two types of Web applications are covered: Web services and Web forms. Each of these has its own use and its own applications. Today you start with Web services.
Examining the Concept of a Component
Before tackling the concept of a Web service, it is worth looking at the concept of components. A component is a piece of software that has a well-defined inter-
face, hidden internals, and the capability of being discovered. By “discovered,” I mean that you can determine what the component does without needing to see the code within it. In a lot of ways, a component is similar to a method. It can be called with arguments that fit a set of parameters, and it has the capability of returning results.
Web Services
The use of methods as components has been moved to the Web. A Web component can be referred to as a Web service. A Web service is a component that per-
forms a function or service. A Web service may also return information to the caller. This service resides somewhere on the Web and can be accessed from other locations on the
Creating Remote Procedures: Web Services
649
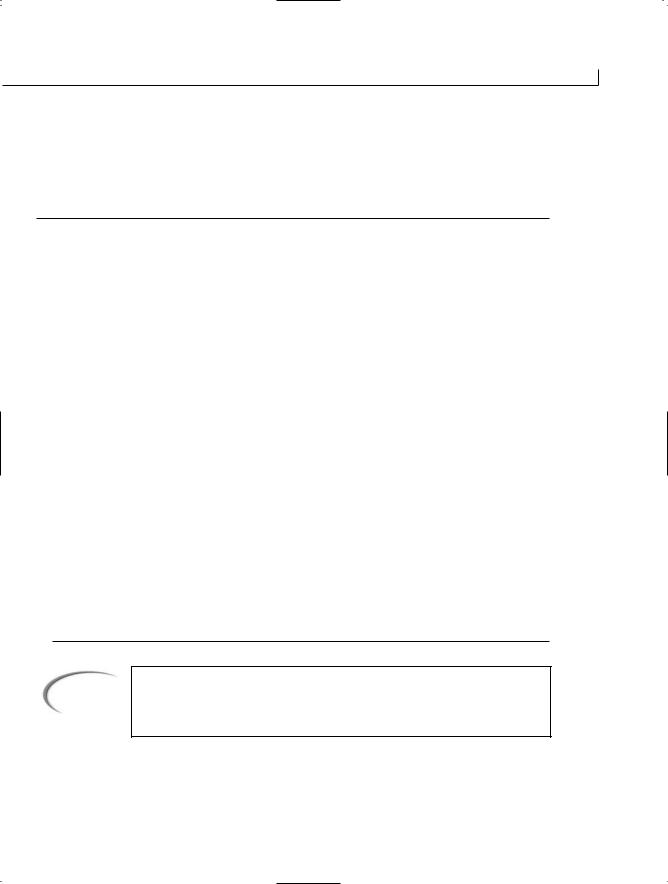
Web. For this service to be called, a number of elements must be in place. First, the caller must know how to call the service. Second, the call must be made across the Web (otherwise, it is just a service, not a Web service). Finally, the Web service must know how to respond. Figure 19.1 illustrates the Web service process.
FIGURE 19.1
Web services.
Calling
SOAP/HTTP
Web
SOAP/HTTP
Program
Service
The Internet
In the figure, the Simple Object Access Protocol (SOAP) has been created to communicate between a program and a Web service. SOAP is a standardized way of formatting information about method calls and data. This formatting is based on the XML standard. Using SOAP, a program can communicate to a Web service, and the Web service can communicate back.
The calling program can be a C# program or a program written in any other programming language. Additionally, the calling program can be a browser or even another Web service, and the Web service can be written in C# or any other language. Because a standardized protocol—SOAP—is being used, the calling program can interact with the Web service and vice versa.
Note
Although understanding SOAP is valuable, it is not critical for creating Web
19
services.
Three basic steps are involved in setting up and using a Web service:
1. Create the actual Web service.
2. Create a program to use the service.
3. Create a file that can help your program call the service. This helper
NEW TERM
program is called a Web proxy.
You’ll learn about creating each of these three parts in the following sections.
Creating a Simple Component
Before creating a Web service, you create a simple class. This class then is used as the basis of your first Web service. This class also is compiled as a routine within a library. Listing 19.1 contains the simple routine that will be used.
650
Day 19
LISTING 19.1 Calc.cs—A Basic Component
1:// Calc.cs
2://----------------------------------
4: using System; 5:
6:public class Calc
7:{
8:public static int Add( int x, int y )
9:{
10:return x + y;
11:}
12:public static int Subtract( int x, int y )
13:{
14:return x - y;
15:}
16:}
To make this an external class that you can call, you need to compile the listing as a library. You create a library by targeting the output as a library. This is done by using library with the command-line target flag:
csc /t:library Calc.cs
The result is a file named Calc.dll instead of Calc.exe.
Note
If you are using Visual Studio .NET 2003, you can set the output type to target a library (Class Library) by selecting the properties of the project. You can see the project properties in several ways. One is to right-click the name of the project in the Solutions Explorer and select Properties from the popup menu. Alternatively, you can select the Properties option on the Project menu. When you have the project’s Properties page displayed, change the Output Type to Class Library.
If you are using SharpDevelop, to set the project to create a library, select Project Options from the Project menus. Within the Project Options dialog box, select the Configurations folder and then Code Generation. In the Code Generation dialog box, you can change the compile target to Library. Clicking OK applies this change.
If you are using another editor, consult your documentation or the help files. In many Integrated Development Environments, including Visual Studio
.NET and SharpDevelop, you can select a library project type when initially creating the project.
ANALYSIS
Creating Remote Procedures: Web Services
651
Looking at the listing, you see that the component will contain two methods in a class named Calc. Add in Lines 8–11 add two numbers. Subtract in Lines 12–15
returns the difference of two numbers. Listing 19.2 presents a routine that can use these methods.
If you compile this routine the normal way, you get an error saying that a type or name- 19 space could not be found:
csc myApp.cs
As you learned earlier in this book, you need to include a reference to the component that you will be using—in this case, Calc. Compile the main listing by including a reference to the file with the component that you created in Listing 19.1. This is done by using the reference compile flag:
csc /r:Calc.dll myApp.cs
The /r: is the reference flag. It tells the compiler to include the identified file, Calc.dll. The result is that myApp.cs will be capable of using the classes and methods in Calc.dll.
If you are using an Integrated Development Environment, you can add a reference to your library in the same manner as the other libraries you’ve referenced. If your library is in a different directory, you may need to browse to that directory.
Note
ANALYSIS
652
Day 19
In Visual Studio .NET, you can add a reference by first selecting Add Reference from the Project menu. You then can click the Browse button in the displayed Add Reference dialog box. Browse and select the library file that you created earlier. You will see the file added to the Solution Explorer.
In SharpDevelop, you can add a reference as well. In the Project window, right-click References and then select Add Reference. This displays the Add Reference dialog box. Select the .NET Assembly Browser. Use the Browse button to find and select the library file that you created earlier. The library will be added to your project.
Looking at the code in Listing 19.2, you can see that there is nothing different from what you have done before. The Main routine makes calls to the classes that
are available. Because you included the Calc.dll in your compile command, the Calc class and its Add and Subtract methods are available.
Creating a Web Service
The Calc class and its methods are nice, but the example in Listings 19.1 and 19.2 are for a class located on a local machine. A Web service uses a component across the Web. You want to have the Calc methods operate as Web services so that they will be accessible across the Web by any Web-based application. This obviously adds complexity to the use of the class.
To create a Web service based on the Calc class, you need to make some changes. Listing 19.3 presents the Calc routine as a Web service.
LISTING 19.3 WebCalc.asmx—Making Calc a Web Service
1: <%@WebService Language=”C#” Class=”Calc”%> 2:
3://----------------------------------
4:// WebCalc.asmx
5://----------------------------------
7:using System;
8:using System.Web.Services;
10:public class Calc : WebService
11:{
12:[WebMethod]
13:public int Add( int x, int y )
14:{
15:return x + y;
Creating Remote Procedures: Web Services
653
LISTING 19.3 continued
16: } 17:
18: [WebMethod]
19: public int Subtract( int x, int y ) 20: {
21: return x - y; 22: } 23: }
ANALYSIS
Several changes were made to this listing to make it a Web service. As you can
see by glancing at the listing, none of the changes was major.
The first change is in the name of the file. Instead of ending with a .cs extension, a Web
service always ends with an .asmx extension. This extension is a signal to the runtime
and to a browser that this is a Web service.
The first coding change is in Line 1—a line with lots of stuff that may seem weird:
%@WebService Language=”C#” Class=”Calc”%
The <%@ and %> are indicators to the Web server. The Web server will see that this is a
Web service written in the language C#. It will also know that the primary routine is
named Calc. Because the language is specified as C#, the server will know to read the
rest of the file as C# and not as some other language.
When this service is first called, it is compiled. You do not need to do the actual compile
19
yourself. The Web server calls the correct compiler based on the language specified in
the Language= command.
The next change that you can see is the inclusion of the System.Web.Service namespace in
Line 8. This is included so that the use of WebMethod and WebService can be done without
explicitly including the namespace name throughout the rest of the listing.
In Line 10, the Calc class is derived from WebService. This gives your class the Web ser-
vice traits as defined within the .NET Framework.
The only remaining change is to identify each of the methods that you want to have
available to anyone accessing your service. These are identified by including [WebMethod]
before the method, as has been done in Lines 12 and 18.
That’s it: This Web service is ready to go.
654
Day 19
Note
If you are using Visual Studio .NET, you have the option to create a Web service project. This project provides you with the basic infrastructure for a Web service. Like many other Visual Studio .NET projects, it includes a lot of additional code.
SharpDevelop also includes a file template for creating Web services. Selecting File, New, File takes you to the New File dialog box. You can then select the category for Web services files. This gives you several options for Web service files.
Other development environments may also include templates for creating Web services.
In the following sections, you learn how to create a proxy and how to call your Web service. You probably can’t wait to see your Web service in action—and you don’t have to.
If you are running a Web server such as Microsoft’s Internet Information Server (IIS), you have a directory on your machine named Inetpub. This directory has a subdirectory named wwwroot. You can copy your Web service (WebCalc.asmx) to this directory.
When your new Web service is in that directory, you can call it by using your browser. You use the following address to call the WebCalc.asmx service:
http://localhost/WebCalc.asmx
When you use this address, you get a page similar to the page in Figure 19.2. If you have an error in your Web service, you might get a different page, indicating the error.
FIGURE 19.2
The WebCalc.asmx Web service displayed in Internet Explorer.
Creating Remote Procedures: Web Services
655
Looking at this page, you can see that a lot of information is displayed regarding your Web service. Most important is that this page lists the two operations that can be performed, Add and Subtract. These are the two methods from your Web services class.
If you click on either of these methods, you are taken to a second screen (see Figure 19.3), which enables you to enter the parameters that your method expects.
FIGURE 19.3
The Add method within the Web service.
In the case of the Add method, two parameters are expected: x and y. This matches your
19
code in Listing 19.3. If you enter the values of 5 and 10, as you did in Listing 19.2, you will see the result:
The result of 15 is in there, but so is a bunch of other stuff. The other stuff is the SOAP information needed to send the information back to the calling routine.
Creating a Proxy
The previous section showed you how to see your Web service in action by using your browser on your local machine; however, it is more likely that you will want to use the service from another program. To do this, you need to set up a Web proxy.
As mentioned earlier, this proxy helps your local program know where on the Web to find the Web service. It also contains the details for communicating to the Web service (the SOAP stuff).
656
Day 19
Writing a proxy can be a lot of work; however, there are utilities to help make this easier. One such utility is wsdl.exe, provided by Microsoft in its framework. This command-line tool can be run using the following parameters:
wsdl WebService_file?wsdl /out:proxyfile
Here, wsdl is the name of the utility that you are executing and WebService_file is the name and location of your Web service file. The Web service name is followed by ?wsdl, which indicates that this is to generate a file using the wsdl standard. For the Calc programming example, this is currently on your localhost server; this could easily be on a different server, in which case this would be the URL to the service.
The /out: flag is optional and is used to give your proxy a name. If you don’t use the /out: flag, your proxy will be named the same as your service. I suggest adding proxy to the name of your proxy. The following line creates the proxy file for the WebCalc.asmx service and places it in the inetpub\wwwroot\ directory with the name of CalcProxy.cs:
The proxy file has a .cs extension, which means that it is C# code that can be compiled. Listing 19.4 contains the code that was generated by wsdl using the WebCalc.asmx file that you created earlier (no line numbers are provided).
LISTING 19.4 CalcProxy.cs—Generated Code from wsdl
object[] results = this.Invoke(“Subtract”, new object[] { x,
y});
return ((int)(results[0]));
}
/// <remarks/>
public System.IAsyncResult BeginSubtract(int x, int y, System.AsyncCallback callback, object asyncState) {
return this.BeginInvoke(“Subtract”, new object[] { x,
y}, callback, asyncState);
}
/// <remarks/>
public int EndSubtract(System.IAsyncResult asyncResult) { object[] results = this.EndInvoke(asyncResult); return ((int)(results[0]));
}
}
It is beyond the scope of this book to explain the code in this listing. The important thing to note is that it takes care of the SOAP stuff for you. Before you can use it, however, you need to compile it. As you’ve done before, you need to compile this listing as a library. Remember, this is done using the target flag (/t:library):
csc /t:library CalcProxy.cs
The result is a file named CalcProxy.dll that you will use with the programs that call your Web service.
Calling a Web Service
The final step in using a Web service is to create the program that will call the service. Listing 19.5 presents a simple program that can use the WebCalc service.
When you compile this listing, you need to include a reference to the proxy file
ANALYSIS
that you previously compiled. You do this the same way that you include any
library, with the /r: flag:
csc /r:CalcProxy.dll WebClient.cs
After it’s compiled, you have a program that can use the Web proxy (via the CalcProxy
program that you generated) to access the Web service that you created (WebCalc.cs).
You can see in Listing 19.5 that using the Web service is very easy. In Line 11, you cre-
ate a Calc object named cSrv. This is then used to call the methods within the service. In
reality, this is the same as if you were using a local library. The difference is that you
created and used the Web proxy file that took care of connecting to the Calc routines on
19
the Web server.
Note
You can move the WebCalc.asmx file to a different Web server. You would then need to create a new proxy file and recompile your local program.
Summary
Today’s lesson was broken into two parts. You spent the first part setting up and using a simple Web service. You learned that a Web service is a piece of code residing somewhere on the Web that you can call from your program. Because of communication standards that have been developed, calling and using such Web services has become relatively easy.
660
Day 19
In tomorrow’s lesson, you will continue working with Web-based applications. Rather than focusing on services, tomorrow you will focus on building Web applications that use forms.
Q&A
QThe code in the Web service and in the client using the Web service is not very different from normal code. Shouldn’t this be more complex?
AThe code presented in today’s Web service and client was very simple. A lot of work has gone into creating standards for communicating across the Web. The complexity of Web services is in the communication. The wsdl tool created the complex code for you. By creating standards for communicating interaction, much of the complexity has been removed from the applications. Your applications can focus on what they need to do rather than on communicating.
Q Do I have to use wsdl.exe to generate the proxy code file?
ANo. You can write this code by hand, or you can use a development tool such as Visual Studio .NET that can help generate some of the code needed.
QCan windows forms, database routines, and other .NET Framework classes be used with Web services?
ABecause a Web service is accessed across the Web, and because a Web service could be called from any platform, you should avoid using a graphical user interface (GUI) within a Web service. You can use database routines or .NET Framework classes in your Web services. Any routines can be used that are supported by the server running the Web service.
Workshop
The Workshop provides quiz questions to help you solidify your understanding of the material covered and exercises to provide you with experience in using what you’ve learned. Try to understand the quiz and exercise answers before continuing to the next day’s lesson. Answers are provided on the CD.
Quiz
1.What is a Web service?
2.What is the file called that helps a client application communicate with a Web service?
3.What program can be used to create the code to communicate with a Web server?
Creating Remote Procedures: Web Services
661
4.How can you tell a Web service from an ASP.NET page?
5.How do you execute an ASP.NET page?
6.What is the SOAP returned from the WebCalc Web service if you enter 20 for x and 10 for y?
7.If you have a Web Service in a file named myService.asmx on a server named www.myserver.com, what wsdl command would you use to create a proxy file named myProxy in the wwwroot directory on your C: drive?
8.If you were using Microsoft’s command-line compiler, how would you compile the proxy file generated in question 7?
9.How would you compile a program in a file named myClient.cs that uses the proxy from question 8?
Exercises
1.What is the first line of a C# program that will be used as a Web service? Assume that the Web service class name is DBInfo and that the first method is named
GetData.
2.What changes need to be made to a method to use it in a Web service?
3.Add a Multiply method and a Subtract method to the WebCalc Web service.
4.Create a new client that uses the Multiply and Divide classes created in Exercise 3.
5.On Your Own: Amazon.com is one of many sites that have provided a Web service. At the time this book was written, you could access this Web service on the
Amazon.com Web site (www.Amazon.com). Incorporate this Web service into an appli-
19
cation. Your application should allow you to see how well your favorite books are
doing at Amazon.
TYPE & RUN 5
Quote of the Day Web
Service
Throughout this book, you will find a number of Type & Run sections. These sections present a listing that is a little longer than the listings within the daily lessons. The purpose of these listings is to give you a program to type in and run.
This Type & Run builds off of Day 19, “Creating Remote Procedures: Web Services.” In this Type & Run, you are presented with a Web service that reads quotes from an XML file. A small application is then presented that uses the service.
The Web Service File
The following listing presents the Web Service file.
664
Type & Run 5
LISTING T&R 5.1 QuoteService.asmx—The Quotes Web Service
Remember, Type & Runs don’t include full analysis. Like the Web service presented on Day 19, the Quote Web service is entered into a file with an .asmx extension. This listing
Quote of the Day Web Service
665
can be placed in the Inetpub\wwwroot directory. Because this listing reads an XML file, you need to also place the XML file into the Inetpub\wwwroot directory. Listing T&R 2 contains the verses XML file. You can replace the text with any quotes you would like.
LISTING T&R 5.2 verses.xml—XML File of Verses
<?xml version=”1.0” encoding=”utf-8” ?> <quotes>
<quote>He is good; his love endures forever. 2 Chronicles 5:13 </quote>
<quote>But I lead a blameless life; redeem me and be merciful to me. Psalm 26:13</quote>
<quote>Listen carefully to my words; let this be the consolation you give me. Job 21:2</quote>
<quote>Resentment kills a fool, and envy slays the simple. Job 5:2</quote>
<quote>Blessed is the man who does not walk in the counsel of the wicked or stand in the way of sinners or sit in the seat of mockers. Psalms 1:1</quote>
<quote>No one remembers you when he is dead. Who praises you from the grave? Psalms 6:5</quote>
<quote>Do not fret because of evil men or be envious of those who
do wrong; Psalms 37:1</quote>
<quote>This is a message you heard from the beginning: We should love one another. 1 John 3:13</quote>
<quote>What good is it, my brothers, if a man claims to have faith but has no deeds? Can such faith save him? James 2:14</quote>
<quote>If a man is lazy, the rafters sag; if his hands are idle, the house leaks. Ecclesiastes 10:18</quote>
<quote>No one knows what is coming - who can tell him what will happen after him? Ecclesiastes 10:14</quote>
<quote>Since no man knows the future, who can tell him what is to come? Ecclesiastes 8:7</quote>
<quote>The evil deeds of a wicked man ensnares him; the cords of his sin hold him fast. Proverbs 5:22</quote>
</quotes>
Note
The quotes come from the Holy Bible, New International Version, ♥1978 by New York International Bible Society, 144 Tices Lane, East Brunswick, New Jersey 08816.
666
Type & Run 5
With both the XML and Web service files in the wwwroot directory, you can use Internet Explorer to test the service by opening the asmx file in the Internet Explorer address bar:
http://localhost/QuoteService.asmx
This results in what you see in Figure T&R5.1.
FIGURE TR5.1
QuoteService.asmx running in Internet Explorer.
The Proxy File
To use the Web service, you need to create a proxy file. Day 19 walks you through this process. To create the proxy, use wsdl:
wsdl http://localhost/QuoteService.asmx?wsdl
/out:c:\inetpub\wwwroot\QuoteProxy.cs
This generates the QuoteProxy.cs file that is shown in Listing T&R 5.3.
LISTING T&R 5.3 QuoteProxy.cs—The wsdl-Generated Proxy Class
object[] results = this.Invoke(“GetQuote”, new object[0]); return ((string)(results[0]));
}
/// <remarks/>
public System.IAsyncResult BeginGetQuote(System.AsyncCallback callback, object asyncState) {
return this.BeginInvoke(“GetQuote”, new object[0], callback, asyncState);
}
/// <remarks/>
public string EndGetQuote(System.IAsyncResult asyncResult) { object[] results = this.EndInvoke(asyncResult);
return ((string)(results[0]));
}
}
668
Type & Run 5
You will want to compile this proxy file as a library. If you are using the Microsoft Visual C# .NET command-line compiler, enter the following to create the library:
csc t:/library QuoteService.cs
This results in a DLL file being created.
Using the Service
Now that you have a service and a proxy, you’ll want to use it. Listing T&R 5.4 contains a client program that uses the Quote service. Remember from Day 19 that you need to include a reference to the compiled proxy library when you compile this. If you are using the Microsoft command-line compiler, enter this:
csc /r:QuoteService.dll frmQuotes.cs
LISTING T&R 5.4 frmQuote.cs—An Application to Use the Web Service
1: /// frmQuote.cs 2:
3:using System;
4:using System.Drawing;
5:using System.Collections;
6:using System.ComponentModel;
7:using System.Windows.Forms;
8:using System.Data;
9:
10://using QuoteService
11:namespace UsingQuotes
12:{
13:/// <summary>
14:/// Summary description for Form1.
15:/// </summary>
16:public class frmQuotes : System.Windows.Forms.Form
Figure TR5.2 presents output from compiling and running the frmQuote application. This is the result from clicking the button. Because a random quote is returned, your output may be different.
OUTPUT
FIGURE TR5.2
Output from the Web
service.
Quote of the Day Web Service
671
Note
The source code for these listings is available on the included CD. Any updates to the code will be available at www.TeachYourselfCSharp.com.
WEEK 3
DAY 20
Creating Web
Applications
A couple of days ago, you learned about creating applications that use windows forms. If you are building applications for the Internet—or, more specifically, the Web—you might not be able to use windows-based forms that use the System.Windows.Forms namespace. Instead you might want to take advantage of the Web’s capability of working with numerous different systems by using general standards, such as HTML and XML. Today you…
•Obtain an overview of what Web forms are.
•Evaluate some of the basic controls used in Web forms.
•Discover the differences between server and client controls.
•Create a basic Web form application.
674
Day 20
Caution
Like yesterday’s topic, the topic of today’s lesson—Web application develop-
ment—could fill an entire book on its own. To avoid adding a large number
of pages to today’s lesson, I make some assumptions. If you don’t fit all
these assumptions, don’t fret—you will still find lots of value in the concepts
and code presented in today’s lessons.
My assumptions are as follows:
• You are familiar with basic Web development concepts, including the
use of HTML and basic client-side scripting.
• You are using a computer that has a Web server running that sup-
ports Active Server Pages and ASP.NET (such as Microsoft Internet
Information Server [IIS]).
• Your Web server is set up with the standard Inetpub/wwwroot direc-
tory. Today’s lesson references this directory as the base directory or
root directory of your Web server. If you know how to set up virtual
directories, you can use those as well.
Creating Regular Web Applications
Yesterday Web services were covered. In today’s lesson, a second type of Web application is covered—Web forms. As a technology, Web forms are closer to windows forms and the standard applications that you are accustomed to. A Web form is a building block to creating dynamic Web sites.
A Web form application is not created as a file with a .cs extension. Instead, it is created as a part of ASP.NET. ASP.NET stands for Active Server Pages dot NET, or Active Server Pages for dot NET. As such, Web form applications end with an .aspx extension.
ASP.NET applications, and thus Web forms, are applications that generate what an end user sees from within a browser. These applications can use any general markup language, such as HTML. Additionally, they can be viewed in any standard browser. Most importantly, they can use programming code that can be executed on a Web server.
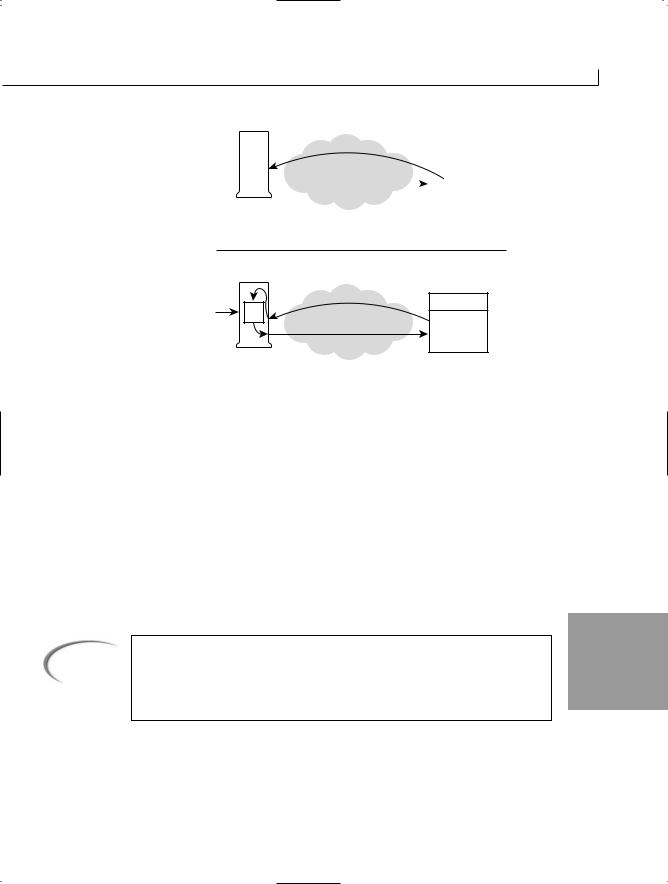
You should already be familiar with HTML and how a Web page is displayed. You should also be aware of how a basic browser works. You should know that a browser (the client) sends a request for a Web page. This request is routed and received by the appropriate Web server (the server). The Web server then processes the request and sends the HTML for the Web page across the Internet back to the browser machine (the client) that made the request. The delivered HTML can then be processed and displayed by the browser (see Figure 20.1).
FIGURE 20.1
Request for a Web page.
Creating Web Applications
675
equest for
Pa
R
ge
Browser
Page Info
Internet
Server
Client
Request for a Standard Web Page
Processing
ASP.
NET
Server
st for ASP.
NE
ue
T
eq
Pa
R
g
e
Generated Page Info
Internet
Request for an ASP.NET Page
Browser
Client
In a basic Web page, the request received by the server causes the server to send HTML back to the browser. Microsoft provided Active Server Pages to intervene in this process. ASP enables greater control over what is being sent to a browser.
When the request is made for an ASP.NET page, rather than simply returning the page, the server executes the ASP.NET code. This runs on the server, not on the browser. This means that an ASP.NET page does not have to be compatible with a browser. This enables you to include real code, such as C#, in the ASP.NET file. The ASP.NET program generates the Web page that will be returned to the browser. The result of this processing is that you can do lots of cool things before sending the HTML. This includes customizing the HTML before sending it. Such customization might include adding current database information, modeling the Web page with browser-specific features, and creating dynamic pages. There are no limits to what the server-side programming can do.
20
Note
Although I call it an ASP.NET page, it is really an ASP.NET application.
Because they are accessed in the same manner as an HTML or other stan-
dard Web page, ASP.NET applications are often referred to as ASP.NET
pages.
With ASP.NET, a lot of the features of the .NET platform can be carried into these ASP.NET applications. This is because the ASP.NET file is executed on the server, not on the client’s machine or the client’s Web browser. I’ve repeated this several times—it is
676
Day 20
the key to the power of ASP.NET. As long as the server is running a .NET runtime and Web server, it can generate Web sites that virtually any browser can view.
The results of the ASP.NET application are sent to the client’s Web browser, so you will want to make sure that the results are compatible with most browsers. Windows forms are not compatible with a machine that is not running the .NET runtime; therefore, they don’t make a very good solution for generating a Web page. Don’t fret: You can use the standard HTML controls. Better yet, .NET provides two additional types of controls that you can use on the server. These server-side controls generate appropriate standard HTML controls or, if supported, newer and better ways of displaying information.
Working with Web Forms
Web forms are generally broken into two pieces: a visual piece and a code piece. The visual piece is generally the look of the Web page or form that will be created. This is the layout, including where controls or text may be presented. The code piece is generally the logic (code) that ties all the visual pieces together and provides the actual functionality of the Web page.
Creating a Basic ASP.NET Application
Creating a simple ASP.NET application requires a combination of HTML, ASP scripting, and the possible use of controls. Listing 20.1 presents a simple ASP.NET application.
LISTING 20.1 FirstASP.aspx—Simple ASP.NET Application
8:lblMyLabel.Text=”The button was <b>clicked</b>!”;
9:}
10:</SCRIPT>
11:</HEAD>
12:
13:<BODY>
14:<H3>Simple Web Form Example</H3>
16:
<FORM runat=server>
17:
<asp:Button id=btnMyButton
18:
runat=”server”
19:
Text=”My Button”
20:
onclick=”btnMyButton_Click” />
cation.
ANALYSIS
OUTPUT
FIGURE 20.2
The result of the FirstASP.aspx appli-
Creating Web Applications
677
LISTING 20.1 continued
21:<br>
22:<br>
23:<asp:Label id=lblMyLabel
24:
runat=server />
25:</FORM>
26:</BODY>
27:</HTML>
Enter this listing and save it as FirstASP.aspx. You don’t need to compile this listing. Instead, as with the Web service program, you copy this program to the
Web server. If you place this application in the inetpub\wwwroot\ directory, you can call it using localhost. After you copy the program, use the following URL in the browser to execute the ASP.NET application:
http://localhost/FirstASP.aspx
The initial result is shown in Figure 20.2. As you can see, the page displays standard HTML. The file extension of .aspx identifies this as an ASP.NET page and, thus, a Web
form. The Web server knows that any files with an .aspx extension are to be treated as 20 ASP.NET applications.
An ASP.NET application can use a number of different languages. The first line of Listing 20.1 includes a standard ASP directive that indicates that this page will use the language C#. Including this line at the top of your page enables you to use C# with your ASP.NET page. If for some strange reason you wanted to use a different language, you would change C# to the language you are going to use. For example, to use Visual Basic, you would change the C# to VB.
678
Day 20
This directive is intercepted by the Web server. The Web server knows to process this as an ASP.NET page because of the <%. The Web server treats everything between the <% and %> tags as ASP.NET directives.
The rest of this listing should look similar to a standard Web page that contains a scripting element. The unique items can be seen in Lines 5, 17, 18, 20, 23, and 24. You should notice two things. First are the runat=server statements and the use of asp: in front of the control names. These items are addressed in the following sections.
The other unique item that you should notice is the slight change in style of the HTML. Instead of regular HTML, an XHTML or XML format is used. You’ll see that all the control tags must include an ending tag. This also is a standard for XML. For example, <html> is an opening tag and </html> is an ending tag. In general, ending tags use the same tag name preceded by a forward slash. With some tags, you can abbreviate this by including the forward slash at the end of the opening tag commands. The controls in Listing 20.1 do this, ending with />. To clarify this, here is an example of the two ways to open and close a generic tag named XXX (note that spacing doesn’t matter):
<XXX attributes > text < /XXX >
<XXX attributes />
The attributes are optional, as is the text.
Before continuing, you should click the button on the Web page. Doing so causes the btnMyButton_Click event to be executed. In Line 8, this event assigns a value to the Text property of the label control, lblMyLabel. Figure 20.3 shows the results of clicking the button.
FIGURE 20.3
The browser code after clicking the button.
Creating Web Applications
679
You should do one more thing before continuing: Within your browser, open the source file using the View Source option. Do you see the FirstASP.aspx code shown earlier? No! You should see the following (after you’ve clicked the button):
<span id=”lblMyLabel”>The button was <b>clicked</b>!</span> </form>
</BODY>
</HTML>
Remember, your browser is not getting the ASP.NET file; it is getting the results generated by the file. This includes the HTML code and browser-friendly controls. You might notice that the lblMyLabel control was converted to an HTML span tag rather than a control. This is the result that the Web server determined appropriate and thus generated.
Using ASP.NET Controls
When creating Web pages with ASP.NET and C#, you have the capability to use two different sets of controls: HTML server controls and Web form controls. Like ASP.NET in general, both sets of controls execute on the Web server, not on the client’s machine.
20
Exploring HTML Server Controls
If you are familiar with the HTML forms controls, HTML server controls will look very familiar. In fact, the HTML server controls follow pretty close to the standard HTML controls—but they are not the same. Figure 20.4 illustrates the HTML server controls that are in the .NET Framework.
680
Day 20
FIGURE 20.4
The HTML server controls.
System.Object
System.Web.UI.Control
System.Web.UI.HtmlControls
HtmlControl
HtmlInputControl
HtmlContainerControl
HtmlImage
HtmlInputButton
HtmlAnchor
HtmlInputCheckBox
HtmlButton
HtmlInputFile
HtmlForm
HtmlInputHidden
HtmlGenericControl
HtmlInputImage
HtmlSelect
HtmlInputRadioButton
HtmlTable
HtmlInputText
HtmlTableCell
HtmlTableRow
HtmlTextArea
Even though the primary purpose of these controls is to provide a migration path for previous versions of ASP, you can still use them. Listing 20.1 presented a Web page application that uses HTML server controls.
Table 20.1 shows you which HTML server control maps to which standard HTML control.
TABLE 20.1 HTML Server Controls
Control
Standard HTML Control
HtmlAnchor
<a>
HtmlButton
<button>
HtmlForm
<form>
HtmlGenericControl
<span>, <div>, <body>, <font>, or other tags not specified in an
existing HTML server control
HtmlImage
<img>
HtmlInputButton
<input type=button>, <input type=submit>, and <input
type=reset>
Creating Web Applications
681
TABLE 20.1 continued
Control
Standard HTML Control
HtmlInputCheckBox
<input type=checkbox>
HtmlInputFile
<input type=file>
HtmlInputHidden
<input type=hidden>
HtmlInputImage
<input type=image>
HtmlInputRadioButton
<input type=radio>
HtmlInputText
<input type=text> and <input type=password>
HtmlSelect
<select>
HtmlTable
<table>
HtmlTableCell
<td> and <th>
HtmlTableRow
<tr>
HtmlTextArea
<textarea>
Although Figure 20.4 lists a bunch of controls with names that are different from the HTML controls, you will see a pattern. The difference is that each of the standard HTML server controls have been named after the standard HTML control, with Html added to the beginning.
When the ASPX file is originally parsed, all the standard HTML controls in the page are left alone. Yes, left alone. They are assumed to be standard HTML controls that should be passed to the calling Web page. However, if you add runat=server to the control’s list of attributes, the parser converts the control to the related HTML server control in
Table 20.1. By converting to the HTML server equivalent, you can manipulate the controls on the server. If you don’t include runat=server, you can’t manipulate the controls on the server; they are sent to the browser instead.
Listing 20.2 is a rather long listing that uses HTML server controls. This listing displays
a form that enables you to enter a username and a password. In the code, the username is 20 Brad and the correct password is Swordfish. The form contains two input boxes and two
buttons. They all have runat=server included, so all the controls will be executed on the server as HTML server controls.
LISTING 20.2 HTMLControls.aspx—Using HTML Server Controls
The structure of this listing is slightly different from the preceding one. Instead of using the ASP.NET Page directive at the top of the listing, this one jumps right
into HTML. In Line 2, a set of script code is included. This is a standard script tag—or is it? Actually, it includes the runat=server directive, so it is actually ASP code that will run on the server. This means that the script functionality will be available when this form executes on the server. If the runat=server was not included, this would be a standard script tag that would be sent off to the browser.
The next several lines are C# code used in the script. Because this script is executed on the server, C# is fine to use. The code checks to see whether the password and name are valid. They set a message field based on the results.
The form starts in Line 24. The controls on the form all look standard. The only thing that is unique is that they include runat=”server” attributes. This changes the controls and the form to HTML server controls. If you know standard HTML, you should be able to follow the rest of this listing.
Caution
If you don’t know standard HTML, you should learn it before tackling Web
20
forms and ASP.NET.
Run this ASP.NET page. Figure 20.6 shows the output when the correct name and password are entered.
You can use any of the other standard HTML controls in the same manner as the input button. For specific properties that you can manipulate with each control, check the online documentation for each of the controls listed in Table 20.1.
684
Day 20
FIGURE 20.6
The HTML server controls program with correct login.
Tip
You should notice that label controls were not used in the form. You are generating HTML. Standard text is treated as part of the HTML file that is sent to the browser. This means that you don’t need to use a label control to display information; instead, you can use standard HTML. You should use a label only when you need to change displayed information.
Exploring Web Server Controls
In addition to the HTML server controls, Web server controls can be used with your ASP.NET applications. These controls are very similar to the windows form controls that you learned to use on Days 16, “Creating Windows Forms,” and 17, “Creating Windows Applications.” The common Web server controls are presented in Figure 20.7.
You generally use the Web server controls to create Web forms. You then can identify the Web server controls in a listing because, in addition to the runat=server directive, Web server controls are preceded by asp:. You can see this in Listing 20.3, which shows another simple Web form application—this time, using the Web server controls.
Caution
Don’t confuse the extensions between Web form applications and Web ser-
vice applications. Web service programs end in .asmx, whereas Web form
applications end in .aspx.
Creating Web Applications
685
FIGURE 20.7
The Web server controls.
System.Object
System.Web.UI.Control
System.Web.UI.WebControls
WebControl
Literal
PlaceHolder
Button
Repeater
Checkbox
Xml
RadioButton
AdRotator
BaseDataList
Hyperlink
Calendar
DataGrid
Image
DataList
ImageButton
ValidationSummary
ListControl
Label
BaseValidator
CheckBoxList
LinkButton
CompareValidator
DropDownList
Panel
CustomValidator
ListBox
Table
RangeValidator
RadioButtonList
TableCell
RegularExpressionValidator
TableheaderCell
RequiredFieldValidator
Legend
TableRow
Concrete class
Textbox
Abstract class
LISTING 20.3 WebForm.aspx—Using Web Server Controls
The results of WebForm.aspx displayed in the browser.
You’ll see that this listing looks very similar to Listing 20.1. The page starts with the Page directive, which indicates the language that will be used. This listing
displays the date and time when you click an Update button. This is the same type of application that you created with windows forms, and the code in Lines 8–10 is the same. This code calculates the date value and assigns it to a label control. In Line 18, this label control is a Web server control. You know this because it is preceded by the asp: and ends with a runat=server. Obviously, a timer would make this listing work better; however, that wouldn’t allow me to illustrate the use of a Web server button with a label control.
This listing displays the date and time when the Update button is clicked (see Figure 20.9). Is this the time on the server or the time on the browser? The correct answer is that it is the server’s time because the code is executed on the server.