

Visual CSharp .NET Programming (2002) [eng]
.pdfprivate swfb btnClear;
Creating Namespaces
It's truly easy to create a namespace. The keyword namespace is followed by an identifier that is the name of the namespace. Curly braces enclose the contents of the namespace-meaning, the members of the namespace (see the following section). Namespaces can be nested within each other.
Listing 5.1 shows an example of namespaces nested three levels deep containing a single class. The class contains a single static method that displays a message box (because the method is static, there's no need to instantiate an object based on the class to use it).
Listing 5.1: Nested Namespaces
// Namespaces.cs using System;
using swf = System.Windows.Forms; namespace noman {
namespace isan { namespace island {
public class theClass { public theClass() { // No constructor code
}
public static void bellTolls (string inStr){ swf.MessageBox.Show("The bell tolls for " + inStr + "!",
"For thee...", swf.MessageBoxButtons.OK, swf.MessageBoxIcon.Exclamation);
}
}
}
}
}
The static method shown in Listing 5.1 can easily be invoked. For example, from within a form module button's click event, in the same project as the nested namespaces code module, the following will do the trick:
private void btnGreeting_Click(object sender, System.EventArgs e) { noman.isan.island.theClass.bellTolls("Dolly");
}

Note If the namespace code is compiled in an assembly external to the code trying to invoke the method, then a reference to the assembly must be added to the calling project.
Namespace Members
Namespaces are at the pinnacle of the tree of C# language elements. Namespaces can encapsulate other namespaces (as shown in Listing 5.1), but no other language element can encapsulate a namespace. So one way of answering the question of what can go in a namespace is, everything. Somewhat more formally, namespace blocks may contain:
•Other namespaces
•Classes
•Delegates
•Enumerations
•Interfaces
•Structs
•using and alias directives
Note If you don't know what these things are, don't worry. You'll find out more in this chapter and in Chapters 6, 'Zen and Now: The C# Language,' and 8, 'The Life of the Object in C#.'
.NET Namespaces
Some of the built-in namespaces that are likely to be most important to C# .NET programmers are described in Table 5.1.
|
Table 5.1: Important .NET Namespaces |
||
|
|
|
|
Namespace |
|
|
Description |
|
|
|
|
Microsoft.CSharp |
|
|
Supports compilation and code generation using the C# |
|
|
|
language. |
|
|
|
|
System |
|
|
Contains fundamental classes that define types, arrays, |
|
|
|
strings, events, event handlers, exceptions, interfaces, data- |
|
|
|
type conversion, mathematics, application environment |
|
|
|
management, and much more. |
|
|
|
|

|
Table 5.1: Important .NET Namespaces |
||
Namespace |
|
|
Description |
|
|
|
|
System.Collections |
|
|
Includes a set of classes that lets you manage collections |
|
|
|
ofobjects, such as lists, queues, arrays, hash tables, and |
|
|
|
dictionaries. |
|
|
|
|
System.Data |
|
|
Consists mainly of the classes that comprise the ADO.NET |
|
|
|
architecture. |
System.Diagnostics
System.Drawing
System.IO
Provides classes used for debugging, tracing, and interacting with system processes, event logs, and performance counters.
Contains classes that provide access to GDI+ basic graphics functionality (namespaces that are hierarchically beneath System.Drawingincluding System.Drawing.Drawing2D and System.Drawing.Textprovide more advanced and specific GDI+ graphics functionality).
Contains types and classes used for reading and writing to data streams and files, and general input/output (I/O) functionality.
System.Reflection |
|
Contains classes and interfaces that provide type inspection |
|
|
and the ability to dynamically bind objects. |
|
|
|
System.Reflection.Emit |
|
Generates assemblies on the fly. |
|
|
|
System.Text |
|
Contains classes used for character encoding, converting |
|
|
blocks of characters to and from blocks of bytes, and more. |
System.Text.RegularExpressions Contains classes that provide access to the .NET Framework regular expression engine.
System.Timer |
|
Provides the Timer component (see the section 'Round |
|
|
Buttons Dancing' in Chapter 4, 'Building a Better Windows |
|
|
Interface,' for an example using the Timer). |
|
|
|
System.Web |
|
Contains the classes that are used to facilitate browser- |
|
|
server communication and other web-related functionality. |
|
|
|
System.Web.Services |
|
Contains the classes used to build and consume web |
|
|
services. |
|
|
|
System.Web.UI |
|
Provides classes and interfaces used in the creation of the |
|
|
user interface of web pages and controls. |
|
|
|
System.Windows.Forms |
|
Contains the classes for creating a Windows-based user |
|
|
interface. |
|
|
|
System.XML |
|
Provides classes that support processing XML. |
Reflection
Reflection is the ability to use the metadata provided by a program to gather information about its types. The example in this section will show you how to use reflection to gather type and member information about compiled .NET assemblies. The information you can gather is not as extensive or as convenient to use as that provided by the Object Browser tool that ships
with Visual Studio, explained later in this chapter. However, with the ability to gather information about the internal program elements of compiled code on the fly, a great deal of advanced functionality becomes possible, including automated and dynamic code and assembly generation, dynamic 'late bound' run-time determination of what code needs to be executed, and automated code documenters.
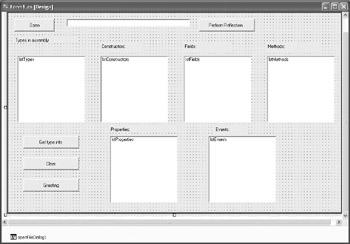
To see how reflection works, let's create a Windows forms application that will open and 'inspect' any .NET assembly (.exe or .dll file). The application will provide an Open button. When the user clicks this button, the OpenFileDialog will allow the choice of a file for reflection. Clicking Open in the common dialog displays the selected file in a TextBox. When the Perform Reflection button is clicked, the types in the selected file are displayed in a Types ListBox. When a type, or class, is selected, and the user clicks the Get Type Info button, the constructors, fields, methods, properties, and events for the type are displayed in respective ListBoxes. This user interface is shown in design mode in Figure 5.3.
Figure 5.3: The form has a ListBox for types in an assembly and separate ListBoxes for each kind of member of a type.
Note Working with ListBoxes and the common dialog controls was explained in Chapter 4.
Here's the code that displays the Open dialog and loads the user's choice into the TextBox:
private void btnOpen_Click(object sender, System.EventArgs e) { openFileDialog1.InitialDirectory = Application.ExecutablePath; openFileDialog1.DefaultExt = "exe";
openFileDialog1.Filter = "Executable (*.exe)|*.exe|DLL (*.dll)|*.dll"; openFileDialog1.ShowDialog();
txtFileToOpen.Text =openFileDialog1.FileName;
}
The user can now select any .NET assembly to examine-including the running file, as shown in the Open dialog depicted in Figure 5.4.

Figure 5.4: You can use reflection to examine the metadata of the program that is running.
To use reflection to pull the types out of the assembly, first add a directive to use the System.Reflection namespace:
using System.Reflection;
Next, within the form class, declare an array (named typeArray) to hold the type information and a variable, theAssembly, of type System.Reflection.Assembly:
Type[] typeArray;
Assembly theAssembly;
When the user clicks Perform Reflection, theAssembly is set to the file selected by the user using the Assembly.LoadFrom method, and the Assembly.GetTypes method is used to load the types in the assembly into typeArray. The elements of the array are then added to the Type ListBox (see Figure 5.5):
private void btnReflect_Click(object sender, System.EventArgs e) { theAssembly = Assembly.LoadFrom(txtFileToOpen.Text); GetTypeInfo(theAssembly);
}
private void GetTypeInfo(Assembly theAssembly){ typeArray = theAssembly.GetTypes();
foreach (Type type in typeArray) { lstTypes.Items.Add(type.FullName);
}
}
Figure 5.5: The types, or classes, within the assembly are displayed.
So far, this is great! We've used reflection to display the types in an assembly. The next step is to let the user choose a type, by selecting it in the Types ListBox. When the user clicks Get Type Info, the members of the type will be displayed in the appropriate ListBox.
But, before we get started with this, we probably should make sure that the ListBoxes we are going to use are empty-so that the type information for only one assembly is displayed. To do this, I've used the code explained in Chapter 3, 'Windows Uses Web Services, Too!' to loop through all the ListBoxes on the form (rather than clearing them by name):
private void btnGetTypeInfo_Click(object sender, System.EventArgs e) { // Clear the ListBoxes except lstTypes
foreach (object o in this.Controls) { if (o is ListBox) {
ListBox lb = (ListBox) o;
if (!(lb.Name == "lstTypes")) lb.Items.Clear();
}
}
...
Continuing with the reflection, here's the code that checks to see whether a type is selected, uses the System.Reflection.Type[].GetMethods method to retrieve the methods for the type, then displays them by adding them to the Methods ListBox (I'm showing method reflection here, but if you look below at the complete code for the Get Type Info procedure, you'll see that the other kinds of members are reflected as well):
if (lstTypes.Text != ""){
...
MethodInfo[] theMethods = typeArray[lstTypes.SelectedIndex].GetMethods(); foreach (MethodInfo method in theMethods) {
lstMethods.Items.Add(method.ToString());
}
...
}
else {
MessageBox.Show("Please select a type for further info!", "Nothing Selected!", MessageBoxButtons.OK,
MessageBoxIcon.Information);
}
Listing 5.2 shows the complete code for generating member information-that is, information about constructors, fields, properties, methods, and events-about types in an assembly using reflection. Listing 5.3 shows a class module, SybexC11.Reflection, that I added to the reflection project to simply show a variety of type members. You'll see these members "reflected" in Figure 5.6.
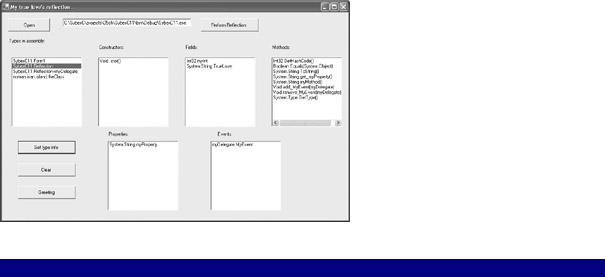
Figure 5.6: Member information for a type is displayed.
Listing 5.2: Displaying Types and Members Using Reflection
// Form1.cs
...
using System.Reflection;
...
public class Form1 : System.Windows.Forms.Form
{
...
Type[] typeArray; Assembly theAssembly;
...
private void btnOpen_Click(object sender, System.EventArgs e) { openFileDialog1.InitialDirectory = Application.ExecutablePath; openFileDialog1.DefaultExt = "exe";
openFileDialog1.Filter = "Executable (*.exe)|*.exe|DLL (*.dll)|*.dll";
openFileDialog1.ShowDialog(); txtFileToOpen.Text =openFileDialog1.FileName;
}
private void btnReflect_Click(object sender, System.EventArgs e) { theAssembly = Assembly.LoadFrom(txtFileToOpen.Text); GetTypeInfo(theAssembly);
}
private void GetTypeInfo(Assembly theAssembly){ typeArray = theAssembly.GetTypes();
foreach (Type type in typeArray) { lstTypes.Items.Add(type.FullName);
}
}
private void btnGetTypeInfo_Click(object sender, System.EventArgs e) { // Clear the ListBoxes except lstTypes
foreach (object o in this.Controls) { if (o is ListBox) {
ListBox lb = (ListBox) o;
if (!(lb.Name == "lstTypes")) lb.Items.Clear();
}
}
if (lstTypes.Text != ""){ ConstructorInfo[] theConstructors =

typeArray[lstTypes.SelectedIndex].GetConstructors(); foreach (ConstructorInfo constructor in theConstructors){ lstConstructors.Items.Add(constructor.ToString());
}
FieldInfo[] theFields = typeArray[lstTypes.SelectedIndex].GetFields();
foreach (FieldInfo field in theFields) { lstFields.Items.Add(field.ToString());
}
MethodInfo[] theMethods = typeArray[lstTypes.SelectedIndex].GetMethods();
foreach (MethodInfo method in theMethods) { lstMethods.Items.Add(method.ToString());
}
PropertyInfo[] theProps = typeArray[lstTypes.SelectedIndex].GetProperties();
foreach (PropertyInfo prop in theProps) { lstProperties.Items.Add(prop.ToString());
}
EventInfo[] theEvents = typeArray[lstTypes.SelectedIndex].GetEvents();
foreach (EventInfo anEvent in theEvents) { lstEvents.Items.Add(anEvent.ToString());
}
}
else {
MessageBox.Show("Please select a type for further info!", "Nothing Selected!", MessageBoxButtons.OK, MessageBoxIcon.Information);
}
}
...
}
Listing 5.3: A Class with Members to Demonstrate Reflection
// Reflection.cs using System; namespace SybexC11
{
public class Reflection
{
public int myInt; public string TrueLove; public Reflection()
{
}
public string myProperty { get {
return "reflection";
}
}
public static string myMethod() { return "True love";
}
public delegate string myDelegate();

public event myDelegate MyEvent = new myDelegate(myMethod);
}
}
Note The code in Listing 5.3 uses the ToString() method to simply display information about each member. You'll find quite a bit of additional programmatic capabilities in the System.Reflection namespace.
Of course, you can also turn the reflection spotlight on the form module itself in the project. Before we do, let's add some class-level variable declarations and assignments (these will show up as Fields):
...
public class Form1 : System.Windows.Forms.Form
{
...
public string myTrueLove = "Phyllis"; public bool isTheFairest = true;
When you run the application now, reflecting on itself and getting type information about the class that represents the form module, you'll see these fields as well as the standard form methods, properties, and events (Figure 5.7).
Figure 5.7: Variables declared at the form's class level appear as Fields; all form methods, properties, and events are displayed in the appropriate ListBoxes.
The reflection application can be used to inspect the assemblies that are part of the .NET Framework, as shown in Figure 5.8.
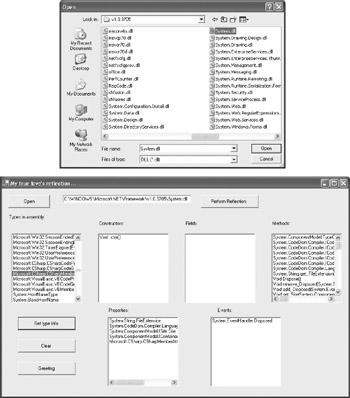
Figure 5.8: Select System.dll, a key class of the .NET Framework (top), and click Open. All the types in the assembly will be displayed (bottom).
Tracking Members with the Class View Window
Visual Studio's Class View window (Figure 5.9) is an excellent way to keep track of namespaces, classes, and class members within a project.