

Visual CSharp .NET Programming (2002) [eng]
.pdfListing 7.4: Creating and Displaying an Array of Structs
public struct Employee {
public string fullName, rank; public long SSN;
public Employee (string fullName, string rank, long SSN) { this.fullName = fullName;
this.rank = rank; this.SSN = SSN;
}
}
private void btnCreate_Click(object sender, System.EventArgs e) { Employee DavisJ = new Employee("Julian Davis", "City Hall", 12345678); Employee DavisN = new Employee("Nicholas Davis", "Opera Singer",
12345678);
Employee HopperK = new Employee("Kenneth Hopper", "Proprietor", 12345678);
Employee [] theRoster = {HopperK, DavisN, DavisJ};
MessageBox.Show(theRoster[1].fullName + " is an " + theRoster[1].rank + ".",
"Arrays", MessageBoxButtons.OK, MessageBoxIcon.Information);
foreach (Employee emp in theRoster) { lstRoster.Items.Add(emp.fullName);
}
}
n-Dimensional Arrays
n-dimensional, or multidimensional, arrays are easy to declare and use. They work just like one-dimensional arrays, except that a comma is placed within the square brackets between the array dimensions.
It's easy to see why you might want to use a two-dimensional array to represent the 'board' of a game like checkers or chess. n-dimensional arrays become handy when more information is needed to adequately model a situation. For example, a three-dimensional array might be used to store stock prices and volume over time.
Here are the declarations for a two-dimensional integer array and a three-dimensional string array:
int [,] numbers; string [,,] words;
Let's have a look at an example. First, declare and instantiate a two-dimensional integer array the2d, with five "rows" and three "columns":
const int rows = 5; const int cols = 3;
int [,] the2d = new int [rows, cols];
Next, populate the array by assigning as a value to each element its row times its column:
for (int i = 0; i < rows; i++) { for (int j = 0; j < cols; j++) {
the2d[i,j] = i * j;
}
}
Next, iterate through both dimensions of the array. For each element, create a string consisting of its coordinates in the array followed by its value, and add it to a ListBox:
for (int i = 0; i < rows; i++) { for (int j = 0; j < cols; j++) {
string theItem = "the2d [" + i.ToString() + "," + j.ToString() + "]
is "
+ the2d[i,j].ToString() + "."; lstMulti.Items.Add(theItem);
}
}
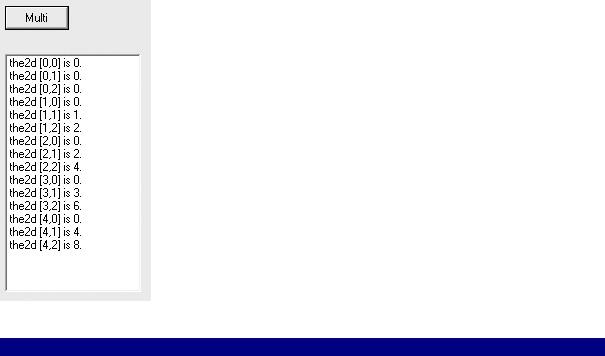
If you run the code (see Listing 7.5), you'll see that the contents of the array are displayed in the ListBox (Figure 7.3).
Figure 7.3: It's easy to declare and initialize multidimensional arrays.
Listing 7.5: Creating and Displaying a Two-Dimensional Array
private void btnMulti_Click(object sender, System.EventArgs e) { const int rows = 5;
const int cols = 3;
// declare 5X3 array
int [,] the2d = new int [rows, cols];
// populate the array
for (int i = 0; i < rows; i++) { for (int j = 0; j < cols; j++) {
the2d[i,j] = i*j;
}

}
// display it
for (int i = 0; i < rows; i++) { for (int j = 0; j < cols; j++) {
string theItem = "the2d [" + i.ToString() + "," + j.ToString() + "] is " + the2d[i,j].ToString() + ".";
lstMulti.Items.Add(theItem);
}
}
}
Arrays of Arrays
An array of arrays (also called a jagged array because of its 'unevenness' compared to a standard n-dimensional array) is an array where each row is a one-dimensional array. Jagged arrays can be declared and instantiated in a single statement-using side-by-side square bracesbut there is no way to initialize the elements of the jagged array in the same statement.
For example, here's how you might declare a two-dimensional jagged string array, with the first dimension having seven rows and the second dimension varying-considerably-in the number of elements:
const int rows = 7;
string [] [] jaggedA = new string [rows] [];
jaggedA[0] = new string [2]; jaggedA[1] = new string [3]; jaggedA[2] = new string [1]; jaggedA[3] = new string [4]; jaggedA[4] = new string [40]; jaggedA[5] = new string [2]; jaggedA[6] = new string [86];
Next, individual elements could be assigned values. For example:
jaggedA [1] [2] = "jagged";
Some of the jagged one-dimensional arrays within arrays are filled using iteration:
for (int dash = 0; dash < 86; dash++) jaggedA [6] [dash] = "-";
Next, each 'column' can be displayed as a single concatenated item in a ListBox:
string column = "";
for (int i = 0; i < 2; i++) {
column = column + " " + jaggedA [0] [i] + " ";
}
lstMulti.Items.Add(column);

Listing 7.6 shows the rather messy code that does this for the entire seven rows (messy because with each 'column' array a different size, nested iteration is not easy). If you run the code, a graph depiction of 'jaggedness' will appear in the ListBox (Figure 7.4).
Figure 7.4: When the column elements of a jagged string array are displayed in a ListBox, rows of unequal length are created.
Listing 7.6: Declaring, Populating, and Displaying a Jagged String Array
private void btnJagged_Click(object sender, System.EventArgs e) {
//declare a jagged array with 7 rows const int rows = 7;
string [] [] jaggedA = new string [rows] [];
//give it some column arrays
jaggedA[0] = new string [2]; jaggedA[1] = new string [3]; jaggedA[2] = new string [1]; jaggedA[3] = new string [4]; jaggedA[4] = new string [40]; jaggedA[5] = new string [2]; jaggedA[6] = new string [86];
// populate it
jaggedA [0] [0] = "This"; jaggedA [0] [1] = "is";
jaggedA [1] [0] = "a"; jaggedA [1] [1] = "very"; jaggedA [1] [2] = "jagged";
jaggedA [2] [0] = "array.";
jaggedA [3] [0] = "It"; jaggedA [3] [1] = "looks"; jaggedA [3] [2] = "extremely"; jaggedA [3] [3] = "uneven.";
//fill the final three columns with dashes (-) for (int dash = 0; dash < 40; dash++)
jaggedA [4] [dash] = "-";
for (int dash = 0; dash < 2; dash++) jaggedA [5] [dash] = "-";
for (int dash = 0; dash < 86; dash++) jaggedA [6] [dash] = "-";
//display it
string column = "";
for (int i = 0; i < 2; i++) {
column = column + " " + jaggedA [0] [i] + " ";

}
lstMulti.Items.Add(column); column = "";
for (int i = 0; i < 3; i++) {
column = column + " " + jaggedA [1] [i] + " ";
}
lstMulti.Items.Add(column); column = "";
for (int i = 0; i < 1; i++) {
column = column + " " + jaggedA [2] [i] + " ";
}
lstMulti.Items.Add(column); column = "";
for (int i = 0; i < 4; i++) {
column = column + " " + jaggedA [3] [i] + " ";
}
lstMulti.Items.Add(column); column = "";
for (int i = 0; i < 40; i++) { column = column + jaggedA [4] [i];
}
lstMulti.Items.Add(column); column = "";
for (int i = 0; i < 2; i++) {
column = column + jaggedA [5] [i];
}
lstMulti.Items.Add(column); column = "";
for (int i = 0; i < 86; i++) { column = column + jaggedA [6] [i];
}
lstMulti.Items.Add(column);
}
Creating a Non-zero Lower Bound
I teased you towards the beginning of the chapter by saying I would show you how to create an array with a non-zero lower bound. Here goes!
Warning You probably won't want to use non-zero lower bounds very often in C#, because arrays created in the way shown in this example do not have many of the conveniences-such as square bracket notation-that we've come to expect when working with arrays.
First, you need to create two integer arrays. The first array is used to store in its elements the size of each dimension you wish to create (the number of elements indicates the number of dimensions). The second array stores the lower bound for each dimension.
In this example, I've used one-dimensional arrays to create an array with six elements where the index of the first element is five-but you could use multidimensional arrays to create an array with different numbers of elements and different lower bounds for different dimensions.
Here are statements that create the two arrays:

int [] theLengths = new int [1] {6}; int [] theBounds = new int [1] {5};
Next, the CreateInstance method of the System.Array class is used to create a non-zero- lower-bound array in the variable theArray. The CreateInstance method is static, indicating that an object of the Array class is not instantiated to use it-as the name of the method implies, it does its own creating of instances.
The first argument of the method is the System.Type of the array to be created, which is derived using the typeof operator-for example, for an integer array, typeof(int). The second and third arguments are the arrays we previously created, which represent the size and lower bound of each dimension:
Array theArray = Array.CreateInstance(typeof(int), theLengths, theBounds);
To test this, let's assign values to each of the putative elements of the array:
for (int i = 5; i < 11; i++) { theArray.SetValue(i,i);
}
We can then use the GetValue method to retrieve and display a value by its index:
MessageBox.Show(theArray.GetValue(7).ToString());
The GetLowerBound method, used with an argument of 0 to retrieve the first-and, in this case, only-dimension of the array, shows that the lower bound is what it is supposed to be, 5:
MessageBox.Show(theArray.GetLowerBound(0).ToString());
Finally, if you try to invoke an element using an index that would normally be in-bounds for a six-element array,
MessageBox.Show(theArray.GetValue(2).ToString());
an out-of-bounds exception is fired.
The code for generating and testing the non-zero-lower-bound array is shown in Listing 7.7.
Listing 7.7: Creating, Populating, and Testing an Array with a Specified (Non-zero) Lower Bound
private void btnNonZero_Click(object sender, System.EventArgs e) { int [] theLengths = new int [1] {6};
int [] theBounds = new int [1] {5};
Array theArray = Array.CreateInstance(typeof(int), theLengths, theBounds);
for (int i = 5; i < 11; i++) { theArray.SetValue(i,i);
}
MessageBox.Show(theArray.GetValue(7).ToString());
MessageBox.Show(theArray.GetLowerBound(0).ToString());

MessageBox.Show(theArray.GetValue(2).ToString());
}
Indexers
An indexer is a class member that allows an object to be referenced in the same way as an array using square brackets ([]). Since indexers use the square bracket array notation, they neither need nor have a name.
Listing 7.8 shows a class that contains an indexer. The class encapsulates a 42-element integer array, which is private to the class, and the indexer simply provides a means of saving
or retrieving array values, providing that the index passed to the indexer is within range of the array.
Listing 7.8: Creating a Class with an Indexer
class IAmAnIndexerClass {
private int [] theArray = new int[42];
//declare the indexer public int this [int ndx] {
get {
if (ndx < 0 || ndx >= 42) return 0;
else
return theArray [ndx];
}
set {
if (!(ndx < 0 || ndx >= 42)) theArray [ndx] = value;
}
}
}
Here's the indexer declaration:
public int this [int ndx] {
...
}
If you look at Listing 7.8, you'll see get and set accessors within the indexer-just like in a property statement.
To use the IAmAnIndexerClass class, an object of the type of the class must be instantiated:
IAmAnIndexerClass iaaio = new IAmAnIndexerClass();
As a demonstration, I'll use the IAmAnIndexerClass indexer to access iaaio-short for "I am an indexer object"-using array syntax. Each "element" in iaaio will be examined using the IsPrime web service developed in the beginning of this book. If the index of the element is a prime, then that prime is saved to the element; otherwise, the value of the element is left at the default, which is 0.
As a first step, you'll need to add a web reference to the SybexC2 service as explained in Chapter 2, 'Consuming the Service on the Web.'
Before invoking the web service, you might want to turn the mouse pointer to an hourglass so that the user knows to expect a delay:
this.Cursor = Cursors.WaitCursors;
The service needs to be named and instantiated as theService:
theService.SybexC2Service theService = new theService.SybexC2Service();
Next, we can easily check whether a given integer is prime, and if it is, use the iaaio indexer to store the value:
for (int i = 0; i < 42 ; i++) { if (theService.IsPrime(i,0))
iaaio [i] = i;
}
Note As you may remember from Chapter 2, the second argument sent to the IsPrime method represents a delay in seconds; this is irrelevant to the current task.
Once the calls to the web service have completed, the mouse pointer should be returned to the normal default:
this.Cursor = Cursors.Default;
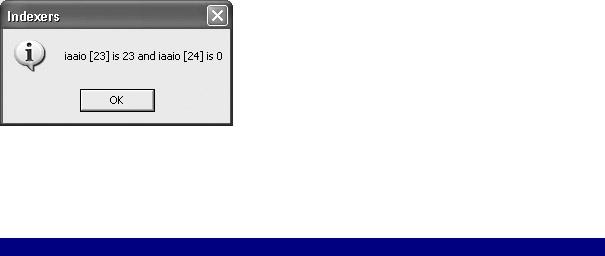
Finally, we can do a bit of displaying to make sure this came out right. Since 23 is a prime and 24 is not, the value of iaaio[23] should be 23 and the value of iaaio[24] should be 0, as shown here.
The code for instantiating an object based on the class and accessing its members using the indexer is shown in Listing 7.9.
Listing 7.9: Instantiating an Object Based on the Indexer Class and Accessing Its Members Using Index Syntax
private void btnIndexer_Click(object sender, System.EventArgs e) { IAmAnIndexerClass iaaio = new IAmAnIndexerClass();
this.Cursor = Cursors.WaitCursors; theService.SybexC2Service theService = new
theService.SybexC2Service(); for (int i = 0; i < 42 ; i++) { if (theService.IsPrime(i,0))
iaaio [i] = i;
}
this.Cursor = Cursors.Default;
MessageBox.Show("iaaio [23] is " + iaaio [23].ToString() +
" and iaaio [24] is " + iaaio [24].ToString(), "Indexers", MessageBoxButtons.OK, MessageBoxIcon.Information);
}
Collection Classes
In quite a few cases, structures that are based on classes other than System.Array will work better to organize groups of items for specific purposes. We'll have a look at working with objects based on some of these classes-ArrayList, Queue, Stack, and SortedList-in the remainder of this chapter. In the meantime, you should know that these classes appear for the most part in the System.Collections namespace (some of the classes that are based on Dictionary structures are located in the System.Collections.Specialized namespace).
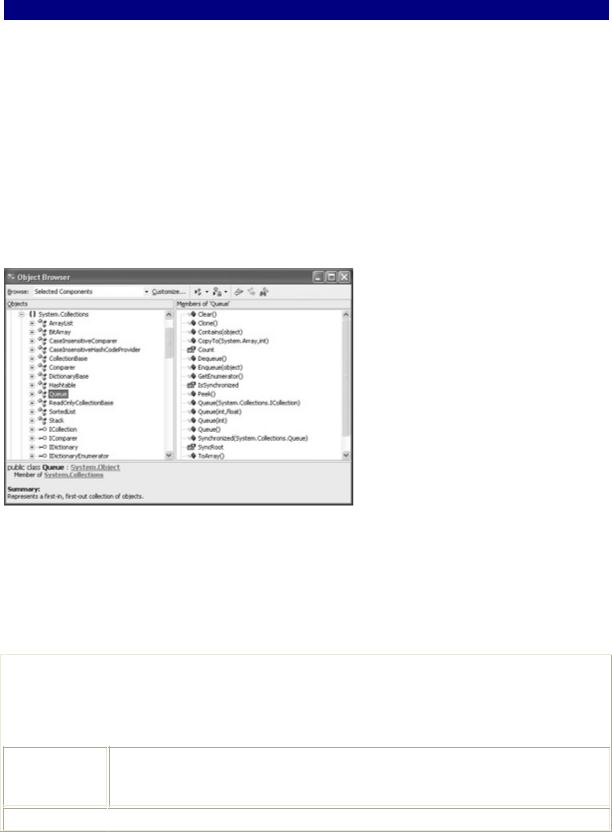
As you can see in Figure 7.5, you can find out a great deal about these classes by pointing the Object Browser at System.Collections.
Figure 7.5: You can use the Object Browser to inspect the collection classes that are the members of System.Collections.
Table 7.3 describes some of the most useful collection classes. You should know that each one of these classes has quite a few members (properties and methods) that you will need to know about to successfully use the class. (Most of these classes have members comparable in extent and utility to the Array members shown in Tables 7.1 and 7.2.)
|
|
Table 7.3: Useful Collection Classes |
Class |
|
Description |
|
|
|
ArrayList |
|
Used to create an array-like structure whose size is dynamically altered as |
|
|
items are added and removed (see example later in this chapter). |
CollectionBase Provides the abstract base classmeaning the class cannot be instantiated, only inherited, and can contain abstract (or nonimplemented) membersfor acollection.
DictionaryBase
 Provides the abstract base class for a dictionary-style collection of key/value
|
|
Table 7.3: Useful Collection Classes |
|
|
|
Class |
|
Description |
|
|
|
|
|
pairs. |
|
|
|
Hashtable |
|
Used to create a collection of key/value pairs that are organized based on the |
|
|
hash code of the key. |
|
|
|
Queue |
|
Used to create a first in, first out collection of objects (see example later in |
|
|
thischapter). |
|
|
|
SortedList |
|
Used to create a collection of key/value pairs that are sorted by the keys and |
|
|
are accessible by key and by indexso it combines the features of an array |
|
|
with those of a dictionary (see example later in this chapter). |
|
|
|
Stack |
|
Used to create a last in, first out collection of objects (see example later in |
|
|
this chapter). |
|
|
|
You can find out a lot about collection classes and class members using the Object Browser (and auto-completion in the Code Editor), but if you are programming an object based on one of these classes, you really should review the full list of the (copious) properties and methods by looking up the class name followed by the word Members in online help (for example, 'ArrayList Members' or 'Queue Members').
Collection Interfaces
An interface provides a binding contract with any class that uses the members specified in the interface. In other words, when a class implements an interface, it tells any object that uses the class that it will support the methods, properties, events, and indexers of the named interface.
This means that objects based on classes that implement the interface all work in the same, comfortable, familiar way.
Interfaces in the .NET Framework, by convention, start with a capital I-for example, IEnumerator. Internally, the syntax of an interface looks like the signatures for a bunch of methods, properties, etc.-without the implementation specifics for these members. I discuss interfaces further in Chapter 9, "Everything Is String Manipulation."
Table 7.4 shows some of the interfaces implemented by the collection classes. In addition, if you need to implement a custom data structure, you should plan to implement at least some of these interfaces.
|
|
Table 7.4: Selected Collection Interfaces |
|
|
|
Interface |
|
Description |
|
|
|
ICollection |
|
Defines size, enumerators, and synchronization methods for all |
|
|
collections. |
|
|
|
IComparer |
|
Exposes a method that compares two objects. |
|
|
|
IDictionary |
|
Represents a collection of key/value pairs. |
|
||
IDictionaryEnumerator |
|
Enumerates the elements of a dictionary. |
|
|
|
IEnumerable |
|
Exposes the enumerator, which supports a simple iteration over a |
|
|
|