

Visual CSharp .NET Programming (2002) [eng]
.pdfIn Multiple Document Interface (MDI) applications, there is one MDI form, or parent form. There are usually many MDI child forms. There can be more than one type of MDI child form, but all children, whatever their type, must fit into the client space of the parent
MDI window.
It is perhaps the case that MDI applications are no longer very stylish. The thinking is that it probably makes just as much sense to open multiple copies of a single application as to have one application with multiple client windows. Be that as it may, it's easy to rig MDI applications in .NET-and you should know how.
As an example of how to 'wire' an MDI application, let's turn the Notepad applet created in the last section into the child form of an MDI application.
The first step is to add a new form (to serve as the parent) to the project. Choose Project →?Add Windows Form to open the Add New Item dialog (Figure 4.16).
Figure 4.16: The Add New Item dialog is used to add a 'parent' form to a project.
In the Add New Item dialog, make sure Windows Form is selected, name the form frmParent.cs, and click Open. The new parent form will be added to the project.
Open frmParent in its designer. Add a panel to the bottom of the form, and a button, btnShowChild, to the right side of the panel (the bottom-right of the form). Use the Properties window to set the Anchor property of btnShowChild to Bottom, Right.
Next, use the Properties window to set the IsMDIContainer property of frmParent to true (Figure 4.17).

Figure 4.17: Setting the form's IsMDIContainer to true means that it can become a parent. Tip When you set IsMDIContainer to true, you'll note that the client area of frmParent shifts
in color, becoming a darker shade of gray.
Setting the Startup Object
The next step in helping frmParent to become a parent is re-jiggering the application to let it start from frmParent. In order for a form to be a Startup Object, it needs a Main method.
Because the original form in the project, Form1, the basis for the Notepad applet, had a Main method, Visual Studio didn't automatically give frmParent a main method. You need to give frmParent one now:
[STAThread]
static void Main() { Application.Run(new frmParent());
}
The Run method of the Application object is invoked with the constructor method for the frmParent class.
Note The [STAThread] attribute tells the Common Language Runtime that a single-threaded apartment model is being used.
Form1 still has its own Main method:
[STAThread]
static void Main() { Application.Run(new Form1());
}
You now have a choice: you can delete the Main method from Form1-in which case, the application will start by default from frmParent. Or, you can open the project Property Pages dialog-by selecting the project in Solution Explorer, right-clicking, and choosing Properties

from the context menu-and explicitly set frmParent as the Startup Object using the General tab (Figure 4.18).
Figure 4.18: If there are multiple modules with entry points-Main methods-then the Startup Object is set using the project's properties pages.
Displaying Children
With the application set to open frmParent first off, the mechanism for displaying the child form needs to be created. This goes in the click event handler for btnShowChild. First, a variable named frmChild, of type Form1, is instantiated:
Form1 frmChild = new Form1();
Next, the MdiParent property of frmChild is set to the current form, frmParent:
frmChild.MdiParent = this;
The child form is given text for its caption bar using a counter variable, i, to indicate which child it is:
frmChild.Text = "I am child #" + i.ToString();
The counter, which was declared at the class level, is iterated:
i++;
Finally, the new instance of Form1 is shown:
frmChild.Show()
Listing 4.7 shows the frmParent class declaration, the counter variable, its Main method, and the click event handler for displaying child forms.
Listing 4.7: Adding Child Forms
...
public class frmParent : System.Windows.Forms.Form {

private System.Windows.Forms.Panel panel1; private System.Windows.Forms.Button btnShowChild; int i = 1;
...
[STAThread]
static void Main() { Application.Run(new frmParent());
}
...
private void btnShowChild_Click(object sender, System.EventArgs e) { Form1 frmChild = new Form1();
frmChild.MdiParent = this;
frmChild.Text = "I am child #" + i.ToString(); i++;
frmChild.Show();
}
...
The MDI Window Menu
A crucial part of the look and feel of an MDI application is a special MDI Window menu. This menu displays a list of all open MDI children and places a check mark next to the currently active child window. It allows the user to navigate between child windows, by selecting one from the list on the MDI Window menu. In addition, it's also conventional and convenient to include the ability to arrange the children forms (in several ways) on the MDI Window menu.
The MDI Window is constructed in the MDI container-frmParent, in our example. You can create it by adding a MainMenu control to the form and using the visual menu designer-or by constructing it entirely in code, as shown in Listing 4.8. Note that setting a top-level menu's MdiList property to true:
mnu.MdiList = true;
sets up the MDI list of child windows. It's also worth observing that the menu shown in Listing 4.8 merges with the menu belonging to a child form when the child is displayed. Aesthetically, the child menu should come before the Window menu. This is controlled by the MergeOrder property:
mnu.MergeOrder = 3;
Listing 4.8: An MDI Window Menu
Menu = new MainMenu();
// MDI Window menu
MenuItem mnu = new MenuItem("&Window"); mnu.MdiList = true;
mnu.MergeOrder = 3; Menu.MenuItems.Add(mnu);
// Cascade
MenuItem mnuCascade = new MenuItem("&Cascade"); mnuCascade.Click += new EventHandler(MDImenu_Click); Menu.MenuItems[0].MenuItems.Add(mnuCascade);

// Tile Horizontal
MenuItem mnuTileH = new MenuItem("&Tile Horizontal"); mnuTileH.Click += new EventHandler(MDImenu_Click); Menu.MenuItems[0].MenuItems.Add(mnuTileH);
// Tile Vertical
MenuItem mnuTileV = new MenuItem("Tile &Vertical"); mnuTileV.Click += new EventHandler(MDImenu_Click); Menu.MenuItems[0].MenuItems.Add(mnuTileV);
// Arrange Icons
MenuItem mnuArrange = new MenuItem("&Arrange Icons"); mnuArrange.Click += new EventHandler(MDImenu_Click); Menu.MenuItems[0].MenuItems.Add(mnuArrange);
Note that the menu shown in Listing 4.8 does not implement functionality in child window arrangements; for each choice, it merely invokes a common event, MDImenu_Click. The MDIMenu_ Click event handler, shown in Listing 4.9, has the job of determining which menu item invoked it by casting the sender parameter to a MenuItem and then checking its Text property:
MenuItem mnu = (MenuItem) sender; switch (mnu.Text) {
...
The LayoutMdi method of the parent form is then used with the appropriate argument to arrange the child windows as shown in Listing 4.9.
Listing 4.9: Implementing MDI Window Functionality
void MDImenu_Click(object sender, EventArgs e) { MenuItem mnu = (MenuItem) sender;
switch (mnu.Text) { case "&Cascade":
this.LayoutMdi(MdiLayout.Cascade);
break;
case "&Tile Horizontal": this.LayoutMdi(MdiLayout.TileHorizontal); break;
case "Tile &Vertical": this.LayoutMdi(MdiLayout.TileVertical); break;
case "&Arrange Icons": this.LayoutMdi(MdiLayout.ArrangeIcons); break;
}
}
If you run the application, you'll see that it is fully functional within normal parameters for an MDI application (Figure 4.19).
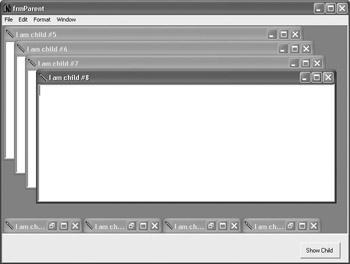
Figure 4.19: It's easy to create MDI applications.
Conclusion
This chapter-and the previous one-has explored using Visual C#, Visual Studio, and the .NET Framework to create functional and exciting user interfaces.
In Chapter 5, 'Reflecting on Classes,' we'll move on to have a look at the organization of the classes within the .NET Framework. Using this organization as a model of clarity leads to an interesting and fruitful field of speculation: what are the best ways to organize classes? And, more generally, are there patterns of practice that are useful in constructing class-based applications? What is the vocabulary used to notate these patterns and how are they recognized?
Chapter 5: Reflecting on Classes
Overview
•Assemblies and namespaces
•Using .NET namespaces
•Reflection
•Working with the Class View window and the Object Browser
•Creating a class library
No man is an island,' wrote seventeenth century poet John Donne. This famous epigram equally applies to program code-it runs in a context, after compilation, on an operating system, and quite likely invoking run-time libraries of code. Certainly, this is true of C# .NET code, which uses the class libraries of the .NET Framework for functionality and can only run through the grace of the Common Language Runtime (CLR).
So far in this book, C# code has been presented basically as separate and apart-as an island, as it were. It's time to have a look at the connectedness of C# programs that you write to the class libraries that make up the .NET Framework.
This chapter explores the organization of programs, internally and for deployment. I also explain reflection, which is used to glean information about the types that make up a
compiled program; this information can be used dynamically while the program in question is running.
How are the classes in the .NET Framework organized? I explain how to use the Object Browser, the best discovery tool for exploring the .NET Framework. When it comes time to deploy your own class libraries, following the design guidelines for .NET classes will help you organize for maximum usability.
Assemblies and Namespaces
Assemblies are the fundamental unit for deployment, version control, security, and more for a
.NET application. In other words, assemblies are deployable units of code that correspond to stand-alone executable files or DLL libraries. Each compiled C# .NET program has at least one related assembly. Every time you build an executable (EXE) or a library (DLL) file in
.NET, you are creating an assembly.
Namespaces are used to organize the classes within assemblies. Assemblies can contain many namespaces, which, in turn, can contain other namespaces. Namespaces are used to make it easier to refer to items, to avoid ambiguity, and to simplify references when large groups of classes are involved.
The Assembly Manifest
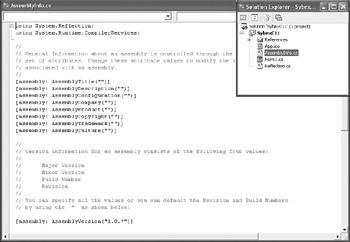
When you start a new C# project, it is the basis of an assembly. Within each built assembly is a manifest, as part of the executable or library. In C#, some of the general manifest information is contained in a file that is part of the project, named AssemblyInfo.cs. Figure 5.1 shows a small project in the Visual Studio Solution Explorer and shows the contents of a sample AssemblyInfo.cs file when opened with the Visual Studio editor.
Figure 5.1: Each C# .NET project includes a file that forms the basis of the assembly manifest. The manifest carries information about content, version, and dependencies so that C# .NET applications don't depend on Registry values.

The assembly manifest can be thought of as a 'table of contents' for an application. It includes the following information:
•The assembly's name and version number
•A file table, listing and describing the files that make up the assembly
•An assembly reference list, which is a catalog of external dependencies
The external dependencies in the assembly reference list may be library files created by someone else, and it's likely that some of them are part of the .NET Framework.
Assembly References
To use an assembly, or a class within an assembly, the assembly must be referenced in your project. Depending on the type of project, you'll find that many of the assemblies that are part of the .NET Framework are referenced by default.
Different project types have different default references. The references that come 'out of the box' for a Windows forms project are not the same as those for a web forms project, although both do reference certain important .NET assemblies such as System.dll.
You can see which assemblies are already referenced in a project by expanding the References node in the Solution Explorer.
If you need to reference an assembly that is not already included in your project, follow these steps:
1.Select Project → Add Reference. (Alternatively, select the References node in Solution Explorer. Right-click, and select Add Reference from the context menu.) The Add Reference dialog will open, as shown in Figure 5.2.

Figure 5.2: The Add Reference dialog is used to add a reference to a project.
2.Select a .NET assembly to add (listed in the Component Name column of the .NET tab).
3.Click the Select button to add the assembly to the Selected Components list (shown at the bottom of Figure 5.2).
4.Click OK to add the reference to the .NET component.
Alternatively, if the assembly you want to add a reference to does not appear on the .NET tab, click the Browse button in the upper-right corner of the Add Reference dialog. The Select Component dialog will open. Locate the assembly to be added and click Open. The assembly will be added to the Selected Components panel of the Add Reference dialog. Click OK to add the reference to your project.
Namespaces
If you drill down one step below the assembly level, you'll find that the members of a given assembly are namespaces. Another way of putting this is that namespaces are the internal organization of the classes defined in an assembly. For example, Microsoft.CSharp is a namespace that is part of the System assembly. It contains classes that support compilation and code generation using the C# language. (What can get a little confusing is that sometimes a namespace and an assembly can have the same name.)
By default, every executable file you create in C# .NET contains a namespace with the same name as your project, although you can change this default name.
You should also know that namespaces can span multiple assemblies. In other words, if two assemblies both define classes within a namespace myNameSpace, then myNameSpace is treated as a single set of names.
The .NET Framework uses a dot operator (.) syntax to designate hierarchies. Related types are grouped into namespaces, so that they can be more easily found. Reading left to right, the first part of a type, up to the first dot, is the namespace name. The last part of the name, to the right of the final period, is the type name. For example System.Boolean designates a Boolean value-type in the System namespace. System.Windows.Forms.MessageBox designates the
MessageBox class within the Forms namespace, that is part of the Windows namespace, that is part of System.
As these examples suggest, the System namespace is the root namespace for all types within the .NET Framework. All base data types used by all applications are included in the System namespace or the Microsoft namespace.
One of the most important types within the System namespace is System.Object, also called the Object class. This class is the root of the .NET type hierarchy and the ultimate parent (or superclass) of all classes in the .NET Framework. This implies that the members of the Object class-such as GetType() and ToString()-are contained in all .NET classes.
Namespace Directives
You have several ways of referring to an object based on a class within a namespace once the assembly containing the class you are interested in has been referenced.
The using Directive
You can use the fully qualified name of the item, as in this variable declaration for btnClear:
private System.Windows.Forms.Button btnClear;
Alternatively, you can place a using namespace directive at the beginning of a code module, as shown here:
using System.Windows.Forms;
After you add a using directive, all of the names in the imported namespace can be used (provided they are unique to your project), like this:
private Button btnClear;
Note The using System directive will automatically be included in most C# modules. This means that you don't have to explicitly invoke System: Windows.Forms.Button btnClear will mean the same thing as System.Windows.Forms.Button btnClear.
The Alias Directive
An alias namespace directive allows a program to use its own, internally assigned, shorthand name for a namespace (or a namespace plus a type belonging to the namespace). This can save you a great deal of typing of long, qualified namespaces, possibly followed by types-and it can help make your code clearer.
Here's how it works. If you add an identifier and an assignment to the using directive, then the identifier can be used in place of the assigned namespace (and type). For example:
using swfb = System.Windows.Forms.Button;
Given this directive, a corresponding variable declaration for a variable named btnClear of type Button could look like this: