

Visual CSharp .NET Programming (2002) [eng]
.pdfFigure 5.9: You can use the Class View window to understand how namespaces, classes, and their members are structured in a project.
To open the Class View window, select View → Class View. The Class View window can also be opened by clicking a button on the Visual Studio toolbar (Figure 5.10).
Figure 5.10: The Class View window can be conveniently opened using a toolbar icon.
With a member of a class selected in the Class View window, if you right-click, a context menu appears. From this context menu, Go To Definition takes you to the code that declares the member (opening the Code Editor if necessary). Go To Reference takes you to the first use of the member. And Browse Definition opens the Object Browser with the member loaded (Figure 5.11).
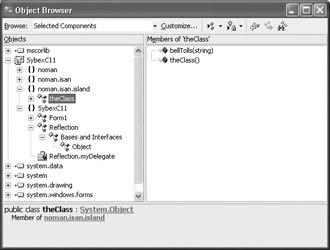
Figure 5.11: By choosing Browse Definition with a member selected in the Class View window, the Object Browser will open, displaying the member's definition.
Navigating with the Object Browser
The Object Browser lets you determine the members of .NET objects, or classes, and the relationships of objects to each other. You can easily use the Object Browser to learn about the objects available for use in your programs.
The Object Browser also teaches about the structure of the .NET Framework. You can use it to discern the hierarchy of classes, members of classes, as well as the properties, events, and methods of each object.
Thus, the Object Browser is a tool of discovery, rather than a tool you use to actually do anything. But it's probably the single most important discovery tool included in the Visual Studio .NET development environment.
Opening the Object Browser
To open the Object Browser, use one of the following methods:
•Select View → Other Windows → Object Browser from the Visual Studio menus.
•Highlight a member in the Class View window, right-click, and choose Browse Definition.
•Press the keyboard shortcut, Ctrl+Alt+J.
•In the Code Editor, place the cursor on a .NET object, right-click, and choose Go To Definition.
Opening the Object Browser Using Go To Definition
When you open the Object Browser from the Code Editor (by choosing Go To Definition from a .NET object's context menu), the Object Browser will open with the highlighted object defined. Note that this does not work if the cursor is hovering over a variable or keyword. In the case of a keyword, Go To Definition does nothing. In the case of a variable, method, or procedure or functional call, Go To Definition takes you to the declaration for the object.
For example, suppose you have a component in your project named openFileDialog1 of type System.Windows.Forms.OpenFileDialog. With the cursor over the statement using
openFileDialog1, right-click and select Go To Definition. You will be taken to the declaration for openFileDialog1 at the beginning of the module. Likely, this declaration was generated for you when you added the OpenFileDialog control to your form. It's probably along these lines:
private System.Windows.Forms.OpenFileDialog openFileDialog1;
If you move the cursor to OpenFileDialog at the end of this declaration statement, and then select Go To Definition again, the Object Browser will open to the definition of the OpenFileDialog class, as shown in Figure 5.12.
Figure 5.12: The class definition of an object is shown in the Object Browser.
Using the Object Browser Interface
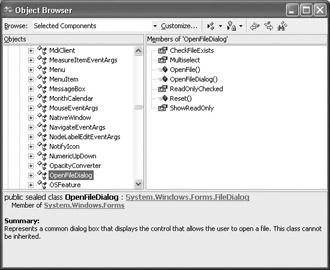
The Object Browser interface consists of a toolbar and three panes: the Objects pane, the Members pane, and the Description pane. Figure 5.13 shows the full Object Browser interface, with information for the MessageBox class.

Figure 5.13: The Members pane shows the members of an object selected in the Objects pane, and the Description pane provides information about the selected object.
The Objects Pane
The Objects pane provides a hierarchical view of the objects (or classes) contained in the namespaces that are within the scope of the Object Browser. Here is an example of the Objects pane with System.Drawing.Color selected and some of the members of Color visible in the Members pane.
Clicking the + or − icons in the Objects pane expands or contracts the tree view of objects. (Color is a member of System.Drawing, so expanding System.Drawing shows the Color class.)
If you fully expand an object in the Objects pane, a great deal about the object-such as the classes that it is based on-will be displayed in the Objects pane.
The Members Pane
The Members pane shows the members of an object selected in the Objects pane. Members mean properties, methods, events, variables, constants, and enumeration values.
A different icon indicates each different kind of member. In addition, one other icon, a key, means the member is protected, or only accessible from within its own class (or a derived class). (For more on this topic, see Chapter 8.)

The Description Pane
The Description pane provides a great deal of information about the object currently selected in the Objects pane. This information isn't the same for all objects, but it usually includes the following:
•A description of the object
•The name of the object and its parent object
•The object syntax
•Links to related objects and members
Note The links in the Description pane take you to objects that are related to the selected object. They are immensely valuable for quickly gathering information about an object.
The Toolbar
The Object Browser toolbar is used to customize the Object Browser scope, arrange the contents of the Object Browser, navigate, and find identifiers (such as object names, but called symbols here).
Setting the Object Browser Scope
When the Object Browser opens, you have a choice regarding the scope of the browser (or which objects it will see). The two scope options are available in the Browse drop-down list in the upperleft corner of the Object Browser. Selected Components is the default initial selection. You can customize the objects included in this scope.
The other scope option is Active Project, which includes the active project and its references (for example, System, and, in the case of a form-based application, System.Windows.Forms). The Active Project setting does not allow any customization of the objects that can be browsed. (But you could go back to the project and add or remove a reference in the Solution Explorer.)
To customize the objects included within the Selected Components scope of the Object Browser, click the Customize button to the right of the Browse drop-down list.
Click the Add button in the Selected Components dialog to open the Component Selector dialog. You can use the Component Selector to choose .NET and COM components to add. To add other projects, executables, and other types of files (such as OLB or TLB type libraries or dynamic link libraries), click the Browse button. Components added to the Selected Components box at the bottom of the Component Selector will appear in the Selected Components dialog and, if checked, will be available to browse in the Object Browser.
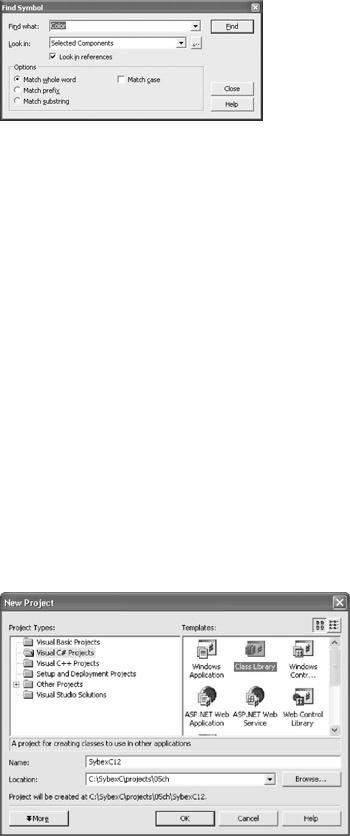
It's likely that the most useful toolbar button is Find Symbol (the button with the binoculars icon). When you click the Find Symbol button, the dialog shown in Figure 5.14 opens.
Figure 5.14: The Find Symbol dialog lets you search for objects using the object's name.
The Find Symbol dialog allows you to search for objects including namespaces, classes, and structures-and the members of these objects-using the object's name.
Note Obviously, the Object Browser tools such as the Find Symbol dialog are the easiest way to locate specific objects within the Object Browser. But pure recreational browsing can teach you a great deal about the way .NET is structured, how to work with it, and even the best way to construct your own object hierarchies (for more on this, see the next section).
Creating a Class Library
Now that you've seen how to inspect the class libraries that are part of the .NET Framework, let's walk through the process of creating your own class library. The class library will contain a single class, which will in turn contain a field, a property, a method, and an event. The point of this is to be very bare-bones. These class members will not be fancy.
After I've shown you how to create each of these members, I'll show you how to use them from a Windows forms project.
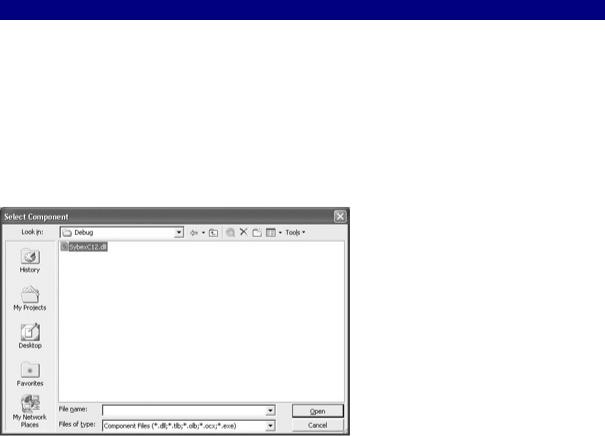
To start with, use the New Project dialog to create a Class Library project by selecting Visual C# Projects in the Project Types pane and Class Library in the Templates pane, and giving the project a name (Figure 5.15).
Figure 5.15: A new project can be opened to serve as the basis for a class library.

When the project opens, it will have a class code module containing (by default) the project name as the namespace and a class named Class1. Our class will be the template representing a baby, and the objects based on the class will be specific babies.
If we keep the namespace, change the class name to Baby to reflect the kinds of objects that will be created based on the class, and remove the class constructor-since we're not going to be using it-we'll now have a code module that looks like this:
using System;
namespace SybexC12
{
public class Baby
{
}
}
Note It probably goes without saying, but let's say it anyhow: the order of members within a class does not matter.
The .NET Design Guidelines
Getting familiar with the Class View and Object Browser tools is a very good thing! There's also no doubt that it will pay you to become familiar with the organization, structure, and way of doing things that goes with the classes in the .NET Framework-since successful .NET programming largely involves working with these classes. But the biggest payoff is in improved usability of your own classes and class libraries. To the extent that you pattern these after the .NET structure, you will be doing things in the way that other developers expect-and they will find your work accessible and understandable.
By following the .NET Framework design guidelines, your code libraries will behave in a predictable and familiar way-cutting down on maintenance effort and making it easier for others to use your libraries, even if they don't have access to the source code.
To view the .NET design guidelines, search online help for 'Design Guidelines for Class Library Developers.' This document functions as a table of contents for class library design topics, and touches on many more areas than will be covered in this section. (You should particularly have a look at 'Naming Guidelines,' which explains the .NET suggested naming conventions for types in class libraries.)
Adding a Field
A field is simply a variable declared at the class level using the public keyword. Since each baby object has a name, let's reflect that fact by giving the Baby class a Name field:
...
public class Baby
{
public string Name = "";
...
Adding a Property
Properties differ from fields, since accessor get and set methods serve as a kind of "gatekeeper" for access to the value contained in the property.
Let's add an Age property to the Baby class. The first step is to declare a private variable to hold the property value internally (in the example, it is initialized to 0):
private int m_Age = 0;
Next, a property procedure is used to provide read-using the get accessor-and writeusing the set accessor-access to the property:
public int Age { get {
return m_Age;
}
set {
m_Age = value;
}
}
The property is set using the special keyword value. If you want to, you can make the property read-only or write-only by only including a get or set accessor function, respectively. You can also include validation code within the property procedures-or, as you'll see in a moment, raise (meaning "fire" or "trigger") an event when a property value is changed.
Adding a Method
A method is simply a public function belonging to the class. Here's one that returns a sound often made by baby objects:
public string GetSound() { return "Waaah!";
}
Adding an Event
To raise an event in the Baby class, we must first declare a delegate, which is a type that defines a method signature-meaning a method's arguments, their types, and the method return type. A delegate instance can hold and invoke a method (or methods) that matches its signature. In turn, the class declares the event by applying the event keyword to a delegate.
Here are the delegate and event declarations for an OnBirthDay event:
public delegate void BirthDayEventHandler (object sender, System.EventArgs e);
public event BirthDayEventHandler OnBirthDay;
It remains to raise the event, which is done by calling the OnBirthDay method with the arguments indicated in the related delegate's signature.

In our Baby class, let's raise the OnBirthDay method when the Age property changes so that it is greater than it was (since it is an integer field, this presumably means that the baby object is a year older). We can do this from within the Age property set method, as follows:
...
set {
if (value > m_Age) { // Raise the event
if (OnBirthDay != null) {
System.EventArgs e = new System.EventArgs(); OnBirthDay(this, e);
}
}
m_Age = value;
}
...
The conditional OnBirthDay != null checks to see that something is using, or, in the lingo, subscribing to the event-otherwise there is no point in firing it. Assuming that the event has subscribers, it is then raised. By the way, the two lines of code
System.EventArgs e = new System.EventArgs();
OnBirthDay(this, e);
could be rewritten for compactness (although not for clarity):
OnBirthDay(this, new System.EvenetArgs());
OK. Let's go ahead and build the class library (Build → Build Solution). The next step will be to open a new Windows forms project with the purpose of instantiating a baby object based on the Baby class and invoking the class methods. In the meantime, Listing 5.4 shows the complete code in the Baby class, with a few comments added for clarity.
Listing 5.4: The Baby Class
using System;
namespace SybexC12
{
public class Baby
{
// Field
public string Name = "";
//Private variable for property private int m_Age = 0;
//Property
public int Age { get {
return m_Age;
}
set {
if (value > m_Age) { // Raise the event
if (OnBirthDay != null) {
System.EventArgs e = new System.EventArgs();
OnBirthDay(this, e);
}
}
m_Age = value;
}
}
// Method
public string GetSound(){ return "Waaah!";
}
// Event declarations
public delegate void BirthDayEventHandler(object sender, System.EventArgs e);
public event BirthDayEventHandler OnBirthDay;
}
}
Invoking the Class Members
Open a new Windows forms project. The first step is to add a reference to the SybexC12 assembly so that we can instantiate an object based on the Baby class contained in that assembly. To do so, as explained earlier in this chapter, open the Add Reference dialog (Project →?Add Reference), and click the Browse button in its upper-right corner. In the Select Component dialog, shown in Figure 5.16, locate SybexC12 and click Open.
Figure 5.16: The Select Component dialog, opened from the Add Reference dialog, is used to locate the assembly containing the class library.
The SybexC12.dll assembly, which contains the Baby class library, now appears in the Selected Components pane of the Add Reference dialog (Figure 5.17). Click OK to add the reference.