

Visual CSharp .NET Programming (2002) [eng]
.pdfAnalyzing what the auto-generation does, the general process is:
•Declare and instantiate a MainMenu and MenuItems for each menu item.
•Use the AddRange method of the MainMenu's menu item collection to add the toplevel menus.
•For each top-level menu, position it in the collection using the Index property, and then use its collection's AddRange to add its own menu items.
•For each menu item, use the collection Index property to assign a location on the menu, and assign properties such as text and handlers.
•Assign the whole menu structure to the Menu property of the form.
Based on this, it certainly looks like we could pretty easily construct a menu ourselves in code doing at least as well as the auto-generated one. Ultimately, depending on your preferences, you may find it less work to construct menus in code yourself rather than relying on Visual Studio for auto-generation.
Let's construct a menu in code for a completely new application that will use a RichTextBox control and the common dialog wrappers to build a Notepad-like application. Table 4.2 shows the menus that we need.
|
|
Table 4.2: 'Notepad' Application Menus |
||
|
|
|
|
|
File |
|
Edit |
|
Format |
|
|
|
|
|
Open |
|
Cut (mnuEditCut) |
|
Font (mnuFormatFont) |
(mnuFileOpen) |
|
|
|
|
|
|
|
|
|
Save |
|
Copy (mnuEditCopy) |
|
Color (mnuFormatColor) |
(mnuFileSave) |
|
|
|
|
|
|
|
|
|
- (separator) |
|
Paste (mnuEditPaste) |
|
|
|
|
|
|
|
Exit |
|
|
|
|
(mnuFileExit) |
|
|
|
|
|
|
|
|
|
First, within the form's constructor, instantiate a MainMenu object and assign it to the form's Menu property:
Menu = new MainMenu();
Note The above statement is equivalent to this.Menu = new MainMenu();. In other words, the omitted this is implied.
Next, declare and instantiate a File menu item, and add it to the main menu's MenuItems collection:
MenuItem mnu = new MenuItem("&File");
Menu.MenuItems.Add(mnu);
The File menu will be referred to as Menu.MenuItems[0]. Now, go ahead and add the items to the File menu's menu items collection, starting with the Open menu item:
MenuItem mnuFileOpen = new MenuItem("&Open");
mnuFileOpen.Click += new EventHandler(mnuFileOpen_Click); mnuFileOpen.Shortcut = Shortcut.CtrlO; Menu.MenuItems[0].MenuItems.Add(mnuFileOpen);
In this code, a new menu item, mnuFileOpen, is declared and instantiated. A click handler is assigned to it, so you have to create the framework for the event handler:
void mnuFileOpen_Click(object sender, EventArgs e){
}
A shortcut key is also assigned to mnuFileOpen. Finally, the Add method for the File menu collection of items is used to add the item (so, effectively, mnuFileOpen is Menu.MenuItems[0]. MenuItems[0]). The key concept is that a MenuItems collection can itself contain a MenuItems collection!
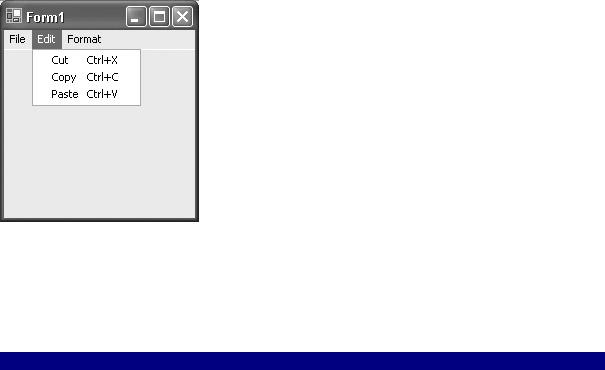
Listing 4.4 shows the completely fleshed-out menu. As you can see in Figure 4.10, this is a fully functional menu, up to all factory specifications. The code shown in Listing 4.4 could, perhaps, be improved by substituting variables for the hard-coded index values. This would create the ability to be easily flexible about menu order in the future.
Figure 4.10: You can easily create fully functional menus in code.
A menu is probably easier to maintain if you create it in code this way than if you autogenerate it. However, the choice is yours; at the least, you should be aware of what the menu designer is doing 'under the hood' in case you need to tweak it.
Listing 4.4: Coding a Menu by Hand
// Form1 constructor public Form1()
{
InitializeComponent();
// Add Menus
Menu = new MainMenu();
// File menu
MenuItem mnu = new MenuItem("&File"); Menu.MenuItems.Add(mnu);
// File Open
MenuItem mnuFileOpen = new MenuItem("&Open"); mnuFileOpen.Click += new EventHandler(mnuFileOpen_Click); mnuFileOpen.Shortcut = Shortcut.CtrlO; Menu.MenuItems[0].MenuItems.Add(mnuFileOpen);
// File Save
MenuItem mnuFileSave = new MenuItem("&Save"); mnuFileSave.Click += new EventHandler(mnuFileSave_Click); mnuFileSave.Shortcut = Shortcut.CtrlS; Menu.MenuItems[0].MenuItems.Add(mnuFileSave);
// separator
mnu = new MenuItem("-"); Menu.MenuItems[0].MenuItems.Add(mnu);
// File Exit
MenuItem mnuFileExit = new MenuItem("E&xit"); mnuFileExit.Click += new EventHandler(mnuFileExit_Click); mnuFileExit.Shortcut = Shortcut.AltF4; Menu.MenuItems[0].MenuItems.Add(mnuFileExit);
// Edit
mnu = new MenuItem("&Edit"); Menu.MenuItems.Add(mnu);
// Edit Cut
MenuItem mnuEditCut = new MenuItem("Cu&t"); mnuEditCut.Click += new EventHandler(mnuEditCut_Click); mnuEditCut.Shortcut = Shortcut.CtrlX; Menu.MenuItems[1].MenuItems.Add(mnuEditCut);
// Edit Copy
MenuItem mnuEditCopy = new MenuItem("&Copy"); mnuEditCopy.Click += new EventHandler(mnuEditCopy_Click); mnuEditCopy.Shortcut = Shortcut.CtrlC; Menu.MenuItems[1].MenuItems.Add(mnuEditCopy);
// Edit Paste
MenuItem mnuEditPaste = new MenuItem("&Paste"); mnuEditPaste.Click += new EventHandler(mnuEditPaste_Click); mnuEditPaste.Shortcut = Shortcut.CtrlV; Menu.MenuItems[1].MenuItems.Add(mnuEditPaste);
// Format
mnu = new MenuItem("&Format"); Menu.MenuItems.Add(mnu);
// Format Font
MenuItem mnuFormatFont = new MenuItem("&Font"); mnuFormatFont.Click += new EventHandler(mnuFormatFont_Click); mnuFormatFont.Shortcut = Shortcut.CtrlF; Menu.MenuItems[2].MenuItems.Add(mnuFormatFont);
// Format Color
MenuItem mnuFormatColor = new MenuItem("&Color"); mnuFormatColor.Click += new EventHandler(mnuFormatColor_Click); mnuFormatColor.Shortcut = Shortcut.CtrlShiftC; Menu.MenuItems[2].MenuItems.Add(mnuFormatColor);
}
...
void mnuFileOpen_Click(object sender, EventArgs e){
}
void mnuFileSave_Click(object sender, EventArgs e){
}
void mnuFileExit_Click(object sender, EventArgs e){
}
void mnuEditCut_Click(object sender, EventArgs e){
}
void mnuEditCopy_Click(object sender, EventArgs e){
}
void mnuEditPaste_Click(object sender, EventArgs e){
}
void mnuFormatFont_Click(object sender, EventArgs e){
}
void mnuFormatColor_Click(object sender, EventArgs e){
}
...
Doing the Common Dialog Thing
Now that we have a menu, created in code, let's build an application around the menu. This will be a Notepad-like application that allows users to: open and save rich text files; cut, copy, and paste selected text to and from the clipboard; and change the color and font characteristics of selected text. The primary user interface will be provided by a RichTextBox control. Common dialog controls will provide users a way to make choices.
Common dialog controls provide a 'wrapper' for dialogs that perform commonly needed tasks, which means that they provide easy access to the functionality of standard Windows dialog boxes. For example, the SaveFileDialog control displays the standard Save As dialog for naming and locating a file to be saved-the same dialog box you see in Microsoft Word and other applications.
By using the .NET common dialog controls to display these dialog boxes, the appearance of your applications becomes standardized. Users see dialog boxes that they recognize and already know how to use.
However, although the common dialog controls show dialog boxes allowing the user to make choices, they don't actually do the work. For example, the SaveFileDialog control doesn't save the contents of a file after the user chooses to save a file. We'll use the methods of the RichTextBox control to do the actual work of changing the characteristics of selected text, working with the Clipboard, and saving and opening files. It's very easy to implement functionality using the methods of the RichTextBox, so that we can concentrate on the common dialogs. But you will need to know how to work directly with files (see Chapter 10, 'Working with Streams and Files'). You should also know that the Clipboard can alternatively be programmed using the members of the Clipboard class.
To get the ball rolling, in the same project with the hand-created menu, add a RichTextBox control. Name it rtb and clear its Text property. Set its Dock property to Fill, meaning it will take up the entire client area of the form and change size with the form.
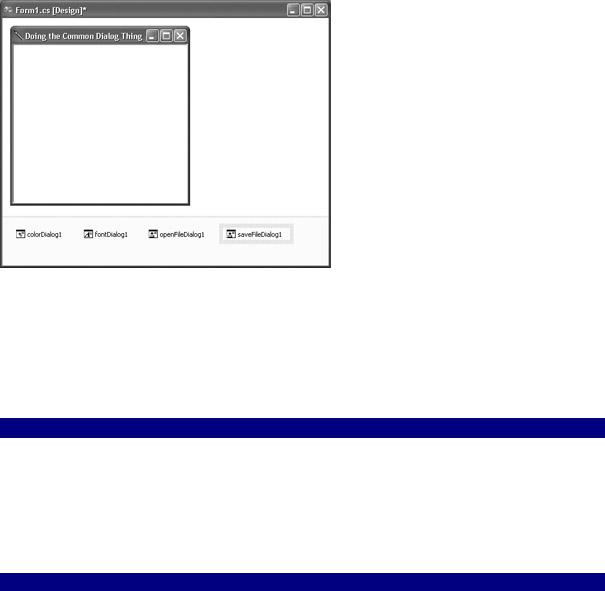
Next, add ColorDialog, FontDialog, OpenFileDialog, and SaveFileDialog controls to the form (these are the common dialog controls the project will implement). Each control appears on the tray beneath the form (Figure 4.11).
Figure 4.11: The form in design mode with common dialog controls in the tray.
Implementing an Edit Menu
Next, use the methods of the RichTextBox to implement the items on the Edit menu-cut, copy, and paste-as shown in Listing 4.5.
Listing 4.5: An Edit Menu
void mnuEditCut_Click(object sender, EventArgs e){ rtb.Cut();
}
void mnuEditCopy_Click(object sender, EventArgs e){ rtb.Copy();
}
void mnuEditPaste_Click(object sender, EventArgs e){ rtb.Paste();
}
These editing methods are inherited by the RichTextBox class from the TextBoxBase class, which implements the core feature set of text-manipulation controls-so, for example, TextBoxes share most of the same functionality, also via inheritance from TextBoxBase. You'll find that the TextBoxBase class has other useful methods that could be used to extend an Edit menu-for example, Redo and Undo methods.
The Color Dialog
Within the click handler for the Color menu item, configure the Color dialog:
colorDialog1.AllowFullOpen = true; colorDialog1.AnyColor = true;
By setting the AllowFullOpen property of the ColorDialog control to true, the user can use the Color dialog to define custom colors. If the AnyColor property is set to true, the dialog displays all available colors; if not, only solid colors-those with 100% opacity-are selectable.
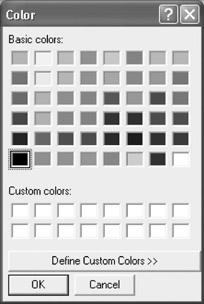
Next, display the dialog (see Figure 4.12):
colorDialog1.ShowDialog();
Figure 4.12: The Color common dialog is used to set the color of the selected text.
Finally, set the selected text to the color chosen in the dialog:
rtb.SelectionColor = colorDialog1.Color;
Note that you might want to store the user selection of color, perhaps to reapply it later to some text. To do this, you could use a variable to capture the user's selection, for example:
Color theColor = colorDialog1.Color;
The Font Dialog
The Font dialog works in much the same way as the Color dialog. If you'd like, you can set its characteristics in advance of invoking it, or you can just use the default, as in the example:
void mnuFormatFont_Click(object sender, EventArgs e){ fontDialog1.ShowDialog();
rtb.SelectionFont = fontDialog1.Font;
}
When the user selects some text and chooses the Font menu item, the Font dialog is displayed (Figure 4.13). Font choices made in the dialog are applied to the selected text, as in Figure 4.14.
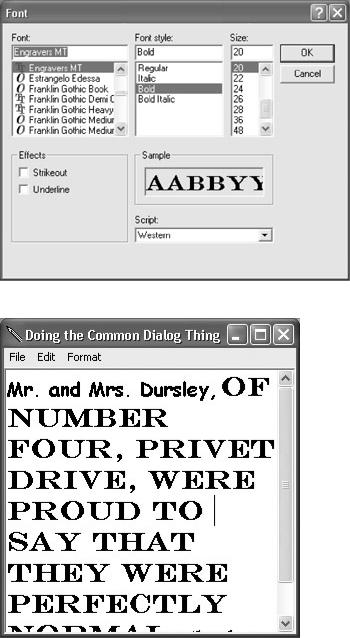
Figure 4.13: The Font common dialog is used to set the font and related attributes of the selected text.
Figure 4.14: Changes to the text formatting are displayed in the RichTextBox.
The Save As and Open Dialogs
The SaveFileDialog control allows the user to pick a file name and location for saving a file via the standard Save As dialog. The OpenFileDialog control lets the user select a file for opening using the Open dialog. To say it once again: designating the file is all these dialogs do; they don't do any of the actual work of saving or loading. We'll let the RichTextBox do the lifting here; for more general information about working with files, see Chapter 10.
As a first order of business, we'll save the contents of the RichTextBox and then retrieve
its contents, formatting and all. Note that the functionality for saving the rich text contents is implemented before the functionality for opening it. It's generally easier to do things in this order rather than looking around for an RTF file (and, even when you find one, you can't be absolutely sure what it should look like).
Saving the Contents of a RichTextBox
It's really very easy to use the SaveFileDialog to implement saving the contents of the RichTextBox. First, set some of the initial characteristics of the Save As dialog.
openFileDialog1.InitialDirectory = Application.ExecutablePath;
This sets the initial directory to the application's executable path (in the case of a C# application running in the development environment, this is the \bin\Debug directory that stores the application's EXE file). Next, set the initial file name to Harold.rtf (a name, other than the suffix, that is dear to my heart!).
SaveFileDialog1.DefaultExt = "rtf";
SaveFileDialog1.FileName = "Harold";
Finally, set a filter to determine the choices that are available to the user in the Save As Type drop-down list.
saveFileDialog1.Filter =
"Rich Text Files (*.rtf) | *.rtf|All files (*.*) | *.*";
The Filter property is a text string delimited by the pipe character (|). Each item consists of a description, followed by a pipe, followed by the file suffix, usually using wildcard characters. Another pipe is used to start the next item.
In the example above, the following is one item:
Rich Text Files (*.rtf) | *.rtf
It is the description followed by the specification, namely *.rtf.
And here's another item:
All Files (*.*) | *.*
This has the specification, *.*, displaying files of all types.
Warning Be careful not to include extra spaces between the end of one item and the beginning of the next. Otherwise, the filter may not work properly.
Next, show the dialog:
SaveFileDialog1.ShowDialog();
The contents of the RichTextBox are saved using its SaveFile method, with the file name selected by the user as its argument:
rtb.SaveFile(SaveFileDialog1.FileName);
To see that this works, run the program and enter some heavily formatted text in the RichTextBox.
Next, choose File → Save. The Save As dialog will open, suggesting a file name, type, and location-Harold.rtf in the \bin\Debug directory.
Warning Unless you set the OverwritePrompt property of the SaveFileDialog to true (either in code or the Properties window), the user can pick an existing file, possibly resulting in overwriting its contents. Setting OverwritePrompt to true causes a message with a warning to appear but allows the user to proceed if they still want to.
Accept the file name, type, and location suggestions. Click Save. A file with the rich text contents will be created at the indicated location. To verify this, you can locate the file and open it in Microsoft Word.
Retrieving Rich Text from a File
The next step is to create the code that will load rich text into the RichTextBox in the application. To do this, we will display an Open dialog using the OpenFileDialog control.
Initializing the OpenFileDialog works in the same way as initializing the SaveFileDialog:
openFileDialog1.InitialDirectory = Application.ExecutablePath; openFileDialog1.DefaultExt = "rtf";
openFileDialog1.FileName = "Harold"; openFileDialog1.Filter =
"Rich Text Files (*.rtf) | *.rtf|All files (*.*) | *.*";
Note As you probably know, the Filter property works the same way in the OpenFileDialog and the SaveFileDialog.
With the OpenFileDialog's properties set, we then need to show the dialog and use the LoadFile method of the RichTextBox to load the contents of the file selected by the user into the control:
OpenFileDialog1.ShowDialog();
rtb.LoadFile(OpenFileDialog1.FileName);
When the user selects File →?Open from the menu, the Open dialog will allow a choice of a file (Figure 4.15). When a file is selected and the Open button clicked, the file is loaded into the RichTextBox.
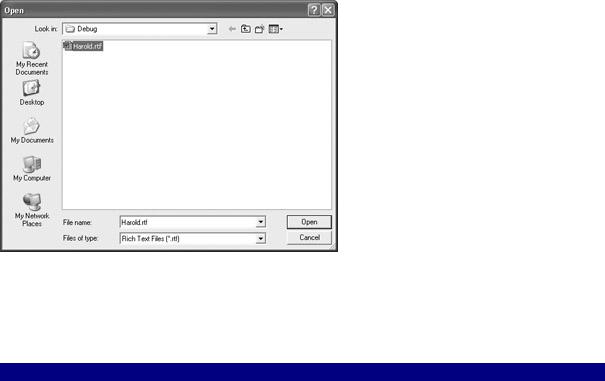
Figure 4.15: The contents of the RichTextBox can be saved and then opened.
The complete code for opening and saving Rich Text files, and for setting the selected text color and font, is shown in Listing 4.6.
Listing 4.6: Opening, Saving, and Setting Font and Color with the Common Dialogs
void mnuFileOpen_Click(object sender, EventArgs e){ openFileDialog1.InitialDirectory = Application.ExecutablePath; openFileDialog1.DefaultExt = "rtf";
openFileDialog1.FileName = "Harold"; openFileDialog1.Filter =
"Rich Text Files (*.rtf) | *.rtf|All files (*.*) | *.*"; openFileDialog1.ShowDialog(); rtb.LoadFile(openFileDialog1.FileName);
}
void mnuFileSave_Click(object sender, EventArgs e){ saveFileDialog1.InitialDirectory = Application.ExecutablePath; saveFileDialog1.DefaultExt = "rtf";
saveFileDialog1.FileName = "Harold"; saveFileDialog1.Filter =
"Rich Text Files (*.rtf) | *.rtf|All files (*.*) | *.*"; saveFileDialog1.ShowDialog(); rtb.SaveFile(saveFileDialog1.FileName);
}
void mnuFormatFont_Click(object sender, EventArgs e){ fontDialog1.ShowDialog();
rtb.SelectionFont = fontDialog1.Font;
}
void mnuFormatColor_Click(object sender, EventArgs e){ colorDialog1.AllowFullOpen = true; colorDialog1.AnyColor = true; colorDialog1.ShowDialog();
// Color theColor = colorDialog1.Color; rtb.SelectionColor = colorDialog1.Color;
}
MDI Applications