

ASP.NET 2.0 Instant Results
.pdfWrox File Share
<siteMapNode url=”ContentFiles/about.aspx” title=”About” /> <siteMapNode url=”ContentFiles/contact.aspx” title=”Contact Us” /> <siteMapNode url=”Management/ManageEmail.aspx” title=”Admin” />
</siteMapNode>
</siteMap>
To add a page to the menu of the web site, you must simply copy and paste (with the necessary modifications) an entry of the Web.sitemap file. In this way, the master page (which contains the only reference to the navigation control) provides visibility to the menu of the site on each page.
The next section explains in detail how to install and configure the source files of the web site and how to deploy the site to a server in a production environment.
Setting up the Project
The time has come to learn how to install this Wrox File Share and see for yourself how quickly you can be up and running with a working resource application. You can install the web site either as a hosted web site application or as a source codebase for editing in Visual Studio 2005 or VWD.
Because the application involves sending e-mails, the configuration of a usable e-mail account is imperative for the project to run properly. Many mail providers do not openly provide SMTP relay to their user accounts, and some careful use of the mail server security protocols may be necessary. This sample application assumes you have access to a mail server with relay permissions granted for a valid user account.
Hosted Web Site Installation
This section assumes that the .NET Framework 2.0 is already installed. If you want to install the Wrox File Share as a hosted web site on a computer or server, without customizations or enhancements at all, follow these steps:
1.Open the folder Chapter 02 – Wrox File Share\Installation Files\ from the CD-ROM that came with this book and double-click the setup.exe file.
2.This process installs the files properly for hosting the web site locally to C:\wwwRoot\FileShare as a file-based web site application. Click Next to install the application, and close the installation program when it completes.
3.Browse to your local web site (for example, http://localhost/FileShare). The Wrox File Share application should appear. To test the Administration section, click the Admin link and log in with a username of Admin and a password of password#.
4.Finally, if you need to expose the site to the outside world, be sure to configure the public IP address to the IIS web site application. The details of this IIS configuration and its implications are outside the scope of this book, but the Wrox File Share is easily configurable as a public web site with a brief tutorial on web site hosting.
67

Chapter 2
Local Developer Installation
This section assumes that the .NET Framework 2.0 is already installed, along with either Visual Studio 2005 or VWD. If you would like to open the project in Visual Studio or VWD, perform the following steps:
1.Create a new web site in Visual Web Developer or Visual Studio 2005.
2.Open the folder Chapter 02 – Wrox File Share Installer\ from the CD-ROM that came with this book and extract the contents of the file FileShareSource.zip to a folder on your hard drive.
3.Open a Windows Explorer and browse to the folder that contains the unpacked files. Next, arrange both Visual Web Developer and the Windows Explorer in such a way that both are visible at the same time.
4.In the Windows Explorer, select all the folders and files within the codebase and drag them from the explorer window into VWD’s Solution Explorer. If you’re prompted to overwrite files, select Yes. You should end up with a Solution Explorer that contains all of the necessary files for the project to run properly.
5.In the appSettings section of the Web.config file, modify the various mail server settings’ values to reflect the SMTP relay e-mail account information to be used for sending e-mails. Also, the PageTitle property is changeable here, which applies to the window title bar of each page in the site:
<appSettings>
<add key=”EmailFrom” value=”admin@wroxfileshare.com”/> <add key=”EmailSubject” value=”File Ready for Download!”/> <add key=”SmtpServer” value=”127.0.0.1”/>
<add key=”MailUser” value=”myalias”/>
<add key=”MailPassword” value=”mypassword”/> <add key=”MailPort” value=”25”/>
<add key=”EmailFormatSelected” value=”Text”/>
<add key=”PageTitle” value=”Wrox File Sharing Website”/> <add key=”ShareLocalFolderPath” value=
“C:\inetpub\wwwroot\FileShare\FileStorage\”/>
<add key=”httpDownloadPath” value=”http://localhost/FileShare/”/> <!--
<add key=”CurrentTheme” value=”CleanBlue” /> -->
<add key=”CurrentTheme” value=”CleanRed”/> </appSettings>
6.Press F5 to run the application in the development environment. The most engaging portion of effort in this process will probably be the use and configuration of the mail server account within the Web.config file.
For some insight on how you can modify your project in order to take advantage of some of the possible uses of the Wrox File Share, head to www.wrox.com and find this book’s download page.
68

Wrox File Share
Summar y
This chapter reviewed some of new controls within the ASP.NET 2.0 Framework, such as the Login,
LoginStatus, PasswordRecovery, SiteMap, SiteMapDataSource, master pages, and Menu controls. The flow of the chapter was centered around a simple application design, using business layer classes, data layer classes, and a basic database structure. You learned how each of these new controls can save development time and effort in great proportions.
The Wrox File Share design provided a glimpse at the class files in use, their properties, their methods, and the general purposes of each. It also gave visibility to the stored procedures, table designs, relationships, and generalized data entities.
The chapter finished by showing you how to extract and customize the Wrox File Share in a development environment, and how to install it to production.
69


3
Wrox Chat Ser ver
A web-based chat application can be a very useful component to your online presence. It is a great way for customers and support representatives to communicate and achieve instantaneous results. Questions can be answered within seconds, whereas e-mail and phone calls have delays that seem to drag the online experience to a grueling halt. Customers can simply type their question along with their order number into the browser window and receive the status of their order almost instantly from the customer support representative on the other side of the world. In other cases, chat applications allow companies to provide cost-effective support regardless of the language barriers that may normally exist between the two people communicating. Certainly, chat applications have had a tremendous impact on the way information is exchanged over the Web. For these reasons and more, many businesses add chat pages to their sites so they can provide instant access to their helpful customer support services. But this simple web site addition can end up becoming a larger effort than it initially appears. What’s the big deal, you ask? It’s just a little chat page! How hard can it be? Well, numerous ways exist to implement a chat application for an organization, and tons of implications may follow. For example, a chat application could require customizations, such as the following:
The capability to store chat messages within a database for reporting purposes.
A provision to logically group the chat rooms for special needs that web users may find helpful.
A way to identify common chat words and phrases that users are chatting about, which may lead to finding commonalities in the user community that provide insight to their interest or concerns.
A way to change the server name and settings of the chat system, allowing for maintenance to server configurations or infrastructure.
A means by which to share chat messages coming in to the web site among many customer support personnel.
Automated chat responses for commonly asked questions. These may include detecting a series of words or phrases that combine to form phrases that can be catalogued, and responses can be sent back in a form of artificial dialogue that might help people find what they are looking for.

Chapter 3
Considering the possibilities, you must take a broad approach to implementing a chat section of a web site for any sort of successful online presence. The basic technology infrastructure needs to focus on the chat mechanisms specifically, because they are the crux of the application and seem to be the differentiator between applications on the market. That is, some chat applications are slower than others, and some are limited to being executed at the desktop level.
The time and energy it takes to create such an application, and the reusable nature of the application itself, make it a perfect candidate to include in this Instant Results book, which provides the basic foundational templates for implementing similar solutions on your own.
The essential features of the Wrox Chat Server include the following:
The capability to enter only your e-mail address and be able to start chatting immediately, without waiting for any sort of applet or heavy application to load.
The display of each chat room is grouped by category, allowing for an organized approach to the available chat categories within your application.
The display of each chat room is accompanied by a number of current chat room members, allowing web browsers to see which chat rooms are currently being accessed.
The use of asynchronous callbacks, a new feature in ASP.NET 2.0, which allow for easy implementation of Ajax methods and technologies (providing behind-the-scenes xmlHttp posts with JavaScript and responding to the posts via events on the server, all without refreshing the page).
The capability to specify the number of hours for which each chat session maintains its messages on the server.
The capability to change the look and feel the entire web site by simply modifying one entry in a configuration file.
These features comprise the bulk of this Wrox Chat Server application — it is fairly straightforward in its use of generalized chat application concepts, but actually implements some very exciting and complicated technologies. So get ready to learn about a few of the greatest web-based features with the all-new ASP.NET 2.0 release!
This chapter analyzes the various components that make up the web site, including the specific controls that ship with the ASP.NET 2.0 development environments. These controls include the following:
Menu control
SiteMapDataSource control
Themes
Master Pages
Callbacks
The section, “Wrox Chat Server Design,” digs into the physical design of the project in great detail. This includes the core pieces of technology and outlines the file structure of the site. It also looks at the various classes involved, the members of each class, and walks you through the database tables and their relationships.
72
Wrox Chat Server
The section titled “Code and Code Explanation” focuses on the design of each class, exposing their methods and properties.
The final section, “Setting up the Project,” reviews how to load up the Wrox Chat Server in a development environment, and how to customize it to meet your needs.
Using the Wrox Chat Ser ver
Using the Wrox Chat Server is completely intuitive. The application has been designed to be the most simplistic approach possible to conducting a chat over the Internet. All you need to do is wrapped up in three simple steps:
1.
2.
3.
Enter your e-mail address and click Continue.
Select a chat room.
Type a message in the chat window and press Enter to send.
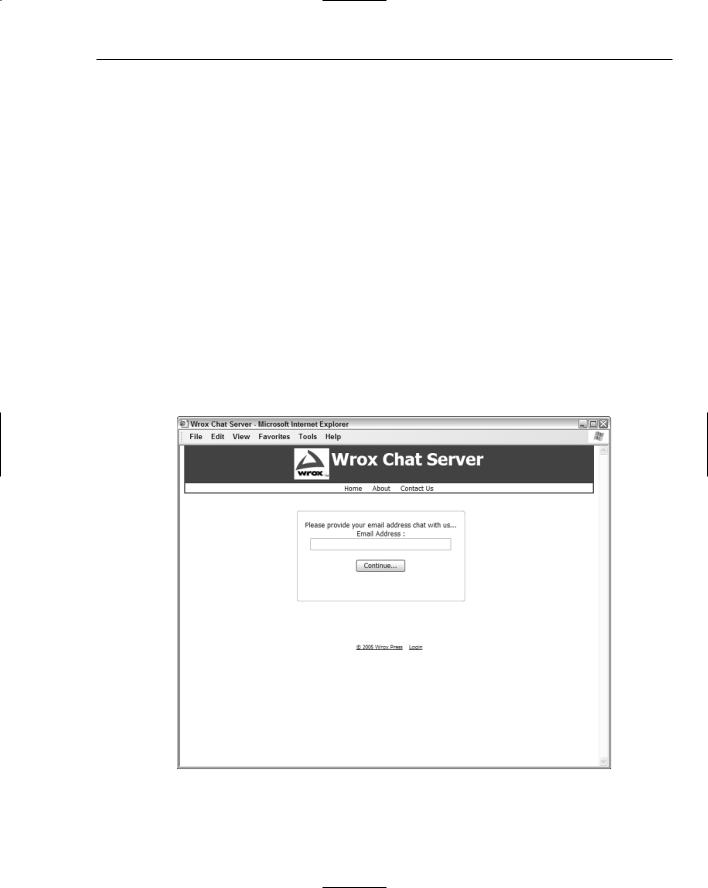
So, cut the chatter and get to business! If you have installed the chat source code to your local machine, (refer to the section “Setting up the Project” later in this chapter), you can browse to view the site by going to http://localhost/ChatServer. The screen shown in Figure 3-1 appears.
Figure 3-1
73
Chapter 3
At the top of the menu are three links to choose from:
Home
About
Contact Us
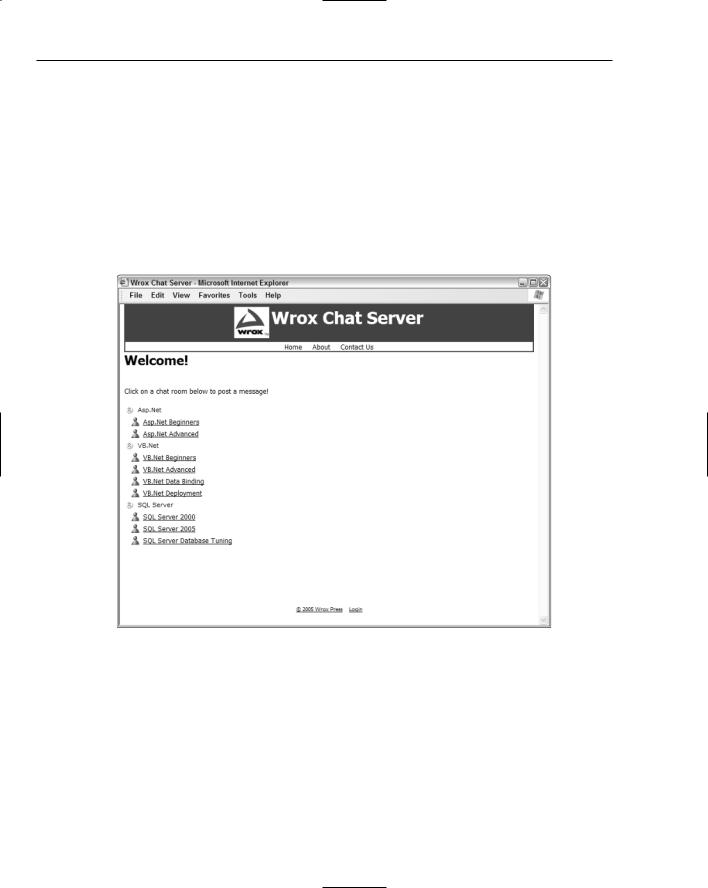
On the homepage, you will see a text box used to capture your e-mail address. Once you enter your e-mail address here, click Continue to proceed. This simply opens up a session variable for your e-mail address, and uses it for the extent of your session within the site. The next screen you are brought to is the chat room selection page (see Figure 3-2), where you will see a list of all the chat rooms available, separated by categories.
Figure 3-2
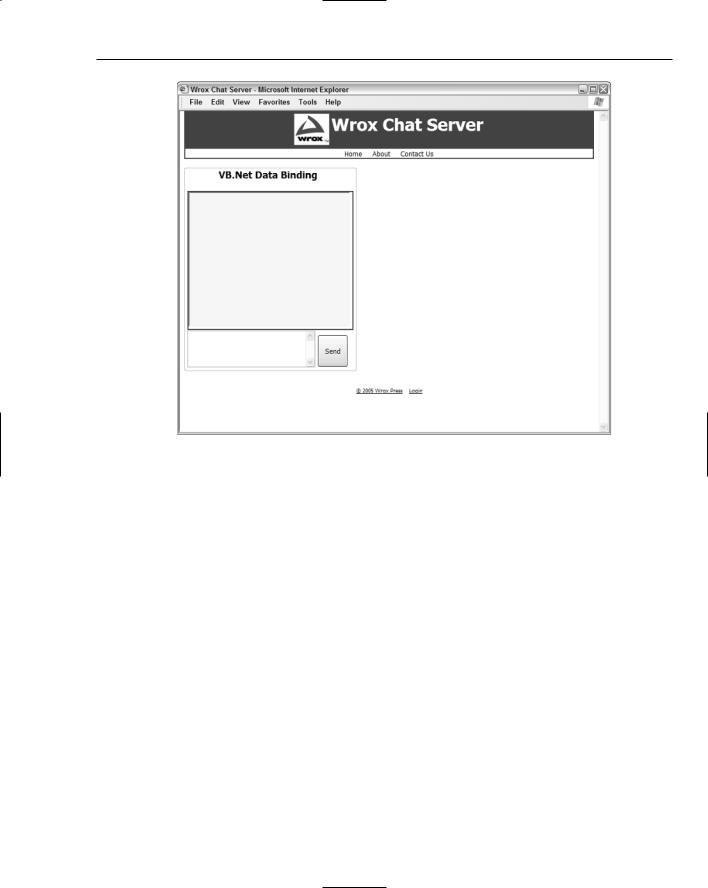
From the interface in Figure 3-2, you can select the chat room by simply clicking its name. You are then brought to the actual chat room, like the one in Figure 3-3, where you are able to enter any text you like into the window.
Figure 3-3 displays the basic chat room interface, with the title of VB.Net Data Binding. It is here that the actual chat interactions will take place.
This chapter covers the essential areas of the development that comprise the application. It walks you through the core class files in detail, outlining their behavior. In addition, you also gain insight into the database, data model, and database objects.
74
Wrox Chat Server
Figure 3-3
The next section addresses the physical design of the application, covering the client, business, and data layers.
Wrox Chat Ser ver Design
In this section you explore the entire design of the Wrox Chat Server, learning how to initiate callbacks, discerning the site’s structure and data model, understanding the themes and skins employed, and finally, absorbing all the classes involved.
Sending Messages Using Callbacks
Callbacks are brand new to the .NET Framework 2.0. They basically allow local browser scripts to make asynchronous calls to remote servers without the need to refresh the page. This technology provides a highly responsive user interface over the Internet, and has been much-needed for many years. Raw data can be sent and received in separate memory spaces without ever refreshing the user’s browser window. This concept is similar to recent technologies that have been masterfully implemented in various online solutions using technologies such as Ajax or Remote Scripting. Although these methods and techniques provide dramatically greater levels of performance within most web interfaces, the actual code to implement such solutions is slightly complicated in nature. Callbacks provide an alternative to the complex implementations of hand-written JavaScript and xmlHTTP post logic.
75

Chapter 3
The flow of events when executing a callback is outlined here:
1.The GetCallbackEventReference method obtains the name of your client-side JavaScript function that is identified as the initiator of the callback. This occurs because your page implemented the ICallbackEventHandler interface. By implementing the interface, the webform automatically adds client-side JavaScript functions for you.
2.The JavaScript that was intrinsically registered at the client contains an extra layer, called the Callback Manager, which is a set of JavaScripts used to launch and receive xmlHTTP posts between the browser and the web server. This Callback Manager intercepts the request that is to be sent to the server as a callback, and creates the actual request mechanism itself as a value-added feature. The Callback Manager sends off the asynchronous xmlHTTP post to the server at this point.
3.Once the Callback Manager has sent the post off to the server, the server receives the request and invokes the ICallbackEventHandler.RaiseCallbackEvent() method, which is where your custom logic can reside, before the server processes the call and returns any sort of response to the caller. Arguments can be accepted in this event as parameters, often used to look up data from a database or process information.
4.The server returns the call over the Internet to the Callback Manager, notifying the client that the request has been received and sent back. String values can be sent back as return values of the call, which are then handed off to the original caller in step 5.
5.Finally, the Callback Manager notifies the JavaScript calling method that the callback has been completed, and passes back any string values the server may have provided. This allows for additional local client-side scripting such as the updating of the user interface.
You must take several required actions in order to use callbacks within ASP.NET 2.0 pages:
Implement the ICallbackEventHandler interface.
Create custom JavaScript methods.
Provide logic in two server-side events.
Register a specific client-side script.
The detailed steps needed to actually create a callback in a new web application are as follows.
1.To create a callback from a WebForm, you first need to decide on the WebForm you want to use. As a reference for troubleshooting, the ChatWindow.aspx page in the ContentFiles folder is where the sample project implements the callback methods. Start by opening the code-behind file you want to process callbacks from, and implement the System.Web.UI.ICallbackEventHandler interface:
Implements System.Web.UI.ICallbackEventHandler
2.This automatically creates an event handler called RaiseCallbackEvent() and a method called GetCallbackResult().
The actual code generated for these two items is as follows:
Public Sub RaiseCallbackEvent(ByVal eventArgument As String) Implements _
System.Web.UI.ICallbackEventHandler.RaiseCallbackEvent
76