

Professional VSTO 2005 - Visual Studio 2005 Tools For Office (2006) [eng]
.pdfChapter 5
C#
private void RemoveMenubar(string menuTitle)
{
//remove the menu try
{
Office.CommandBarPopup foundMenu = (Office.CommandBarPopup) this.ActiveExplorer().CommandBars.ActiveMenuBar. FindControl(Office.MsoControlType.msoControlPopup, missing, menuTitle, true, true);
if (foundMenu != null)
{
foundMenu.Delete(true);
}
}
catch (Exception ex)
{
MessageBox.Show(ex.Message);
}
}
Listing 5-26: Code to remove items from a Microsoft Outlook menu
The removeMenuBar routine accepts a string parameter. This parameter is used as a key to find the target menu option. The code uses the FindControl method of the ActiveMenuBar object to internally probe the menu bar collection for a menu matching the unique tag. Once the FindControl method has executed, the code simply tests the variable to see if it contains a valid object. If it does, the object is deleted. The code is wrapped in an exception handling block, just in case things go wrong.
Although Visual Basic can perform automatic casting in some instances, you will need to perform an explicit cast when manipulating menus and toolbars. Otherwise, the code will compile but fail with a runtime exception, indicating that the array value is out of bounds.
The FindControl call is optimized the to search the collection efficiently, but it can only return a single instance. This is not a concern since each control should contain a unique tag. However, if there is a requirement to search for multiple controls, an iterative loop should be used instead of the FindControl method. As pointed out previously, an iterative loop is less efficient than the FindControl method.
Integrating Windows Applications with Outlook
The code snippets and discussions in this chapter have operated under the assumption that functionality is being added to Microsoft Outlook. Now, we consider the opposite case. The next piece of code demonstrates how to harness Microsoft Outlook functionality in Windows applications. We spend some time considering the case where items are dropped from Microsoft Outlook onto a Windows forms application.
198

Outlook Automation
Drag and drop support is another feature that end users have come to expect in any type of windows applications. In fact, end users typically drag objects from the desktop to running applications with the expectation that the application will service the request. However, these types of requests have no automatic implementation. They must be built in.
Drag and drop is implemented with the help of events. When the user initiates a drag operation, the dragdrop event for the application is fired. When the end user releases the object being dragged, the drop event is fired. Application code simply needs to listen for these two events and handle them appropriately to successfully service the request. Consider the code in Listing 5-27.
Visual Basic
Imports System.IO
Imports System.Collections
Imports System.Text
Public Class Form1
Dim incomingTitle As String = “FileGroupDescriptor”
Private Sub TreeView1_DragDrop(ByVal sender As System.Object, ByVal e As System.Windows.Forms.DragEventArgs) Handles WinTree.DragDrop
Dim str() As String = e.Data.GetFormats(True) Dim supported As Boolean = False
Dim data As String For Each data In str
If data = incomingTitle Then supported = True
Exit For End If
Next
If Not supported Then
‘data file format not supported so simply exit Return
End If
Dim fileNames() As String = New String(5) {} Dim sizeByte As String = 512
‘ get the incoming data
Dim ioStream As System.IO.Stream = CType(e.Data.GetData(“FileGroupDescriptor”), System.IO.Stream)
Dim contents() As Byte = New Byte(sizeByte) {} ioStream.Read(contents, 0, sizeByte) ioStream.Close()
Dim currentNode As TreeNode = WinTree.Nodes(0) If Not currentNode Is Nothing Then
currentNode.Text = currentNode.Text + “ 1 item added” WinTree.Update()
End If
End Sub
Private Sub TreeView1_DragEnter(ByVal sender As System.Object, ByVal e As System.Windows.Forms.DragEventArgs) Handles WinTree.DragEnter
e.Effect = DragDropEffects.Link End Sub
End Class
199

Chapter 5
C#
using System;
using System.Collections.Generic; using System.ComponentModel; using System.Data;
using System.Drawing; using System.Text;
using System.Windows.Forms;
using MSForms = Microsoft.Vbe.Interop.Forms; using System.IO;
namespace DragClient
{
public partial class Form1 : Form
{
public Form1()
{
InitializeComponent();
}
string incomingTitle = “FileGroupDescriptor”;
private void WinTree_DragEnter(object sender, DragEventArgs e)
{
e.Effect = DragDropEffects.Link;
}
private void Form1_Load()
{
}
private void WinTree_DragDrop(object sender, DragEventArgs e)
{
string[] str = e.Data.GetFormats(true); bool supported = false;
foreach (string data in str)
{
if (data == incomingTitle)
{
supported = true; break;
}
}
if (!supported)
{
//data file format not supported so simply exit return;
}
int sizeByte = 512;
string[] fileNames = new string[5];
200

Outlook Automation
// get the incoming data
Stream incoming = (Stream)e.Data.GetData(incomingTitle); byte[] fileGroupDescriptor = new byte[sizeByte]; incoming.Read(fileGroupDescriptor, 0, sizeByte); System.Text.StringBuilder sb = new StringBuilder(); System.IO.Stream ioStream =
(System.IO.Stream)e.Data.GetData(“FileGroupDescriptor”); byte[] contents = new Byte[sizeByte]; ioStream.Read(contents, 0, sizeByte); ioStream.Close();
TreeNode currentNode = WinTree.Nodes[0]; if (currentNode != null)
{
currentNode.Text = currentNode.Text + “1 item added”; WinTree.Update();
}
}
}
}
Listing 5-27: Drag and drop with Outlook emails
To run this code, you will need to create a Windows project. On the default form, drop a treeview control. From the property pages, set the allowdrop property of the treeview control to true so that the application can respond to dragdrop events. Also, you will need to double-click the dragdrop event and dragenter events so that event handlers can be created. These are your listening devices that monitor a drag operation to determine when it starts and when it ends. The dragenter event handler is not strictly necessary but it adds some flavor to the code in that it simply adds a drag effect so that the end user has some inclination that the drag operation is being initiated.
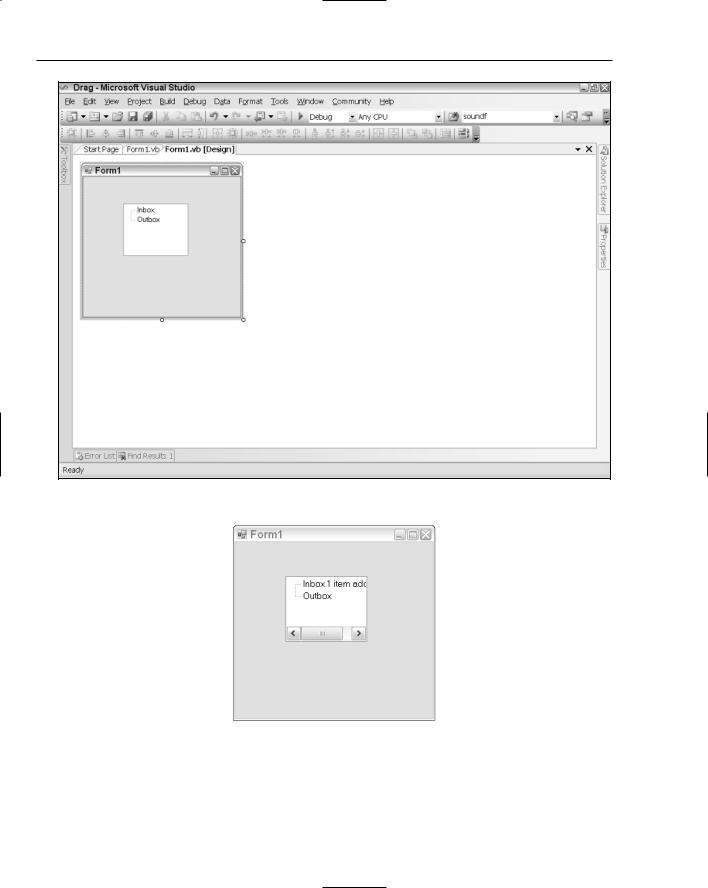
Add two nodes to the treeview as shown in Figure 5-13. Name these nodes inbox and outbox. Once the project is complete, you may then enter the code shown in Listing 5-27.
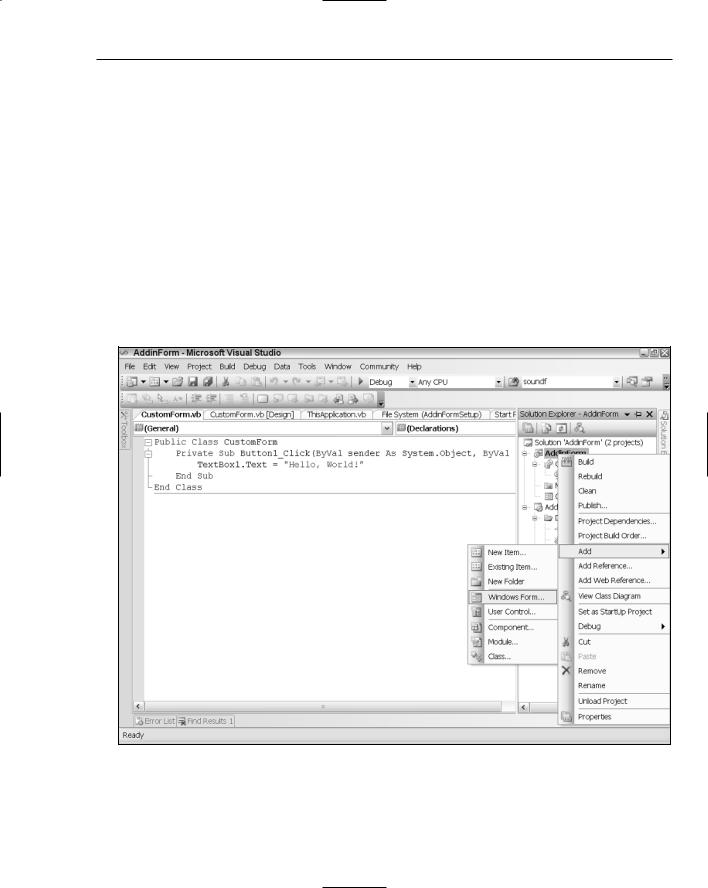
Compile and run the application. Figure 5-14 shows the application in action.
The dragdrop event handler contains the bulk of the code. The handler fires when the drop operation is complete. The code uses the Drageventargs e parameter to retrieve the data being dropped. Applications that support drag operations set the data type differently. The code checks for type because we assume that the data is coming from Microsoft Outlook. If it is data we are interested in, we take some action.
You should realize that the code is fairly basic. The intention is to show that common windows functionality can be incorporated into a VSTO application. The code shown in Listing 5-27 presents opportunities for optimization and code simplification. One such optimization can be made to the WinTree_Drag function. For example, the entire code can be replaced with this:
if(!e.Data.GetDataPresent(IncomingTitle, false))
return;
201
Chapter 5
Figure 5-13
Figure 5-14
202
Outlook Automation
Now, consider the requirement that needs a Windows form added to an Outlook project. You should note that this is the opposite of the previous requirement. However, both these requirements span the spectrum of Outlook functionality. If you have a basic understanding of how to achieve both these requirements, you will be well on your way toward creating enterprise-level applications.
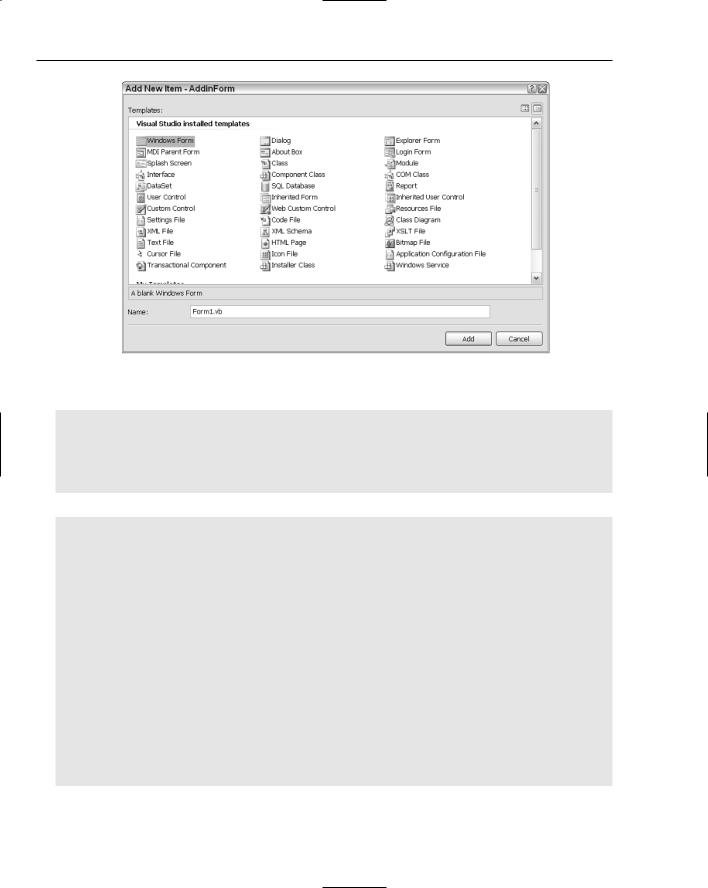
Create a new VSTO Outlook Add-in following the instructions at the beginning of the chapter. Name the project AddinForm. On the project node in the Visual Studio .NET IDE, right-click to view the project menu. A sample menu is shown in Figure 5-15.
Choose Add Windows Forms. The action will display an Add New Item dialog, as shown in Figure 5-16.
Add a text box and a button to the form. You may accept the default names. From this point on, you should notice that this is simply a Windows forms mini-application that may be programmed in the usual way. Our example is simple. When the button is clicked, we write some text to the text box on the form.
To add the code, double-click the button and add some text to the text box’s Text method. Your barebones code should look like Listing 5-28.
Figure 5-15
203
Chapter 5
Figure 5-16
Visual Basic
Public Class CustomForm
Private Sub Button1_Click(ByVal sender As System.Object, ByVal e As
System.EventArgs) Handles Button1.Click
TextBox1.Text = “Hello, World!”
End Sub
End Class
C#
using System;
using System.Collections.Generic; using System.ComponentModel; using System.Data;
using System.Drawing; using System.Text;
using System.Windows.Forms;
namespace AddinForm
{
public partial class CustomForm : Form
{
public CustomForm()
{
InitializeComponent();
}
private void button1_Click(object sender, EventArgs e)
{
textBox1.Text = “Hello, World!”;
204

Outlook Automation
}
}
}
Listing 5-28: Button click example
The form is ready for action at this point. However, the most important piece of the puzzle needs to be added. Microsoft Outlook must be informed that this window needs to be called in order for it to be displayed. There are several approaches to accomplishing this. One of the most common approaches is to subscribe to an Outlook event, as shown in Listing 5-29. When this event is fired, your Windows form will be displayed.
Visual Basic
public class ThisApplication
Private WithEvents explorEvent As Outlook.Explorers |
|
Private Sub ThisApplication_Startup(ByVal sender As Object, ByVal e As |
|
System.EventArgs) Handles Me.Startup |
|
explorEvent = Me.Explorers |
|
AddHandler explorEvent.NewExplorer, AddressOf Explorers_NewExplorer |
End |
Sub |
|
Private Sub Explorers_NewExplorer ByVal Inspector As |
|
Microsoft.Office.Interop.Outlook.Explorer) Handles explorEvent.NewExplorer |
|
Dim myCustomForm As CustomForm |
|
myCustomForm = New CustomForm() |
|
myCustomForm.Show() |
|
End Sub |
|
Private Sub ThisApplication_Shutdown(ByVal sender As Object, ByVal e As |
|
System.EventArgs) Handles Me.Shutdown |
|
End Sub |
|
End class |
|
C# |
|
using System; |
|
using System.Windows.Forms; |
|
using Microsoft.VisualStudio.Tools.Applications.Runtime; |
|
using Outlook = Microsoft.Office.Interop.Outlook; |
|
using Office = Microsoft.Office.Core; |
|
namespace AddinForm |
|
{ |
|
public partial class ThisApplication |
|
{ |
|
private void ThisApplication_Startup(object sender, System.EventArgs e)
{
this.Explorers.NewExplorer += new Microsoft.Office.Interop.Outlook
.ExplorersEvents_NewExplorerEventHandler(Explorers_NewExplorer);
}
void Explorers_NewExplorer(Microsoft.Office.Interop.Outlook.Explorer Explorer)
205

Chapter 5
{
CustomForm myForm = new CustomForm(); myForm.Show();
}
private void ThisApplication_Shutdown(object sender, System.EventArgs e)
{
}
}
}
Listing 5-29: Calling a custom form
That’s it. The code is pretty simple. When a new Explorer window is opened (select a folder, right-click, and choose Open in new window), the NewExplorer event fires and calls your code. The code simply creates an instance of your custom-generated form and displays it. If you click the button, some text is written to the text box on the form.
You should note that this example, while conceptually simple, is complete. It shows how to call a custom form from code that is built at design time. But, you can easily modify the application to create and display a form at runtime as well. Also the example demonstrates how Outlook is able to display your form and cause the form’s event to work correctly. This is the basis for all windows applications; a form is created, and some action is taken based on the controls that are placed on the form.
Finally, you should note that once outlook calls your code through the event handler, there aren’t any restrictions on what the code can do. For instance, you can run another application or write and read files on disk. Also, the events that are fired can be cancelled as well. One advanced use is wiring into the appropriate Explorer window event, calling your customized form, and disabling Outlook’s Explorer form from showing by cancelling the event. The possibilities are endless!
Summar y
This chapter presented a number of key concepts that enable developers to build enterprise-level applications. The most important objects such as the Application, Explorer, and Inspector objects were presented with some code examples. These objects form the cornerstone of every Outlook-based add-in.
The chapter also provided an overview of MAPI. This email protocol powers the underpinnings of the Outlook application, and it is helpful to understand MAPI if you are to build robust applications.
The bulk of the chapter focused on building applications that use the Explorer and Inspector objects. These objects provide a number of events that may be useful to calling code. In fact, events are the main way that add-ins interact with Microsoft Outlook applications. Our sample snippets ran the gamut of application requirements that are common in industry.
It is not uncommon to find developers adding functionality to Microsoft Outlook that has nothing in common with emails or message management. One reason for this abuse is that end users constantly seek a single point of access to software-related tasks. Since Outlook is being used by these end users,
206

Outlook Automation
it seems justified to graft a spreadsheet-like application to Outlook or to integrate an existing custom mortgage calculator into the Outlook interface, for instance. However, that type of justification is without merit.
The chapter also focused special attention on emails. We learned to create and send emails. When creating emails, it’s always a good idea to call the Resolve method so that email address can be validated against the Outlook address book for integrity.
One quirk that needs to be pointed out is that Microsoft Outlook add-ins cannot execute with the debugger attached if an instance of Outlook is running on the same machine. The debugger attach process cannot gain access to the running instance of Microsoft Outlook. In order to debug the code, there must be no running instances of Outlook on the desktop initially.
VSTO has eased the burden of application integration with Outlook because it greatly simplifies the process, while providing a solid platform for integration and extensibility. Expect to see more applications bundled in with the Outlook interface in corporate environments.
To be sure, the integration was a last-minute decision. Consequently, the support is provided as an extension to the IDE. However, the internal plumbing does not have a significant impact on the caliber of Microsoft Outlook software that can be built on this platform.
207