

Professional VSTO 2005 - Visual Studio 2005 Tools For Office (2006) [eng]
.pdfChapter 4
Application
Document
Bookmarks
Range
Selection
Bookmarks
Document
Range
Figure 4-1
Using the application object hierarchy, it is possible to create Microsoft Office Word documents that combine text with shapes. The next few sections examine some key objects that are most likely to be used when building enterprise software in VSTO.
ThisApplication Instance
Perhaps the most important object is the ThisApplication instance. This object represents an instance of the executing application. The ThisApplication object makes several other key Office Word objects available to executing code. In addition, the ThisApplication object exposes methods and properties that may be used to access information about the executing application in general. For instance, the application path may be determined from the ThisApplication object. Consider another example in Listing 4-1.
Visual Basic
Private Sub ThisDocument_Startup(ByVal sender As Object, ByVal e As System.EventArgs)
Dim fileName As Object = “c:\setup.log”
Dim myDoc As Microsoft.Office.Interop.Word.Document = Me.Application.Documents.Open(fileName)
myDoc.AddToFavorites()
myDoc.Kind = Microsoft.Office.Interop.Word.WdDocumentKind.wdDocumentLetter myDoc.ShowSpellingErrors = True
End Sub
C#
private void ThisDocument_Startup(object sender, System.EventArgs e)
{
object fileName = @”c:\setup.log”; Microsoft.Office.Interop.Word.Document myDoc = this.Application.Documents.Open(ref fileName,
108

Word Automation
ref missing, ref missing, ref missing, ref missing, ref missing, ref missing, ref missing, ref missing, ref missing, ref missing, ref missing, ref missing, ref missing, ref missing, ref missing); myDoc.AddToFavorites();
myDoc.Kind = Microsoft.Office.Interop.Word.WdDocumentKind.wdDocumentLetter; myDoc.ShowSpellingErrors = true;
}
Listing 4-1: Application open method
Listing 4-1 shows the application object being used to gain access to the document object’s Open method. The Open method will get its 15 minutes of fame later. For now, just note that the call accepts a filename and some optional parameters that may be used to open a file on disk.
Notice that the example actually opens the Visual Studio .NET installation file log. Although this file extension may not necessarily be associated with an application, Notepad for instance, the file is still able to open. In that case, the contents are interpreted as plain text.
Once the document is opened successfully, it is added to the Favorites folder in Windows Explorer and Internet Explorer so that it may be retrieved quickly. This is a nifty technique that should be used with caution. For instance, end users may not find favor with application links suddenly showing up in the Favorites folder. Etiquette absolutely demands that if such actions must be taken by the application, the code should prompt the end user for confirmation first.
Working with the Range Object
The Range object is probably the most popular object in the Word hierarchy of objects. It is responsible for defining a contiguous block of text on the document’s surface. The Range object is very flexible and even allows for the addressing of several different Range objects at a time. Let’s consider an example that manipulates some text. We are interested in deleting a word from the second sentence and replacing it with some other word. Here is the sample text: Note that the second sentence starts on line 2 and ends on line 3.
First create a new Office project called SampleText. Enter the sample text above into the Word document. Listing 4-2 shows the code to manipulate the sample text.
Visual Basic
Private Sub ThisDocument_Startup(ByVal sender As Object, ByVal e As System.EventArgs)
If Me.Paragraphs.Count > 0 Then
Dim par As Word.Range = Me.Paragraphs(Paragraphs.Count).Range Dim singleSent As Word.Range = par.Sentences(2)
If singleSent IsNot Nothing AndAlso singleSent.Words IsNot Nothing AndAlso singleSent.Words.Count > 0 Then
Dim i As Integer
For i = 1 To singleSent.Words.Count - 1
If singleSent.Words(i).Text.ToLower().Trim() = “documents” Then Dim removeChar As Word.Range = singleSent.Words(i) removeChar.Delete()
‘delete and add customizations removeChar.InsertAfter(“ document’s “)
109

Chapter 4
removeChar.Font.Name = “Arial” removeChar.Font.Size = 10.0F
removeChar.Font.Color = Word.WdColor.wdColorDarkRed removeChar.Underline = Word.WdUnderline.wdUnderlineDash
End If
Next End If
End IfEnd Sub
C#
private void ThisDocument_Startup(object sender, System.EventArgs e)
{
if (this.Paragraphs.Count > 0)
{
Word.Range par = this.Paragraphs[Paragraphs.Count].Range;
{
Word.Range singleSent = par.Sentences[2];
if (singleSent != null && singleSent.Words != null && singleSent.Words.Count > 0)
{
for (int i = 1; i < singleSent.Words.Count; i++)
{
if (singleSent.Words[i].Text.ToLower().Trim() ==
“documents”)
{
Word.Range removeChar = singleSent.Words[i]; removeChar.Delete(ref missing, ref missing); //delete and add customizations removeChar.InsertAfter(“ document’s “); removeChar.Font.Name = “Arial”; removeChar.Font.Size = 10F; removeChar.Font.Color =
Word.WdColor.wdColorDarkRed;
removeChar.Underline = Word.WdUnderline.wdUnderlineDash;
}
}
}
}
}
}
Listing 4-2: Range reference manipulation
Technically, a paragraph is denoted by a line feed character. Striking the Enter key inserts a return line feed in the document that VSTO uses as a paragraph marker. From our sample text, there are four lines of text, each line being followed by a line feed marker. Another easy way to discern paragraphs, according to VSTO’s yardstick, is to choose to view the document while revealing all formatting.
Once there is a reference to a paragraph, the code picks out the second sentence of the document and sets a variable to point to the range. It may be of some importance to note that the sentence relates to the range,
110

Word Automation
whereas the paragraph relates to the document. The range may be made up of several sentences. Or it may be made up of one sentence that spans several lines in the document. However, the paragraph is not determined by the number of lines. Rather, it simply depends on the line feed character. On the other hand, a sentence in Word is defined by the number of punctuation marks in a paragraph. Based on that argument, we rightfully index into the sentence collection and return the first sentence of the Range object.
Next, we iterate the words that form part of this single sentence. Our approach examines each word to see if it matches the word “documents.” If we find the word, we delete it. Next, we insert a piece of text and add some cosmetic touch ups to highlight the change in the document. Notice that a lot can be accomplished in terms of formatting. And the Word API spares no expense in making the full formatting API available to you through the Range object. However, you must be careful not to overdo it, since these changes can certainly be distracting to the user. This is a very crude spell-check engine, obviously lacking the sophistication and efficiency of the spell-check engine provided by Word. However, both are based on the same principle.
By the way, this is not the only approach to retrieving and formatting text. Another good approach is to execute the find method on the document. The search method returns a Range reference to the found items, and you can proceed to customize and format the target as you see fit. Listing 4-3 demonstrates an example of this approach based on the data presented previously.
Visual Basic
Private Sub ThisDocument_Startup(ByVal sender As Object, ByVal e As System.EventArgs)
‘ Set the second paragraph as the search range. Dim rng As Word.Range = Me.Paragraphs(1).Range Dim searchRange As Word.Find = rng.Find
Dim textToFind As Object = “the”
If searchRange.Execute( textToFind) Then
MessageBox.Show(“Found text: “ + Cstr(textToFind), “Finding...”) rng.Font.Italic = 1
rng.Font.Color = Word.WdColor.wdColorBlue End If
End Sub
C#
private void ThisDocument_Startup(object sender, System.EventArgs e)
{
// Set the second paragraph as the search range. Word.Range rng = this.Paragraphs[1].Range; Word.Find searchRange = rng.Find;
object textToFind = “the”;
if (searchRange.Execute(ref textToFind, ref missing, ref missing, ref
missing, ref missing, ref missing, ref missing, ref missing, ref missing, ref missing, ref missing, ref missing, ref missing, ref missing, ref missing))
{
MessageBox.Show(“Found text: “ + textToFind, “Finding...”); rng.Font.Italic = 1;
rng.Font.Color = Word.WdColor.wdColorBlue;
}
}
Listing 4-3: Implementing document search functionality
111
Chapter 4
In Listing 4-3, a variable is set to point to the first paragraph. With the reference, the code simply executes the find method on the range. If the find is successful, the range is formatted appropriately. This approach is less crude than Listing 4-2 and a lot closer in implementation to the Word spell-check engine implementation as well.
There may be more approaches that are cleaner and more efficient to implement. However, these two examples provide a good starting point. Also, with the second approach, you may need to write extra code to determine if this piece of text is found in the last line, since there may be identical words scattered throughout the search range. An implementation is left to the reader.
Working with the Bookmark Object
Bookmarks represent objects that mark a specific position in the document. Once a bookmark is set up in the document, it is easy to navigate to that particular bookmark. In addition, it is possible to manipulate the target of the bookmark. Consider an example that first creates a bookmark using the Word Office menu and then manipulates this bookmark in code.
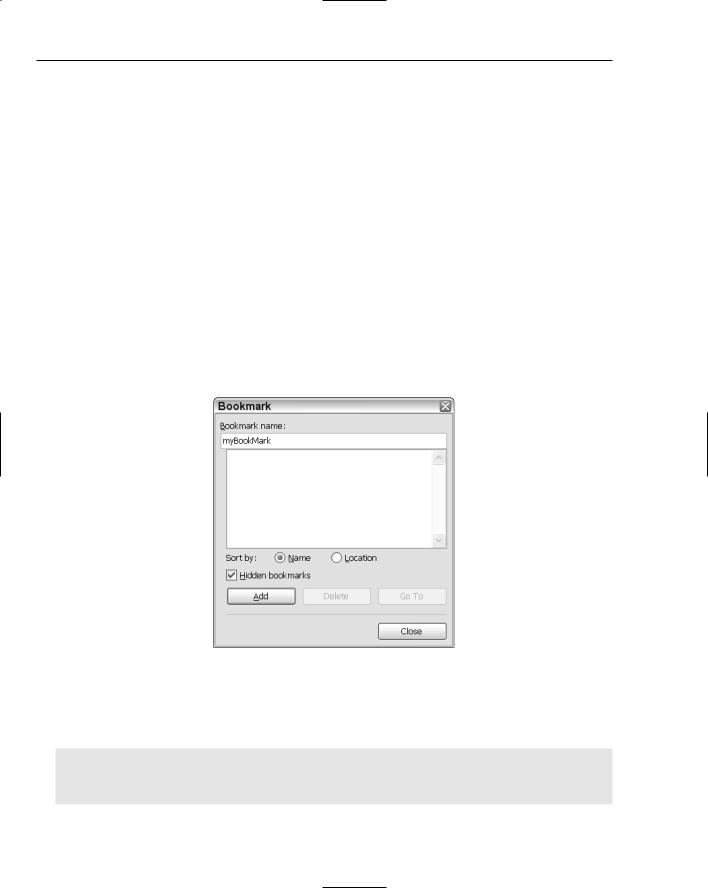
For this example, reuse the piece of text from the previous example. From the Insert menu on the VSTO word document, select Bookmark. The bookmark dialog should now be present on screen. Enter the title myBookMark. Set the options according to Figure 4-2.
Figure 4-2
Once the bookmark is set up, navigate to the OfficeCodeBehind file and add the code shown in Listing 4-4.
Visual Basic
Private Sub ThisDocument_Startup(ByVal sender As Object, ByVal e As
System.EventArgs)
If ThisApplication.ActiveDocument.Bookmarks <> Nothing And ThisApplication.ActiveDocument.Bookmarks.Count > 0 Then
112

Word Automation
Dim mark As Word.Bookmarks
For Each mark In ThisApplication.ActiveDocument.Bookmarks If mark.ToString().ToLower().Trim() = “mybookmark” Then
MessageBox.Show(“Found bookmark”) Exit For
End If
Next
Else
Dim par as Word.Range = Me.Paragraphs(Paragraphs.Count).Range
Dim singleSent As Word.Range = par.Sentences(1)
If singleSent IsNot Nothing AndAlso singleSent.Words IsNot Nothing AndAlso singleSent.Words.Count > 0 Then
Dim i As Integer
For i = 1 To singleSent.Words.Count- 1 Step i + 1 If singleSent.Words(i).Text.ToLower().Trim() = “the”
Then
Dim bookMark As Object = singleSent.Words(i)
ThisApplication.ActiveDocument.Bookmarks.Add(“myBookMark”, bookMark) End If
Next End If
End If
End Sub
C#
private void ThisDocument_Startup(object sender, System.EventArgs e)
{
if (this.Bookmarks != null && this.Bookmarks.Count > 0)
{
foreach (Word.Bookmarks mark in this.Bookmarks)
{
if (mark.ToString().ToLower().Trim() == “mybookmark”)
{
MessageBox.Show(“Found bookmark”); break;
}
}
}
else
{
Word.Range par = this.Paragraphs[Paragraphs.Count].Range;
{
Word.Range singleSent = par.Sentences[1];
if (singleSent != null && singleSent.Words != null && singleSent.Words.Count > 0)
{
for (int i = 1; i < singleSent.Words.Count; i++)
{
if (singleSent.Words[i].Text.ToLower().trim() == “the”)
{
113

Chapter 4
object bookMark = singleSent.Words[i]; this.Bookmarks.Add(“myBookMark”, ref bookMark);
}
}
}
}
}
}
Listing 4-4: Bookmark code manipulation
The approach involves checking the document to see if a bookmark exists in the bookmarks collection. Since bookmarks are document specific in nature, it makes sense to check to see if one exists first. If it does, the code simply displays a message indicating that the bookmark has been found. Otherwise, the code creates the bookmark and inserts it into the document. In the absence of such a check, the newly created bookmark simply overwrites the old.
Aside from this minor inconvenience, there is a bug in the code. Most collections in VSTO are not zerobased collections. If there is only one paragraph in the document, the Paragraphs.Count property line of code will return 1. After the subtraction operation is performed, the code will then attempt to access data using an invalid zero index. Be wary about indexing into collections in VSTO, especially when calculations are performed as in Listing 4-4. You should be able to repair the code without any more help.
Working with the Selection Object
The Selection object represents the cursor selection in the active document. Listing 4-5 has an example.
Visual Basic
Dim start As Object = 0
Dim end As Object = 0
Word.Range par = Me.Paragraphs(Paragraphs.Count).Range
Par.Select()
If(ThisApplication.Selection <> Nothing)
ThisApplication.Selection.TypeText = “This is some selected text”
Par.InsertAfter = “This is the end.”
End If
C#
Object start = 0; Object end = 0;
Word.Range par = this.Paragraphs[Paragraphs.Count ].Range; Par.Select();
If(ThisApplication.Selection != null)
{
ThisApplication.Selection.TypeText = “This is some selected text”; Par.InsertAfter = “This is the end.”;
}
Listing 4-5: Selection object example
114

Word Automation
The obvious difference between the Range and the Selection object has to do with the fact that a range must be selected for the selection object to be valid. However, more differences exist. Selection objects are more difficult to work with and expose less functionality than Range objects. Attempting to manipulate selection objects will result in visible selection changes in the user’s document. Often, users will not welcome such changes, even though they will likely not affect the data in the document.
In both cases, the selection and the Range objects’ lifetimes are affected by scoping rules. If these objects go out of scope, the Range and Selection objects follow suit. As a precaution, always test the variables pointing to selection and Range objects for validity before using them.
Additionally, a range provides a suitable way to work with a contiguous block of text without selecting that piece of text in the interface. By using the Range object instead of the selection object, code can safely work with data on the document surface without drawing the user’s attention to the operation.
Although, the selection object does provide access to noncontiguous blocks on the document surface, the technical limitation is that the selection object referencing the noncontiguous blocks only points to the last selected range. So technically, addressing noncontiguous blocks with the selection object is simply not feasible in this version of VSTO.
VSTO Table Manipulation
The Microsoft Office suite of products has always had built-in support for table objects, and this has been extended to include VSTO from the very first public version. However, the most recent release of VSTO has added improved support for tables. Conceptually, tables group logical pieces of information into rows and columns. Figure 4-3 shows a Word table.
The programmatic table object is functionally equivalent to the Office table shown in Figure 4-3. That is, it supports rows, columns, cells, and various built-in formatting capabilities. Listing 4-6 shows an example that adds a table to the document with some text.
Visual Basic
Private Sub ThisDocument_Startup(ByVal sender As Object, ByVal e As System.EventArgs)
Dim rng As Word.Range = Range() Dim tRange As Word.Range = Range()
Dim table As Word.Table = rng.Tables.Add(rng,3,3 ) table.Rows(1).Cells(1).Range.Text = “Table Heading 1” table.Rows(1).Cells(2).Range.Text = “Table Heading 2” table.Rows(1).Cells(3).Range.Text = “Table Heading 3” Dim style As Object = “Table Grid”
table. Style= style End Sub
C#
private void ThisDocument_Startup(object sender, System.EventArgs e)
{
Word.Range rng = Range(ref missing, ref missing);
Word.Range tRange = Range(ref missing, ref missing);
Word.Table table = rng.Tables.Add(rng, 3, 3, ref missing, ref missing); table.Rows[1].Cells[1].Range.Text = “Table Heading 1”;
115

Chapter 4
table.Rows[1].Cells[2].Range.Text = “Table Heading 2”; table.Rows[1].Cells[3].Range.Text = “Table Heading 3”; object style = “Table Grid”;
table.set_Style(ref style);
}
Listing 4-6: Adding tables programmatically via VSTO
Let’s walk through the code in order to understand the basics. The Range object provides access to the global table collection. The first parameter determines the location of the table. Once the table is imposed on the document’s surface, the cells of the table may be filled with data. The Rows property of the table object returns a reference to each row in the table. Each row must contain at least one cell. For each row object, the cells correspond exactly to the column object, and vice versa. The implementation provides a coordinate type addressing schema that is both convenient and intuitive.
Figure 4-3
116

Word Automation
If you click the Modify button on the dialog shown in Figure 4-4, you will be able to customize the default styles. Figure 4-5 shows the possible customizations.
Figure 4-4
Notice that the table is also able to respond to custom styles. There are over 100 table styles that are available. You can view table styles by selecting Table Table AutoFormat in a Microsoft Office Word document. Figure 4-4 shows a snapshot of the available styles.
All the customizations that are possible in design mode or through the word menu may also be applied through code. In fact, Listing 4-6 uses one of the custom styles. That sort of advanced table manipulation may be necessary if application requirements dictate a special look and feel or if you simply are not satisfied with the default table offerings. Consider the example shown in Listing 4-7, which shows how to manipulate tables. The example is based on Listing 4-6.
117