

Professional VSTO 2005 - Visual Studio 2005 Tools For Office (2006) [eng]
.pdfChapter 3
Using Formulas at Runtime
The formula manipulation can also occur in the Office code-behind file. Consider Listing 3-6.
Visual Basic
Dim calcRange As Excel.Range = CType(Me.Application.Range(“A4”), Excel.Range) calcRange.Formula = “=SUM(A1:A3)”
calcRange.Calculate()
C#
Excel.Range calcRange = (Excel.Range)Globals.ThisWorkbook.ThisApplication
.get_Range(“A4”, missing);
calcRange.Formula = “=SUM(A1:A3)”; calcRange.Calculate();
Listing 3-6: Runtime formula usage
The example sets a reference to the cell A4. Then a formula “=SUM(A1:A3)” is applied to the range. The final line of code invokes the calculation. Listing 3-13 is functionally equivalent to adding the formula from the design view, as discussed in the previous section. It’s important to note that this code contains some deficiencies that affect performance. As soon as the target range receives a formula input, the calculation is performed. Therefore, it is unnecessary to call the Calculate method again.
The code was presented because it is a common programming error that can result in decreased efficiency of the application especially with large worksheeets that require a lot of calculation. The Calculate method should only be invoked when a manual calculation or a refresh is required. Also note that the result of the calculation will be placed in the cell A4 because the range points to that particular cell.
Consider this refinement to the current example, shown in Listing 3-7, where only the positive integers need to be summed.
Visual Basic
Dim calcRange As Excel.Range = CType(Globals.ThisWorkbook.ThisApplication
.Range(“A4”, Type.Missing), Excel.Range) calcRange.Formula = “=SUMIF(A1:A3,””> 0””)”
C#
Excel.Range calcRange = (Excel.Range)Globals.ThisWorkbook.ThisApplication
.get_Range(“A4”, missing); calcRange.Formula = “=SUMIF(A1:A3,\”>0\”)”;
Listing 3-7: Conditional formula usage
In the example, notice how the code escapes the quotes so that they are presented in the correct format to the calculation engine. Without the backslash character (C#) or double quotation marks (VB), a runtime exception would be thrown with a cheesy error message. The final result is a summation of the range, excluding values that are negative.
The use of unfamiliar formulas such as SUMIF may pose a problem because the parameter types may not be obvious. For instance, it is rather easy to deduce that SUM should contain two values given by a
68

Advanced Excel Automation
reference to two cells. But it is less obvious for SUMIF. If you must use formulas that you are not familiar with, first look up the format using the Excel help file. At the time of this writing, the help documentation specifies the correct number and type of arguments necessary for each function.
Working with the WorksheetFunctions Method
Microsoft Excel supports over 300 different types of worksheet functions. All of these functions may be used in formula manipulation inside the spreadsheet. Consider Listing 3-8.
Visual Basic
MessageBox.Show(Me.Application.WorksheetFunction.Ceiling(20.3,20.4).ToString())
C#
MessageBox.Show(this.Application.WorksheetFunction.Ceiling(20.3,20.4).ToString());
Listing 3-8: WorksheetFunctions implementation
Listing 3-15 calculates the mathematical ceiling (the greater of the two numbers) of the input parameters and displays the result on the screen. Although the single line of code is tempting to write, you should make every effort to resist this approach because it is less readable and presents challenges during debugging. For instance, if an exception occurs in Listing 3-15 there is no way to easily identify the source of the exception. This can make debugging extremely painful. Exceptions are common when manipulating worksheets due mostly to invalid parameters, but the error messages presented by the exception object in VSTO typically contain very little usable information about the cause of the exception. Instead, your code approach should follow Listing 3-9.
Visual Basic
Dim wrkFunc As Excel.WorksheetFunction = Me.Application.WorksheetFunction If wrkFunc IsNot Nothing Then
Dim d As Double = wrkFunc.Ceiling(20.3, 20.4) MessageBox.Show(d.ToString())
End If
C#
Excel.WorksheetFunction wrkFunc = this.Application.WorksheetFunction; if (wrkFunc != null)
{
Double d = wrkFunc.Ceiling(20.3,20.4); MessageBox.Show(d.ToString());
}
Listing 3-9: Correctly structured WorksheetFunctions implementation
Excel Spreadsheet Error Values
Sooner or later, during spreadsheet formula manipulation, the Excel user interface may indicate an error in one or more of the cell values. It is especially troubling if the cell in question received its input from code that you wrote. Although seasoned Microsoft Excel users are familiar with these error values,
69

Chapter 3
the developer may not necessarily be familiar with them. In order to address these issues, you need to understand the cause of the error.
Excel can generate specific errors based on the data in the cell. The following table lists these values.
Error code |
Description |
####The cell contains a time or date format that is wider than the minimum width of the cell. Resize the cell to fit by using the auto width property of the cell.
#CIRC |
A formula in the cell refers to itself either directly or indirectly. Repair the circular |
|
reference. |
#DIV/0! |
A formula is being divided by zero. Division by zero is not permitted in the |
|
calculation engine. Use a more appropriate value. |
#N/A |
The formula is not available or may be deprecated. Use another formula or a |
|
default value of #N/A for cells that may be used in calculations. |
#NAME? |
An incorrect formula is used. Correct the formula so that it is recognizable by the |
|
spreadsheet. |
#NULL! |
An invalid intersection. Make sure that the intersection is valid. |
#NUM! |
An invalid piece of text is being interpreted as a number. Add valid numbers only. |
#REF! |
Incorrect cell reference has been specified. Correct the cell reference. Make certain |
|
that your correction does not cause a circular reference. |
#VALUE! |
Incorrect arguments or operands have been specified. Use the correct arguments |
|
or operands. |
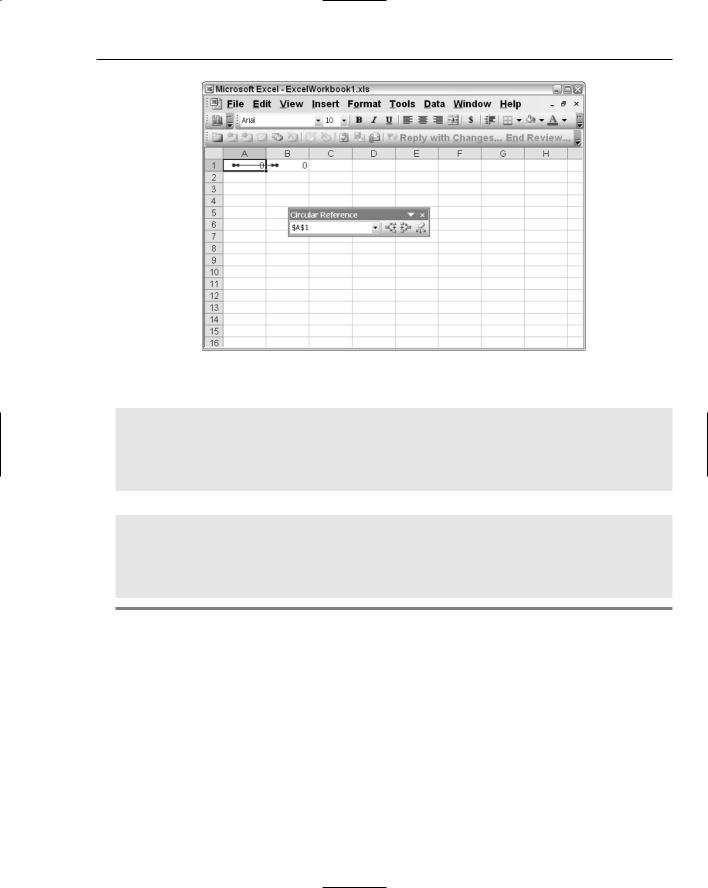
Consider an example that forces a circular reference in a spreadsheet. Listing 3-10 sets up a range to force a circular reference error.
Visual Basic
Me.Application.Range(“A1”).Formula = “=B1”
Me.Application.Range(“B1”).Formula = “=A1”
C#
this.Application.get_Range(“A1”, missing).Formula = “=B1”;
this.Application.get_Range(“B1”, missing).Formula = “=A1”;
Listing 3-10: Circular reference error
The Microsoft Excel engine actively monitors the spreadsheet for error values and will call attention to the problem. On later versions of Excel 2002 and 2003, a circular reference toolbar appears instead of the #CIRC warning so that the end user can correct the circular reference, as shown in Figure 3-5.
The #### can be handled with a clever use of one of the cell’s properties. Consider the example in Listing 3-11, which prints a value to the cell that is wider than the default width resulting in a #### error.
70
Advanced Excel Automation
Figure 3-5
Visual Basic
‘set a namedrange
Dim fittedRange As Microsoft.Office.Tools.Excel.NamedRange = Globals.Sheet1.Controls.AddNamedRange(Me.Application.Range(“A1”, “B2”),
“fittedRange”)
fittedRange.Value = DateTime.Now.ToString(“mm-DD-yyyy hh:mm:ss”) fittedRange.ShrinkToFit = True
C#
//set a namedrange Microsoft.Office.Tools.Excel.NamedRange fittedRange =
Globals.Sheet1.Controls.AddNamedRange(this.Application.get_Range(“A1”, “ B2”),
“fittedRange”);
fittedRange.Value2 = DateTime.Now.ToString(“mm-DD-yyyy hh:mm:ss”); fittedRange.ShrinkToFit = true;
Listing 3-11: Fixing error values in ranges
The ShrinkToFit property forces the contents of the cell to fit within the dimensions of the cell. Internally, the spreadsheet simply adjusts the font attributes of the value or the piece of text in the cell so that it fits. One side effect is that the cell contents may no longer be readable. Exercise caution when using this feature.
Responding to Events
As mentioned earlier, the .NET assembly is linked to the Excel Workbook object. Applications based on Excel can, therefore, respond to two different event paths. One path stems from the .NET Framework
71

Chapter 3
linked to the document and the other path stems from the Native Excel object. These events are housed in the ThisWorkbook class. Code that needs to respond to Excel workbook events must be placed in this class.
The ThisWorkbook class provides two default event handlers whose responsibility is to handle the ThisWorkbook_Open and ThisWorkbook_BeforeClose events. These events fire when the Excel workbook is opened and immediately before the workbook is closed. You may use these event handlers to provide initialization and clean up code for the workbook. Consider the example in Listing 3-12.
Visual Basic
Private Sub ThisWorkbook_Startup(ByVal sender As Object, ByVal e As
System.EventArgs) Handles Me.Startup
Dim namedRange1 As Microsoft.Office.Tools.Excel.NamedRange =
Globals.Sheet1.Controls.AddNamedRange(Globals.Sheet1.Range(“A1”), “NamedRange”)
AddHandler namedRange1.Change, AddressOf Me.namedRange1_Change
End Sub
C#
private void ThisWorkbook_Startup(object sender, System.EventArgs e)
{
Microsoft.Office.Tools.Excel.NamedRange namedRange1 = Globals.Sheet1.Controls.AddNamedRange(Globals.Sheet1.Range[“A1”, missing],
“NamedRange”); namedRange1.Change +=new
Microsoft.Office.Interop.Excel.DocEvents_ChangeEventHandler(namedRange1_Change);
}
Listing 3-12: Sheet startup event
If you care to examine the ThisWorkbook class, you will also find an initialization code section. This section houses the _Startup and _Shutdown methods. The _ Startup method initializes the ThisApplication and ThisWorkbook variables. The _Shutdown method releases these variables.
Code that needs to manipulate these variables must be placed sometime after the _ Startup method has been called.
The Change event handler is free to implement any sort of programming functionality. Listing 3-13 is an example.
Visual Basic
Private Sub namedRange1_Change(ByVal Target As Excel.Range)
If Not Me.Application.CheckSpelling(CType(Target.Value, String)) Then
MessageBox.Show(“This word is misspelled”)
End If
End Sub
C#
private void namedRange1_Change(Microsoft.Office.Interop.Excel.Range Target)
{
if (!this.Application.CheckSpelling((string)Target.Value2, null, true)) MessageBox.Show(“This word is misspelled”);
}
Listing 3-13: Event handler in action
72

Advanced Excel Automation
The event handler checks the spelling on the named range when a change is detected in the cell. For the code to fire, the end user must enter data into the cell and navigate to the next cell. The change event won’t fire while the end user is entering data into the cell. To test the example, enter an incorrectly spelled word in the range “A1” and press the tab key. A message box will appear on screen, indicating that the word has not been spelled correctly.
Although the worksheet object has a couple of predefined events, nothing stops you from wiring your own functionality via the events model. As long as you perform the wiring after the startup event handler has fired and the reference that holds the event is declared as a global object, your code should execute successfully. Finally, it’s important to also unwire dynamically added events when they are no longer needed. Listing 3-14 shows another example that uses events to perform some calculation on the spreadsheet based on events.
Visual Basic
Public Class Sheet1
Dim evntRange As Microsoft.Office.Tools.Excel.NamedRange = Nothing Private Sub evntRange_Change(ByVal Target As Microsoft.Office.Interop
.Excel.Range)
Dim currentCell As Excel.Range = Target.Application.ActiveCell currentCell.EntireRow.Font.Bold = True currentCell.EntireRow.Font.Color = System.Drawing.ColorTranslator
.ToOle(System.Drawing.Color.Silver) End Sub
Private Sub Sheet1_Startup(ByVal sender As Object, ByVal e As System.EventArgs) Handles Me.Startup
evntRange = Globals.Sheet1.Controls.AddNamedRange(Globals.Sheet1
.Range(“A1”), “evntRange”)
AddHandler evntRange.Change, AddressOf Me. evntRange_Change End Sub
Private Sub Sheet1_Shutdown(ByVal sender As Object, ByVal e As
System.EventArgs) Handles Me.Shutdown
RemoveHandler evntRange.Change, AddressOf Me.evntRange_Change
End Sub
End Class
C#
using System; using System.Data;
using System.Drawing; using System.Windows.Forms;
using Microsoft.VisualStudio.Tools.Applications.Runtime; using Excel = Microsoft.Office.Interop.Excel;
using Office = Microsoft.Office.Core;
namespace Difference
{
public partial class Sheet1
{
Microsoft.Office.Tools.Excel.NamedRange evntRange = null; private void Sheet1_Startup(object sender, System.EventArgs e)
{
73

Chapter 3
evntRange = Globals.Sheet1.Controls.AddNamedRange(Globals
.Sheet1.Range[“A1”, missing], “evntRange”);
evntRange.Change += new Microsoft.Office.Interop.Excel.DocEvents_ ChangeEventHandler(evntRange_Change);
}
void evntRange_Change(Microsoft.Office.Interop.Excel.Range Target)
{
Excel.Range currentCell = Target.Application.ActiveCell; currentCell.EntireRow.Font.Bold = true; currentCell.EntireRow.Font.Color = System.Drawing.ColorTranslator
.ToOle(System.Drawing.Color.Silver);
}
private void Sheet1_Shutdown(object sender, System.EventArgs e)
{
evntRange.Change -= new Microsoft.Office.Interop.Excel.DocEvents_ ChangeEventHandler(evntRange_Change);
}
}
}
Listing 3-14: Change events
Listing 3-14 shows code that performs some basic formatting based on the change event. Notice that the code correctly declares the variables at the application level. This is correct form. Events that are declared inside methods will stop functioning when garbage collection occurs. For long running applications, this can be problematic since the application functionality will simply stop working.
Once a user has entered information in the cell and tabs over to another cell, the change event fires. The code in the event handler then applies a bold format and a silver font color to the text in the entire row. Excel can support over 56 colors in a workbook, so there are plenty of choices for formatting.
One important thing to note is that the actual cell that was changed is available by using the Target parameter of the event handler. You may use this parameter to extract the contents of the changed cell or to format it appropriately.
Working with Workbook Controls
Legacy applications that provide Office functionality have one common shortfall. These applications cannot embed any type of window control on the spreadsheet surface. VSTO now allows Windows controls to be embedded on the spreadsheet surface. Although this is a welcome addition, embedding Windows controls in the spreadsheet may pose some challenges that aren’t easy to overcome. The next few sections will show how to work with controls on the Excel spreadsheet surface. A better alternative to embedding Windows controls on the spreadsheet surface will be discussed later in the next few sections.
74
Advanced Excel Automation
The Range Control
The Excel spreadsheet can support both Windows COM controls and .NET controls on its surface. Simply drag a control onto the Excel spreadsheet and wire it up to an event. The process is designed to be exactly the same as for Windows forms development.
The Range control can be attached to a specific range in the spreadsheet. The properties of the control can then be used to customize the range at design time and at runtime. Here is an example that applies some formatting to a range, the same as in Listing 2-15 in the previous chapter. Listing 2-15 has been reproduced here, as Listing 3-15, for convenience.
Visual Basic
Dim rng As Excel.Range = Globals.Sheet1.Range(“a1”,”g12”) rng.AutoFormat(Excel.XlRangeAutoFormat.xlRangeAutoFormat3DEffects2,
True, False, True, False, True, True)
C#
Excel.Range rng = Globals.Sheet1.Range[“a1”, “g12”] as Excel.Range; rng.AutoFormat(Excel.XlRangeAutoFormat.xlRangeAutoFormat3DEffects2,
true, false, true, false, true, true);
Listing 3-15: Autoformatting a range
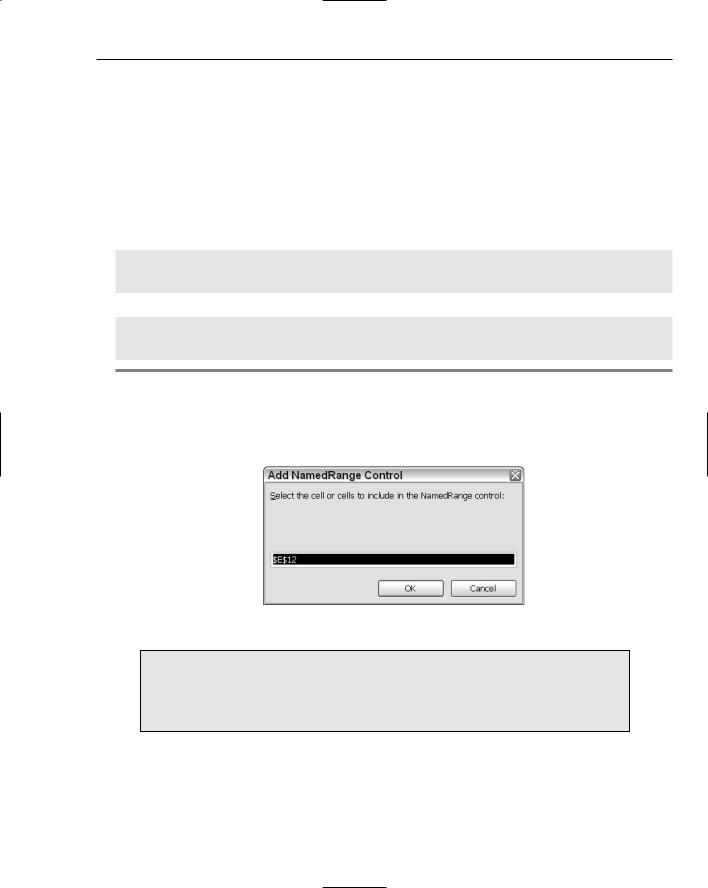
Drop a Range control on the spreadsheet. Right-click on the spreadsheet and choose Manage Named Range. In the dialog box that pops up, you have the option to name the range and to set the target of the range. Set these properties to be identical to those in Figure 3-6.
Figure 3-6
VSTO ships with a few default controls that are especially built to interact with the spreadsheet. The Range object is part of these select few. After a default installation, the Range control will automatically be available in the Excel controls node of the toolbox property page.
That’s as far as the named Range control will take you. To format the range as in Figure 3-6, you will need to replicate the line of code in Listing 3-16. Here is an example:
75

Chapter 3
Visual Basic
Globals.Sheet1.Rng.AutoFormat(Excel.XlRangeAutoFormat.xlRangeAutoFormat3DEffects2,
True, False, True, False, True, True)
C#
Globals.Sheet1.Rng.AutoFormat(Microsoft.Office.Interop.Excel.XlRangeAutoFormat.xlRa
ngeAutoFormat3DEffects2, true, false, true, false, true, true);
Listing 3-16: Named range control
Although you cannot see a declaration for the control, it is available to calling code using the name of the control. In Listing 3-16, the name of the control is set to Rng, and this variable is automatically available in the ThisWorkbook file.
Definitions for host controls are available in the designer.cs file of the project.
This file does not show up because it is hidden. But it is available for viewing through Windows Explorer.
Admittedly, the NamedRange control is extremely limited in design mode. Future releases may cure this malady. On the other hand, the benefit of using a named range is that the code can be made as generic as possible. If there is ever a need to readjust the target cells, the change can be accomplished without having to modify the existing code.
The List Control
The list object control is new for VSTO. The list object control allows the developer to enter data into a predetermined area on the spreadsheet and work with that control in the code behind using the list object’s name.
To implement a list control, first create a new VSTO project. Name the project ListTest. Open the designer and drag a list object control onto the spreadsheet. From this point, the list object behaves like an ordinary Windows control. For instance, enter data into the list object column. In the property pages for the list object, change the default name of list1 to myListObject. In the code behind, you are now able to access a variable named myListObject that provides access to the data you entered in the column. Listing 3-17 has some code to manipulate the list object.
Visual Basic
Dim lister As Excel.Range lister = Me.Range(“F4”, “F7”)
myListObject.Resize(lister)
‘add code to manipulate the list object here
C#
Excel.Range lister = this.Range[“F4”, “F7”]; myListObject.Resize(liste);
//add code to manipulate the list object here
Listing 3-17: List manipulation
76

Advanced Excel Automation
In Listing 3-17, a reference to a range “F4,F7” is first obtained and stored in variable lister. Then, the list object myListObject is resized with the new range. By default, a list object is tied to a single cell when it is first placed on the Excel designer form. That single cell is the implicit anchor for the list object. When the range is resized, it must be resized from the anchored cell. For Listing 3-17 to run correctly, the list object must be renamed from list1 to myListObject and placed on cell F4. A runtime exception results if these two conditions are not met.
List objects can be bound directly to a data source such as a database table or to XML files. Then, the data can be manipulated in design mode or in the code behind. In Figure 3-7, a list control has been bound directly to an XML file. The data contained in the XML file is displayed in the spreadsheet. The XML file is simple and contains two nodes, count and item, each containing three sets of values. The list object is able to read the XML file and format it correctly for display in the spreadsheet.
When VSTO detects that a list object is present, a floater list object menu bar immediately appears as shown in Figure 3-8. Using either the property pages for the list object in Visual Studio or the list object floater bar, point the data source property to an XML file on disk.
Figure 3-7
77