

Professional VSTO 2005 - Visual Studio 2005 Tools For Office (2006) [eng]
.pdfChapter 3
Figure 3-8
Click the second button on the floater toolbar to total the range. Finally, print the contents of the list object by using the print button on the list object floater bar. Notice that these steps were all performed at design time.
Notice the component tray at the bottom in the Visual Studio IDE. The data source component appears when the list object is bound to a data source. Double-clicking the data source opens up the code-behind file to the currentchange event. You can place code to react accordingly when the contents of the bound data source changes.
The Actions Pane
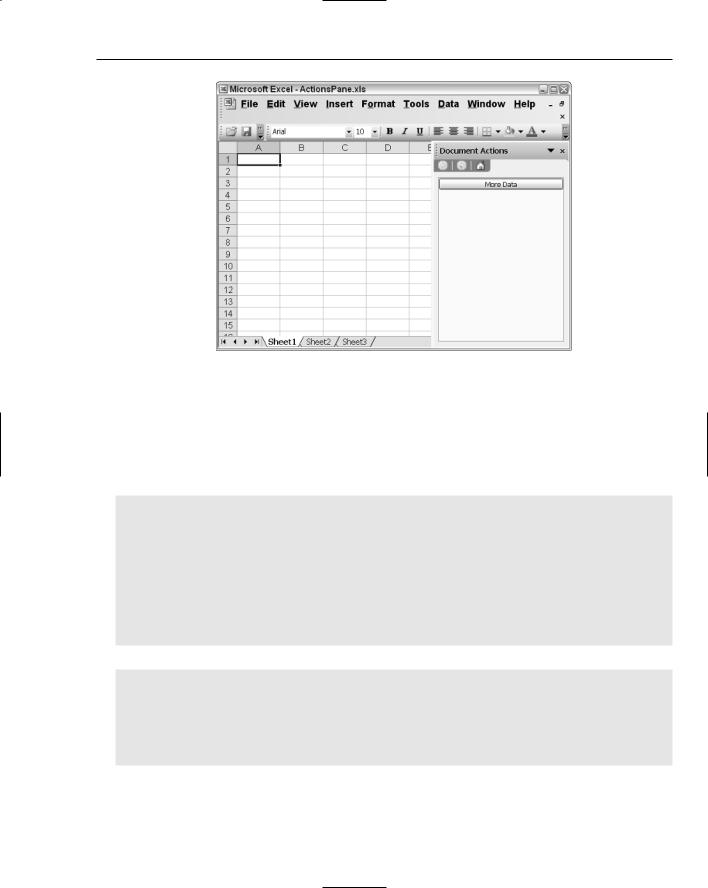
The Actions pane was introduced in the first version of VSTO. It was aimed at allowing developers more flexibility to work with controls on the document surface. While VSTO certainly does allow controls to be dropped on the spreadsheet surface, it is a technique that should be avoided in Excel development because it is clumsy and unprofessional. Instead, controls should be moved to the Excel actions pane. Figure 3-9 shows the actions pane.
78
Advanced Excel Automation
Figure 3-9
The actions pane contains a world of functionality. All sorts of controls can be added to the actions pane surface. The controls can be wired to respond to events to implement functionality either independently of the spreadsheet or integrated with it. The actions pane can also be styled and formatted. The controls that appear on its surface can be positioned and oriented in a variety of ways. Listing 3-18 contains an example of some rudimentary functionality.
Visual Basic
Public myBut As Button = New Button()
Private Sub Sheet1_Startup(ByVal sender As Object, ByVal e As System.EventArgs) myBut.Text = “Save Data”
AddHandler myBut.Click, AddressOf Me. myBut_Click Globals.ThisWorkbook.ActionsPane.Controls.Add(myBut) End Sub
Private Sub myBut_Click(ByVal sender As Object, ByVal e As EventArgs) Dim saveFileDialog1 As System.Windows.Forms.SaveFileDialog saveFileDialog1 = New SaveFileDialog()
saveFileDialog1.ShowDialog() End Sub
C#
public Button myBut = new Button();
private void Sheet1_Startup(object sender, System.EventArgs e)
{
myBut.Text = “Save Data”;
myBut.Click += new EventHandler(myBut_Click); Globals.ThisWorkbook.ActionsPane.Controls.Add(myBut);
}
79

Chapter 3
void myBut_Click(object sender, EventArgs e)
{
System.Windows.Forms.SaveFileDialog saveFileDialog1 = new SaveFileDialog(); saveFileDialog1.ShowDialog();
}
Listing 3-18: Actions pane functionality
If you treat the actions pane as an ordinary Windows forms control, you should be able to program the pane without any difficulty. Listing 3-18 first declares an instance of a button control and then adds this control to the actions pane. Once this button is clicked, it raises a File dialog so that the user can save the data associated with the range. The actual save routine has not been implemented here. An example of the save routine may be found in Chapter 2.
Notice that the actions pane is referenced through the Globals object. A reference to the actions pane allows you to access the rich feature set of the actions pane form. For instance, you are able to customize the appearance of the controls on the surface among other things.
There are a couple of limitations with actions panes. First, actions panes cannot support multiple documents. An actions pane is dedicated to a single document. Second, it is not possible to reposition the actions pane because it is embedded in the task pane. One workaround is to programmatically reposition the task pane by using the position property of the commandbar object. Consider Listing 3-19:
Visual Basic
Me.CommandBars(“Task Pane”).Position = _
Microsoft.Office.Core.MsoBarPosition.msoBarLeft
C#
this.CommandBars[“Task Pane”].Position =
Microsoft.Office.Core.MsoBarPosition.msoBarLeft;
Listing 3-19: Repositioning the task pane
End users generally position panes in convenient locations according to their own preferences in the user interface. Because of this, it is not a good idea to impose your own preferences on the end user. If you have a need to reposition a pane, you should always allow the end user to override this behavior.
Printing Workbook Data
Historically, printing data involved a lot of drama. Office-based applications built to run in a web browser can only be printed through the web browser. The web browser provides very little printing flexibility with the end result that data is either cropped or incorrectly formatted on the print surface. For other applications built using Excel Interop, entire libraries dedicated to printing had to be written. These printing libraries had the complex task of ensuring that the print document remained consistent for a wide variety of printers. Today, VSTO makes this process really simple without the headache. The printing functionality is wrapped in a new API that gets the job done while maintaining the flexibility
80
Advanced Excel Automation
for different printing environments. Consider the example in Listing 3-20, which displays the Print Preview dialog.
Visual Basic
Dim i As Integer
For i = 1 To Application.Worksheets.Count- 1 Step i + 1
Dim wr As Excel.Worksheet = Application.Worksheets(i)
If Not wr Is Nothing Then
wr.PrintOut(1, 1, 1, True)
End If
Next
C#
for (int i = 1; i < Application.Worksheets.Count; i++)
{
Excel.Worksheet wr = Application.Worksheets[i] as Excel.Worksheet;
if (wr != null)
wr.PrintOut(1, 1, 1, true, missing, missing, missing, missing);
}
Listing 3-20: Printing workbook data
From the options chosen, and assuming that the end user decides to print the document, the code starts printing from page 1 and prints one copy of the document. Listing 3-21 shows an alternative way to display the print dialog.
Visual Basic
CType(Me.Sheets(1), Excel.Worksheet).PrintPreview(False)
C#
((Excel.Worksheet)ThisApplication.Sheets[1]).PrintPreview(false);
Listing 3-21: Print preview
When documents are printed, embedded objects are printed by default. There is no way to print a document without printing the embedded object, since it is part of the document. However, if you just want to print the embedded document and not the Excel spreadsheet, consider Listing 3-22.
Visual Basic
Microsoft.Office.Tools.Excel.NamedRange printedRange = Me.Controls.AddNamedRange(Me.Range(“A1”, “B2”), “printedRange”)
printedRange.Value = “Adding text here for printing purposes” printedRange.PrintPreview(True)
C#
Microsoft.Office.Tools.Excel.NamedRange printedRange = this.Controls.AddNamedRange(this.Range[“A1”, “B2”], “printedRange”);
printedRange.Value2 = “Adding text here for printing purposes”; printedRange.PrintPreview(true);
Listing 3-22: Print preview example
81

Chapter 3
Before running the code, you must first create a namedRange control by dragging it from the toolbox unto the design surface in VSTO. Name that new Range control printedRange. Once you have completed this step, you may enter the code in
Listing 3-22.
In case you were wondering, the optional parameter, set to true in Listing 3-22, allows the user to make changes to the document while in print preview mode. Notice how the code adds some default text to the range. The reason for this is that printing is optimized to only print dirty cells, or cells that contain data. Without this optimization, an excel worksheet would simply print all the cells available on the spreadsheet. That type of functionality would certainly be a huge waste of resources, since Excel supports 65,536 rows and 256 columns.
Excel Toolbar Customization
Historically, the Office toolbar was a COM object that was wired into the Office user interface widget. Even that has changed. The toolbar now presents as a CommandBars object. The CommandBars object is actually a collection of CommandBarControls consisting of buttons, combo boxes, bar controls, and popup components. These are the basic objects that may be used with the Office toolbar. Although Microsoft Excel imposes no upper limit on the number of toolbars that may be created, you should exercise restraint when creating toolbars, since they tend to overwhelm the end user.
Manipulating the toolbar is fairly easy. Listing 3-23 adds a button to the main menu bar. The new button allows the user to customize the appearance of a range on the spreadsheet through the styles object.
Visual Basic
Private Sub AddMyToolBar()
Dim NewCommandBar As Office.CommandBar
NewCommandBar = Application.CommandBars.Add(“myButton”,Office
.MsoBarPosition.msoBarTop,False,False)
Dim NewCBarButton As Office.CommandBarButton = CType(NewCommandBar
.Controls.Add(Office.MsoControlType.msoControlButton,Office.CommandBarButton)
NewCBarButton.Caption = “my new button”
NewCBarButton.FaceId = 563
NewCommandBar.Visible = True
AddHandler NewCBarButton.Click, AddressOf Me. ButtonClick
End Sub
C#
private void AddMyToolBar()
{
Office.CommandBar NewCommandBar = Application.CommandBars
.Add(“myButton”, Office.MsoBarPosition.msoBarTop, false,false); Office.CommandBarButton NewCBarButton = (Office
.CommandBarButton)NewCommandBar.Controls.Add(Office.MsoControlType.msoControlButton, missing, missing, missing, false);
NewCBarButton.Caption = “my new button”; NewCBarButton.FaceId = 563;
82

Advanced Excel Automation
NewCommandBar.Visible = true;
NewCBarButton.Click += new
Microsoft.Office.Core._CommandBarButtonEvents_ClickEventHandler(ButtonClick);
}
Listing 3-23: Toolbar customization
For events to fire consistently, the variables that hold references to the events must be declared global in scope. Otherwise, the event will fire once and stop working.
The code in Listing 3-23 first creates a commandbar object and then adds a specific type of button to it along with the appropriate caption. The code also sets up an event handler to handle the newly created button click event. The click event handler is shown in Listing 3-24.
Visual Basic
‘ Handles the event when a button on the new toolbar is clicked.
private Sub ButtonClick(ByVar ctrl as Office.CommandBarButton, ByRef cancel as Boolean)
MessageBox.Show(“Hello, world!”) End Sub
C#
// Handles the event when a button on the new toolbar is clicked. private void ButtonClick(Office.CommandBarButton ctrl, ref bool cancel)
{
MessageBox.Show(“Hello, world!”);
}
Listing 3-24: Toolbar event handler
The AddMyToolbar method deserves some special attention. Consider the line of code in Listing 3-28 that adds a control of type Office.MsoControlType.msoControlButton.
This code creates a new command bar button and stores a reference to the newly created object in the
NewCBarButton variable. If the Office.MsoControlType type is set to type msoControlButton, as in the example, the VSTO engine enables caption display on the button face only. Images will not be displayed. In fact, if images are present, they are overridden. If you require an image or perhaps
a mixture of images and text on the button surface, change the type to msoButtonIcon or msoButton IconAndCaptionBelow. The former causes images to display on the button surface. The latter causes icons to be displayed with the caption text neatly formatted below the image.
The image used to fill the button surface is sourced from an image control. There are about 2000 icons in the image control. By assigning an appropriate index to the faceId property, an image is made available to the button. In Listing 3-24, the image assignment is given by:
NewCBarButton.FaceId = 563
Two thousand image icons are more than sufficient to satisfy most end-user requirements. However, there is no way to tell what images are available. One good approach is to write a loop to iterate the possible choices in the control. Simply pick the one that is most appropriate and make a note of the
83

Chapter 3
index for use later. Note that valid IDs are positive integers including zero. If no icon exists for the id, a blank icon is automatically displayed and no exception is thrown. Negative values assigned to the faceId result in a runtime exception. If you would like to load your own custom image, Chapter 4 discusses one approach and presents some sample code to do so.
In some cases, the code presented previously may fail to work correctly. This is especially true if there are several events wired inside the application code. The end result is that the message box may not be displayed at all. Interestingly, the event wiring is dependent on a unique identifier being assigned to the Tag property for event hook up to be successful. VSTO uses these unique tags to track the event handlers and events in the application. Consider Listing 3-25, which enables the message box to be displayed.
Visual Basic
aButton.Tag = DateTime.Now ‘new tag added aButton.FaceId = 563
AddHandler aButton.Click, AddressOf Me. aButton_Click
C#
aButton.Tag = DateTime.Now.ToString(); //new tag added aButton.FaceId = 563;
aButton.Click += new Office._CommandBarButtonEvents_ClickEventHandler (Button_Click);
Listing 3-25: A better event handler implementation
There is another problem lurking in the code. If you run the code twice in succession, it will throw an ArgumentException with an error message that is certain to cause some hair-pulling anxiety. The message reads, “Value does not fall within the expected range.” As it turns out, the toolbar buttons that are created are permanently persisted in Excel if the last parameter in the Add method is set to false, as shown in Listing 3-24.
The exception is thrown because each toolbar button must have a unique identifier. Running the code a second time creates a duplicate “mybutton” identifier. To be sure, better error messages have been written, but this is not one of them!
Further, setting the final parameter to false is dangerous because your application is invasive to the Excel application living on the desktop. The average user cannot easily reverse the change after your application has run and has been terminated. And, the new feature is not expected to work when the desktop version of Excel is used outside of your application. So, in a nutshell, the code adds a button that is perfectly useless outside of the housing application, and it is difficult to remove. For these reasons, the recommended approach is to set the last parameter to true so that the buttons are temporary.
To move this code from a theoretical example to something closer to the real world, the event handler section of code that displays the message may be modified to actually format the spreadsheet range using a style object. Consider Listing 3-26.
Visual Basic
Private Sub ButtonClick(ByVal ctrl As Office.CommandBarButton, ByRef cancel As Boolean)
Dim style As Excel.Style = Globals.ThisWorkbook.Styles.Add(“NewStyle”) style.Font.Name = “Arial”
style.Font.Size = 10
84
Advanced Excel Automation
style.Font.Color = System.Drawing.ColorTranslator.ToOle(System.Drawing.Color.Black)
style.Interior.Color = System.Drawing.ColorTranslator.ToOle(System.Drawing.Color.Beige)
style.Interior.Pattern = Excel.XlPattern.xlPatternSolid Dim NamedRange1 As Microsoft.Office.Tools.Excel.NamedRange
NamedRange1 = Me.Controls.AddNamedRange(Me.Range(“A1”),”NamedRange1”) NamedRange1.Value = “Style Test”
NamedRange1.Style = “NewStyle”
NamedRange1.Columns.AutoFit()
End Sub
C#
void barButton_Click(Microsoft.Office.Core.CommandBarButton Ctrl, ref bool CancelDefault)
{
Excel.Style style = Globals.ThisWorkbook.Styles.Add(“NewStyle”, missing); style.Font.Name = “Arial”;
style.Font.Size = 10; style.Font.Color =
System.Drawing.ColorTranslator.ToOle(System.Drawing.Color.Black); style.Interior.Color =
System.Drawing.ColorTranslator.ToOle(System.Drawing.Color.Beige); style.Interior.Pattern = Excel.XlPattern.xlPatternSolid; Microsoft.Office.Tools.Excel.NamedRange NamedRange1 =
Globals.Sheet1.Controls.AddNamedRange(Globals.Sheet1.Range[“A1”, missing], “NamedRange1”);
NamedRange1.Value2 = “‘Style Test”; NamedRange1.Style = “NewStyle”; NamedRange1.Columns.AutoFit();
}
Listing 3-26: Style customization
Except for the style concept, the actual implementation is not new. A style object is created and named. The font object is customized appropriately and some aesthetic features are applied. Finally, the style object is assigned to a named range so that the functionality may be applied to it.
The style object offers convenient formatting options that are easy to maintain and modify when code goes to production. And there is no real overhead. Microsoft Excel provides the style object for formatting and customization. Excel can contain as many as 4000 styles in a workbook. The type of customization may be applied as a single unit of functionality to the target worksheet.
Excel Menu Customization
Most applications that interact heavily with the end user require some sort of menu manipulation. Menus play an organizational role in software applications by allowing structured access to application functionality. For instance, file manipulation functionality may be organized under a File menu and application configuration may be organized under the Tools menu. Successful frameworks present menus that are easy to modify and flexible to work with. VSTO is no exception. VSTO allows developers to build menus easily.
85

Chapter 3
Menu customization allows the developer to customize the default menus in Excel. One advantage to customizing the default menu is that very little training is required, since users are already familiar with the menu. Another advantage is that the customized functionality appears as if it is part of the Excel Office application. A third advantage is that the code to generate menus may be used in other parts of VSTO, such as Microsoft Outlook or Microsoft Office, because menu generation belongs to VSTO as a whole and not necessarily to a specific component of the tool suite.
Consider Listing 3-27, which adds a menu to the default toolbar.
Visual Basic
‘ Add the menu.
Dim menubar As Office.CommandBar = CType(Application.CommandBars.ActiveMenuBar, Office.CommandBar)
Dim cmdBarControl As Office.CommandBarPopup cmdBarControl =
CType(menubar.Controls.Add(Office.MsoControlType.msoControlPopup, , , menubar.Controls.Count, True), Office.CommandBarPopup)
If Not cmdBarControl Is Nothing Then cmdBarControl.Caption = “&Refresh” ‘ Add the menu command.
Dim menuCommand As Office.CommandBarButton menuCommand =
CType(cmdBarControl.Controls.Add(Office.MsoControlType.msoControlButton, , , ,
True), Office.CommandBarButton) menuCommand.Caption = “&Calculate” menuCommand.Tag = DateTime.Now.ToString() menuCommand.FaceId = 265
AddHandler menuCommand.Click, AddressOf Me.menuCommand_Click End If
C#
// Add the menu. Office.CommandBar menubar =
(Office.CommandBar)Application.CommandBars.ActiveMenuBar; Office.CommandBarPopup cmdBarControl = (Office.CommandBarPopup)menubar.Controls.Add( Office.MsoControlType.msoControlPopup, missing, missing, menubar.Controls.Count, true);
if (cmdBarControl != null)
{
cmdBarControl.Caption = “&Refresh”;
// Add the menu command. Office.CommandBarButton menuCommand =
(Office.CommandBarButton)cmdBarControl.Controls.Add( Office.MsoControlType.msoControlButton, missing, missing, missing, true);
menuCommand.Caption = “&Calculate”; menuCommand.Tag = DateTime.Now.ToString(); menuCommand.FaceId = 265; menuCommand.Click += new
Microsoft.Office.Core._CommandBarButtonEvents_ClickEventHandler(menuCommand_Click);
}
Listing 3-27: Menu customization
86
Advanced Excel Automation
First, a reference to the ActiveMenuBar is retrieved. The ActiveMenuBar retrieves the instance of the menu bar that is active in the application. The code then tests to see if there are any buttons present. If there are buttons present, a button is placed at the last position and titled accordingly.
The type parameter allows you to get fancy with the type of button that you wish to create. However, you should not overdo it. The idea is to present a consistent look and feel to the user so that your new addition appears to be part of the default functionality. Buttons that stand out look unprofessional.
Cheesy applications promote a lack of confidence in the software, and users are typically less tolerant of bugs found in the software.
If you require further functionality, simply use the reference to the existing button. For instance, a reference to the variable newButton may be used to add an event or a bitmap image, or disable the button. Visual Studio IntelliSense usually provides a slew of properties and methods to help with the customization. You may also consult the help documentation for a full explanation on each property or method.
The handler for the button click event presented in Listing 3-27 appears in Listing 3-28.
Visual Basic
‘ update the calculated range
Private Sub menuCommand_Click(ByVal Ctrl As Microsoft.Office.Core.CommandBarButton, ByRef CancelDefault As Boolean)
Dim updateRange As Microsoft.Office.Tools.Excel.NamedRange
updateRange = Globals.Sheet1.Controls.AddNamedRange(Globals.Sheet1.get_Range(“A1”),
“UpdateRange”)
updateRange.AutoFormat(Excel.XlRangeAutoFormat.xlRangeAutoFormat3DEffects1, True, False, True, False, True, True)
updateRange.Calculate() End Sub
C#
// update the calculated range
private void menuCommand_Click(Microsoft.Office.Core.CommandBarButton Ctrl, ref bool CancelDefault)
{
Microsoft.Office.Tools.Excel.NamedRange updateRange = Globals.Sheet1.Controls.AddNamedRange(Globals.Sheet1.get_Range(“A1”,
missing), “UpdateRange”); updateRange.AutoFormat(Excel.XlRangeAutoFormat.xlRangeAutoFormat3DEffects1, true, false, true, false, true, true);
updateRange.Calculate();
}
Listing 3-28: Event handler for menu control
In Listing 3-28, the two lines of code simply obtain the values in the specified range, assign it to a named range object, and fire the Calculate method. The range is colored appropriately as a visual confirmation to the user that the calculation has occurred.
87