

ASP Programming for the Absolute Beginner
.pdf116
ASP Programming for the Absolute Beginner
ENSURING THAT FORM DATA IS PROVIDED
If you have ever ordered anything on the Web or been asked to complete a questionnaire, survey, and the like, you’ve probably seen some type of marking on the form to indicate that certain fields are required. Perhaps you ignored these required fields, leaving them blank, and tried to submit the form without providing any data.
More than likely, if you were using a well-designed form, you were presented with a message announcing that you failed to provide required data and are being returned to the form to enter this information. This type of form data verification can be done in a variety of ways and is critical to ensuring that all the data you want to collect via a form is, indeed, collected.
later chapters.) If you use an application like rontPageY(don’t forget that you’re going to be
Fortunately, because of the increasing power of HTML editing programs such as Microsoft
FrontPage or Macromedia HomeSite, you don’t have to know any special programming to
build this type of form verification into your Web pages. In fact, you can do simple form data
verification by using ASP. (I’ll show you an example of this later in this chapter, as well as in
taking a look at FrontPage in Chapter 10, “ASP and HTML Scripting with FrontPage 2000”), |
|
|
L |
automated tools allow you to customize the type of verification you want to perform on form |
|
data. For example, you can |
F |
• |
Verify the type of data being entered into the form field (letters, digits, white space, and |
|
|
the like). |
M |
• |
Verify the length of the data stringAbeing entered into the form field. You can set a mini- |
|
E mum or maximum numberTof characters that must be entered into a specific field for the
form to be processed. his type of form field verification is especially useful when you are capturing such information as a social security number, in which case, you’d set the minimum and maximum data string lengths to 9.
• Verify a range within which the form field data must fall. For example, you can require it to be greater than or equal to a specific value.
In short, form field verification is yet another tool for ensuring the overall integrity, usability, and functionality of your Web pages. There is nothing worse than your users trying to access your Web site, but through no fault of their own—such as entering information into a form field that falls outside your desired range—the page crashes or does not function as you intended.
Are you ready to build the Memory Game? Let’s get started, then, with the design of the Memory database.
The Memory Database
The Memory Game database is a Microsoft Access database and consists of two primary tables: History and MatchData (see Figure 6.4):
•MatchData is used as a transient storage table to capture data specific to each game. Figure 6.5 illustrates the MatchData table in Design view. As you start to program the Memory Game code, you will review this table in detail.
Team-Fly®

FIGURE 6.4
The Memory.mdb
database,
consisting of two
tables: History and
MatchData.
•History is used to store information about each game for future reference (see Figure 6.6). Specifically, this table stores the player’s name, the date he or she played the game, and the number of guesses it took to correctly make all the matches.
Install the Memory.mdb database by following these instructions. If you are using Windows 9x, open the Control Panel, and click the ODBC icon to perform these steps. Although the dialog boxes look slightly different, the process of establishing the ODBC connection is nearly identical to that of Windows 2000.
117
C h a p te r
6
U s i n F g o r m s
FIGURE 6.5
The MatchData
table is used to
store information
about each game as
it is being played.
FIGURE 6.6
As with many electronic games, the History table serves as a repository of high (and low!) scores for later review (and possibly gloating over).
118 |
1. Locate the Memory.mdb database file on the enclosed CD-ROM, and copy it into |
|
your ABG_ASP folder in the Inetpub directory. |
ASP Programming for the Absolute Beginner
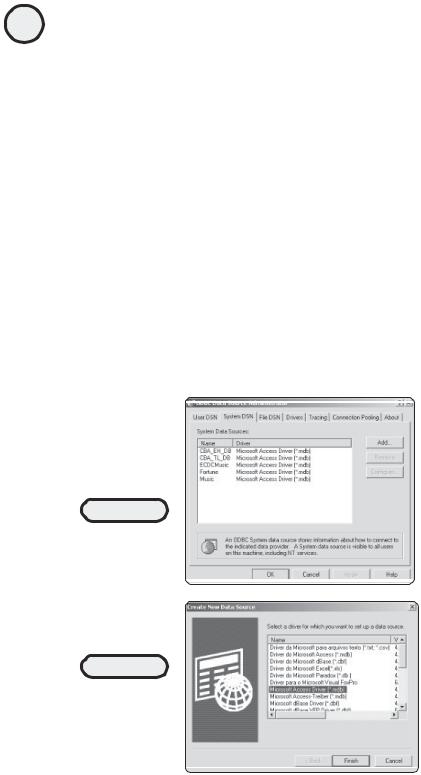
2.Create the ODBC connection to the database. From the Windows 2000 Control Panel, click the Administrative Tools icon, and then click the Data Sources (ODBC) icon. The ODBC Data Source Administrator dialog box opens (see Figure 6.7).
3.Click the System DSN tab, and then click Add to open the Create New Data Source dialog box (see Figure 6.8). Highlight the Microsoft Access Driver (*.mdb) option, and click Finish.
4.Complete the ODBC access setup process by clicking the Select button and selecting the Memory.mdb database file you copied into your ABG_ASP directory (see Figure 6.9).
5.As shown in Figure 6.9, you complete the Data Source Name field by entering Memory.mdb. Provide a short description in the Description field, and click the OK button. Figure 6.10 shows the Memory.mdb database added to your list of available System Data Sources.
You have now established an ODBC connection to the Memory database.
FIGURE 6.7
Select the System
DSN tab to begin
the ODBC
connection process.
FIGURE 6.8
As mentioned in Chapter 5, note the different kinds of data source drivers available to you via ODBC.

FIGURE 6.9
The ODBC setup is
nearly complete!
FIGURE 6.10
You should see the
Memory.mdb file in the listing of System Data Sources under the System DSN tab.
Establishing Database Permissions with Windows 2000
If you are using Windows 2000 and Access 2000, you must establish the proper security setting on the database so that it will work properly with your ASP code:
1.Navigate to the Memory.mdb file, select it, and right-click. From the pop-up menu that appears, select the Properties option (see Figure 6.11).
2.The Memory Properties dialog box opens. Click the Security tab. In the Name section of the dialog box, select the Everyone listing. In the Permissions section, make sure that the Modify, Read & Execute, and Read and Write options are
FIGURE 6.11
If you are using Windows 2000 and Access 2000, you must set the proper security permissions on the Memory database for it to work with your ASP code.
119
C h a p te r
6
U s i n F g o r m s

120 |
selected; then click the Apply button. Your database is now ready to function |
|
properly with the Memory Game ASP code. |
ASP Programming for the Absolute Beginner
As you move through the programming of the Memory Game, you will come to understand in more detail how the Memory database and its tables fit into the functioning of the game. For now, be content in having established the ODBC connection and the proper security settings because these are critical “first things first” issues of programming a game.
Programming the Memory Game
Now that you have established the database, it’s time to begin programming the Memory Game.
One of the key elements of the game is its capability to assign the matches randomly each time the game is played. In other words, the game board should never be the same configuration twice, to make it more difficult (and more fun) to guess where the matches are hidden.
Before you begin to build the game (including the HTML that will form the game board, as shown in Figure 6.1), I want to make sure that you understand the piece of code that randomly generates the game board each time it is played.
Random Number Generation, Part I
An essential element of any game is the ability to randomly generate numbers. This is used to add an element of chance to any game, and the Memory Game example in this chapter is no exception.
That said, let’s take a moment to review a sample random number generator code that will, in turn, be used with the Memory Game.
1.Locate the Random.asp file on the enclosed CD-ROM, and copy it into your ABG_ASP folder in the Inetpub directory.
A LITTLE SECURITY IN AN INSECURE WORLD
Why bother with security? Although it’s true that you don’t have to worry about “unauthorized” access to data with the games in this book, in the real world you will undoubtedly want to limit access to your critical data. A full discussion of Windows security and permission settings is well beyond the scope of this book, but be aware that setting proper security on your systems (especially your Web sites, given that the porous nature of the Web provides an open invitation to would-be hackers) is an absolute requirement in today’s world. There is no worse feeling of helplessness than when you realize that your Web site and related systems have been penetrated by unauthorized and often times malevolent intruders. Be cautious with both the design and placement of your critical data.
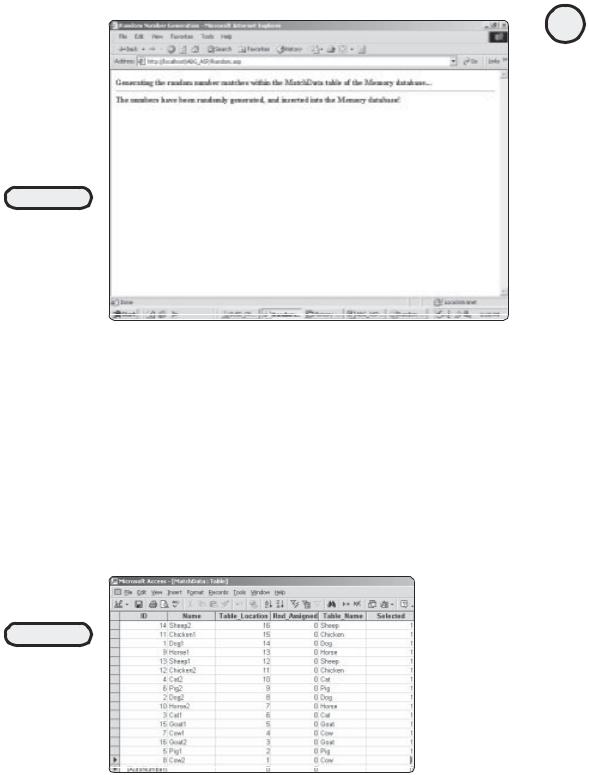
FIGURE 6.12
Once the code runs,
open the
Memory.mdb
database to see the
random numbers
that will have been
inserted.
2.Open this page within a Web browser. After a few moments, the ASP code within this page will execute, and your screen will look like Figure 6.12. The ASP code within Random.asp takes a few moments to complete because it must perform certain conditional logic statements, as well as insert information into the Memory database each time the loop that makes up the code is executed.
3.Admittedly, the screen output isn’t exciting, but the ASP code behind the scenes is doing some interesting things. Navigate to the Memory database, open it, and then open the MatchData table. Your MatchData table should look something like Figure 6.13.
The following code is for the Random.asp file. Take a look at it to see what you can figure out. Then I’ll explain how the code works.
121
C h a p te r
6
U s i n F g o r m s
FIGURE 6.13
New, random numbers (1–16) are assigned to each record in the MatchData table every time the
Random_Code.asp
page is executed.

122
ASP Programming for the Absolute Beginner
Listing 6.3 Random.asp
<HTML>
<TITLE>Random Number Generation</TITLE> <BODY>
<B>Generating the random number matches within the MatchData table of the Memory database...</B>
<HR>
<%
Dim CheckVar
For i=1 to 16
set DataCheck=Server.CreateObject("ADODB.Recordset") sqlstmt="SELECT * FROM MatchData WHERE ID=" & i DataCheck.Open sqlstmt, "DSN=Memory", 3, 3, 1 B=DataCheck("RND_Assigned")
IF B=0 THEN
CheckVar=0
ELSE
CheckVar=1
END IF
DO UNTIL CheckVar = 1
RANDOMIZE
RndCheck=INT((16-1+1) * RND + 1)
For Index = 1 to 750000
Next
set Datacheck2=Server.Createobject("ADODB.Recordset") sqlstmt2="SELECT * FROM MatchData WHERE Table_Location="&RndCheck DataCheck2.Open sqlstmt2, "DSN=Memory", 3, 3, 1
If DataCheck2.recordcount = 0 THEN
set InsertCheck=Server.Createobject("ADODB.Recordset") sqlinsert="UPDATE MatchData SET Table_Location=" & RndCheck & " & " WHERE ID="& i
InsertCheck.Open sqlinsert, "DSN=Memory"
CheckVar=1
END IF
DataCheck2.close
Set DataCheck2=nothing
LOOP

Datacheck.close
Set Datacheck=nothing
Next
%>
<B>The numbers have been randomly generated and inserted into the Memory database!</B>
</BODY>
</HTML>
As mentioned before, a primary function of the Memory game is to generate numbers randomly from 1 to 16 so that each matching pair can be assigned a random location within the table every time the game is played. This is accomplished through the use of two For...Next loops. You were introduced to For...Next loops in Chapter 2, “Programming ASP Web Pages with VBScript.” You will learn more about using loops in Chapter 7, “Essential Programming Logic,” and you can also find a reference for this and other VBScript topics in Appendix A, “VBScript Variable Reference.”
In essence, the two For...Next loops split this code into two parts. Take a look at each piece individually so that you can understand how everything fits together:
1.The line For i=1 to 16 is, as you know, the beginning line of a For...Next loop. By beginning the loop at 1 and ending it at 16, you are telling the loop—you guessed it!—to repeat itself 16 times. Each time through the loop, the current number (1–16) is assigned to a variable so that you can tell within your code how far you are into the loop. In this case, I used the variable i, but you can call this variable anything you want.
2.The next part of the code establishes a connection to the Memory DSN you created. Note that, in the SELECT statement, the only record that is returned is the one that matches the current number of the loop. This is done by utilizing the i
variable assigned to the loop. For example, the fifth time through the loop, the
SELECT statement would read SELECT * FROM MatchData WHERE ID=5.
3.After this particular record is retrieved via the SELECT statement, a variable is created (B), and the value of the Selected field from the returned record is assigned to this variable. For example, if this is the fifth time through the loop, the SELECT statement reads the record from the MatchData table where the ID record equals 5. Then, the B variable is given the same value as the value in the Selected field of the returned record.
4.For the game to work properly, each matching pair should be assigned a unique number between 1 and 16. This enables each match (for example, Dog1, Cat2, Goat1, and so on) within the MatchData table of the database to have a unique number. That said, the next section of the code checks whether the record currently selected has already been assigned a number from 1 to 16. This is done using an IF...THEN statement (which you learned about in Chapter 2): If the variable
B equals 0, a new variable, CheckVar, is set to 0. Otherwise, the CheckVar variable is set to 1. The CheckVar variable is used to denote whether the selected record (the record currently being analyzed via the For...Next loop) has already been assigned a random number between 1 and 16.
123
C h a p te r
6
U s i n F g o r m s

124
ASP Programming for the Absolute Beginner
Random Number Generation, Part II
In essence, the first part of the Random.asp code described in the preceding section just establishes the For...Next loop that will run for 16 times. Each time through, the MatchData table of the Memory database is queried, and, for the record returned, the value of the Rnd_Assigned field is checked. That value is assigned to the CheckVar variable.
Now the second part of the Random.asp code comes into play, depending on whether the value of the CheckVar variable is a 0 or a 1. First, examine the second part of the code when the CheckVar variable is set to 0:
1.When the CheckVar variable is set to 0, this denotes that the B variable has been set to 0. Take another look at the section of code that assigns the B variable: If the Rnd_Assigned field is 0, this means that a random number between 1 and 16 has yet to be assigned for the record being analyzed (the record being reviewed as the For...Next, 1–16 loop executes).
2.When CheckVar is set to 0, the next section of code, a DO loop, executes until CheckVar is set to 1 (the DO loop is denoted by the line DO UNTIL CheckVar=1). As you learned in Chapter 2, you can use a DO loop to execute a specific section of code until some variable evaluates to a value you specify. In this case, you want the DO loop to execute until the CheckVar variable is equal to 1.
3.After the DO loop is called, the first lines of code generate a random number between 1 and 16. The random number generated is assigned to the variable
RndCheck. Then (similar to the first call to the Memory DSN in Part I of this code), a connection is set to the MatchData table (this connection is DataCheck2). In this case, the SELECT statement pulls the specific record from the MatchData table where the Table_Location field is set to the random number that has been generated. The Table_Location field is used to denote where on the game table this matching pair is to be located.
4.If the record count of this query is 0, no records were found in the MatchData table where the Table_Location record is equal to the RndCheck variable, and the
next section of code executes. Again, a connection (InsertCheck) to the MatchData table is created. This time, an UPDATE statement is used to assign the value of the RndCheck variable to the Table_Location field of the record being analyzed. If the record count of the DataCheck2 connection is greater than 0, the random number that has been generated already has been assigned to some other record in the table, so the DO loop continues to execute. That is, another random number between 1 and 16 is generated, the DataCheck2 connection is established again, the record count is checked, and so on.
5.After the CheckVar variable is set to 1 (or after a unique random number between 1 and 16 has been generated and then inserted via the UPDATE statement into the database), the DO loop is terminated, and the next number in the FOR...NEXT loop is generated, with the entire process being repeated. To put all of this simply, each individual record in the MatchData table must be assigned a unique number between 1 and 16 to ensure that each record has a unique location
on the game board.
6.Finally, when the FOR...NEXT loop is completed, the text you see in Figure 6.12 is output to the screen, indicating that the entire code has executed.

TRAP
You might (should!) have noticed that I didn’t mention the following lines of code in my explanation of how the Random.asp code executes:
For Index = 1 to 750000
Next
As you already know, this code assigns a variable (Index) to the value of the For...Next loop each time it executes. This particular For...Next loop executes 750,000 times(!) but doesn’t seem to do anything other than that. On the surface, at least, all this section of code seems to be doing is to pause the execution of the rest of the code. Before anything else can execute, this loop has to execute three-quarters of a million times! However, this pause is the whole point. Because of ADO’s speed limitations when working with Access, it is sometimes necessary to include these code pauses. Otherwise, your code tends to jump ahead of itself, resulting in errors.
What do I mean? Try running the Random.asp code without this particular For...Next loop. Within the MatchData table, you will see the same random, 1–16 number being assigned to more than one record. The reason for this is that, because the DataCheck2 and InsertCheck connections are established (and the specific SQL statements executed), the Access ADO driver can’t keep up with the speed of the code execution. As the DO loop executes, this results in the DataCheck2 connection being run before the InsertCheck is allowed to execute fully. The result of this overlap is that the DataCheck2 record count returns an erroneous value. That is, what would otherwise return a record count greater than 1 returns as 0 because the InsertCheck connection has not been allowed to execute and thus update the MatchData table.
Long story short: When you are calling back-to-back connections to an Access database via ADO—especially if one of those connections is inserting or updating information into the database—it is wise to place one of the For...Next delays between the connections to ensure that your connections have a chance to execute (close) fully before the next connection is established and executed.
This code will become clearer as you study the rest of the code that comprises the Memory Game. For now, however, understand the following plain-English summary of how this section of code functions:
1.Hi, I’m the code for the Memory Game! For every matching pair (Cat1, Cat2, Dog1, Dog2), I need to assign a unique random number between 1 and 16. This random number will correlate to the location of each matching pair on the game board.
2.To do this, I use a For...Next loop that executes 16 times. Each time through the loop, I check the MatchData table of the database to see whether the record being analyzed (again, this record corresponds to each time through the
For...Next loop) has already been assigned a random number. This random number will be the unique location on the game board for that matching pair.
3.If the random number generated has already been assigned, I keep generating a random number (1–16) via a DO loop. When I find a random number that has not already been assigned, I use the SQL UPDATE statement to assign this number to the record being analyzed (again, the record being analyzed corresponds to the 1–16 number currently being evaluated via the For...Next loop).
125
C h a p te r
6
U s i n F g o r m s