

ASP Programming for the Absolute Beginner
.pdf86
ASP Programming for the Absolute Beginner
Are you still with me? Again, my goal is to familiarize you with the three major objects of ADO because you will consistently use them in your ASP programming. Although the history of ADO development is important, the real issue is understanding the power of ADO and how you can best exploit it. That is the focus of this chapter, so let’s jump into some examples now.
Creating a Data Source Name (DSN)
Before you can begin using your database in your ASP Web page, you have to create the appropriate connection to the database. By creating this connection, you are creating a Data Source Name (DSN for short).
HINT |
Before creating your first DSN, you should have some type of Web server installed |
||
|
|||
|
on your computer. If you haven’t installed a Web server as instructed in Chapter 1, |
||
|
“Preparing to Work with ASP,” you should do that now. |
||
|
|
|
Y |
|
|
L |
|
HINT |
|
F |
|
|
|
||
|
You might have noticed my seemingly interchangeable use of the terms data source |
||
|
and database. Specifically, a data source is any type of information store that has |
||
|
information you want to retrieve, so a data source can include a database, a Word |
||
|
|
M |
|
|
or an Excel document, and so on. Moving forward, however, when I write about data |
||
|
A |
|
|
|
sources, I am specifically referring to a database. Moreover, I am referring to |
||
|
Microsoft AccessEdatabases. |
|
|
|
T |
|
|
Now you will create a DSN for the Music.mdb Access database found on the enclosed CD-ROM:
1.Before you do anything else, copy the Music.mdb file from the CD-ROM to your ABG_ASP directory, in the wwwroot directory of the Inetpub folder.
2.Navigate to the ODBC Data Source Administrator dialog box, using one of the following paths, and click the System DSN tab (see Figure 5.1):
•For Windows 9x, click Start, Settings, Control Panel, and then the 32-bit ODBC icon.
•For Windows 2000 (from which these screens are captured), click Start, Settings, Control Panel, Administrative Tools, and then the Data Sources (ODBC) icon.
TRICK |
Depending on which version of Windows you are running (Windows 9x or 2000), |
|
|
|
getting to the ODBC Data Source Administrator dialog box (refer to Figure 5.1), in- |
|
volves two slightly different paths. Note, however, that after you arrive at the dialog |
|
box, the process for establishing a DSN is the same, regardless of which version of |
|
Windows you are running. |
3.Click the Add button. The Create New Data Source dialog box opens (see Figure 5.2). Scroll down the list, and select the Microsoft Access Driver (*.mdb) option.
Team-Fly®
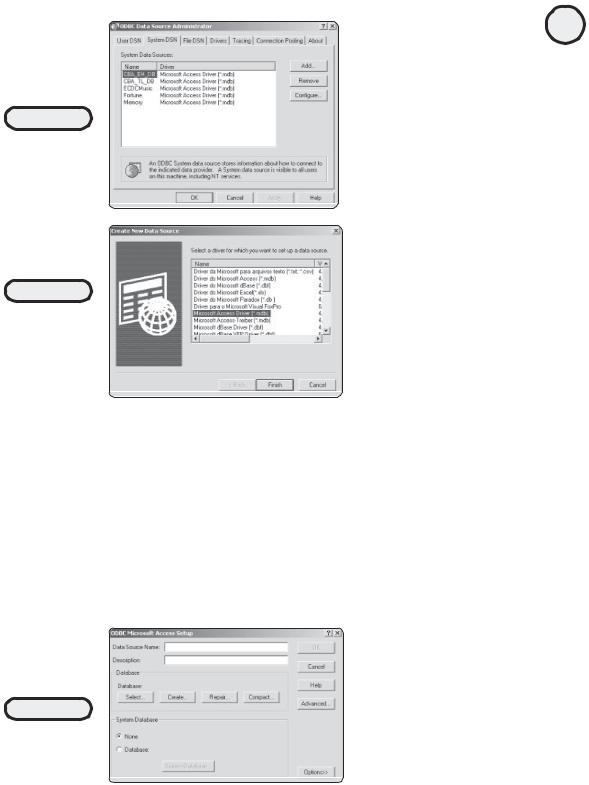
FIGURE 5.1
Click the System
DSN tab to begin
the configuration
process of creating
a DSN.
FIGURE 5.2
Note the list of
available drivers.
ADO/ODBC can
integrate with a
variety of data
sources.
4.Click the Finish button. The ODBC Microsoft Access Setup dialog box opens (see Figure 5.3).
5.In the Data Source Name field, type Music.
6.In the Description field, type This is the DSN that is used with Chapter 5 of the book.
7.In the Database section, click the Select button. The Select Database dialog box opens (see Figure 5.4). Navigate to the ABG_ASP folder in the wwwroot directory of the InetPub folder to find the Music.mdb file. Select it, and then click OK.
87
C h a p te r
5
D a t ab a s A e c c e s s
w i t h
A D O
FIGURE 5.3
You select the data
source for which
you want to create
a DSN.

88
ASP Programming for the Absolute Beginner
FIGURE 5.4
You select the database file that will be used with the Music DSN you are creating.
FIGURE 5.5
With the ODBC Microsoft Access Setup dialog box completed, you have provided all the information necessary to create a DSN.
FIGURE 5.6
With the Music DSN created, you are ready to access the
Music.mdb database from within your ASP Web pages.
8.Your screen should look like Figure 5.5. Click OK. You will be returned to the ODBC Data Source Administrator dialog box (refer to Figure 5.1). Note that your Music.mdb file has been added as a System Data Source (see Figure 5.6).
This process for creating a DSN is repeated several times in this book because you will work with different Access databases (all included on the CD-ROM). Although this process might seem complicated now, it will soon become second nature. The next section allows you to test your newly created DSN and introduces you to the power of SQL.
Introducing SQL
Now that you’ve created a DSN, you can begin working with the Music.mdb database within your ASP pages. If you recall, from the discussion of ADO objects at the beginning of the chapter, SQL is the primary mechanism for retrieving and manipulating data from within your database via your ASP pages. It’s time to introduce you to SQL and show you how this method makes your Web pages come alive.

TRICK |
Although it is best to learn how to code by hand before moving to any type of HTML/ |
|
|
|
scripting editor, in the future you will find that the use of such an application has |
|
distinct advantages. Not the least of these is the time saved by automating routine, |
|
mundane tasks. That said, I will return to many concepts presented in this chapter |
|
(especially the discussion of the various SQL statements) in Chapter 10, “ASP and |
|
HTML Scripting with FrontPage 2000.” Although you might be tempted to move ahead |
|
to that chapter now, resist the temptation! By reading this chapter first, you will |
|
gain a far greater fundamental understanding of these important database concepts |
|
than those who rely heavily on a tool such as FrontPage without first gaining an |
|
understanding of how things work. |
TRICK |
A full discussion of SQL is well beyond the scope of this book. You will learn how to |
|
|
|
work with the four major SQL statements that, combined with a little creativity on |
|
your part, allow you to do all kinds of wonderful database interactions in conjunc- |
|
tion with ASP. However, if you are interested in learning more about SQL, be sure to |
|
check out Microsoft SQL Server 7 Administrator’s Guide (Premier Press). |
What is SQL? Again, this term is short for Structured Query Language, which was developed to serve as a universal method of manipulating information in a database. By using SQL (via ADO) within ASP Web pages, you can do some amazing things. This chapter will whet your SQL whistle (so to speak!), with later chapters building on the foundation you learn here.
You can use SQL to test whether the DSN configuration you created is working properly. You will create a Web page to do just that:
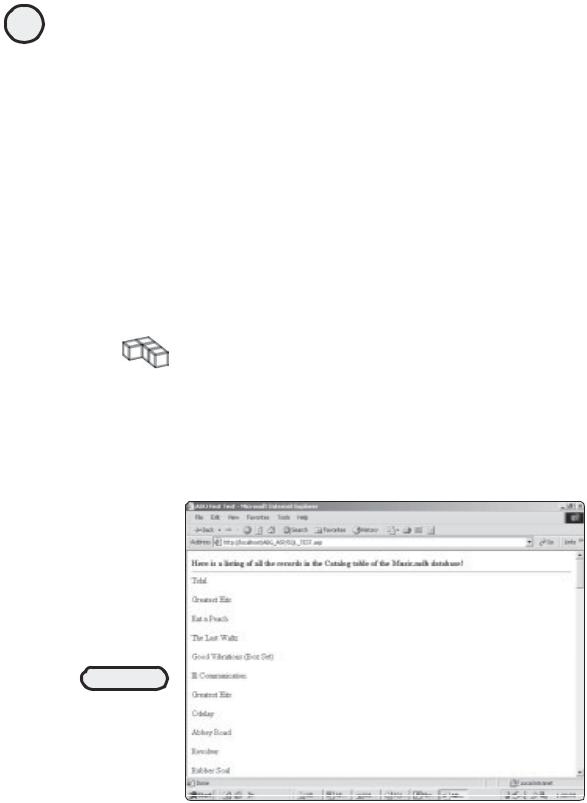
1.In Notepad, open the file SQL_Test.asp on the CD-ROM, and immediately save it (keeping the name SQL_Test.asp) to your ABG_ASP folder.
2.Open this page in a Web browser. If everything is configured properly, your screen should look like Figure 5.7.
TRAP
A common mistake in establishing a DSN is not referring to it properly with your ASP pages. If you see the following error message,
Error Type:
Microsoft OLE DB Provider for ODBC Drivers (0x80004005)
[Microsoft][ODBC Driver Manager] Data source name not found
and no default driver specified
then you probably have misspelled the DSN reference within your code or not properly referenced the DSN within your code.
Take a look at the code for this page to see everything that is happening:
Listing 5.1 SQL_Test.asp
<HTML>
<HEAD>
89
C h a p te r
5
D a t ab a s A e c c e s s
w i t h
A D O
90
ASP Programming for the Absolute Beginner
<TITLE>ADO First Test</TITLE> <BODY>
<B>Here is a listing of all the records in the Catalog table of the Music.mdb database!</B>
<HR>
<%
Set Catalog=Server.CreateObject("ADODB.Recordset")
Catalog.open "SELECT * FROM Catalog", "DSN=Music"
Do WHILE NOT Catalog.EOF
Response.Write Catalog("Title") & "<p>"
Catalog.MoveNext
Loop
Catalog.Close
Set Catalog=Nothing %>
</BODY>
</HTML>
TRICK |
Note in Code Listing 5.1 the following lines: |
|
|
|
Catalog.Close |
|
Set Catalog=Nothing |
|
These lines do two important things, which you should be careful to include in all of your |
|
code that utilizes ADO: the first line literally closes the connection to the data source |
|
(which is important because keeping a connection open can cause application errors, |
|
performance loss on the server, and so on). The second line, then, erases any lingering |
|
association with the connection to the variable name (in this case, Catalog). |
FIGURE 5.7
If your DSN is configured properly, your SQL_Test.asp page will display information from the
Music.mdb
database.

What’s happening with Code Listing 5.1? It’s really not that complicated if you take a moment to follow the programming logic to see how the page functions:
•First, some simple HTML formatting is provided, including giving the page a title
(ADO First Test).
•The script section begins with the usual <% identifier.
•Next, a connection is made to the Music database via the recordset object. This connection is given the name Catalog. Note that you can name these connections whatever you want. However, it is usually a good idea to keep them simple and in some sense descriptive of what the connection represents. The "DSN=Music" portion is used as an indicator, letting your code know which DSN you are interested in using.
•When the connection is made, the connection is then opened (Catalog.open), and the SQL query is performed. In this case, the query asks for all records in the Catalog table to be returned. (I explain this and other SQL statements in much more detail later in this chapter.)
•Next, the line Do WHILE NOT Catalog.EOF instructs the script to run through each record in the returned recordset. The returned recordset is all the records generated by the SQL query—in this case, all the records in the Catalog table of the database. EOF is short for End of File, so, in essence, this script will execute (or loop) until the last record in the Catalog table is returned.
•The next line, Response.Write Catalog("Title") & "<p>", instructs the code to write to the screen the current value being returned for the Title field of the Catalog table. Remember, the script is looping through all the records in the Catalog table, so the current value is whatever value, at that point in the loop, is present in the Title field.
•The next two lines, Catalog.MoveNext and Loop, instruct the code to do just that: Move to the next record, and then continue looping through the returned recordset (until the EOF value is reached).
•Finally, the lines Catalog.Close and Set Catalog=Nothing close all connections to the database. You should always perform this step in all ADO scripts because this ensures that no connections are maintained past the point you need them. More important, this helps to prevent unwanted and frustrating errors.
Clear as proverbial mud, right? It’s not that difficult if you view the code logically and take the statements at face value (meaning that their functioning is very similar to the simple meaning they imply).
Although I talk more about all the components of this code throughout the chapter, take a closer look now at the SQL statement:
SELECT * FROM Catalog
This statement is simple, but (as with all things SQL) deceptively so. The SELECT statement is perhaps the primary SQL statement because it is used in various permutations to select or “read” data from a table. The information that follows it (in this case, the * symbol) modifies it to the level of specificity in which you are interested. Put simply, you first invoke the SELECT statement and then tell it how “selective” you want it to be in retrieving records from the specified table (in this case, the Catalog table of the Music.mdb database). In this statement, you can interpret it in plain English as saying, “Please return all the records and fields from the Catalog table to me.”
91
C h a p te r
5
D a t ab a s A e c c e s s
w i t h
A D O
92
ASP Programming for the Absolute Beginner
Besides the SELECT statement, there are three basic SQL commands you will learn how to use in this chapter. If you master these simple commands and use your creativity, you can use SQL to manipulate data very powerfully within your ASP Web pages. The three additional statements you will be zeroing in on include
•INSERT
•UPDATE
•DELETE
The following sections examine each of these statements, presenting code examples showing how they work with ADP and ASP.
The SELECT Statement
In the preceding section, you saw a simple use of the SELECT statement. This is all fine and good, but on many occasions you won’t need to return all the records in a specific table. You might be looking for a specific record or for records that fall within a given range. All these data query options are possible via the SELECT statement by increasing the level of selectivity in which the statement is executed.
Here are a few examples to demonstrate these concepts:
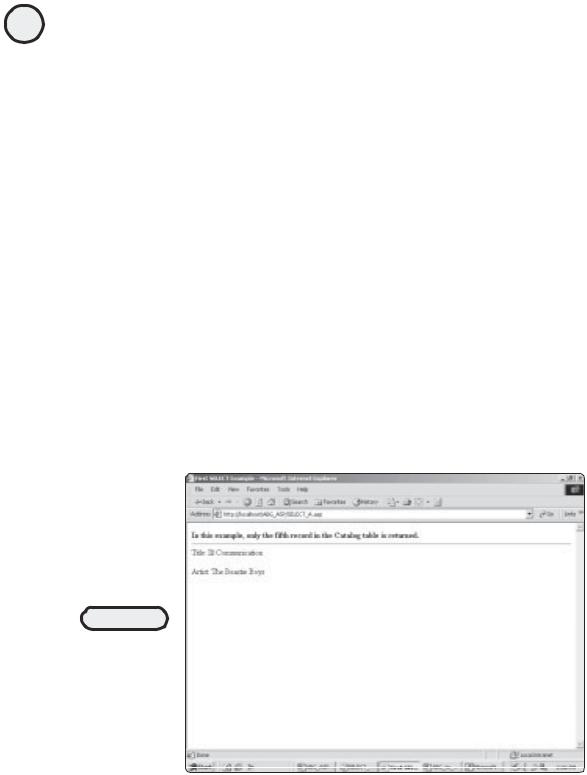
1.Load the file SELECT_A.asp from the CD-ROM, and save it inside your ABG_ASP folder.
2.Open the page in your Web browser. Note that this page (like all examples in this chapter) accesses the Music.mdb database, so you need to ensure that you’ve created a working DSN connection to this database, as described earlier in this chapter. Your Web browser should look similar to Figure 5.8.
FIGURE 5.8
By modifying a typical SELECT statement with a WHERE clause, you gain far more precise control on the data returned via your SQL queries.
How does this work? As usual, take a look at the code.
Listing 5.2 Select_A.asp
<HTML>
<HEAD>
<TITLE>First SELECT Example</TITLE> <BODY>
<B>In this example, only the fifth record in the Catalog table is returned.</B> <HR>
<%
Set Catalog=Server.CreateObject("ADODB.Recordset")
Catalog.open "SELECT * FROM Catalog WHERE ID=5", "DSN=Music"
Response.Write "Title: " & Catalog("Title") & "<p>"
Response.Write "Artist: " & Catalog("Artist")
Catalog.close
Set Catalog=Nothing %>
</BODY>
</HTML>
The following is an explanation of this code. It’s not terribly different from the preceding listing, but the biggest difference is in the SELECT statement:
•As before, a connection is established to the Music database. This connection is given the name Catalog. Remember, you can name these connections whatever you want.
•Next, the SQL command is executed. In this example, you are instructing the code to return only the fifth record in the Catalog table. This is indicated via the WHERE
clause: WHERE ID=5.
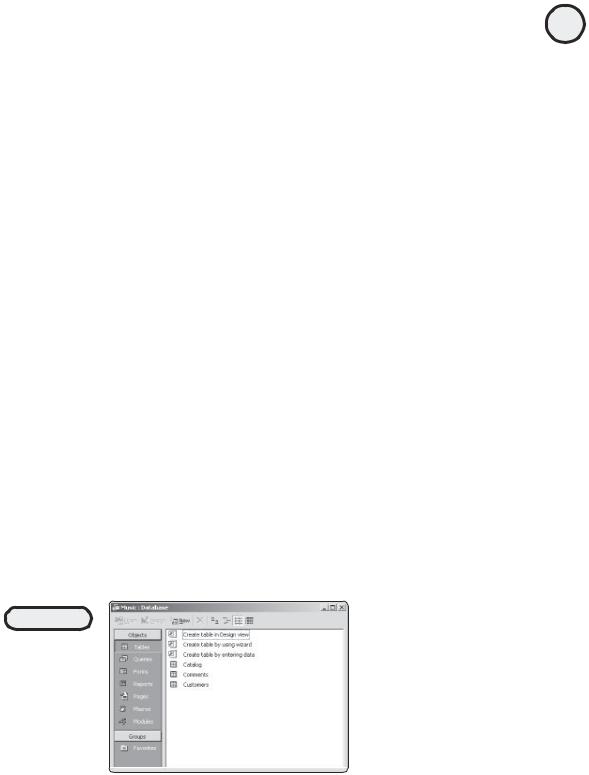
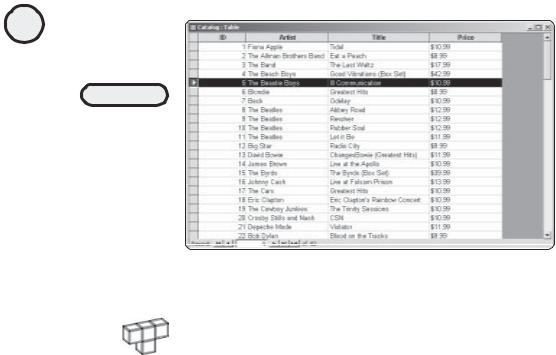
•How do you know what the fifth record is? Open the Music database in Access, and view the Catalog table, shown in Figures 5.9 and 5.10.
FIGURE 5.9
The Music database, consisting of three tables. If you are using an older version of Access, these screens may appear slightly different.
93
C h a p te r
5
D a t ab a s A e c c e s s
w i t h
A D O
94
ASP Programming for the Absolute Beginner
FIGURE 5.10
The Catalog table, illustrating the fifth record. Note the use of the ID field as an Autonumber field (see Appendix C, “Access Essentials,” for more information).
HINT |
What is the Music database? For illustrative purposes in this chapter (as well as |
|
|
|
Chapter 10, “ASP and HTML Scripting with FrontPage 2000”), imagine this database |
|
as the central repository for a small record store. The owners have decided to place |
|
all their inventory information (the Catalog table), as well as information about their |
|
customers (the Customers table), into an Access database. Perhaps they (like you) |
|
are also interested in integrating their database with ASP and creating an e-com- |
|
merce Web site where their customers can place orders on-line. All these things |
|
are possible through ADO and ASP. |
•As you see in Figure 5.10, the fifth field corresponds to the ID field where the value is 5.
•Finally, utilizing the response object, the values of both the Artist and Title fields are written to the screen. Then, the Catalog connection is closed and set to nothing.
This WHERE clause example is fine, but what if you want to add an even greater level of specificity regarding which record is returned? Take a look at another example:
1.Load the file SELECT_B.asp from the CD-ROM, and save it inside your ABG_ASP folder.
2.Open the page in your Web browser. It should look like Figure 5.11.
Take a look at the following code to see what is happening:
Listing 5.3 Select_B.asp
<HTML>
<HEAD>
<TITLE>Second SELECT Example</TITLE>
<BODY>
<B>In this example, the only record that is returned is the first record

FIGURE 5.11
More exact control of which records are returned is possible by modifying the WHERE clause to include a greater degree of specificity.
that has an ID greater than 5, and where the Beatles is the artist.</B> <HR>
<%
Set Catalog=Server.CreateObject("ADODB.Recordset")
Catalog.open "SELECT * FROM Catalog WHERE ID > 5 AND ARTIST='The Beatles'", "DSN=Music"
Response.Write "Title: " & Catalog("Title") & "<p>"
Response.Write "Artist: " & Catalog("Artist")
Catalog.close
Set Catalog=Nothing %>
</BODY>
</HTML>
This code is very similar (indeed, nearly identical) to the preceding listing, with the exception of the SQL statement. Note that in this example you are instructing the code to return the first record that has an ID greater than 5 and where the Artist field has a
value of The Beatles.
You should note at this point that, depending on the level of specificity of the returned data, your SQL statements can become quite long. To demonstrate this, here is yet another example of the WHERE clause:
1.Load the file SELECT_C.asp from the CD-ROM, and save it to your ABG_ASP folder.
2.Open the page in a Web browser. It should look like Figure 5.12.
95
C h a p te r
5
D a t ab a s A e c c e s s
w i t h
A D O