

ASP Programming for the Absolute Beginner
.pdf6
ASP Programming for the Absolute Beginner
When installing IIS, be sure to disable the FTP Server option. Leaving it on can pose some very serious security breaches.
6.Click Install. Note that you might be asked to provide your Windows 2000 CD-ROM to complete the installation process.
FIGURE 1.3
Note the
Description information shown when you click the IIS option. Along with general details about the component option, total disk space required for the installation is displayed.
Team-Fly®

FIGURE 1.4
Various components are installed with IIS, including ways for administering IIS, FrontPage 2000 Server Extensions, and other tools.
Confirming Your IIS Installation
Although I’ll talk much more about working with your Web server when I begin the discussion of manipulating Web page files (in the next chapter), there are a few things you can look at now to get a better idea of how IIS functions on your machine:
1.Open the Windows 2000 Explorer, and navigate to your C: drive. Find the folder Inetpub and select it (see Figure 1.5).
2.Note that below the Inetpub folder are several subfolders (AdminScripts, ftproot, iissamples, and so on). These folders correspond to additional IIS components placed on your computer during the installation process described in the preceding section.
7
C h a p te r
1
P re p a r i n g
t o
W o r k
w it h
A S P
FIGURE 1.5
The Inetpub folder is the central storage location for all the Web pages you create and administer with IIS.
8
ASP Programming for the Absolute Beginner
Think of the Inetpub folder as your central location for storing, manipulating, and displaying your Web pages via IIS (Web pages of all kinds, not just ASPenabled Web pages). As you begin to develop Web pages, you will become quite familiar with the Inetpub folder, as well as its subfolders.
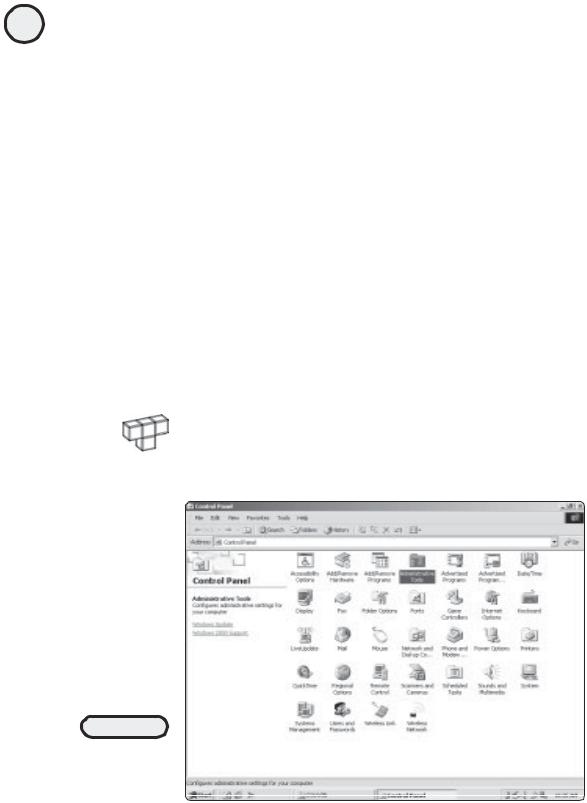
3.Aside from the creation of the Inetpub folder, take a look at the tools used to administer IIS on your computer. Again, from the Start menu, select Settings, Control Panel. Then, click the icon Administrative Tools (see Figure 1.6).
4.In the Administrative Tools screen, you notice a few icons that deal specifically with IIS (see Figure 1.7).
5.Double-click the Internet Services Manager icon to gain access to the Internet Information Services control panel. Throughout this book, I’ll be talking more about administering the Web pages you create via the aid of your Web server of choice. For now, just note the availability and location of these administration services. Close the Internet Information Services control panel.
6.Now, in the Administrative Tools screen (refer to Figure 1.7), double-click the Personal Web Manager icon. The Personal Web Manager control panel appears (see Figure 1.8).
7.Note the information immediately available to you on this Main screen. You can gain quick access to your home page and home directory (note the location of your home directory within the Inetpub folder). You can also view statistics about your Web site, such as the number of active connections and the number of visitors.
HINT |
Take a look at the address of your home page (refer to Figure 1.8). This address will |
|
|
|
differ, depending on the configuration of your machine. If your home address doesn’t |
|
look like the one shown here (and, indeed, it shouldn’t!), that is completely normal. |
FIGURE 1.6
Click Administrative
Tools to gain access
to IIS administrative
features.
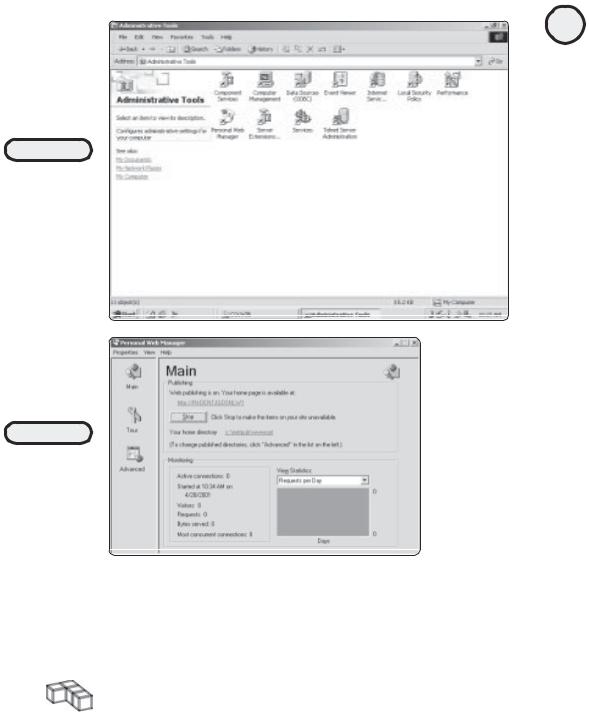
FIGURE 1.7
Several icons under Administrative Tools deal specifically with IIS, or configuring data sources, which I’ll discuss specifically in Chapter 5, “Database Access with ADO.”
FIGURE 1.8
The Personal Web Manager control panel provides a quick overview of the general features of your computer’s Web server.
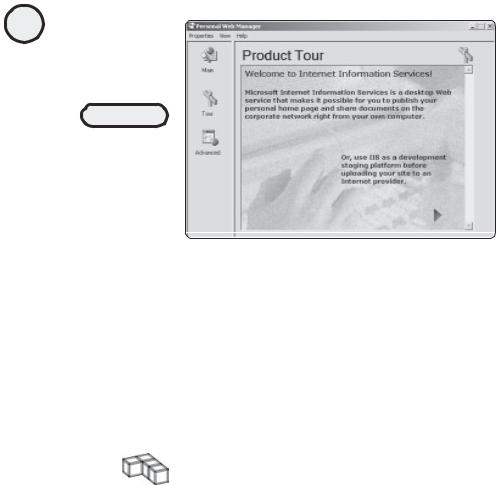
8.For more general information on IIS, click the Tour icon in the Personal Web Manager control panel. You are then given a guided tour through the features of IIS (see Figure 1.9).
TRICK |
Take a closer look at Figure 1.9. Note the text Or, use IIS as a development staging |
|
|
|
platform before uploading your site to an Internet provider. As discussed earlier, you |
|
can use your ISP’s servers to develop your Web site (assuming that it offers support |
|
for ASP). However, by utilizing the power of IIS, you have a convenient staging plat- |
|
form for developing your Web pages before you deploy them for public consumption |
|
(thus ensuring that they appear and function as you intend). This holds true whether |
|
you are planning on making your Web pages available on the World Wide Web or |
|
within the confines of a corporate intranet. |
9
C h a p te r
1
P re p a r i n g
t o
W o r k
w it h
A S P
10
ASP Programming for the Absolute Beginner
FIGURE 1.9
The Tour option presents a general overview of the features and benefits of working with IIS on your own computer.
Again, I talk more about the administration of your Web pages via IIS in later chapters. For now, just familiarize yourself with the location of these administrative tools.
Configuring Personal Web Server with Windows 98
Although Windows 2000 offers a full-featured Web server in the IIS, you can load a functional Web server on your computer if you are using Windows 98. This Web server is the Personal Web Server (PWS) and is just as easy to install and configure as IIS is with Windows 2000. Also, it offers full support for ASP.
TRICK |
If you have upgraded from Windows 98 to Windows 2000, the IIS described in the |
|
|
|
preceding section should already be installed on your computer. |
Installing Personal Web Server
To begin the discussion of the PWS, you will first install it on your computer:
1.Place your Windows 98 CD-ROM into your computer.
2.Click the Windows Start button, and choose Run. In the Run dialog box, type d:\add-ons\pws\setup.exe (substituting the letter of your computer’s CD-ROM drive for the letter d, if necessary). Then click OK.
3.The PWS installation procedure begins. You are first greeted with the Microsoft Personal Web Server setup greeting (see Figure 1.10). Click Next.
4.On the next screen, click the option Add/Remove (see Figure 1.11).
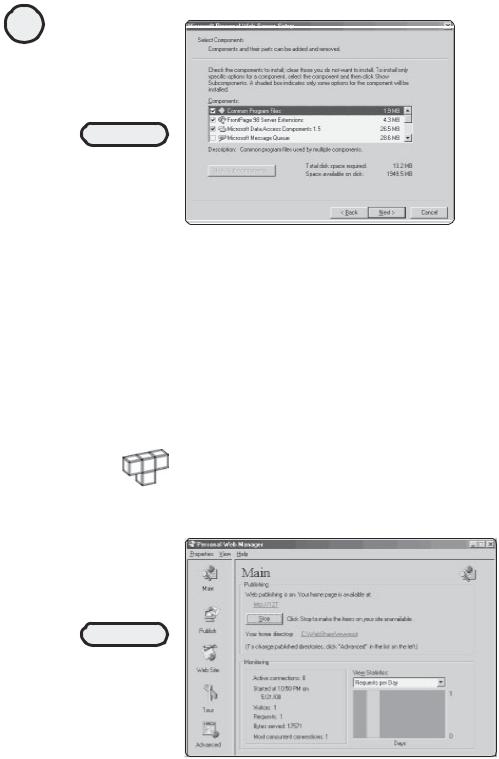
5.The next screen asks you which components you want to install. Be sure that the following items are checked for installation (see Figure 1.12):
•Common Program Files
•FrontPage 98 Server Extensions
•Microsoft Data Access Components 1.5
•Personal Web Server
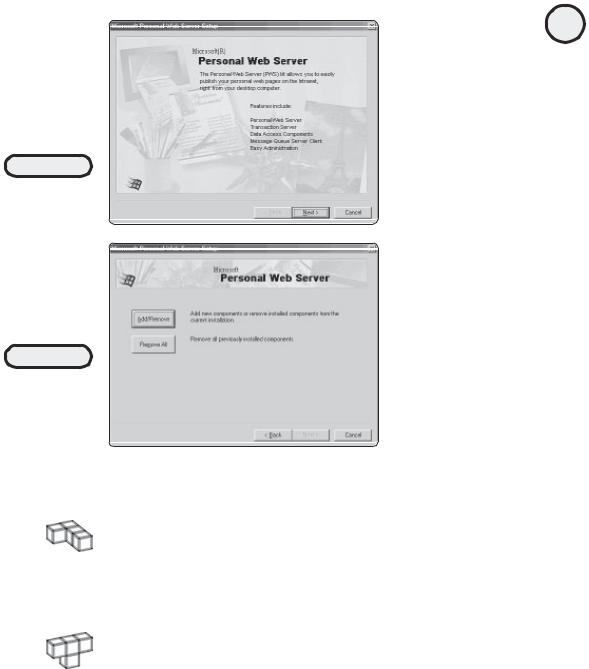
FIGURE 1.10
The Personal Web
Server installation
welcome screen.
FIGURE 1.11
Regardless of
whether you have
installed PWS in the
past, click Add/
Remove.
TRICK |
You don’t have to install all the options presented in Figure 1.12. You don’t need them |
|
|
|
to use the PWS effectively. Also, they take up precious space on your computer. |
6.Click Next. When the installation process is complete, a message appears, asking you to restart your computer. Go ahead and restart your machine at this time.
HINT |
Given that you are a savvy computer user, what I’m about to say will come as no |
|
|
|
surprise, but I’m going to say it anyway: the Windows operating system (any flavor |
|
of it) can be a fickle, frustrating piece of software to work with. That said, you may |
|
notice—from time to time—that after you install the PWS in Windows 98, you may |
|
experience slow startups, or startup may hang. If the latter occurs, press |
|
Ctrl+Alt+Delete and see if any files are not responding. If they are, go ahead and |
|
stop them and then see if Windows finishes the startup process (it probably will). |
|
Chances are good that you won’t have this problem (especially if you are running on |
|
a Pentium III machine or higher, with at least 64MB of memory). If you continue to |
|
have problems, consult http://www.microsoft.com/support, for the latest product/ |
|
troubleshooting updates. |
11
C h a p te r
1
P re p a r i n g
t o
W o r k
w it h
A S P
12
ASP Programming for the Absolute Beginner
FIGURE 1.12
Be sure to select
only the necessary
components for
installation of
the PWS.
Confirming Your PWS Installation
After your computer restarts, the PWS icon appears in your Windows taskbar (in the status area of your screen).
When you click the PWS icon, you are presented with the Personal Web Manager control panel, shown in Figure 1.13.
Take a quick look at some of the Personal Web Manager features so that you have an idea of how to work with the PWS. In later chapters, as you start developing your ASP pages, you will learn in detail how to work with these features.
HINT |
Notice the address of your home page (refer to Figure 1.13). This address will differ, |
|
|
|
depending on the configuration of your machine. If your home address doesn’t match |
|
the one shown here (and it shouldn’t), that is completely normal. |
FIGURE 1.13
The Personal Web
Manager offers
convenient, easy
access to a variety
of PWS
administrative
features.
•Publish. This button calls up the Publishing Wizard, which is one way to Webenable your pages (ASP or otherwise). Although it is easy to use, I don’t discuss this feature in this book.
•Web Site. This button brings forth the Home Page Wizard, which guides you through the creation of a simple home page for display in conjunction with PWS. Again, our focus here is the creation of far more robust Web pages, utilizing the power of ASP.
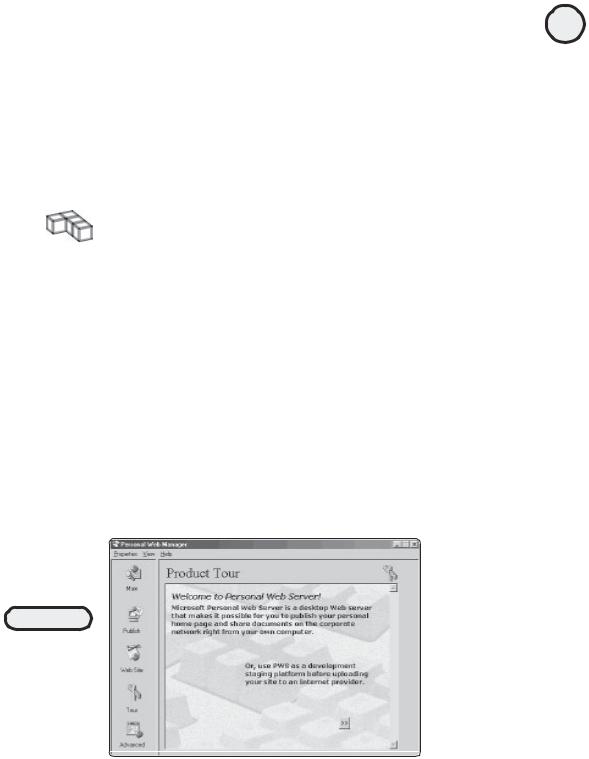
•Tour. This option provides a general overview of the PWS features (see Figure 1.14). This is an excellent source of basic information about what a Web server is and how you can use PWS in conjunction with your Web design efforts.
TRICK |
Take a closer look at Figure 1.14. Note the text Or, use PWS as a development stag- |
|
|
|
ing platform before uploading your site to an Internet provider. As discussed earlier, |
|
you can use your ISP’s servers to develop your Web site (assuming that it offers |
|
support for ASP). However, by utilizing the power of PWS, you have a convenient |
|
staging platform for developing your Web pages before you deploy them for public |
|
consumption (thus ensuring that they appear and function as you intend). This holds |
|
true whether you are planning on making your Web pages available on the World |
|
Wide Web or within the confines of a corporate intranet. |
•Advanced. This option allows you to customize and edit specific directories within your home directory (refer to Figure 1.13).
Confirming Your Web Server’s
ASP Functionality
Regardless of which Web server you are running on your Windows computer (IIS or PWS), you can do a quick check to make sure that the server supports ASP functionality.
13
C h a p te r
1
P re p a r i n g
t o
W o r k
w it h
A S P
FIGURE 1.14
Be sure to note how to use the PWS as a development staging platform to test your Web pages before you deploy them for public consumption.
14 To do this, you will quickly create a very simple ASP Web page and use the Windows Notepad as your editor.
ASP Programming for the Absolute Beginner
HINT |
I am using a Windows 2000 client machine, with the IIS installed. Unless specifi- |
|
|
|
cally noted, you should have no problem using a Windows 98 or NT machine run- |
|
ning PWS. You might notice some (very slight) differences in screen appearance |
|
(that is, how the figures in this book compare to the ones on your computer) if you |
|
are not using Windows 2000, but this should give you no reason for concern—the |
|
functionality described remain the same. |
1.From the Start menu, select Programs, Accessories, Notepad.
2.Enter the following ASP code exactly as it appears here (see Figure 1.15):
<html>
<body>
<p>
<b>This is my first ASP Web page!</b>
</p>
Today's date is <%=Date()%>
</body>
</html>
TRICK
The line of code shown here:
Today's date is <%=Date()%>
will display the current date within your ASP page. You’ll be learning much more about VBScript and functions like the Date() function later in the book.
FIGURE 1.15
Testing your Web
server’s ASP
functionality with
some simple code.
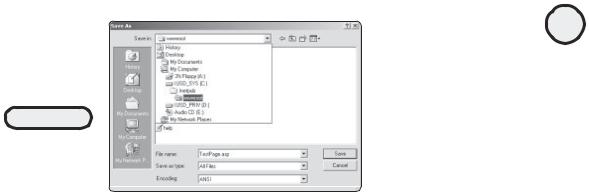
FIGURE 1.16
Saving your first
ASP Web page in
your Web server’s
home directory.
3.From the File menu within Notepad, select the Save As option.
4.In the Save In field, navigate to the wwwroot folder, below the Inetpub folder (see Figure 1.16). For a more detailed discussion of the Inetpub folder, see the earlier discussions of your specific Web server, IIS or PWS.
5.As shown in Figure 1.16, give this page the name TestPage.asp. Be sure to name the page with the .asp extension. If you don’t save your ASP pages with the .asp extension, any VBScript contained within those pages will not function.
Now that you’ve created your first ASP page, it’s time to test it on your Web server:
1.Open your Web browser of choice.
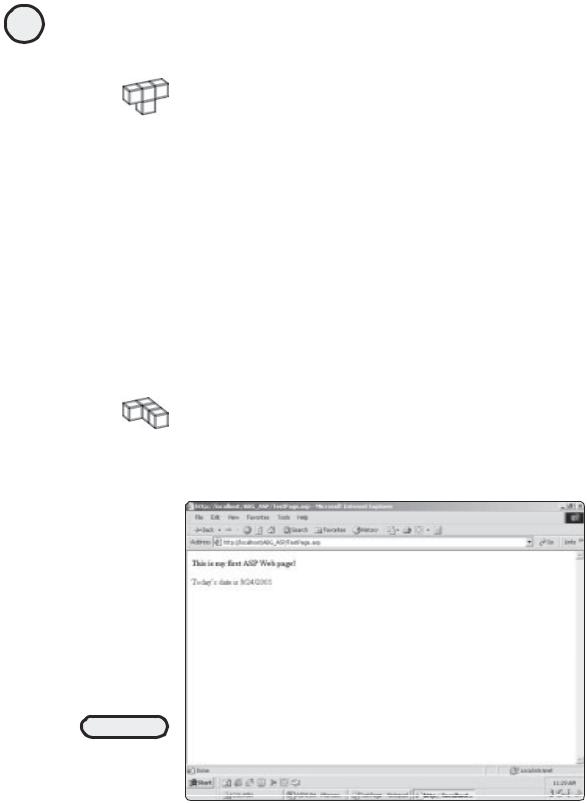
2.If you are using Windows 2000, type the following URL into your browser’s location field: http://localhost/TestPage.asp.
If you are using Windows 98, type the following URL into your browser’s location field: http://127.0.0.1/TestPage.asp.
Assuming that you saved your TestPage.asp Web page into the wwwroot subfolder of your Inetpub folder, your screen should now look like Figure 1.17.
Admittedly, this isn’t an exciting page—especially compared to the things you will be doing throughout this book—but this is an important first step in ensuring that you’ve accomplished the following critical tasks:
•On your own machine, you’ve successfully installed a Web server that you can use to develop and test your ASP Web pages.
•You understand how to save your ASP Web pages with the appropriate .asp extension (versus .html or some other extension) to ensure that the ASP programming you build into these pages functions as you intend.
•You’ve created your first ASP Web page. Although this is perhaps not a very interesting page, it does confirm your ability to embark on this exciting path of Web development!
Displaying Your Web Server’s Default Home Page
15
C h a p te r
1
P re p a r i n g
t o
W o r k
w it h
A S P
You probably noticed in the preceding section the address of your TestPage.asp Web page. Again, whether you are using IIS or PWS, the complete URL to access this page