

ASP Programming for the Absolute Beginner
.pdf36
ASP Programming for the Absolute Beginner
<% ELSE %>
The weather is good -- <%=Good_Weather%> <%
END IF %> </body>
</html>
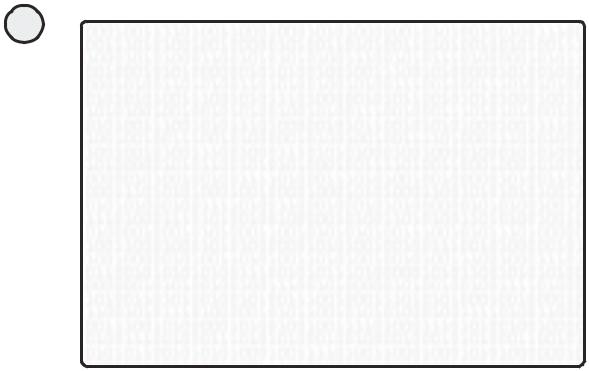
When this code is executed, your screen should look like Figure 2.8.
Can you see what’s happening here? By adding the E SE statement to the usual IF...THEN, you allow your code to evaluate more than one condition. In simple English, you can
read it as IF the weather is bad, THEN we'll go to the movies. E SE we will go to the park. Note that |
|||||
you still need the closing END IF statement. |
|
Y |
|||
L |
|||||
|
|
|
|||
TRICK |
This type of program logic isFillustrated in far greater detail in Chapter 7, “Essential |
||||
|
|||||
|
Programming Logic.” |
M |
|
||
A E I explain more about thisTconcept in examples throughout the book, but let me men-
tion now that it is possible to nest IF...THEN statements so that you evaluate a variety of conditions, based on the programming rules you set. Examine the following code:
FIGURE 2.8
If the WeatherCheck
variable is set to
something other
than 2, the condition
for bad weather, this
message is
displayed.
Team-Fly®

Listing 2.8 Nested.asp
<html>
<body>
<% Test_Variable_A=1
RecordName_A="Pretzel Logic"
RecordName_B="Aja"
Test_Variable_B=2
IF Test_Variable_A=1 THEN
IF Test_Variable_B=2 THEN
%>
My favorite record has the title of <%=RecordName_A%> <%
ELSE %>
My favorite record has the title of <%=RecordName_B%> <%
END IF
END IF %> </body> </html>
Now see what’s happening in this code:
1.As with the preceding example, four variables are set with specific values. These
variables are Test_Variable_A, RecordName_A, Test_Variable_B, and RecordName_B.
2.The first IF...THEN statement is called. If Test_Variable_A is equal to 1, the second
IF...THEN statement is executed, IF Test_Variable_B=2 THEN. If this second IF...THEN
statement evaluates as true (the Test_Variable_B is equal to 2), the following state-
ment is executed: My favorite record has the title of <%=RecordName_A%>. If the
Test_Variable_B variable does not equal 2, the following statement is executed: My
favorite record has the title of <%=RecordName_B%>.
3.Finally, note that two END IF statements are placed in the code. For every IF...THEN or IF...THEN...ELSE statement you use, there must be a corresponding END IF statement.
Be sure to note in this code that if the first IF...THEN statement does not evaluate to true (Test_Variable_A does not equal 1), the second IF...THEN statement does not execute. It can’t because it falls within, or is nested within, the first IF...THEN statement. This results in a blank screen being displayed, which should be avoided.
The FOR…NEXT Statement
37
C h a p te r
2
P r o g r am m i n A g S P
W e P b a g e s
w i t h
V B S c ri p t
As will be the case with many, many programs you write, the need to have a specific action repeated, or looped, will occur. This is useful when you want to evaluate a variety of values against the same condition. For example, imagine that you have 10
38
ASP Programming for the Absolute Beginner
names of visitors to your Web site, but you want to give the fifth name a prize for being the fifth person to visit your site. You have the list of names in random order, so you want to loop through them, and when you hit the fifth name, you want a special message to be displayed.
Take a look at the following code, and see how this is illustrated:
Listing 2.9 Loop.asp
<html>
<body>
<%
FOR i=1 to 10 IF i=5 THEN %>
<b> Congratulations! You are the fifth visitor to the site!</b> <p> <%
ELSE %>
Sorry, you are not the fifth visitor! <p> <%
END IF
NEXT %>
</body>
</html>
In this example, you are utilizing the FOR...NEXT statement to loop through a count of 10 numbers. This count is identified in the statement FOR i=1 to 10. i is a variable (you can name it anything—I just picked i for this example) that is temporarily assigned the count value (1 through 10).
Next, an IF...THEN statement is placed. If the loop count is equal to 5 (indicated here by
the statement IF i=5 THEN), the message Congratulations! You are the fifth visitor to the site!
is displayed. Otherwise, when the loop count is anything other than 5, the message
Sorry, you are not the fifth visitor! is displayed.
Figure 2.9 shows this code displayed in a Web browser.
This is a simple example of the FOR...NEXT loop, but it gives you an idea of the power of this statement and the ways you can utilize it in your code. Throughout the book, you will see many, many examples of the FOR...NEXT statement.
HINT |
As with the IF...THEN statements, you need to close your FOR...NEXT statements. |
|
|
|
However, with FOR...NEXT statements, you don’t close them with an END FOR but rather |
|
the simple statement NEXT. By placing this statement in your code, it completes the |
|
loop cycle you put into motion with the FOR i=1 to 10 statement in the example. |
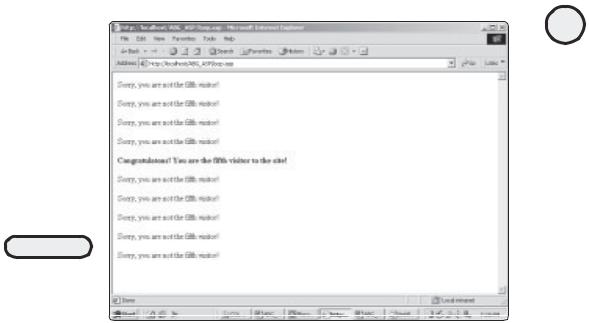
FIGURE 2.9
When the loop
count gets to 5, the
winning message is
displayed.
Commenting Your VBScript Code
Although the code examples in this chapter are simple and not in need of much internal commentary, the more advanced programs you develop (including those in this book) require that you comment your code. By commenting your code, you place notes to yourself and, critically, to others who might view your code later, explaining the rationale behind the way you coded the program and reminding you how things work. You’d be surprised how quickly you forget your own programming, even after a short while.
Commenting your code in VBScript is very simple. You place a single quotation mark, also known as a tick mark, (') before the line, to indicate that it is a commented line. In looking at the preceding code example, you can see how it would appear if it were commented:
Listing 2.10 Loop.asp
<html>
<body>
<%
'The loop begins here. In this loop, the count will run from 1-10 FOR i=1 to 10
'When the loop gets to five, I want a special message to be displayed IF i=5 THEN
%>
<b> Congratulations! You are the fifth visitor to the site!</b> <p>
39
C h a p te r
2
P r o g r am m i n A g S P
W e P b a g e s
w i t h
V B S c ri p t
40
ASP Programming for the Absolute Beginner
<% ELSE %>
Sorry, you are not the fifth visitor! <p> <%
END IF
' Don't forget the NEXT statement, which completes the loop NEXT
%>
</body>
</html>
As you can see here, providing even basic commentary makes your code easier to review. Take advantage of this essential element of successful programming. You won’t regret it, and neither will the programmers who need to review your code at a later date.
TRICK |
Any line that begins with the ' character is considered a comment and is not ex- |
|
|
|
ecuted. You can use this feature to disable a line of code temporarily, which is often |
|
helpful in troubleshooting your programs as you search for possible errors. |
The Hello, World! Game
It is a tradition that when you learn a new programming language, your first program should be the Hello, World! program, which displays this very text to your computer screen.
Despite the groans of some of you who have learned a programming language before, I won’t veer from tradition. The Hello, World! game is the first game you will program in this book. It is very similar to the sample code you saw in the section describing the FOR...NEXT statement earlier.
The code for the game is shown here:
Listing 2.11 HelloWorld.asp
<html>
<body>
<b>Welcome to the Hello, World! Game!</b><p>
<i>Admittedly, not much of a game, but hey...you gotta start somewhere, right?</i>
<p>
<%
'Be sure to assign the value of the NAME variable to your own name! NAME="John Gosney"
FOR i=1 to 15
IF i=5 THEN
'Again, you'll need to assign your own name here! IF NAME="John Gosney" THEN
%>
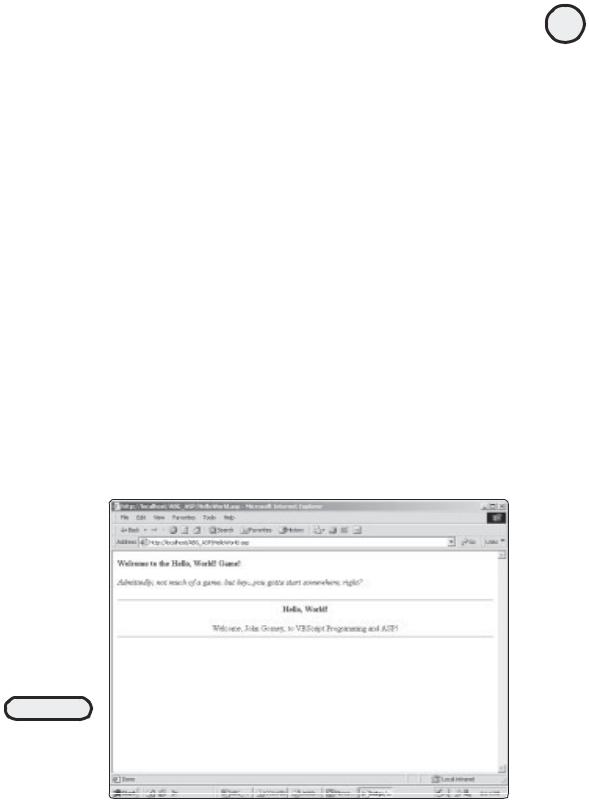
<hr>
<center><b>Hello, World!</b><p>
Welcome, <%=NAME%>, to VBScript Programming and ASP! </center><hr>
<%
'Don't forget you need two END IF statements, one for each IF...THEN END IF
END IF
'And don't forget to include the NEXT statement so that your loop functions NEXT
%>
</body>
</html>
You can see the game code in action in Figure 2.10.
Summary
In this chapter, you were introduced to essential concepts of working with VBScript as your programming tool of choice when developing ASP Web pages. You learned the difference between client-side and server-side scripting languages and the pros and cons of each. You learned about VBScript variables, including what they are and how to use them. You also examined some essential program statements, including the IF...THEN and FOR...NEXT statements, both of which you will use throughout this book. Also, you learned the importance of commenting your code, so you will take the time to provide this type of internal documentation in your code. Finally, you programmed your first ASP game and worked up a healthy programming appetite for the fun that lies ahead.
FIGURE 2.10
Your first game! As the screen says, not too exciting, but things will get more interesting soon.
41
C h a p te r
2
P r o g r am m i n A g S P
W e P b a g e s
w i t h
V B S c ri p t
42
ASP Programming for the Absolute Beginner
E X E R C I S E S
Work through the following exercises to help you gain a further understanding of the essential
concepts you learned in this chapter:
1.Without referring to the text, take out a piece of scratch paper. To keep more in line with the flavor of this book, open a blank document in Word or your favorite text editor. Briefly describe in a short paragraph the difference between client-side and server-side code processing.
2.Go back to the code examples in this book, and in at least two of them, assign a variable with the value of your name. Have it displayed on screen when the code executes.
3.Write a program that utilizes the FOR...NEXT loop statement to count from 1 to 50, displaying each number on the screen. When this count hits 50, have the program display a special completion message.
4.Write a program that has at least three nested FOR...NEXT loops. Like the examples in this chapter, be sure that as the code executes, a blank screen is never displayed when the conditions you set are evaluated.
5.In the programs you develop in steps 3 and 4, add comments so that you clearly understand how your code is functioning.

C3H A P T E R
Working with
ASP Objects
In this chapter, you will
•Learn to work with the Response and Request objects and use them to (among other things) process form results and display them on a Web page.
•Understand the difference between passing information between Web pages with the QueryString and form collections.
•Learn to manipulate the File object so that your
ASP Web pages interact with common text files.
•Program the ASP MadLibs game, using the
Request, Response, and File objects.
44
ASP Programming for the Absolute Beginner
In the first two chapters of the book, I introduce you to fundamental groundwork for working with ASP. In Chapter 1, “Preparing to Work with ASP,” you configured a Web server of your choice for a solid development platform from which to build your ASP pages. In Chapter 2, “Programming ASP Web Pages with VBScript,” you learned how VBScript brings your ASP pages to life. Although all this information is critical, you are probably ready to begin developing real ASP Web pages (and a game here and there, too).
You are in luck. With this chapter, you begin your journey into the exciting world of ASP by learning how to manipulate objects. Think of objects as the building blocks of your ASP pages, powerful tools to help you bring all that functionality you’ve been dreaming about to your own personal Web design toolbox. Without further delay, jump right in!
Introducing the Request and
Response Objects
Of all the objects in ASP, you use the Request and Response objects the most frequently. As is my custom in this book, the discussion of these two powerful ASP objects begins with an example, in Listing 3.1.
Listing 3.1 Response.asp
<html>
<head>
<title>Example of the Response Object</title> </head>
<body>
This is an example of the ASP Response Object! <hr>
<%
Name="Robert Smith"
Response.Write Name & ", welcome to ASP!" %>
</body>
</html>
This code is straightforward. You know from Chapter 2 that you can define variables and declare constants. In this example, the variable Name is assigned the value Robert Smith. Then, by using the Response object, the variable is output to the Web page, along with the comment "welcome to ASP!". In essence, the Response object is an easy, effective way of presenting the values of your variables and any results of your code manipulation to the Web page.
TRICK |
The use of the <%= can also be viewed as equal to Response.Write. You can think of |
|
|
|
<%= as a method of telling your VBScript to “write” to the screen what comes next. |
|
For example, <%=SomeVariable%> would write the contents of SomeVariable variable |
|
to the screen. |

What are the Response and Request objects? The best way to understand these two objects is to think of a telephone call. When you place a call, you are requesting that someone on the other end of the line pick up the phone. When that person answers the phone, he or she issues a response to your request (the ringing phone). Depending on what the person says (your resulting conversation), you process the results of your request by taking specific actions, depending on whom you are talking to and for what purpose. Without much extrapolation, this is the way the Response and Request objects work with ASP.
The Request Object
Before any further explanation, take a look at the Request object in Listing 3.2. You can view the Request object as the “call to action” that the Response object, in turn, answers.
Listing 3.2 RequestForm.asp
<html>
<head>
<title>Example of the Request Object</title> </head>
<body>
<p><b>This is an example of the Request Object!</b></p> <form method="POST" action="RequestForm_Results.asp">
<p>This is a typical HTML form. In the space provided, enter your name and then click on the Submit button.</p>
<p><input type="text" name="Name" size="20"><input type="submit" value="Submit" name="B1"></p>
</form>
<p> </p>
</body>
</html>
Although you will be learning all about working with forms in ASP in Chapter 6, “Using Forms,” here you can see how easy it is via the power of the Request object. Take a look at Listing 3.3.
Listing 3.3 RequestForm_Results.asp
<html>
<head>
<title>Example of Form Processing with the Request Object</title> </head>
45
C h a p te r
3
W o r k in g
w i t A h S P
O b je c t s
<body>