

ASP Programming for the Absolute Beginner
.pdf76
ASP Programming for the Absolute Beginner
If you’re confused about the For...Next business in step 2, stay with me. You will be learning all about loops and how to use them in the coming chapters. The important
|
|
|
Y |
FIGURE 4.1 |
|
L |
|
Each respective |
|
|
|
URL is bulleted and |
|
M |
|
placed within a |
|
|
|
A |
|
||
unique row of a |
|
||
|
F |
||
typical HTML table. |
|
||
|
E |
|
|
|
T |
|
|
thing at this point is that you understand how the Content Linking component works with a text file to read information from that text file into a Web page.
Working with the Ad Rotator Component
You use the Ad Rotator component to mimic the action you see on numerous Web pages where various advertisements are rotated each time the page is loaded into your Web browser. Even if you don’t have traditional advertisements (that is, you’re not trying to sell anything), you can use this component to rotate through any set of images. For example, you might have four or five business graphics representing various assets of your company. Even if only your employees see these graphics, using the Ad Rotator component makes for an attractive, easy method of displaying information.
Like the Content Linking component, the Ad Rotator component has specific members. These are
• GetAdvertisement method. Uses the information found in the related Ad Rotator file. (I’ll talk about this file in a moment. It is similar in function to the text file you used when working with the Content Linking component.) This is the only method of the Ad Rotator component.
• Border property. Indicates the thickness of the border that should appear around the advertisement image.
• Clickable property. Determines whether the image displayed should also serve as a hyperlink. Normally, this is the case so that when you click an image, you are taken to that advertiser’s Web site.
Team-Fly®

• TargetFrame property. Determines which frame to load the page that is linked to the image, if you are using frames on the page where you display the advertisement. I talk more about frames and other HTML formatting in Chapter 9, “Formatting Processed Output.”
As already mentioned, the Ad Rotator component also reads from a text file to retrieve important information on how the specific advertisements should be displayed. Take a look at the sample text file in Listing 4.4, which I’ll explain in the example of working with the Ad Rotator component.
Listing 4.4 Rotator.txt
WIDTH 137
HEIGHT 180
BORDER 1
*
2h.gif
http://www.premierpressbooks.com
Link to Premier Press, Inc.
2
9d.gif
http://www.premierpressbooks.com
Link to Premier Press, Inc.
2
The Ad Rotator Component—An Example
Before I explain how the text file in Listing 4.4 works, Listing 4.5 shows it in action, along with a page that uses the Ad Rotator component.
Listing 4.5 Ad_Rotator.asp
<html>
<head>
<title>Working with the Ad Rotator Component</title> </head>
<body>
<%
Set objRotate=Server.CreateObject("MSWC.AdRotator") objRotate.Border=0
objRotate.Clickable=True
RotateHTML=objRotate.GetAdvertisement("Rotator.txt")
Response.Write(RotateHTML)
%>
</body>
</html>
77
C h a p te r
4
W o r k in g
w i t h
A S P
C o m p o n e nt s
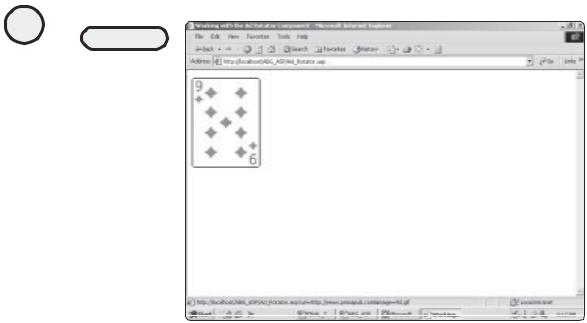
When this page is loaded in a Web browser, the result looks like Figure 4.2.
78
ASP Programming for the Absolute Beginner
FIGURE 4.2
Depending on the specifications you list in the corresponding text file, different images or advertisements appear. The displayed text is for the sake of browsers that do not support graphics. Also, in this example, the images are hyperlinked to a Web site (http://
www.premier
pressbooks.com).
Take a closer look at all of this to be sure that you understand what is happening. First, you need to understand how the corresponding text file works and what information is stored within it (refer to Listing 4.4):
•The first part of the text file (everything above the * mark in Listing 4.4) indicates the size of the image to be displayed and whether it should have a border. You specify zero for no border.
•Underneath the * mark are the attributes for each specific ad image.
1.The first line (2h.gif) is the image file. In this case, the image file is in the same directory as the rest of your Web pages, so all you have to do is list the file name. If it is in a different directory, you add this information to the front of the image file name: /some_directory/another_directory/2h.gif.
2.The second line indicates the URL to which you want the image to link. In the case of the Rotator.txt file used here, both the images link to the Premier Press
home page (http://www.premierpressbooks.com).
3.The third line indicates the text that should appear when the cursor hovers over the image or the text to be displayed if the Web browser cannot support images. Again, in the case of these two images, the text to display is Link to Premier Press, Inc.
4.The fourth line is more complicated. Depending on the number of ads represented in the file (in this case, two: 2h.gif and 9d.gif), the number on the fourth line is a weight for how many times an image should be displayed. This number, also called the impression, is roughly equivalent to the percentage of times each image will appear. For example, if there are three images, the first image has its impression value set to 3, the second has its value set to 5, and the third set to 1. This translates to the first image being displayed 30 percent of the time, the second 50 percent, and the third 10 percent.

In Listing 4.5, look at the code that calls the Ad Rotator component:
<%
Set objRotate=Server.CreateObject("MSWC.AdRotator")
objRotate.Border=0
objRotate.Clickable=True
RotateHTML=objRotate.GetAdvertisement("Rotator.txt")
Response.Write(RotateHTML)
%>
1.As with all components, the particular component is created and named first (in this case, objRotate).
2.The specific properties of the Ad Rotator component are defined. In this case, it is given no border (obj.Border=0), and the images are made clickable
(objRotate.Clickable=True).
3.The text file is called (RotateHTML=objRotate.GetAdvertisement("Rotator.txt"), as described
in the preceding list.
Working with the Content Rotator Component
The Content Rotator component is very similar to the Ad Rotator component and is just as useful. By using the Content Rotator component, you can quickly insert uniform text into any Web page. Also, like the Content Linking component, you can change the information in the text file and see those changes immediately reflected in all pages that use the component (rather than go through each individual page and change the content).
The following two methods are used by the Content Rotator component:
• GetAllContent. Retrieves and makes available all the content in the associated text file (more about this text file in a moment)
• ChooseContent. Allows you to get the next string from the text file but does not display it
As with the Content Linking component, a text file is used with the Content Rotator component. Listing 4.6 is an example of such a text file.
Listing 4.6 ContentRotator.txt
%% 4 // The following is the usual welcome message
Welcome to ASP Programming for the Absolute Beginner. We hope that you find it enjoyable and useful in your learning to program with ASP!
%% 2 // The following is the link to Premier Press
For more information on Premier Press, visit http://premierpressbooks.com %%3 // The following is an example of some formatted HTML text
<b>Within the text file, you can also include HTML formatting</b> <hr>
<center>Welcome to the exciting world of the Content Linking component!</center>
How does this text file work?
1. Each line of text begins with %%.
79
C h a p te r
4
W o r k in g
w i t h
A S P
C o m p o n e nt s
80
ASP Programming for the Absolute Beginner
2.The number that follows is similar to the expression number in the Ad Rotator component in that it corresponds (roughly) to a percentage of how often that particular line of text will display.
3.The information that follows the // is an optional comment.
4.The line of text is inserted. As you can see in the third line of text in Listing 4.6, you can also include HTML formatting directly within this text file.
The Content Rotator Component—An Example
Listing 4.7 is an example of the Content Rotator component in action. Note that the ContentRotator.txt file reference is the same sample text file described in Listing 4.6.
Listing 4.7 ContentRotator.asp
<html>
<head>
<title>Working with the Content Rotator Component</title> </head>
<body>
<%
Set CRotator=Server.CreateObject("MSWC.ContentRotator")
RotatorContent=CRotator.GetAllContent("ContentRotator.txt")
Response.Write RotatorContent
%>
</body>
</html>
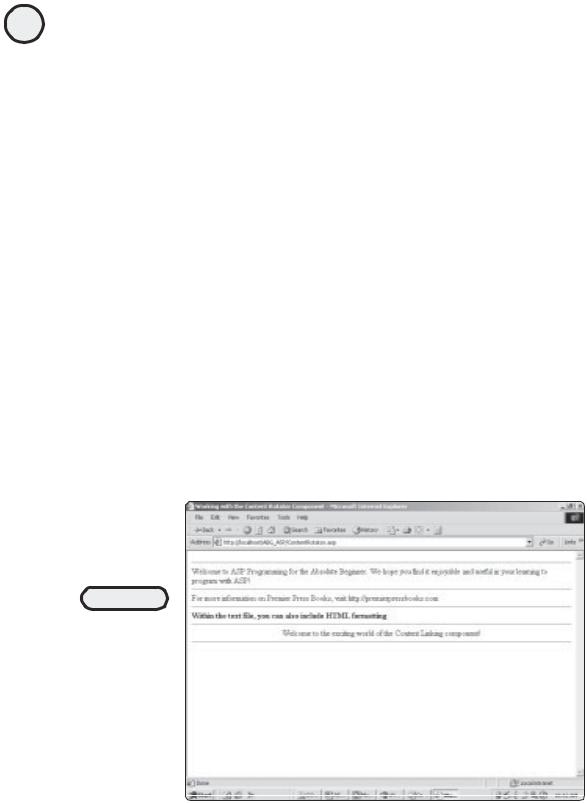
When this page is loaded into a Web browser, it looks like Figure 4.3.
FIGURE 4.3
Notice how you can include HTML tags within the text file and it will display the formatting on screen when the text file is read— very similar to the Ad Rotator component and its corresponding text file.

Working with the Page Counter Component
I’m sure that you have seen the various page counters on different Web pages. Perhaps they have corresponding text that reads something like You are the (number) person to visit this Web site. By using the Page Counter component, you can add this functionality to your ASP pages as well.
The Page Counter component has the following three methods:
• Hits. Returns the number of hits (or number of times the page has been accessed) for either a specified page or the current page.
•PageHit. Increases the hit count for the current page.
•Reset. Returns the hit count for the specified page to zero. If such a page is not in-
dicated, the current page has its hit count returned to zero.
The Page Counter Component—An Example
Listing 4.8 is an example of the Page Counter component. This component is particularly useful in providing an easy, yet effective, way of tracking and displaying the number of visitors to your Web site.
Listing 4.8 PageCounter.asp
<html>
<head>
<title>Working with the Page Counter Component</title> </head>
<body>
<%
Set PageCount=Server.CreateObject("MSWC.PageCounter") Response.Write('You are the ' & PageCount.PageHit & ' person to visit this page')
%>
</body>
</html>
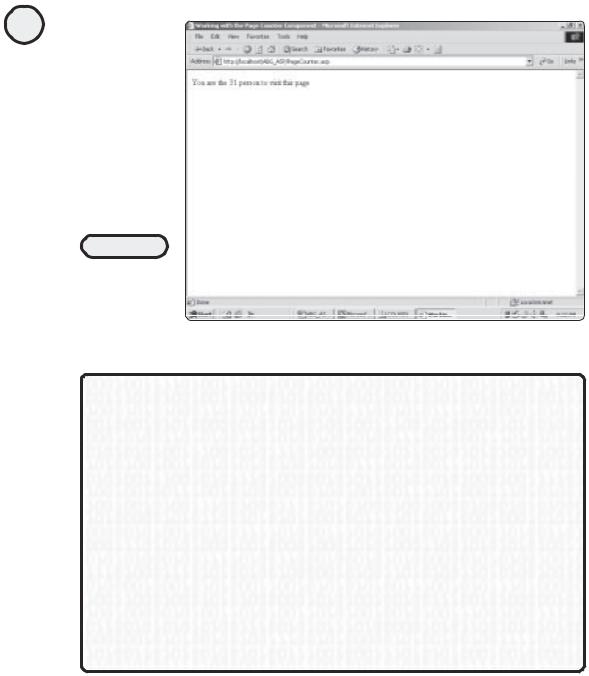
When this page is loaded into a Web browser, it looks like Figure 4.4.
Summary
This chapter gives you a brief overview of some of the more common, easy-to-use ASP components. Many of these components use a simple text file to store essential information that helps to drive their functionality. Within these text files, you can also include HTML and other scripting information, which is then executed in the ASP page on which the component resides. Finally, you assign and call components in the same way you learned how to work with other objects in Chapter 3, “Working with ASP Objects.”
81
C h a p te r
4
W o r k in g
w i t h
A S P
C o m p o n e nt s
82
ASP Programming for the Absolute Beginner
FIGURE 4.4
Each time the page
is visited, the
number shown
increases by one.
E X E R C I S E S
This chapter presents a cursory overview of components. You can increase your understand-
ing by performing the following exercises:
1.Create a new page that makes use of the Page Counter component. Design the page (using standard HTML) so that the Page Count listing appears in the center of your page (perhaps use a table to make this appear neatly formatted).
2.Pull some images or graphics from your personal files and integrate them into the Ad Rotator component example.
3.Develop a text file for use with the Content Linking component that uses at least five URLs for your favorite Web sites.
4.Utilizing the Ad Rotator component, set at least one of the image/advertisements so that the URL contained within it points to one of your favorite Web sites.
5.Finally, develop a page of your own that integrates all the components described in this chapter.

C5H A P T E R
Database Access
with ADO
In this chapter, you will
•Learn the fundamentals of ADO, the heart of this Web page database connectivity in ASP.
•Learn how to configure your databases so that they can be used in conjunction with your Web pages.
•Learn the major Structured Query Language (SQL) statements that you will use in your ASP code to work with information in your databases via your Web pages.
•Experiment with different kinds of data access within your ASP Web pages so that you can see the power of a dynamic, database-driven Web page (compared to a static Web page without this type of access).

84
ASP Programming for the Absolute Beginner
I think that I was about twelve or thirteen when my parents bought me my first component stereo system for Christmas. Up to that point, I had always received my older sister’s hand-me-down stereos. (At that time, we weren’t talking CD player, 200-watt surround sound! No, it was more like a turntable and an 8-track player.) I was really excited to have, finally, a stereo worthy of my ever-growing record collection. At any rate, my parents bought the stereo well before Christmas, and given that it came in seven or eight (very big) boxes, there was no way to hide it. I was obviously well beyond the Santa Claus years, but my Mom insisted that I not see what was inside the boxes until Christmas morning (even though I knew, of course, what sonic delights awaited me inside those boxes). Fortunately, my Dad was still a big kid at heart, and he didn’t see any harm in “just opening the boxes” so that I could view the goods. This, of course, turned into “Well, we’ll put the rack together for the stereo, but we won’t add any components,” which then turned into “Well, now that we’ve got the rack together, we might as well put the components in, but we won’t hook them up.” Things progressed until my Mom finally put her foot down and made me wait until Christmas morning to hear the thing.
What does this story have to do with database access with ASP? Think of my unconnected stereo system as a Web page without any access to a data source. Yes, it’s very pretty to look at (and perhaps impressive, on a superficial level), but it doesn’t do anything! Without giving your Web pages a means of interacting with data (and thus making them dynamic, versus static), you are very limited in not only the types of information you can display, but also—and more importantly—the type of interaction you can provide to your users. Fortunately, as with most things involving ASP, providing your Web pages with this database interaction is quite easy—and that, loyal reader, is the focus of this chapter.
Understanding ADO
Imagine a world where every type of car, regardless of the make and model, ran on a different kind of gasoline, or, instead of having one standard for recording and playback, there were twenty-five types of compact discs. In both scenarios, it would be very difficult to achieve any type of standard because so many people could be (potentially) using so many things. The undeniable result: confusion, frustration, and a major lack of productivity.
So it was before ADO and the effort in accessing information from a database. (Okay, maybe it wasn’t that bad, but it was at the very least more complicated.) With ADO (short for ActiveX Data Objects), programmers have a way to access information easily from a database via the Web.
However, ADO isn’t the full story. In the early 1990s, Microsoft created a standard known as the Open Database Connectivity standard (ODBC). Using this technology, you can connect to data regardless of where it is stored, that is, in an Access database, in Oracle, you name it. This worked (and worked well), but the question then became how to access information that isn’t stored in a database, for example, in an Excel worksheet. The next iteration of ODBC was OLE-DB, short for Object Linking and Embedding Database, which allows this kind of data retrieval from an information source other than a database.
Yikes, you are probably saying at this point. What do all these confusing terms mean, and why should you worry about them? What does any of this have to do with ADO (which is, if you’ve forgotten, the title of this section)? In reality, you don’t have to be

overly concerned with the history of this topic as long as you understand the importance of ADO, especially in relation to your work with ASP. In short, ADO represents a collection of objects that, via ASP, you can easily manipulate to gain incredible control over the information stored in your data source (be it an Access database, an Excel spreadsheet, and so on).
The ADO Object Collection
You’re probably getting annoyed with me at this point (and if so, I don’t blame you) for introducing all these terms (and very quickly). Now I’ve gone and added yet another term, objects, to the mix. Stay with me, though. With objects, you’ve reached the important point of this discussion of ADO. (Put simply, I’m not going to hit you with any more confusing terms, at least not for the moment.)
Objects represent relationships between other objects in that some objects have to be created before other objects can be used. Moreover, each object represents a unique part of the interaction that occurs between your ASP Web pages and your data source. Within ADO are three major objects, which I’ll discuss in this book:
•Connection object. Used to do just that—create a connection to the data source.
•Command object. Allows you to program commands to access the information stored in the data source. These commands are created using the Structured Query Language (SQL for short, pronounced See-Quell). I’ll be talking a lot about SQL in this and subsequent chapters because it provides the primary mechanism for accessing and manipulating data in a database.
•Recordset object. Comes in handy because it serves as a repository of information returned from the execution of the command objects. Think of the recordset objects as the results of your actions. Through the power of recordsets, you can create your own unique view of the information stored in a database.
To understand how these three objects work together, think of ordering a new computer. When you place the order on-line, you are presented with an order form that lists all the options available for each component of the computer (memory, hard disk size, and the like). As you go through the form, you specify exactly which options you want, and the result of all this specification is a computer unique to your needs.
In comparing this with the ADO objects, think of the process this way:
•When you go on-line and access the form, you are creating a link to the manufacturer’s stored information. This is like the connection object because you are establishing the connection to the data source.
•When you start to configure your specific requirements, you are commanding the manufacturer’s information to produce the computer that meets your specific needs. In a Web page utilizing SQL, you are reaching into the database and commanding that specific information be returned to you.
•Finally, based on the specifications you provide, a unique computer is built for you. In ADO, this corresponds to the recordset object: You have established a connection, have commanded (or to use the SQL-specific terminology, queried) the database to return unique information, and now, via the recordset object, have access to that unique information.
85
C h a p te r
5
D a t ab a s A e c c e s s
w i t h
A D O