

ASP.NET 2.0 Instant Results
.pdfWrox File Share
The final stored procedure, sprocResourceInsertUpdateItem, is by far the most complex one, but not to worry. The basic idea of it is actually quite simple:
ALTER PROCEDURE dbo.sprocResourceInsertUpdateItem |
||
/* |
‘=============================================================== |
|
‘ |
NAME: |
sprocResourceInsertUpdateItem |
‘ |
DATE CREATED: |
October 19, 2005 |
‘ |
CREATED BY: |
Shawn Livermore (shawnlivermore.blogspot.com) |
‘ |
CREATED FOR: |
ASP.NET 2.0 - Instant Results |
‘ |
FUNCTION: |
Inserts or Updates a resource into the DB |
‘=============================================================== |
||
*/
(@id int,
@filename varchar(300), @fromContactEmail varchar(300), @toContactEmail varchar(300), @message varchar(1000))
AS
DECLARE @returnValue int
Declare @fromContactID int
Declare @toContactID int
/*
----------- fromContactID --------------
*/
--insert the contact records if they do not already exist...
if((select count(*) from contact where email = @fromContactEmail)=0) begin
insert into contact (email) values (@fromContactEmail)
SET @fromContactID = SCOPE_IDENTITY() --extract the contact id from the
insert end
else begin
--extract the contact id from the insert
SET @fromContactID = (select id from contact where email = @fromContactEmail)
end
/*
----------- toContactID --------------
*/
if((select count(*) from contact where email = @toContactEmail)=0) begin
insert into contact (email) values (@toContactEmail)
SET @toContactID = SCOPE_IDENTITY() --extract the contact id from the insert
end else
begin
--extract the contact id from the insert
SET @toContactID = (select id from contact where email = @toContactEmail)
end
-- Insert a new resource record
47

Chapter 2
IF (@id IS NULL) BEGIN
INSERT INTO
Resource
(
filename,
fromContactID,
toContactID, message
)
VALUES
(
@filename,
@fromContactID,
@toContactID,
@message
)
SET @returnValue = SCOPE_IDENTITY()
END
ELSE
BEGIN
UPDATE Resource SET
filename = @filename, fromContactID = @fromContactID, toContactID = @toContactID, message = @message
WHERE
Id = @id
SET @returnValue = @id
END
select @returnValue
This procedure is used to insert the resource information into the database, add new contacts to the Contact table, and resources to the Resource table. It uses the upsert methodology, wherein it will provide an update if the record already exists, or an insert if it does not.
sprocResourceInsertUpdateItem follows these specific steps:
1.Checks to see if the e-mail address of the sender (@fromContactEmail) is not already in the system:
/*
----------- fromContactID --------------
*/
--insert the contact records if they do not already exist...
if((select count(*) from contact where email = @fromContactEmail)=0)
2.If not, the stored procedure adds the e-mail address as new contact record, extracting the unique ID value to set the the @fromContactID locally declared variable for later insertion into the Resource table. If the record does exist, it performs a select statement to populate @fromContactID:
48

Wrox File Share
begin
insert into contact (email) values (@fromContactEmail)
SET @fromContactID = SCOPE_IDENTITY()
--we extracted the contact id from the insert
end else
begin
--extract the contact id from the insert SET @fromContactID =
(select id from contact
where email = @fromContactEmail)
end
*The next section of the stored procedure does the exact same thing, except this time it is with the @toContactEmail parameter, populating the @toContactID variable.
3.After you have valid ContactIDs, you can focus on the insertion of the resource record into the database. The following section is used to insert a new resource record into the Resource table, returning the new ID of the resource into the @resourceID variable:
--Insert a new resource record
IF (@id IS NULL) BEGIN
INSERT INTO
Resource
(
filename,
fromContactID,
toContactID, message
)
VALUES
(
@filename,
@fromContactID,
@toContactID,
@message
)
SET @returnValue = SCOPE_IDENTITY()
END
4.The following else statement immediately follows this if clause, with the case in which the @id parameter is not null. This would be the case if the application passed an ID to the stored procedure, indicating that a resource record already existed, and the stored procedure is expected to perform an update, instead of an insert:
ELSE
BEGIN
UPDATE Resource SET
filename = @filename, fromContactID = @fromContactID,
49

Chapter 2
toContactID = @toContactID, message = @message
WHERE
Id = @id
SET @returnValue = @id
END
select @returnValue
The preceding code performs the UPDATE query, and returns the resulting @resourceID variable. Once the @resourceID variable is sent back to the caller (the data layer), the process for inserting a resource into the system is complete.
These are the stored procedures used within the Wrox File Share, and are entirely common for this type of application.
Themes and Skins
The Wrox File Share project provides a simple way to apply themes and skins to each page of the site, without modifying any HTML markup sections on any page (even the master page is safe from special control-based HTML markup). You can apply a theme to the entire web site by modifying the Web.config file to point to the name of your theme (assuming the theme exists in your project under the app_themes folder). This is carried out within each ASP.NET form by using the following code in each of the form’s pre-initialization events:
‘’’ <summary>
‘’’ this preinit event fires to initialize the page. It allows for the ‘’’ theme and title to be set for this page, which actually pulls from
‘’’ the web.config setting via the shared Config class’s exposed properties. ‘’’ </summary>
Protected Sub Page_PreInit(ByVal sender As Object, ByVal e As System.EventArgs) Handles Me.PreInit
Page.Theme = Config.CurrentTheme Page.Title = Config.PageTitle
End Sub
This basically accesses the config class’s properties (pulled from the Web.config file), and sets the page’s theme member to be the current theme value. In this way, you can maintain a consistent experience throughout the web site, with only one change needed to the Web.config to change the look and feel of the entire user experience! You are probably glad to hear that — I know I am. The exact place where you would change the theme for the site is in the appSettings section of the Web.config, as displayed here:
<!--
<add key=”CurrentTheme” value=”CleanBlue” />
-->
<add key=”CurrentTheme” value=”CleanRed” />
This code displays one of the theme entries as commented out, and one of them as active. Simply swap the two values to change the theme.
50

Wrox File Share
Security Model
The Wrox File Share uses ASP.NET 2.0 Forms Authentication with a SQL Server Security Provider. The initial designation to use this provider from within the ASP.NET Security Administration tool generates a new security database, which is included in the project and used to house all of the user account information and security settings. This security model implements Forms Authentication intrinsically within the various new ASP.NET 2.0 security controls, such as those used to log in, display login status, and recover your password. Fortunately, the heavy lifting is already done here (if there is any!), and a standard security starting point created for you. Using the ASP.NET Security Administration tool allows for further customization and changes to your settings as you see fit, but is not necessary to run the project properly with the basic Admin user.
The security model mentioned is utilized and referenced in several areas of the application. One such area is in reference to the Management folder of the site. The security model allows you to log in to the web site and become an authenticated user. The login.aspx form is loaded automatically whenever you try to access any of the ASPX files in the Management folder without first being unauthenticated. This is a clear glimpse at the new ASP.NET 2.0 security model implemented via the Role and Membership Providers. The configuration is such that the only provision to implement such security is an instance of the ASP.NET Login control:
<asp:Login ID=”Login1” runat=”server” />
As a practical use, this provides a clear example of a secure web site folder and the use of role-based access to pages within that folder via the ASP.NET 2.0 Configuration Tool. This tool is essentially used simply for security-rights management. The ASP.NET 2.0 Configuration Tool can be accessed within Visual Studio by choosing Website ASP.NET Configuration from the main menu. Once the tool fully loads you’ll see a Security tab. Clicking the Security tab allows you to modify the settings of any folder within your site to allow or restrict access based on roles that you can define and assign users to. The output of this effort generates the Web.config file that lies within the folder that you specified to restrict access to. An example of this Web.config file output is shown here:
<?xml version=”1.0” encoding=”utf-8”?>
<configuration xmlns=”http://schemas.microsoft.com/.NetConfiguration/v2.0”> <system.web>
<authorization>
<allow roles=”Admin” /> <deny users=”?” />
</authorization>
</system.web>
</configuration>
This configuration file uses two main entries as the meat of the security settings. These are essentially XML statements that define the security rights for that folder, hierarchically within the web site, overriding the web site’s root Web.config, as well as the machine.config on the server. In this file, the <deny users=”?” /> phrase means that the folder should deny any unauthenticated users, denoted by the question mark. Next, the <allow roles=”Admin” entry represents the capability of the folder to allow access to Admin role.
51
Chapter 2
Only one account is created for use within the Wrox File Share, and one role that the account is assigned to. These are as follows:
Username |
Password |
Account Description |
Administrator |
password# |
This user is assigned to the Administrator role. |
The following role is already in the security database and referenced within the application:
Role |
Role Description |
|
|
Administrator |
This role has the ability to login to the administrative area, editing the |
|
contents of the e-mail text. |
|
|
You can control access to form elements, functions, and file folders using the security roles implemented via the ASP.NET Configuration Tool, through your own scripted logic in VB.NET. This basic use of the ASP.NET 2.0 security model performs the bare minimum in application security.
Next, you have a chance to dive into the classes of the application, learning all about the layered approach to the flow of information within the site.
Classes Involved
The Wrox File Share contains some essential classes that represent the business and data layers of the application. In these basic class structures, you will find the basic methods and properties that provide the bulk of the features in the application.
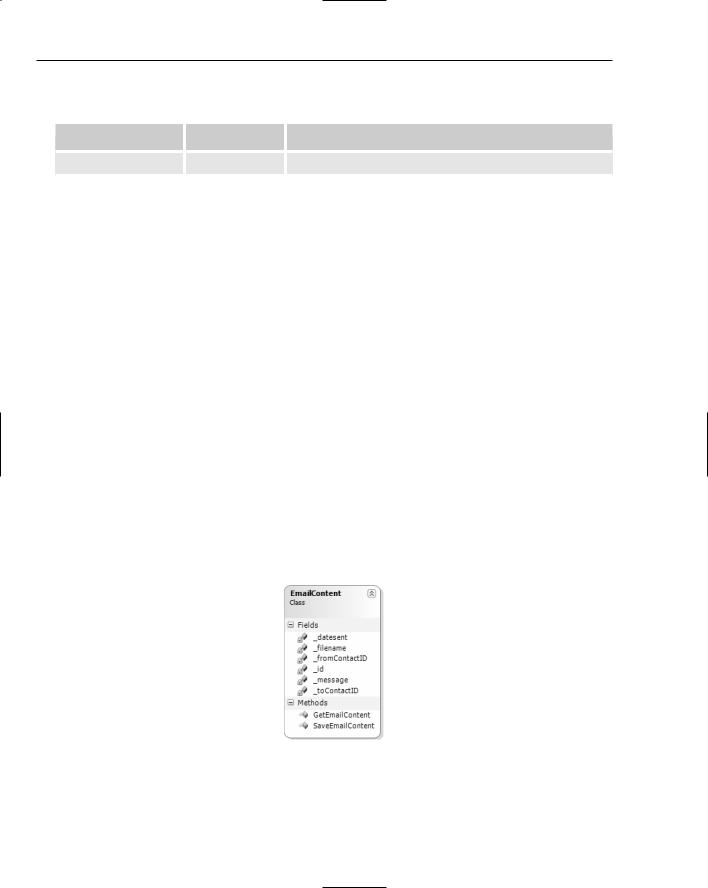
The EmailContent Class
The EmailContent class (see Figure 2-6) is essentially the class that allows for the saving and retrieving of e-mail content text to and from the database.
Figure 2-6
52
Wrox File Share
The EmailContent class’s methods are outlined in the following table:
Method |
Return Type |
Description |
|
|
|
SaveEmailContent() |
n/a |
Saves the e-mail content, via the EmailContentDB |
|
|
class. |
GetEmailContent() |
String |
Retrieves the e-mail from the database, via the |
|
|
EmailContentDB class. |
|
|
|
The Resource Class
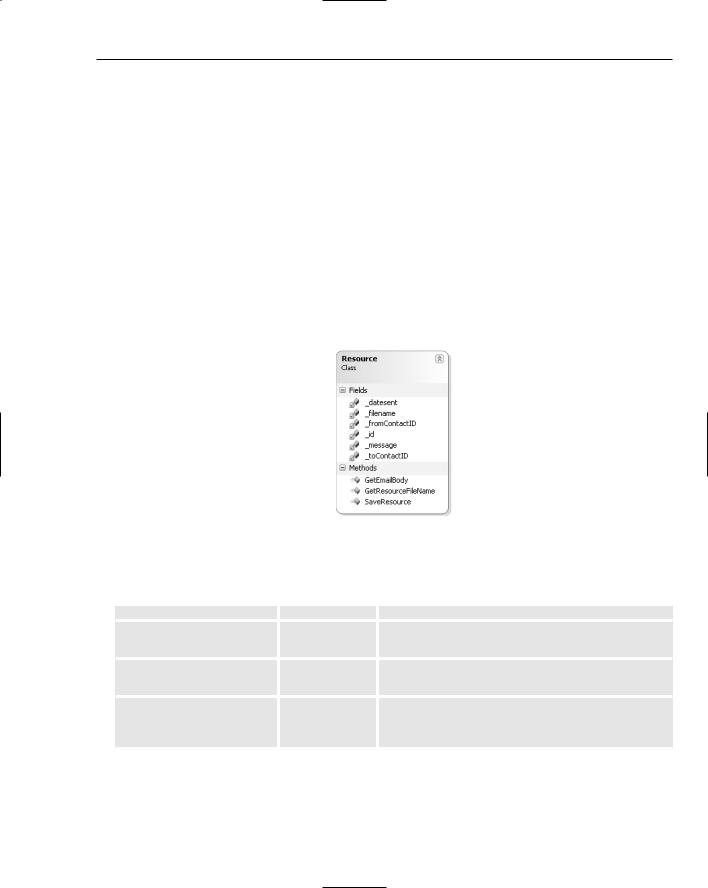
The Resource class (see Figure 2-7) is used to perform the bulk of the object provisioning for the business layer of the application. Its methods are accessible as public and shared for ease of use within the various forms and controls of the application. This means that you do not have to instantiate an instance of the Resource class in order call its methods. Instead, simply use the syntax of Resource.MethodName() in any VB.NET WebForm or control of the application to execute the function.
Figure 2-7
The following table displays the accessible members of the Resource class:
Method |
Return Type |
Description |
|
|
|
GetEmailBody() |
String |
Returns the HTML body of the e-mail message to |
|
|
be sent out. |
GetResourceFileName() |
String |
Returns the filename of the class by sending in the |
|
|
resource ID. |
SaveResource() |
Integer |
Saves the new resource (file) to the database, pass- |
|
|
ing in the sender information, receiver |
|
|
information, a message, and the filename. |
53
Chapter 2
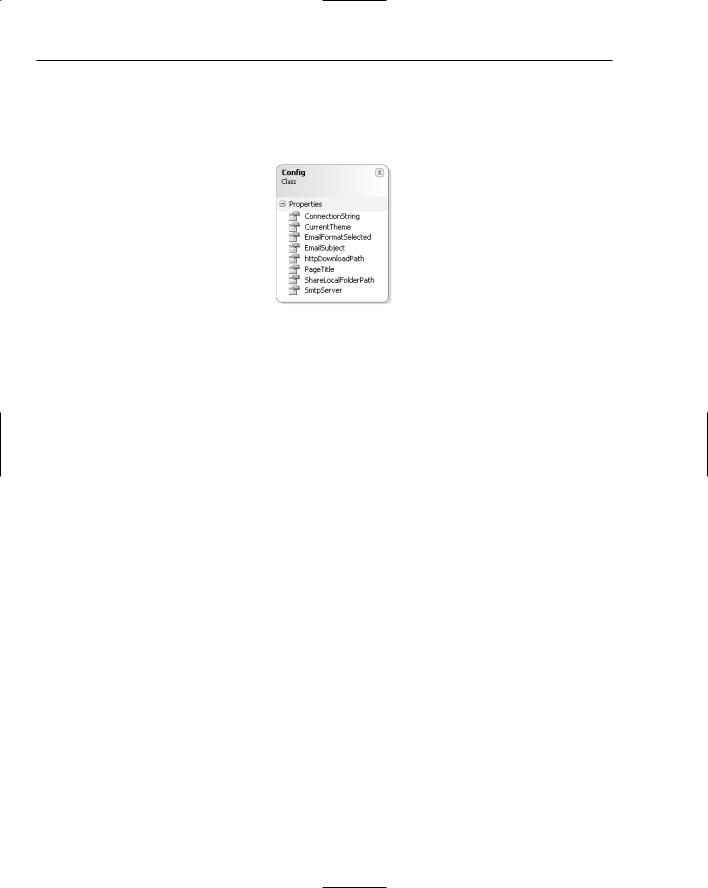
The Config Class
The Config class, shown in Figure 2-8, is used as the configuration manager of the application. It is essentially the main access point for all configuration settings that any of the application tiers may require access to.
Figure 2-8
The following table displays the accessible members of the Config class:
Property |
Return Type |
Description |
|
|
|
ConnectionString() |
String |
The connection string property that pulls from |
|
|
Web.config. |
CurrentTheme() |
String |
The current theme of the web site as defined in |
|
|
the Web.config file. |
EmailFormatSelected() |
String |
The extendable format variable for the type of |
|
|
e-mail format to be used. Text is the only value in |
|
|
use so far, but HTML may be desired. |
EmailSubject() |
String |
The e-mail subject line for all outgoing e-mails |
|
|
notifying users that they have been sent a file to |
|
|
download. |
httpDownloadPath() |
String |
The configuration entry determining the |
|
|
httpDownloadPath http://localhost/ |
|
|
FileShare/, which is set at the Web.config. |
PageTitle() |
String |
The HTML title value that each page displays, |
|
|
from the Web.config file. |
ShareLocalFolderPath() |
String |
The local folder file path for all files to be uploaded |
|
|
onto the server from the Web.config file. |
SmtpServer() |
String |
The configuration entry determining the SMTP |
|
|
server name and address. |
|
|
|
54
Wrox File Share
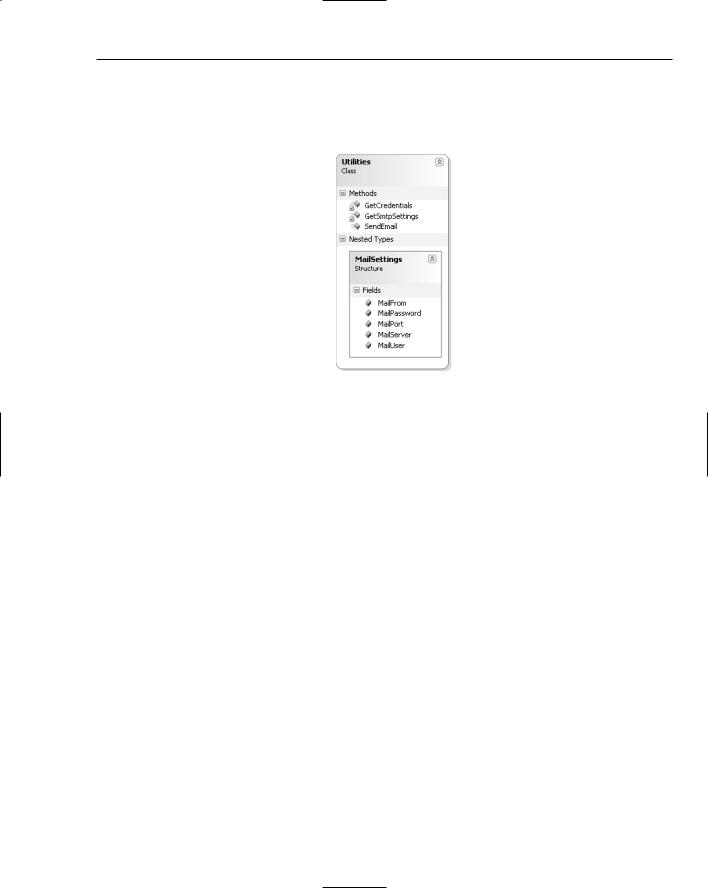
The Utilities Class
The Utilities class is used to house the e-mail sending functionality of the Wrox File Share application (see Figure 2-9).
Figure 2-9
The following table displays the accessible members of the Utilities class:
Property |
Return Type |
Description |
|
|
|
GetCredentials() |
System.Net |
Creates and returns a System.Net |
|
.NetworkCredential |
.NetworkCredential class object |
|
|
reference with the applicable config values. |
GetSmtpSettings() |
MailSettings (struct) |
Used to retrieve the Web.config file values |
|
|
and set them to the struct instance |
|
|
properties. |
SendEmail() |
n/a |
Used to send an e-mail, with the established |
|
|
settings. |
|
|
|
Now you have seen the classes involved, and their applicable method calls. The next section, “Code and Code Explanation,” dives deep into the development and walks you through all of the essential pieces of code you need to understand.
Code and Code Explanation
This section explains each of the essential code files in the Wrox File Share project. You look in detail at the files in the each of the different folders and learn how they interact and are used across the project.
55

Chapter 2
Root Files
The root of the Wrox File Share contains several important files, including the main ASPX shell-pages, and the configuration and formatting pages.
Web.config
The Web.config stores vital configuration entries used within the application. One entry, named as the SqlServerConnectionString, controls the connection to the SQL Server 2005 Express database file FileShareDB.mdf, as shown here:
<connectionStrings>
<add name=”ConnectionString” connectionString=”Data Source=(local)\SqlExpress;AttachDbFilename=|DataDirectory|\FileShareDB.mdf;Integrat ed Security=True;User Instance=True” providerName=”System.Data.SqlClient”/>
</connectionStrings>
Web.config also contains information managing the SMTP e-mail settings for sending out e-mails:
<configuration xmlns=”http://schemas.microsoft.com/.NetConfiguration/v2.0”> <appSettings>
<add key=”EmailFrom” value=”admin@wroxfileshare.com”/> <add key=”EmailSubject” value=”File Ready for Download!”/> <add key=”SmtpServer” value=”127.0.0.1”/>
<add key=”MailUser” value=”myalias”/>
<add key=”MailPassword” value=”mypassword”/> <add key=”MailPort” value=”25”/>
<add key=”EmailFormatSelected” value=”Text”/>
<add key=”PageTitle” value=”Wrox File Sharing Website”/> <add key=”ShareLocalFolderPath”
value=”C:\inetpub\wwwroot\FileShare\FileStorage\”/>
<add key=”httpDownloadPath” value=”http://localhost/FileShare/”/> <!--
<add key=”CurrentTheme” value=”CleanBlue” /> -->
<add key=”CurrentTheme” value=”CleanRed”/> </appSettings>
These SMTP configuration entries are where you can specify the mail server settings that your application will use to send out e-mails to the specified recipients. The Web.config file is also used to provide easy modification to the themes in use for the entire site. More information on this is located in the design portion of this chapter, in the section “Themes and Skins.”
config.vb
The Config class is used as an available business object for values and settings through visibility of some static members. Its members are listed as properties in order to abstract the location in which these values are stored. All of the values for the properties are stored in the Web.config file, with this Config class to retrieve them when they are needed:
Imports Microsoft.VisualBasic
Public Class Config
‘’’ <summary>
56