

Visual CSharp .NET Programming (2002) [eng]
.pdfFigure 4.3: You can add an array of items to a ListBox in a single statement.
Positioning by Index
We've already added an item to the bottom of the items collection using Items.Add. Alternatively, you can position an item in CheckedListBox's items collection using the Items.Insert method.
Tip Remember that the Items collection is zero based, so that the first item in it has an index of zero, and the last item has an index of Items.Count - 1.
You could use the Items.Insert method to position an item in the specified place as shown in Figure 4.4 (the first argument is the index position, the second is the text to add):
checkedListBox1.Items.Insert(Convert.ToInt16(txtIndex.Text), txtAdd.Text);
Figure 4.4: Y ou can insert an item anywhere you'd like using an index value.
It's probably a good idea, and easy enough, to check that the insertion is within the range of the items in the collection:
private void btnInsert_Click(object sender, System.EventArgs e) { if ((Convert.ToInt16(txtIndex.Text) >= 0) &&
(Convert.ToInt16(txtIndex.Text) <= checkedListBox1.Items.Count)) { checkedListBox1.Items.Insert(Convert.ToInt16(txtIndex.Text),
txtAdd.Text);
}
else {
MessageBox.Show("Out of Range", "Please try again", MessageBoxButtons.OK, MessageBoxIcon.Exclamation);
}
}

This way, if the user attempts to enter an index that is out of range, you can display an appropriate message.
Warning Generally, the code in this chapter omits exception handling, but this is not a good idea in the real world. For more about exceptions, see Chapter 6, 'Zen and Now: The C# Language.'
Retrieving Selected Text
It's easy to retrieve the text of a selected item from a CheckedListBox by using its Text property, checkedListBox1.Text. (Alternatively, checkedListBox1.SelectedItem.ToString() amounts to the same thing.)
Before we display the selected item, let's write a function that determines, by item index, whether an item is checked:
private bool IsItChecked(CheckedListBox clb, int theIndex) { if (clb.GetItemChecked(theIndex) == true){
return true;
}
else {
return false;
}
}
First, we also need to make sure that an item is actually selected by testing the checkedListBox1.Text property. Assuming that there is an item selected, we can display it (Figure 4.5) and display whether it is checked:
private void btnSelect_Click(object sender, System.EventArgs e) { if (checkedListBox1.Text != ""){
MessageBox.Show("Selected Item Text: " +
// checkedListBox1.SelectedItem.ToString(), checkedListBox1.Text, "Here is your text", MessageBoxButtons.OK, MessageBoxIcon.Information);
if (IsItChecked(checkedListBox1, checkedListBox1.SelectedIndex)) { MessageBox.Show("Checked");
}
else { MessageBox.Show("Unchecked");
}
}
else {
MessageBox.Show("Nothing selected!","No text today", MessageBoxButtons.OK, MessageBoxIcon.Information);
}
}
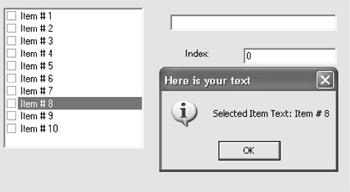
Figure 4.5: It 's easy to retrieve selected text.
Retrieving by Index
You can also retrieve the text of an item by using its index in the Items collection. For example:
private void btnRetrieve_Click(object sender, System.EventArgs e) { MessageBox.Show
(checkedListBox1.Items [Convert.ToInt16(txtIndex.Text)].ToString(), "Here is your text", MessageBoxButtons.OK,
MessageBoxIcon.Information);
if (IsItChecked(checkedListBox1, Convert.ToInt16(txtIndex.Text))) { MessageBox.Show("Checked");
}
else { MessageBox.Show("Unchecked");
}
}
Retrieving Multiple Checked Items
Sometimes you'd like to get all the checked items in one list (such as a CheckedListBox) and read them into another CheckedListBox. You can do this by iterating through the Items collection of the first CheckedListBox. Each time a checked item is found, the item is added to the new CheckedListBox (and marked checked):
private void btnGetChecked_Click(object sender, System.EventArgs e) { for (int i = 0; i < checkedListBox1.Items.Count; i++){
if (IsItChecked(checkedListBox1,i)) { clb2.Items.Add(checkedListBox1.Items[i],CheckState.Checked);
}
}
}
When the iteration is complete, the checked items have been added to the new box (Figure 4.6).
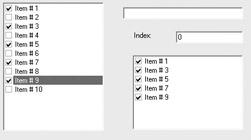
Figure 4.6: You can loop through the CheckedListBox to retrieve all checked items.
This procedure uses the IsItChecked function, which you'll recall I first showed you in the section on retrieving text. Here it is again:
private bool IsItChecked(CheckedListBox clb, int theIndex) { if (clb.GetItemChecked(theIndex) == true){
return true;
}
else {
return false;
}
}
Clearing an Item
It's easy to delete a collection of items using the Clear method. For example, to delete the items in a pair of CheckedListBoxes and a ListBox:
private void btnClear_Click(object sender, System.EventArgs e) { checkedListBox1.Items.Clear();
clb2.Items.Clear();
listBox1.Items.Clear();
}
Deleting Items
You can delete an individual item from a CheckedListBox if it is selected using the Remove method of the Items collection:
checkedListBox1.Items.Remove(checkedListBox1.SelectedItem);
Similarly, if you know the text of the item you want to delete:
checkedListBox1.Items.Remove(txtAdd.Text);
On the other hand, if you want to delete an item from the items collection by position (index), the RemoveAt method is used. This code checks to see that a given index is within the count of the items collection and, if it is, deletes the corresponding item:
if ((Convert.ToInt16(txtIndex.Text) >= 0) && (Convert.ToInt16(txtIndex.Text) <= checkedListBox1.Items.Count)) { checkedListBox1.Items.RemoveAt(Convert.ToInt16(txtIndex.Text));
}
Retrieving Multiple Selections
Retrieving multiple selections from a ListBox works in the same way as retrieving multiple checked items from a CheckedListBox (see 'Retrieving Multiple Checked Items' earlier in this chapter).
First, we'll need to add a ListBox to the project and set its SelectionMode property to MultiSimple. We can populate it, using the same procedure used to populate the CheckedListBox:
private void btnPopulateLB_Click(object sender, System.EventArgs e) { AddToList(listBox1,30);
}
In case you don't remember, here's the AddToList method:
private void AddToList(ListBox lb, int size) { string[] myarray = new string [size];
for (int i = 0; i < size; i++) {
myarray[i] = "Item # " + (i+1).ToString();
}
lb.Items.AddRange(myarray);
}
Finally, we can iterate through the ListBox, adding items to a 'results' CheckedListBox for each selected item in the ListBox:
private void btnGetSelect_Click(object sender, System.EventArgs e) { for (int i = 0; i < listBox1.SelectedItems.Count; i++){
clb2.Items.Add(listBox1.SelectedItems[i]);
}
}
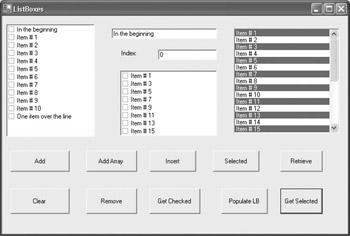
If you save the project, run it, populate the ListBox, select some items, and click the Get Selected button, the selected items will be displayed in the new CheckedListBox (Figure 4.7).
Figure 4.7: You can have lots of fun with ListBoxes (retrieving all selected items shown).

I'm sure you'll agree that ListBoxes, CheckedListBoxes, and their respective Items collections are lots of fun-and very useful. The ListBox operations performed in this section are shown in Listing 4.2.
Listing 4.2: Fun and Games with CheckedListBoxes (ListBox Operations)
private void btnAdd_Click(object sender, System.EventArgs e) { checkedListBox1.Items.Add(txtAdd.Text);
}
private void btnAddArray_Click(object sender, System.EventArgs e) { AddToList(checkedListBox1, 10);
}
private void AddToList(ListBox lb, int size) { string[] myarray = new string [size];
for (int i = 0; i < size; i++) {
myarray[i] = "Item # " + (i+1).ToString();
}
lb.Items.AddRange(myarray);
}
private void btnInsert_Click(object sender, System.EventArgs e) { if ((Convert.ToInt16(txtIndex.Text) >= 0) &&
(Convert.ToInt16(txtIndex.Text) <= checkedListBox1.Items.Count)) { checkedListBox1.Items.Insert(Convert.ToInt16(txtIndex.Text),
txtAdd.Text);
}
else {
MessageBox.Show("Out of Range", "Please try again", MessageBoxButtons.OK, MessageBoxIcon.Exclamation);
}
}
private void btnSelect_Click(object sender, System.EventArgs e) { if (checkedListBox1.Text != ""){
MessageBox.Show("Selected Item Text: " +
// checkedListBox1.SelectedItem.ToString(), checkedListBox1.Text, "Here is your text", MessageBoxButtons.OK,
MessageBoxIcon.Information);
if (IsItChecked(checkedListBox1, checkedListBox1.SelectedIndex)) { MessageBox.Show("Checked");
}
else { MessageBox.Show("Unchecked");
}
}
else {
MessageBox.Show("Nothing selected!", "No text today", MessageBoxButtons.OK, MessageBoxIcon.Information);
}
}
private void btnRetrieve_Click(object sender, System.EventArgs e) { MessageBox.Show
(checkedListBox1.Items[Convert.ToInt16(txtIndex.Text)].ToString(), "Here is your text", MessageBoxButtons.OK,
MessageBoxIcon.Information);
if (IsItChecked(checkedListBox1, Convert.ToInt16(txtIndex.Text))) { MessageBox.Show("Checked");
}
else { MessageBox.Show("Unchecked");
}
}
private bool IsItChecked(CheckedListBox clb, int theIndex) { if (clb.GetItemChecked(theIndex) == true){
return true;
}
else {
return false;
}
}
private void btnClear_Click(object sender, System.EventArgs e) { checkedListBox1.Items.Clear();
clb2.Items.Clear();
listBox1.Items.Clear();
}
private void btnRemove_Click(object sender, System.EventArgs e) {
//by index
//if ((Convert.ToInt16(txtIndex.Text) >= 0) &&
//(Convert.ToInt16(txtIndex.Text) <= checkedListBox1.Items.Count)) {
//checkedListBox1.Items.RemoveAt(Convert.ToInt16(txtIndex.Text));
//}
//selected
//checkedListBox1.Items.Remove(checkedListBox1.SelectedItem);
//by text
checkedListBox1.Items.Remove(txtAdd.Text);
}
private void btnGetChecked_Click(object sender, System.EventArgs e) { for (int i = 0; i < checkedListBox1.Items.Count; i++){
if (IsItChecked(checkedListBox1,i)) { clb2.Items.Add(checkedListBox1.Items[i],CheckState.Checked);
}
}
}
private void btnPopulateLB_Click(object sender, System.EventArgs e) { AddToList(listBox1,30);
}
private void btnGetSelect_Click(object sender, System.EventArgs e) { for (int i = 0; i < listBox1.SelectedItems.Count; i++){
clb2.Items.Add(listBox1.SelectedItems[i]);
}
}
Menus
If ever a user interface cried to heaven, 'Give me menus,' it is the one shown in Figure 4.7 with its 10 clunky buttons. So let's put this user interface out of its misery, and give it a menu already!
To create a menu visually, using the tools supplied by Visual Studio, drag a MainMenu control to your form. Like the Timer, the instance of the control added to the form appears on the tray beneath the form.
With the MainMenu control sitting on the tray, you can go ahead and add menus-that is, the high-level menu items across the top of the form-and menu items, which are the items beneath each menu, by entering the appropriate information in position (Figure 4.8).
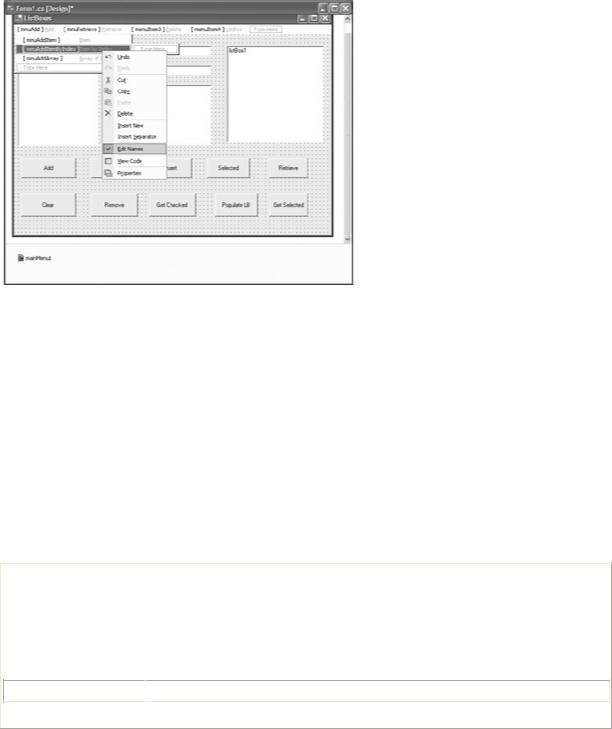
Figure 4.8: When you add a MainMenu control to the tray, you can edit the menu visually (shown here in Edit Namesmode).
By right-clicking and selecting Edit Names from the context menu, the menu insertion is performed in Edit Names mode, which allows you to edit in place the internal names of the menu items you are adding.
Let's use the visual interface to add some menus and menu items, and then check out the autogenerated menu code that Visual Studio has created on our behalf. The application will have four menus running along the top of the form: Add, Retrieve, Delete, and ListBox.
To keep things simple, I'll just look at the first menu, the Add menu, which as you can see in Figure 4.8 is in the normal place of a File menu. The menu item names and text are as shown in Table 4.1 (with access keys ignored).
Table 4.1: Add (mnuAdd) Menu Items Names and Text
Menu Item Name |
|
Text |
|
|
|
mnuAdd (parent |
|
Add |
menu) |
|
|
|
|
|
mnuAddItem |
|
Item |
mnuAddItembyIndex
 Item by Index
mnuAddArray |
|
Array of Items |
In keeping with the RAD 'look, Ma, no code' theme of the menu designer, you should note that the Events tab of the Properties window can be used to assign menu item click events to button click event handlers (Figure 4.9). This means that no new code needs to be written to make these menus functional: mnuAdd's click event handler is assigned to the (already existing) handler for btnAdd's click event, and so on.
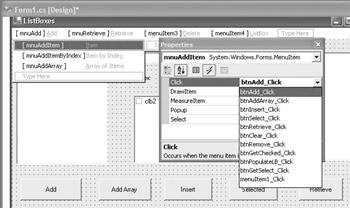
Figure 4.9: Menu item events can be assigned an existing handler using the Events tab of the Properties window.
The Auto-Generated Menu Code
What code has been created for us to implement the menus we've visually added? To start with, a variable of type MainMenu has been declared, along with MenuItem variables for each of the menus and menu items:
private System.Windows.Forms.MainMenu mainMenu1; private System.Windows.Forms.MenuItem mnuAdd; private System.Windows.Forms.MenuItem mnuAddItem;
...
Note Most of the action takes place within the 'hidden' region of Windows Form Designergenerated code, so you will have to expand the region to view the action.
Next, the MainMenu and each of the MenuItems are instantiated:
this.mainMenu1 = new System.Windows.Forms.MainMenu(); this.mnuAdd = new System.Windows.Forms.MenuItem(); this.mnuAddItem = new System.Windows.Forms.MenuItem();
...
Next, the main menu collection of menu items is created, using the collection's AddRange method to add the four top-level menu items (Add, Delete, Retrieve, and ListBox):
this.mainMenu1.MenuItems.AddRange(new System.Windows.Forms.MenuItem[] { this.mnuAdd,
this.mnuRetrieve,
this.mnuDelete,
this.mnuListBox});
As promised, we'll look at mnuAdd only, ignoring the other three menus. Here's the code that positions mnuAdd as the first top-level menu and uses the AddRange method of its menu items collection to add its contents:
this.mnuAdd.Index = 0;
this.mnuAdd.MenuItems.AddRange(new System.Windows.Forms.MenuItem[] { this.mnuAddItem,
this.mnuAddItemByIndex,
this.mnuAddArray});

Finally, each menu item below mnuAdd is given a position by Index in mnuAdd's collection, and its properties (e.g., text and event handlers) fleshed out:
this.mnuAddItem.Index = 0; this.mnuAddItem.Text = "&Item";
this.mnuAddItem.Click += new System.EventHandler(this.btnAdd_Click);
As a last, but not least, required step, the whole menu construction is then assigned to the Menu property of the form:
this.Menu = this.mainMenu1;
Listing 4.3 shows the relevant portions of the auto-generated menu code.
Listing 4.3: Auto-Generated Menu Code (Excerpted)
public class Form1 : System.Windows.Forms.Form
{
...
private System.Windows.Forms.MainMenu mainMenu1; private System.Windows.Forms.MenuItem mnuAdd; private System.Windows.Forms.MenuItem mnuAddItem;
...
// within Initialize Component, called by Form1 constructor this.mainMenu1 = new System.Windows.Forms.MainMenu(); this.mnuAdd = new System.Windows.Forms.MenuItem(); this.mnuAddItem = new System.Windows.Forms.MenuItem();
...
//
//mainMenu1
this.mainMenu1.MenuItems.AddRange(new System.Windows.Forms.MenuItem[] { this.mnuAdd,
this.mnuRetrieve,
this.mnuDelete,
this.mnuListBox});
//mnuAdd
//
this.mnuAdd.Index = 0;
this.mnuAdd.MenuItems.AddRange(new System.Windows.Forms.MenuItem[] { this.mnuAddItem,
this.mnuAddItemByIndex,
this.mnuAddArray});
//
// mnuAddItem
//
this.mnuAddItem.Index = 0; this.mnuAddItem.Text = "&Item";
this.mnuAddItem.Click += new System.EventHandler(this.btnAdd_Click);
...
this.Menu = this.mainMenu1;
...
}