

Visual CSharp .NET Programming (2002) [eng]
.pdfFigure 3.16: Calling the AddPolygon method produces a polygon path from the array of points you provide.
The Asynchronous Pattern
Back in Chapter 2, 'Consuming the Service on the Web,' I promised you an example that showed how to asynchronously use a web service from a Windows application using the preferred pattern for asynchronous invocations. Before we get there, let's consider briefly what we mean by a 'preferred pattern.'
Design patterns, which will be explored further in Chapter 5, 'Reflecting on Classes,' are systematic high-level solutions to a recurring problem in object-oriented programming. As you'll see in Chapter 5, software design patterns are often likened to architectural solutions. A great virtue of patterns is that once you know the best way to do something, you don't have to rethink it each time!
The .NET asynchronous design pattern involves a number of points, including:
•The called object does not know whether it is invoked synchronously or asynchronously.
•The .NET Framework automatically creates Begin and End asynchronous methods to go along with synchronous methods explicitly exposed by the called object.
•A result object is supplied via a callback mechanism.
Note To find out more about how this design pattern works, look up 'Asynchronous Design Pattern Overview' in online help.
Let's have a look at this in the context of a practical example. Although the example shows the asynchronous consumption of the IsPrime web service, the general pattern applies
to the asynchronous invocation of anything. (You'll find more material about asynchronous programming in Chapter 10, "Working with Streams and Files.")
Start a new Windows application project with a TextBox for the user to enter a number to check for primality and a Button whose click event will invoke the asynchronous call to the IsPrime web service. You must also add the SybexC2 web service to the project as a web reference, following the process explained in Chapter 2, and rename it theService.
With the user interface in place, and the web reference added, let's start coding.
First, create a new procedure, ServiceCallBack, to hold the result object (note that it takes an IAsyncResult as an argument):
public void ServiceCallback(IAsyncResult ar) {
}
Moving to the Button's click event, create a variable to hold an instance of the service:
private void btnAsync_Click(object sender, System.EventArgs e) { theService.SybexC2Service cService = new theService.SybexC2Service();
Next, instantiate an AsyncCallback object, passing it the ServiceCallback procedure as an argument so that it knows where to send the results:
AsyncCallback cb = new AsyncCallback(ServiceCallback);
Invoke the BeginIsPrime method with the two arguments required by IsPrime (the number to check and the delay) followed by the AsyncCallback object and the service object. Assign the return value of BeginIsPrime to the IAsyncResult object that is passed to ServiceCallback:
IAsyncResult ar =
cService.BeginIsPrime(Convert.ToInt64(txtInNum.Text), 10, cb, cService);
Note Note that the second parameter sent to the BeginIsPrime method is the delay in seconds. If 10 seconds is too long for you to wait, you can replace it with a smaller integer.
Now you can go ahead and put whatever code you want in for execution while the asynchronous call is completing. In our case, we'll write some text to a label and display a message box:
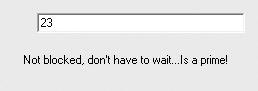
lblResult.Text = "Not blocked, don't have to wait..."; MessageBox.Show("I can do other things!", "AsyncCallback Demo",
MessageBoxButtons.OK, MessageBoxIcon.Information);
Meanwhile, back at the callback ranch, we need to create an instance of the service based on the passed IAsyncResult object:
theService.SybexC2Service cService = (theService.SybexC2Service) ar.AsyncState;
Next, the EndIsPrime method can be checked for the return value from the web service:
if (cService.EndIsPrime(ar)) {
lblResult.Text = lblResult.Text + "Is a prime!";
}
else {
lblResult.Text = lblResult.Text + "Not prime!";
}
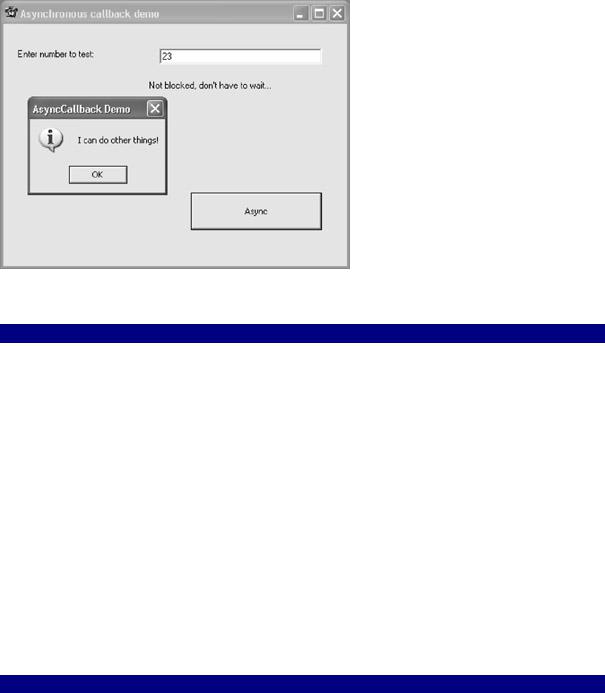
The project is now ready to run (Listing 3.11 shows the complete click event code, as well as the callback procedure). If you enter a number in the box and click Async, you'll see the message box displayed while the asynchronous call is underway (Figure 3.17).
Figure 3.17: The message box is a demo of the use of a new thread to perform tasks while the asynchronous web call is completing.
Listing 3.11: Using a Callback to Perform an Asynchronous Call to a Web Method
private void btnAsync_Click(object sender, System.EventArgs e) { theService.SybexC2Service cService = new theService.SybexC2Service(); AsyncCallback cb = new AsyncCallback(ServiceCallback);
IAsyncResult ar = cService.BeginIsPrime(Convert.ToInt64(txtInNum.Text), 10, cb,
cService);
lblResult.Text = "Not blocked, don't have to wait..."; MessageBox.Show("I can do other things!", "AsyncCallback Demo",
MessageBoxButtons.OK, MessageBoxIcon.Information);
// Do more stuff
}
public void ServiceCallback(IAsyncResult ar) { theService.SybexC2Service cService =
(theService.SybexC2Service) ar.AsyncState; if (cService.EndIsPrime(ar)) {
lblResult.Text = lblResult.Text + "Is a prime!";
}
else {
lblResult.Text = lblResult.Text + "Not prime!";
}
}
Clearly, you could place any code you'd like to have executed in place of the message box display. Meanwhile, when the asynchronous call completes, the callback procedure takes care of it and displays the appropriate results in the label.
Conclusion
Visual Studio .NET is great for building Windows applications, and this chapter has shown you a lot about building them using C#. Forms were covered in great detail; we spent some time with the lowly message box and playing various variations out in determining which radio button was selected. Along the way, you learned how to create ovaland polygonshaped windows. Finally, the journey meandered back to something I promised in the last chapter: an asynchronous consumption of the web service developed in Chapter 1 using a callback object for the result.
Chapter 4, 'Building a Better Windows Interface,' picks up where we left off. You'll find bouncing round controls, ListBoxes, menus, and much more
Chapter 4: Building a Better Windows
Interface
Overview
•Making round controls
•Animating controls
•Working with CheckedListBoxes
•Building menus
•Taking advantage of the common dialog controls
•Constructing MDI applications
Windows, windows, windows! Here's a truism for you: Most Windows applications have user interfaces built around windows. This chapter picks up where the last chapter left off-there's more information here about building the windowing interface.
One of the examples in Chapter 3, 'Windows Uses Web Services, Too!', showed you how to change the shape of a window to a circle (or a polygon). Why just windows? The first project in this chapter will show you how to make ovoid labels, buttons, and other controls-and then use a Timer component to make these controls 'dance' across the screen.
In a slightly less frivolous vein, this chapter will show you how to work with ListBoxes, how to create menus using code, how to use the common dialog controls, and how to create an MDI application.
Round Buttons Dancing
In Chapter 3 I used the Region property of a form to set the shape of the form by assigning a GraphicsPath object to the property. (The AddEllipse method was used to make the GraphicsPath oval.)
Region is a member of System.Windows.Forms.Control that sets (or gets) the window region associated with a control. It's therefore a property you can use for all objects that inherit from Control. This includes the Form object, as in the example in Chapter 3, which inherits
from Control via ScrollableControl and ContainerControl. It also includes all controls in the Toolbox that have a visual interface: Buttons, TextBoxes, Labels, and so on.
Making a Button Round
Let's write a general method that we can use to make a control round, using the logic explained in Chapter 3 in which the AddEllipse method of a GraphicsPath object is used to make an oval based on the size of the control:
public void MakeItRound(Control c) { GraphicsPath gp = new GraphicsPath();
gp.AddEllipse(new Rectangle(0, 0, c.Size.Width - 5, c.Size.Height - 5)); c.Region = new Region(gp);
}
Note I've subtracted five pixels off both the width and the height of the oval to eliminate the line produced by the 'raised' bevel when you make a Button round.
Place a button named button1 on the form. (For the sake of aesthetic harmony, use the Properties window to delete the contents of its Text property and the other controls used later in this example-although, of course, this is a matter of your choice. They can have text if you'd like.)
If you call the MakeItRound method with a control, such as button1, as an argument, the control will become round:
private void btnRound_Click(object sender, System.EventArgs e) { MakeItRound(button1);
}
Let's add a Panel, docked along the bottom of a form, to act as the control panel for this application (see Figure 4.1). The panel has three buttons whose click events will be used to:

Figure 4.1: Making round controls dance
•Make a single control round, as explained above (this will be expanded in a second to toggle back and forth between 'roundness' and 'squareness'). This button is named btnRound and has the initial text "Round One".
•Turn all the controls in the client area of the form-that is, the form excluding the panel that I placed on it-round. This button has the text 'Round All'.
•Animate all controls in the client area, with the text toggling between 'Dance' and 'Stop'.
Note The client space of a form is the form background area, exclusive of title bar, toolbars, menus, and border.
Toggling the Round Button
To toggle the single control, we need to store the initial value of its Region property in a variable declared outside the click event (so that the value persists). We can do this by declaring a variable named theRegion as part of the initial class declaration:
public class Form1 : System.Windows.Forms.Form {
...
System.Drawing.Region theRegion;
...
Next, the click event of btnRound can be modified to store the initial control Region and restore it when toggled:
private void btnRound_Click(object sender, System.EventArgs e) { if (btnRound.Text == "Round One") {
theRegion = button1.Region; MakeItRound(button1); btnRound.Text = "Square One";
}
else {
button1.Region = theRegion; btnRound.Text = "Round One";
}
}
Try it! If you run the project and click Round One, button1 will become round. If you click again, it is back to its normal shape.
One for All and All for One
It's easy to extend the rounding process to all the controls in a form's control collection. To see this in action, add a gaggle of Buttons, Labels, TextBoxes-and any other control you'd like-to the form, making sure that the Text property of each is empty (just to keep the aesthetics neat).
With a bunch of controls added to the client area of the form, code can be added to the click event of the Round All button to cycle through the form's control collection, rounding each one in turn:
private void btnRoundAll_Click(object sender, System.EventArgs e) { foreach (Control c in this.Controls) {
MakeItRound(c);
}
}
Animating the Controls
Now that we have all these nice, round controls, let's use a Timer component to animate them. When you drag a Timer component from the Toolbox to a form, it sits on the 'tray' beneath the form-which is symbolic of the fact that the Timer has no run-time visual representation.
Essentially, the Timer component is a mechanism for the time-based firing of an event. As you may know, the key Timer members are the properties Enabled and Interval. If Enabled is true, the Timer's sole event-Tick-is repeatedly fired after the Interval (expressed in milliseconds).
The object of animating the controls is to move them in the Tick property in one direction, and to reset things when they reach the edge of a form. If we let the control pass out of the form's coordinates, it won't be visible.
Use the Properties window to set the Timer's Enabled property to false, and its Interval property to 100 (or one-tenth of a second).
In the click event of the button used to start the animation, toggle the Timer's Enabled property:
private void btnDance_Click(object sender, System.EventArgs e) { if (btnDance.Text == "Dance") {
timer1.Enabled = true; btnDance.Text = "Stop";
}
else {
timer1.Enabled = false; btnDance.Text = "Dance";
}

}
Next, in the Timer's Tick event, add the code to move each control in the control's collection, sending each one back to the upper-left of the form as it goes off the lower-right:
private void timer1_Tick(object sender, System.EventArgs e) { int xIncrement = 5; int yIncrement = 5;
foreach (Control c in this.Controls) {
if (c.Location.X > this.Size.Width - 30) { xIncrement = -500;
}
if (c.Location.Y > this.Size.Height - 50) { yIncrement = -500;
}
if (c.Location.X <= 0) { xIncrement = 5;
}
if (c.Location.Y <= 0) { yIncrement = 10;
}
c.Location = new Point(c.Location.X + xIncrement, c.Location.Y + yIncrement);
}
}
In creating this kind of procedure, it's helpful to use the Debug object to track where objects actually are, so that code can be adjusted accordingly, along these lines:
using System.Diagnostics;
...
Debug.WriteLine("XLocation: " + c.Location.X.ToString()); Debug.WriteLine("X Increment: " + xIncrement.ToString()); Debug.WriteLine("YLocation: " + c.Location.Y.ToString()); Debug.WriteLine("Y Increment: " + yIncrement.ToString());
Save the project (the code is shown in Listing 4.1). If you run it, you'll see that turning controls round and animating them is almost as good as watching a lava lamp!
Listing 4.1: Making Round Controls Dance
...
using System.Drawing.Drawing2D;
private void btnRound_Click(object sender, System.EventArgs e) { if (btnRound.Text == "Round One") {
theRegion = button1.Region; MakeItRound(button1); btnRound.Text = "Square One";
}
else {
button1.Region = theRegion; btnRound.Text = "Round One";
}
}
public void MakeItRound(Control c) { GraphicsPath gp = new GraphicsPath();
gp.AddEllipse(new Rectangle(0, 0, c.Size.Width - 5,c.Size.Height - 5));
c.Region = new Region (gp);
}
private void btnRoundAll_Click(object sender, System.EventArgs e) { foreach (Control c in this.Controls) {
MakeItRound(c);
}
}
private void btnDance_Click(object sender, System.EventArgs e) { if (btnDance.Text == "Dance") {
timer1.Enabled = true; btnDance.Text = "Stop";
}
else {
timer1.Enabled = false; btnDance.Text = "Dance";
}
}
private void timer1_Tick(object sender, System.EventArgs e) { int xIncrement = 5; int yIncrement = 5;
foreach (Control c in this.Controls) {
if (c.Location.X > this.Size.Width - 30) { xIncrement = -500;
}
if (c.Location.Y > this.Size.Height - 50) { yIncrement = -500;
}
if (c.Location.X <= 0) { xIncrement = 5;
}
if (c.Location.Y <= 0) { yIncrement = 10;
}
c.Location = new Point(c.Location.X + xIncrement, c.Location.Y + yIncrement);
}
}
ListBoxes Listing
Moving on, ListBoxes in their various varieties provide a visual mechanism for dealing with collections of items. As such, they are an important part of many user interfaces. (For more information about programming the collections of items that lie underneath the ListBox classes, see Chapter 7, 'Array, Indexers, and Collections.')
The three ListBox controls you'll find on the Toolbox-all inheriting from System
.Windows.Forms.ListControl-are ComboBox, ListBox, and CheckedListBox. These controls are all far more alike than they are unalike. The ComboBox combines an editing field with the list of items in a ListBox, which allows the user to select an item from the list or to enter a new item. The CheckedListBox is just like a ListBox, except that it includes a Checked property. In addition, CheckedListBoxes do not support multiple selection. (To enable multiple selection with a ListBox, set its SelectionMode property to MultiSimple or MultiExtended.)

The example in this section primarily works with CheckedListBoxes, because those checks are so much fun, but you could substitute ComboBoxes or ListBoxes without changing very much.
Adding an Item
The Add method of the CheckedListBox's Item collection will add an item at the bottom of the CheckedListBox, as shown in Figure 4.2:
private void btnAdd_Click(object sender, System.EventArgs e) { checkedListBox1.Items.Add(txtAdd.Text);
}
Figure 4.2: It's easy to add items to a ListBox.
Adding an Array
The Items.AddRange method allows you to add an array of items to the Items collection of a ListBox. Here's code to generate an array of items (Item # 1 ... Item # n) and add them to a ListBox. Both the specific control and the number of items are passed in to the procedure:
private void AddToList(ListBox lb, int size) { string[] myarray = new string [size];
for (int i = 0; i < size; i++) {
myarray[i] = "Item # " + (i+1).ToString();
}
lb.Items.AddRange(myarray);
}
You can invoke this method with a specific control and the number of elements you want to add, with the results shown in Figure 4.3:
private void btnAddArray_Click(object sender, System.EventArgs e) { AddToList(checkedListBox1, 10);
}