


62 CHAPTER 2. A TOY APP
2.1 Planning the application
In this section, we’ll outline our plans for the toy application. As in Section 1.3, we’ll start by generating the application skeleton using the rails new command with a specific Rails version number:
$ cd ~/workspace
$ rails _4.2.2_ new toy_app $ cd toy_app/
If the command above returns an error like “Could not find ’railties”’, it means you dont have the right version of Rails installed, and you should double-check that you followed the command in Listing 1.1 exactly as written. (If you’re using the cloud IDE as recommended in Section 1.2.1, note that this second app can be created in the same workspace as the first. It is not necessary to create a new workspace. In order to get the files to appear, you may need to click the gear icon in the file navigator area and select “Refresh File Tree”.)
Next, we’ll use a text editor to update the Gemfile needed by Bundler with the contents of Listing 2.1.
Listing 2.1: A Gemfile for the toy app.
source 'https://rubygems.org'
gem 'rails', |
'4.2.2' |
|
gem 'sass-rails', |
'5.0.2' |
|
gem 'uglifier', |
'2.5.3' |
|
gem 'coffee-rails', |
'4.1.0' |
|
gem 'jquery-rails', |
'4.0.3' |
|
gem 'turbolinks', |
'2.3.0' |
|
gem 'jbuilder', |
'2.2.3' |
|
gem 'sdoc', |
'0.4.0', group: :doc |
|
group |
:development, |
:test do |
gem |
'sqlite3', |
'1.3.9' |
gem |
'byebug', |
'3.4.0' |
gem |
'web-console', '2.0.0.beta3' |
|
gem |
'spring', |
'1.1.3' |
end |
|
|
group |
:production do |
|

2.1. PLANNING THE APPLICATION |
63 |
|
|
|
|
gem 'pg', |
'0.17.1' |
|
gem 'rails_12factor', '0.0.2' |
|
|
end |
|
|
|
|
|
Note that Listing 2.1 is identical to Listing 1.14.
As in Section 1.5.1, we’ll install the local gems while suppressing the installation of production gems using the --without production option:
$ bundle install --without production
Finally, we’ll put the toy app under version control with Git:
$ git init $ git add -A
$ git commit -m "Initialize repository"
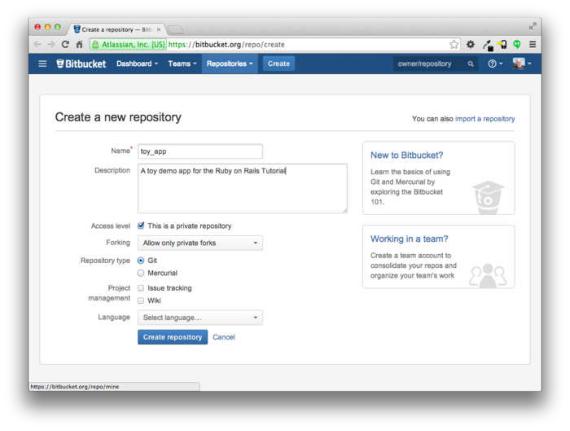
You should also create a new repository by clicking on the “Create” button at Bitbucket (Figure 2.1), and then push up to the remote repository:
$ git remote add origin git@bitbucket.org:<username>/toy_app.git
$ git push -u origin --all # pushes up the repo and its refs for the first time
Finally, it’s never too early to deploy, which I suggest doing by following the same “hello, world!” steps in Listing 1.8 and Listing 1.9.1 Then commit the changes and push up to Heroku:
$ git commit -am "Add hello" $ heroku create
$ git push heroku master
(As in Section 1.5, you may see some warning messages, which you should ignore for now. We’ll eliminate them in Section 7.5.) Apart from the address of the Heroku app, the result should be the same as in Figure 1.18.
1The main reason for this is that the default Rails page typically breaks at Heroku, which makes it hard to tell if the deployment was successful or not.
64 |
CHAPTER 2. A TOY APP |
Figure 2.1: Creating the toy app repository at Bitbucket.
2.1. PLANNING THE APPLICATION |
65 |
USERS
ID integer
NAME string
EMAIL string
Figure 2.2: The data model for users.
Now we’re ready to start making the app itself. The typical first step when making a web application is to create a data model, which is a representation of the structures needed by our application. In our case, the toy app will be a microblog, with only users and short (micro)posts. Thus, we’ll begin with a model for users of the app (Section 2.1.1), and then we’ll add a model for microposts (Section 2.1.2).
2.1.1 A toy model for users
There are as many choices for a user data model as there are different registration forms on the web; we’ll go with a distinctly minimalist approach. Users of our toy app will have a unique integer identifier called id, a publicly viewable name (of type string), and an email address (also a string) that will double as a username. A summary of the data model for users appears in Figure 2.2.
As we’ll see starting in Section 6.1.1, the label users in Figure 2.2 corresponds to a table in a database, and the id, name, and email attributes are columns in that table.
2.1.2 A toy model for microposts
The core of the micropost data model is even simpler than the one for users: a micropost has only an id and a content field for the micropost’s text (of