

1.3. THE FIRST APPLICATION |
15 |
the command shown in Listing 1.1 into your command-line terminal. (If developing on your local system, this means using a regular terminal window; if using the cloud IDE, this means using the command-line area shown in Figure 1.1.)
Listing 1.1: Installing Rails with a specific version number.
$ gem install rails -v 4.2.2
Here the -v flag ensures that the specified version of Rails gets installed, which is important to get results consistent with this tutorial.
1.3 The first application
Following a long tradition in computer programming, our goal for the first application is to write a “hello, world” program. In particular, we will create a simple application that displays the string “hello, world!” on a web page, both on our development environment (Section 1.3.4) and on the live web (Section 1.5).
Virtually all Rails applications start the same way, by running the rails new command. This handy command creates a skeleton Rails application in a directory of your choice. To get started, users not using the Cloud9 IDE recommended in Section 1.2.1 should make a workspace directory for your Rails projects if it doesn’t already exist (Listing 1.2) and then change into the directory. (Listing 1.2 uses the Unix commands cd and mkdir; see Box 1.3 if you are not already familiar with these commands.)
Listing 1.2: Making a workspace directory for Rails projects (unnecessary in the cloud).
$ cd |
|
# Change |
to the home directory. |
$ mkdir workspace |
# Make a |
workspace directory. |
|
$ cd |
workspace/ |
# Change |
into the workspace directory. |

16 |
CHAPTER 1. FROM ZERO TO DEPLOY |
Box 1.3. A crash course on the Unix command line
For readers coming from Windows or (to a lesser but still significant extent) Macintosh OS X, the Unix command line may be unfamiliar. Luckily, if you are using the recommended cloud environment, you automatically have access to a Unix (Linux) command line running a standard shell command-line interface known as Bash.
The basic idea of the command line is simple: by issuing short commands, users can perform a large number of operations, such as creating directories (mkdir), moving and copying files (mv and cp), and navigating the filesystem by changing directories (cd). Although the command line may seem primitive to users mainly familiar with graphical user interfaces (GUIs), appearances are deceiving: the command line is one of the most powerful tools in the developer’s toolbox. Indeed, you will rarely see the desktop of an experienced developer without several open terminal windows running command-line shells.
The general subject is deep, but for the purposes of this tutorial we will need only a few of the most common Unix command-line commands, as summarized in Table 1.1. For a more in-depth treatment of the Unix command line, see Conquering the Command Line by Mark Bates (available as a free online version and as ebooks and screencasts).
The next step on both local systems and the cloud IDE is to create the first application using the command in Listing 1.3. Note that Listing 1.3 explicitly includes the Rails version number (_4.2.2_) as part of the command. This ensures that the same version of Rails we installed in Listing 1.1 is used to create the first application’s file structure. (If the command in Listing 1.3 returns an error like “Could not find ’railties”’, it means you don’t have the right version of Rails installed, and you should double-check that you followed the command in Listing 1.1 exactly as written.)
1.3. THE FIRST APPLICATION |
17 |
Description |
Command |
Example |
|
|
|
list contents |
ls |
$ ls -l |
make directory |
mkdir <dirname> |
$ mkdir workspace |
change directory |
cd <dirname> |
$ cd workspace/ |
cd one directory up |
|
$ cd .. |
cd to home directory |
|
$ cd ~ or just $ cd |
cd to path incl. home dir |
|
$ cd ~/workspace/ |
move file (rename) |
mv <source> <target> |
$ mv README.rdoc README.md |
copy file |
cp <source> <target> |
$ cp README.rdoc README.md |
remove file |
rm <file> |
$ rm README.rdoc |
remove empty directory |
rmdir <directory> |
$ rmdir workspace/ |
remove nonempty directory |
rm -rf <directory> |
$ rm -rf tmp/ |
concatenate & display file contents |
cat <file> |
$ cat ~/.ssh/id_rsa.pub |
Table 1.1: Some common Unix commands.
Listing 1.3: Running rails new (with a specific version number).
$ cd ~/workspace
$ rails _4.2.2_ new hello_app
create |
|
create |
README.rdoc |
create |
Rakefile |
create |
config.ru |
create |
.gitignore |
create |
Gemfile |
create |
app |
create |
app/assets/javascripts/application.js |
create |
app/assets/stylesheets/application.css |
create |
app/controllers/application_controller.rb |
. |
|
. |
|
. |
|
create |
test/test_helper.rb |
create |
tmp/cache |
create |
tmp/cache/assets |
create |
vendor/assets/javascripts |
create |
vendor/assets/javascripts/.keep |
create |
vendor/assets/stylesheets |
create |
vendor/assets/stylesheets/.keep |
run |
bundle install |
Fetching gem metadata from https://rubygems.org/..........
Fetching additional metadata from https://rubygems.org/.. Resolving dependencies...
Using rake 10.3.2 Using i18n 0.6.11
.

18 CHAPTER 1. FROM ZERO TO DEPLOY
.
.
Your bundle is complete!
Use `bundle show [gemname]` to see where a bundled gem is installed. run bundle exec spring binstub --all
*bin/rake: spring inserted
*bin/rails: spring inserted
As seen at the end of Listing 1.3, running rails new automatically runs the bundle install command after the file creation is done. We’ll discuss what this means in more detail starting in Section 1.3.1.
Notice how many files and directories the rails command creates. This standard directory and file structure (Figure 1.4) is one of the many advantages of Rails; it immediately gets you from zero to a functional (if minimal) application. Moreover, since the structure is common to all Rails apps, you can immediately get your bearings when looking at someone else’s code. A summary of the default Rails files appears in Table 1.2; we’ll learn about most of these files and directories throughout the rest of this book. In particular, starting in Section 5.2.1 we’ll discuss the app/assets directory, part of the asset pipeline that makes it easier than ever to organize and deploy assets such as cascading style sheets and JavaScript files.
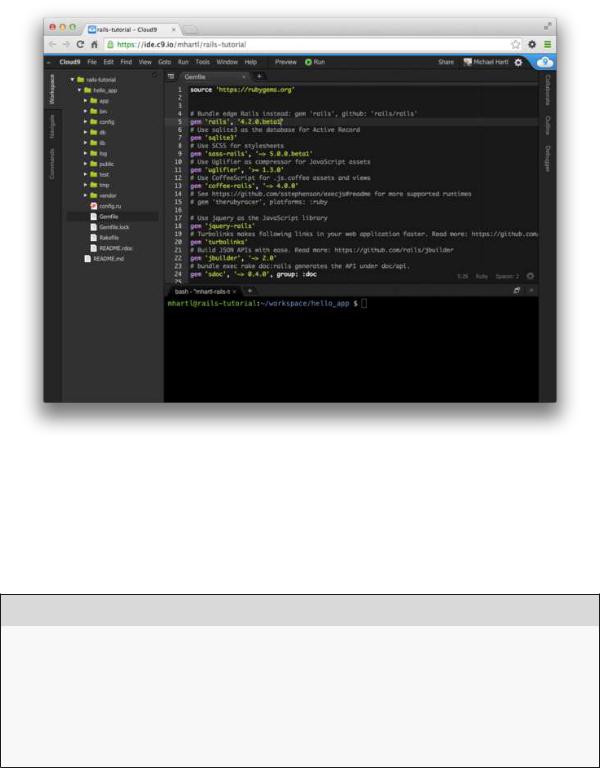
1.3.1 Bundler
After creating a new Rails application, the next step is to use Bundler to install and include the gems needed by the app. As noted briefly in Section 1.3, Bundler is run automatically (via bundle install) by the rails command, but in this section we’ll make some changes to the default application gems and run Bundler again. This involves opening the Gemfile with a text editor. (With the cloud IDE, this involves clicking the arrow in the file navigator to open the sample app directory and double-clicking the Gemfile icon.) Although the exact version numbers and details may differ slightly, the results should look something like Figure 1.5 and Listing 1.4. (The code in this file is Ruby, but don’t worry at this point about the syntax; Chapter 4 will cover Ruby in more depth.) If the files and directories don’t appear as shown in Figure 1.5, click on the file navigator’s gear icon and select “Refresh File Tree”. (As a
1.3. THE FIRST APPLICATION |
19 |
Figure 1.4: The directory structure for a newly created Rails app.
20 |
CHAPTER 1. FROM ZERO TO DEPLOY |
File/Directory |
Purpose |
|
|
app/ |
Core application (app) code, including models, views, controllers, and helpers |
app/assets |
Applications assets such as cascading style sheets (CSS), JavaScript files, and images |
bin/ |
Binary executable files |
config/ |
Application configuration |
db/ |
Database files |
doc/ |
Documentation for the application |
lib/ |
Library modules |
lib/assets |
Library assets such as cascading style sheets (CSS), JavaScript files, and images |
log/ |
Application log files |
public/ |
Data accessible to the public (e.g., via web browsers), such as error pages |
bin/rails |
A program for generating code, opening console sessions, or starting a local server |
test/ |
Application tests |
tmp/ |
Temporary files |
vendor/ |
Third-party code such as plugins and gems |
vendor/assets |
Third-party assets such as cascading style sheets (CSS), JavaScript files, and images |
README.rdoc |
A brief description of the application |
Rakefile |
Utility tasks available via the rake command |
Gemfile |
Gem requirements for this app |
Gemfile.lock |
A list of gems used to ensure that all copies of the app use the same gem versions |
config.ru |
A configuration file for Rack middleware |
.gitignore |
Patterns for files that should be ignored by Git |
Table 1.2: A summary of the default Rails directory structure.
1.3. THE FIRST APPLICATION |
21 |
Figure 1.5: The default Gemfile open in a text editor.
general rule, you should refresh the file tree any time files or directories don’t appear as expected.)
Listing 1.4: The default Gemfile in the hello_app directory.
source 'https://rubygems.org'
#Bundle edge Rails instead: gem 'rails', github: 'rails/rails' gem 'rails', '4.2.2'
#Use sqlite3 as the database for Active Record
gem 'sqlite3'
# Use SCSS for stylesheets gem 'sass-rails', '~> 5.0'

22 |
CHAPTER 1. FROM ZERO TO DEPLOY |
#Use Uglifier as compressor for JavaScript assets gem 'uglifier', '>= 1.3.0'
#Use CoffeeScript for .js.coffee assets and views gem 'coffee-rails', '~> 4.0.0'
#See https://github.com/sstephenson/execjs#readme for more supported runtimes
#gem 'therubyracer', platforms: :ruby
#Use jquery as the JavaScript library
gem 'jquery-rails'
#Turbolinks makes following links in your web application faster. Read more:
#https://github.com/rails/turbolinks
gem 'turbolinks'
#Build JSON APIs with ease. Read more: https://github.com/rails/jbuilder gem 'jbuilder', '~> 2.0'
#bundle exec rake doc:rails generates the API under doc/api.
gem 'sdoc', '~> 0.4.0', group: :doc
#Use ActiveModel has_secure_password
#gem 'bcrypt', '~> 3.1.7'
#Use Unicorn as the app server
#gem 'unicorn'
#Use Capistrano for deployment
#gem 'capistrano-rails', group: :development
group :development, :test do
#Call 'debugger' anywhere in the code to stop execution and get a
#debugger console
gem 'byebug'
#Access an IRB console on exceptions page and /console in development gem 'web-console', '~> 2.0.0.beta2'
#Spring speeds up development by keeping your application running in the
#background. Read more: https://github.com/rails/spring
gem 'spring' end
Many of these lines are commented out with the hash symbol #; they are there to show you some commonly needed gems and to give examples of the Bundler syntax. For now, we won’t need any gems other than the defaults.
Unless you specify a version number to the gem command, Bundler will automatically install the latest requested version of the gem. This is the case, for example, in the code
1.3. THE FIRST APPLICATION |
23 |
gem 'sqlite3'
There are also two common ways to specify a gem version range, which allows us to exert some control over the version used by Rails. The first looks like this:
gem 'uglifier', '>= 1.3.0'
This installs the latest version of the uglifier gem (which handles file compression for the asset pipeline) as long as it’s greater than or equal to version 1.3.0—even if it’s, say, version 7.2. The second method looks like this:
gem 'coffee-rails', '~> 4.0.0'
This installs the gem coffee-rails as long as it’s newer than version 4.0.0 and not newer than 4.1. In other words, the >= notation always installs the latest gem, whereas the ~> 4.0.0 notation only installs updated gems representing minor point releases (e.g., from 4.0.0 to 4.0.1), but not major point releases (e.g., from 4.0 to 4.1). Unfortunately, experience shows that even minor point releases can break things, so for the Ruby on Rails Tutorial we’ll err on the side of caution by including exact version numbers for all gems. You are welcome to use the most up-to-date version of any gem, including using the ~> construction in the Gemfile (which I generally recommend for more advanced users), but be warned that this may cause the tutorial to act unpredictably.
Converting the Gemfile in Listing 1.4 to use exact gem versions results in the code shown in Listing 1.5. Note that we’ve also taken this opportunity to arrange for the sqlite3 gem to be included only in a development or test environment (Section 7.1.1), which prevents potential conflicts with the database used by Heroku (Section 1.5).