


40 |
CHAPTER 1. FROM ZERO TO DEPLOY |
$ git checkout -f $ git status
# On branch master
nothing to commit (working directory clean) $ ls app/controllers/ application_controller.rb concerns/
The missing files and directories are back. That’s a relief!
1.4.3 Bitbucket
Now that we’ve put our project under version control with Git, it’s time to push our code up to Bitbucket, a site optimized for hosting and sharing Git repositories. (Previous editions of this tutorial used GitHub instead; see Box 1.4 to learn the reasons for the switch.) Putting a copy of your Git repository at Bitbucket serves two purposes: it’s a full backup of your code (including the full history of commits), and it makes any future collaboration much easier.
Box 1.4. GitHub and Bitbucket
By far the two most popular sites for hosting Git repositories are GitHub and Bitbucket. The two services share many similarities: both sites allow for Git repository hosting and collaboration, as well as offering convenient ways to browse and search repositories. The important differences (from the perspective of this tutorial) are that GitHub offers unlimited free repositories (with collaboration) for open-source repositories while charging for private repos, whereas Bitbucket allows unlimited free private repos while charging for more than a certain number of collaborators. Which service you use for a particular repo thus depends on your specific needs.
Previous editions of this book used GitHub because of its emphasis on supporting open-source code, but growing concerns about security have led me to recommend that all web application repositories be private by default. The issue is that web application repositories might contain potentially sensitive information
1.4. VERSION CONTROL WITH GIT |
41 |
such as cryptographic keys and passwords, which could be used to compromise the security of a site running the code. It is possible, of course, to arrange for this information to be handled securely (by having Git ignore it, for example), but this is error-prone and requires significant expertise.
As it happens, the sample application created in this tutorial is safe for exposure on the web, but it is dangerous to rely on this fact in general. Thus, to be as secure as possible, we will err on the side of caution and use private repositories by default. Since GitHub charges for private repositories while Bitbucket offers an unlimited number for free, for our purposes Bitbucket is a better fit than GitHub.
Getting started with Bitbucket is simple:
1.Sign up for a Bitbucket account if you don’t already have one.
2.Copy your public key to your clipboard. As indicated in Listing 1.11, users of the cloud IDE can view their public key using the cat command, which can then be selected and copied. If you’re using your own system and see no output when running the command in Listing 1.11, follow the instructions on how to install a public key on your Bitbucket account.
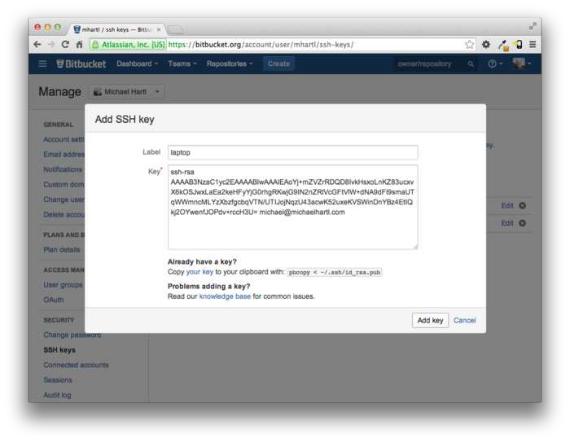
3.Add your public key to Bitbucket by clicking on the avatar image in the upper right and selecting “Manage account” and then “SSH keys” (Figure 1.13).
Listing 1.11: Printing the public key using cat.
$ cat ~/.ssh/id_rsa.pub
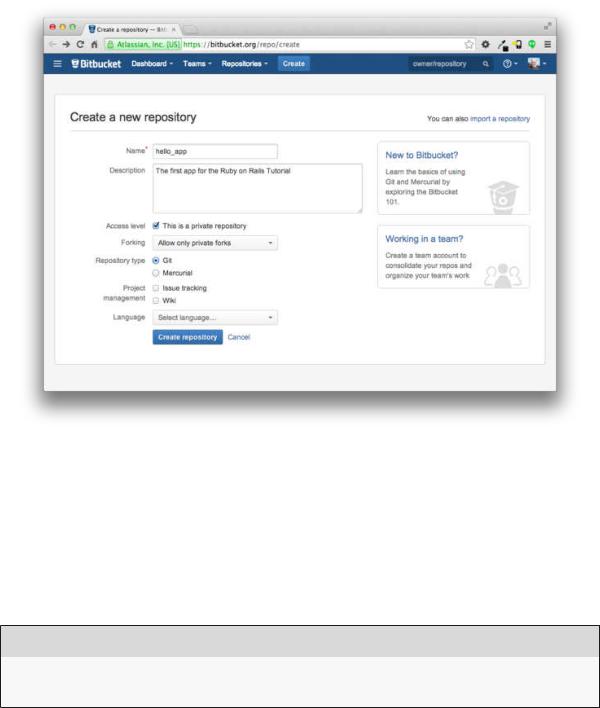
Once you’ve added your public key, click on “Create” to create a new repository, as shown in Figure 1.14. When filling in the information for the project, take care to leave the box next to “This is a private repository.” checked. After clicking “Create repository”, follow the instructions under “Command line > I have an existing project”, which should look something like Listing 1.12. (If
42 |
CHAPTER 1. FROM ZERO TO DEPLOY |
Figure 1.13: Adding the SSH public key.
1.4. VERSION CONTROL WITH GIT |
43 |
Figure 1.14: Creating the first app repository at Bitbucket.
it doesn’t look like Listing 1.12, it might be because the public key didn’t get added correctly, in which case I suggest trying that step again.) When pushing up the repository, answer yes if you see the question “Are you sure you want to continue connecting (yes/no)?”
Listing 1.12: Adding Bitbucket and pushing up the repository.
$ git remote add origin git@bitbucket.org:<username>/hello_app.git
$ git push -u origin --all # pushes up the repo and its refs for the first time
The commands in Listing 1.12 first tell Git that you want to add Bitbucket as the origin for your repository, and then push your repository up to the remote
44 |
CHAPTER 1. FROM ZERO TO DEPLOY |
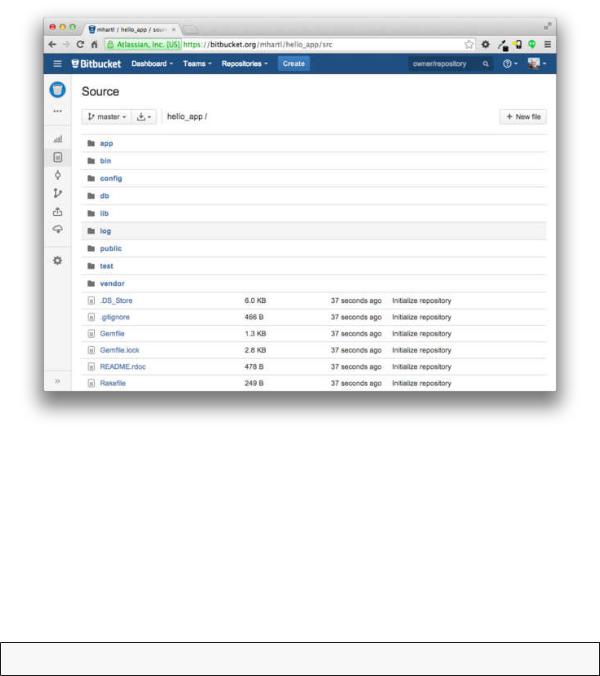
Figure 1.15: A Bitbucket repository page.
origin. (Don’t worry about what the -u flag does; if you’re curious, do a web search for “git set upstream”.) Of course, you should replace <username> with your actual username. For example, the command I ran was
$ git remote add origin git@bitbucket.org:mhartl/hello_app.git
The result is a page at Bitbucket for the hello_app repository, with file browsing, full commit history, and lots of other goodies (Figure 1.15).